2021 HYUNDAI ELANTRA HYBRID transmission
[x] Cancel search: transmissionPage 132 of 555

04
4-31
User settings mode
OCN7040038N
In this mode, you can change the
settings of the instrument cluster, doors,
lamps, etc.
1. Driver Assistance
2. Door
3. Lights
4. Sound
5. Convenience
6. Service interval
7. Theme selection
8. Other
9. ECO vehicle
10. Language
11. Reset
The information provided may differ
depending on which functions are
applicable to your vehicle. Shift to P to edit settings / Engage parking
brake to edit settings
This warning message illuminates if
you try to select an item from the User
Settings mode while driving.
•
Intelligent variable transmission
For your safety, change the User
Settings after parking the vehicle,
applying the parking brake and
moving the shift level to P(Park).
• Manual transmission
For your safety, change the User
Settings after engaging the parking
brake.
Quick guide (Help)
This mode provides quick guides for the
systems in the User Settings mode.
Select an item, press and hold the OK
button.
For more details about each system,
refer to this Owner’s Manual.
Page 147 of 555

Instrument Cluster
4-46
Warning message group
When the warning message light
appears, check the detailed information
in warning message group.
User settings mode
In this mode, you can change the
settings of the instrument cluster, doors,
lamps, etc.
1. Driver Assistance
2. Door
3. Lights
4. Sound
5. Convenience
6. Service interval
7. Theme selection
8. Other
9. ECO vehicle
10. Language
11. Reset
The information provided may differ
depending on which functions are
applicable to your vehicle. Shift to P to edit settings / Engage parking
brake to edit settings
This warning message illuminates if
you try to select an item from the User
Settings mode while driving.
•
Intelligent variable transmission
For your safety, change the User
Settings after parking the vehicle,
applying the parking brake and
moving the shift level to P(Park).
• Manual transmission
For your safety, change the User
Settings after engaging the parking
brake.
Quick guide (Help)
This mode provides quick guides for the
systems in the User Settings mode.
Select an item, press and hold the OK
button.
For more details about each system,
refer to this Owner’s Manual.
Page 199 of 555

Convenient Features
5-46
WARNING
Before programing HomeLink® to a
garage door opener or gate operator,
make sure people and objects are out
of the way of the device to prevent
potential harm or damage. Do not
use the HomeLink® with any garage
door opener that lacks the safety
stop and reverse features required
by U.S. federal safety standards (this
includes any garage door opener model
manufactured before April 1, 1982).
A garage door that cannot detect an
object - signaling the door to stop and
reverse - does not meet current U.S.
federal safety standards. Using a garage
door opener without these features
increases the risk of serious injury or
death.
Programing HomeLink
®
Please note the following:
• When programing a garage door opener, it is advised to park the
vehicle outside of the garage.
• It is recommended that a new battery be placed in the hand-held transmitter
of the device being programed to
HomeLink® for quicker training and
accurate transmission of the radio-
frequency signal.
• Some vehicles may require the Engine Start/Stop button to be in
the ACC (or “Accessories”) position
for programing and/or operation of
HomeLink®.
• In the event that there are still programing difficulties or questions
after following the programing steps
listed below, contact HomeLink® at:
www.homelink.com, www.youtube.
com/HomeLinkGentex or by calling
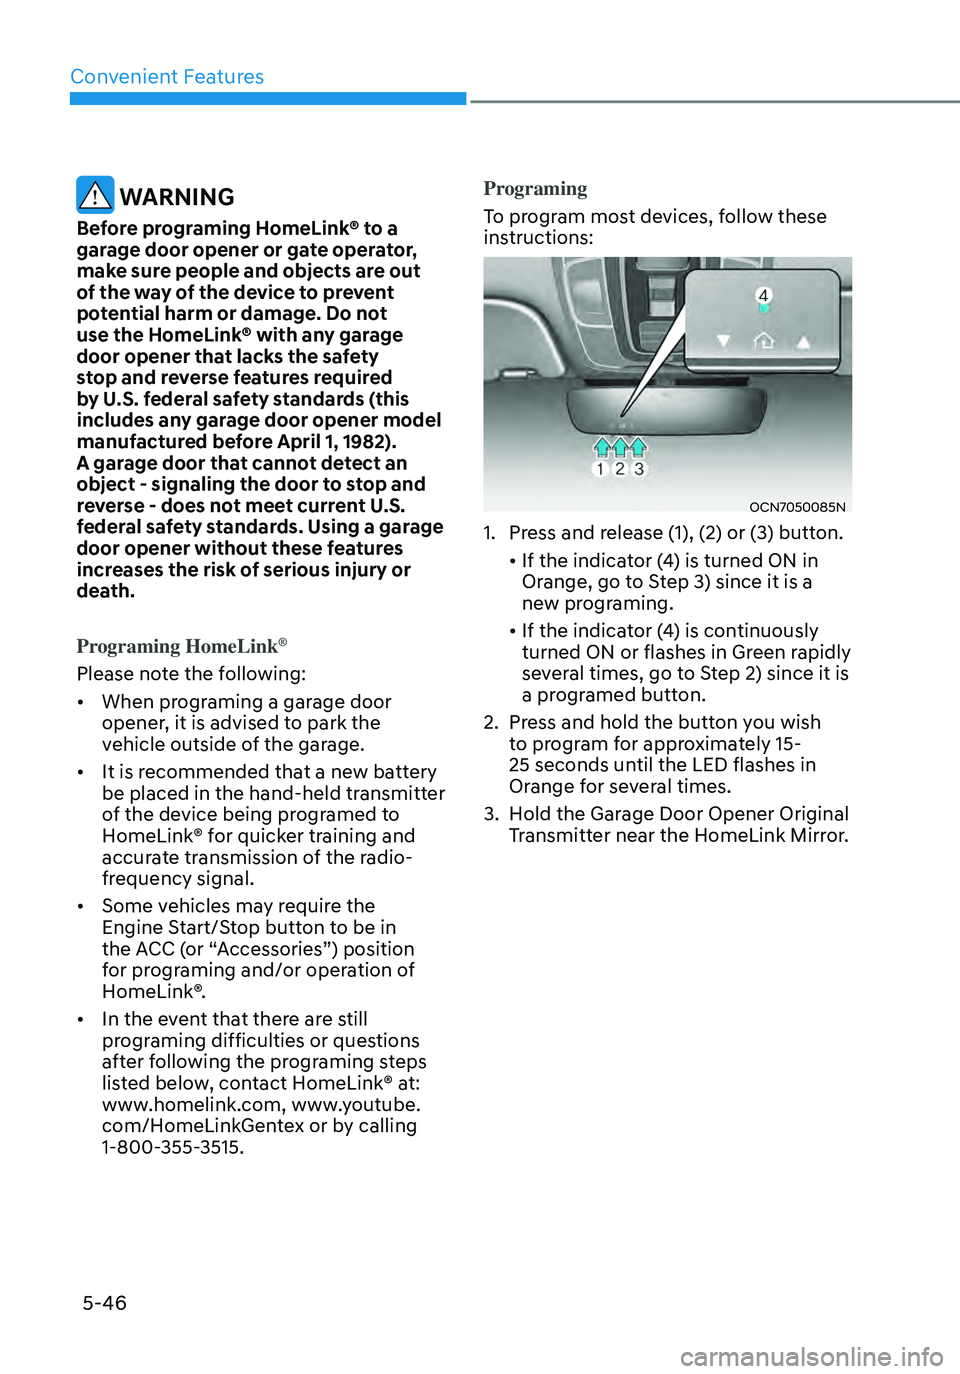
1-800-355-3515.Programing
To program most devices, follow these
instructions:
OCN7050085N
1. Press and release (1), (2) or (3) button.
• If the indica
tor ( 4) is turned ON in Orange, go to Step 3) since it is a
new programing.
• If the indicator ( 4) is con tinuously turned ON or flashes in Green rapidly
several times, go to Step 2) since it is
a programed button.
2. Press and hold the button you wish to program for approximately 15-
25 seconds until the LED flashes in
Orange for several times.
3. Hold the Garage Door Opener Original Transmitter near the HomeLink Mirror.
Page 217 of 555

Convenient Features
5-64
TRUNK
Opening the trunk
1. Make sure the shift lever is in P
(Park, for Dual clutch transmission/
Intelligent variable transmission) or
first gear or R (Reverse, for manual
transmission) and set the parking
brake.
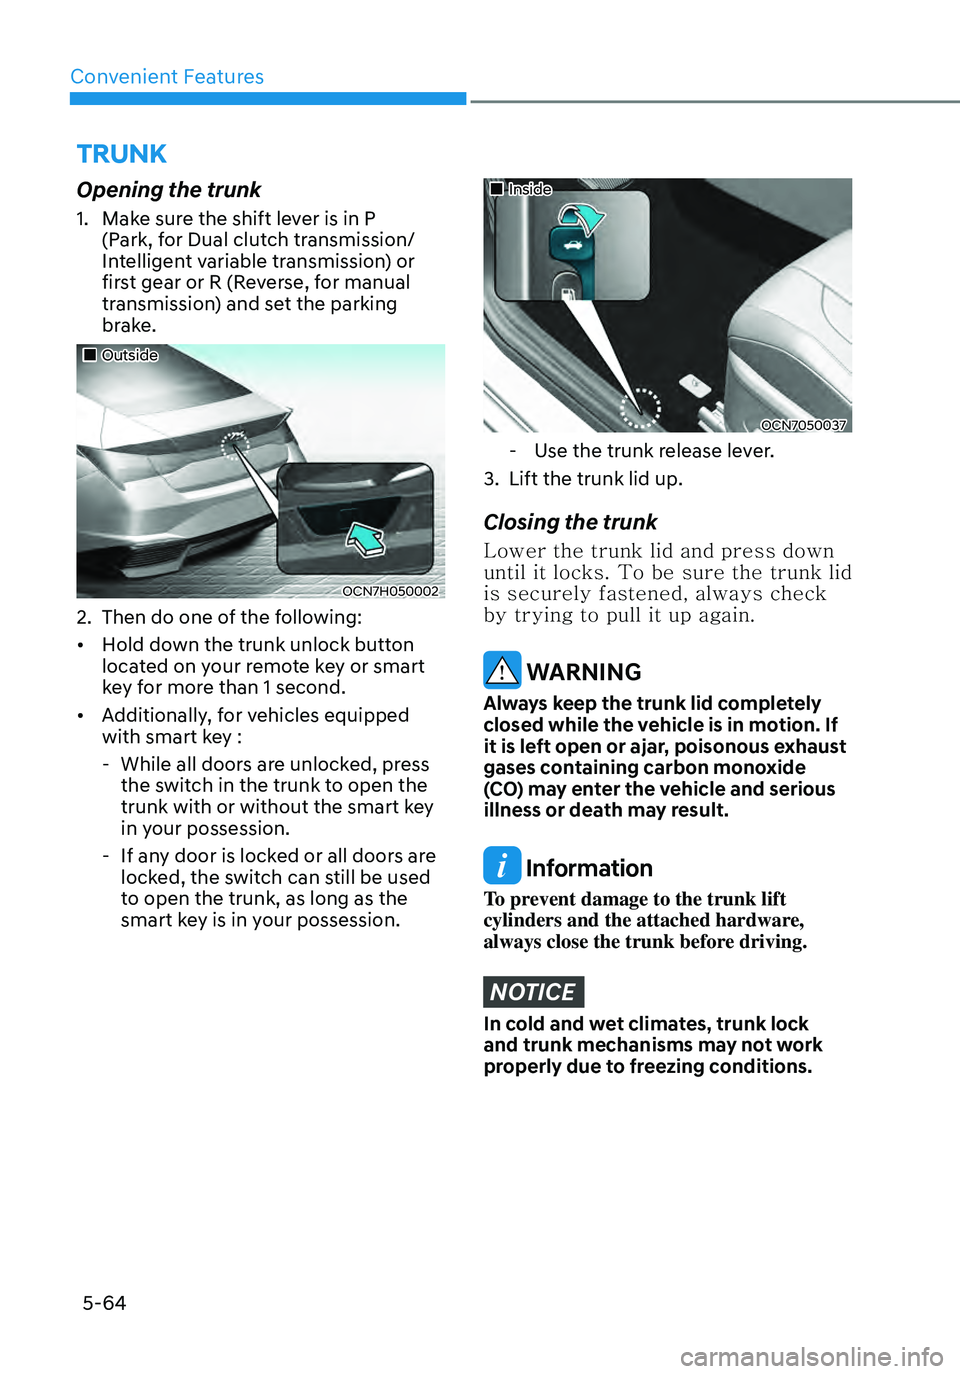
„„Outside
OCN7H050002
2. Then do one of the following:
• Hold down the trunk unlock button
located on your remote key or smart
key for more than 1 second.
• Additionally, for vehicles equipped
with smart key :
-While all doors are unlocked, press
the switch in the trunk to open the
trunk with or without the smart key
in your possession.
-If any door is locked or all doors are
locked, the switch can still be used
to open the trunk, as long as the
smart key is in your possession.
„„Inside
OCN7050037
- Use the trunk release lever.
3. Lift the trunk lid up.
Closing the trunk
Lower the trunk lid and press down
until it locks. To be sure the trunk lid
is securely fastened, always check
by trying to pull it up again.
WARNING
Always keep the trunk lid completely
closed while the vehicle is in motion. If
it is left open or ajar, poisonous exhaust
gases containing carbon monoxide
(CO) may enter the vehicle and serious
illness or death may result.
Information
To prevent damage to the trunk lift
cylinders and the attached hardware,
always close the trunk before driving.
NOTICE
In cold and wet climates, trunk lock
and trunk mechanisms may not work
properly due to freezing conditions.
Page 269 of 555

6
6. Driving your vehicle
Before Driving ........................................................................\
........................6-3Before Entering the Vehicle ........................................................................\
.............6-3
Before Starting ........................................................................\
.................................6-3
Ignition Switch ........................................................................\
.......................6-4Key Ignition Switch ........................................................................\
...........................6-4
Engine Start/Stop Button ........................................................................\
................6 -7
Dual clutch transmission ........................................................................\
......6-12Dual clutch transmission operation .......................................................................6-12
LCD display for transmission temperature and warning message ......................6-14
Parking ........................................................................\
............................................6-20
Good driving practices ........................................................................\
....................6-21
Coasting guide ........................................................................\
.....................6-22
Brake System
........................................................................\
........................6-23Power Brakes ........................................................................\
..................................6-23
Disc Brakes Wear Indicator ........................................................................\
............ 6-23
Electronic Parking Brake (EPB)
........................................................................\
.....6-24
Auto Hold ........................................................................\
........................................6-28
Anti-lock Brake System (ABS) ......................................................................6-31Electronic Stability Control (ESC) ........................................................................\
.6-33
Vehicle Stability Management (VSM) ..................................................................6-35
Hill-Start Assist Control (HAC) ........................................................................\
......6-36
Good Braking Practices ........................................................................\
.................6-37
Drive Mode Integrated Control System ......................................................6-38Drive Mode ........................................................................\
.....................................6-38
Smart shift on trip computer ........................................................................\
..........6-41
Special Driving Conditions ........................................................................\
..6-42Hazardous Driving Conditions ........................................................................\
......6-42
Rocking the Vehicle ........................................................................\
.......................6-42
Smooth Cornering ........................................................................\
..........................6-43
Driving at Night ........................................................................\
..............................6-43
Driving in the Rain ........................................................................\
..........................6-43
Driving in Flooded Areas ........................................................................\
................6-44
Highway Driving ........................................................................\
.............................6-44
Winter Driving ........................................................................\
......................6-45Snow or Icy Conditions ........................................................................\
..................6-45
Winter Precautions ........................................................................\
.........................6-47
Vehicle load limit ........................................................................\
................. 6-48Tire Loading Information Label ........................................................................\
.....6-49
Trailer Towing ........................................................................\
.......................6-53
Page 280 of 555
![HYUNDAI ELANTRA HYBRID 2021 Owners Manual 6-12
OCN7060006
[A] : Shift button, [B] : Shift lever
Depress the brake pedal and press the shift button while moving the shift lever.
Press the shift button while moving the shift lever.
The shift l HYUNDAI ELANTRA HYBRID 2021 Owners Manual 6-12
OCN7060006
[A] : Shift button, [B] : Shift lever
Depress the brake pedal and press the shift button while moving the shift lever.
Press the shift button while moving the shift lever.
The shift l](/manual-img/35/56094/w960_56094-279.png)
6-12
OCN7060006
[A] : Shift button, [B] : Shift lever
Depress the brake pedal and press the shift button while moving the shift lever.
Press the shift button while moving the shift lever.
The shift lever can freely operate.
Dual clutch transmission operation
The dual clutch transmission has 6 forward speeds and one reverse speed.
The individual speeds are selected automatically in the D (Drive) position.
DUAL CLUTCH TRANSMISSION (IF EQUIPPED)
Driving your vehicle
Page 281 of 555

06
6-13
WARNING
To reduce the risk of serious injury or
death:
• ALWAYS check the surrounding
areas near your vehicle for people,
especially children, before shifting a
vehicle into D (Drive) or R (Reverse).
• Before leaving the driver’s seat,
always make sure the shift lever
is in the P (Park) position, then set
the parking brake, and place the
ignition switch in the LOCK/OFF
position. Unexpected and sudden
vehicle movement can occur if these
precautions are not followed.
• When using Manual Shift Mode, do
not use engine braking (shifting from
a high gear to lower gear) rapidly on
slippery roads. The vehicle may slip
causing an accident.
• To avoid damage to your transaxle,
do not try to accelerate in R (Reverse)
or any forward gear position with the
brakes on.
• When stopped on slope, do not hold
the vehicle with accelerator pedal.
Use the service brake or the parking
brake. •
The dual clutch transmission can be
thought of as an automatically shifting
manual transmission. It gives the
driving feel of a manual transmission,
yet provides the ease of a fully
automatic transmission.
• When D (Drive) is selected, the
transmission will automatically
shift through the gears similar to a
conventional automatic transmission.
Unlike a traditional automatic
transmission, the gear shifting can
sometimes be felt and heard as the
actuators engage the clutches and the
gears are selected.
• The dual clutch transmission adopts
a dry-type dual clutch, which is
different from the torque converter of
the automatic transmission. It shows
better acceleration performance
and increased fuel efficiency while
driving but initial launch might be
little bit slower than the automatic
transmission.
As a result, gear shifts are sometimes
more noticeable than a conventional
automatic transmission and a light
vibration during launching can be felt
as the transmission speed. This is a
normal condition of the dual clutch
transmission.
• The dry-type clutch transfers torque
more directly and provides a direct
drive feeling which may feel different
from a conventional automatic
transmission. This may be more
noticeable when launching the vehicle
from a stop or when traveling at low,
stop-and-go vehicle speeds.
• When rapidly accelerating at a low
vehicle speed, the engine rpm may
increase highly depending on the
vehicle’s driving condition.
• For smooth launch uphill, press
down the accelerator pedal smoothly
depending on the current conditions.
Page 282 of 555

6-14
• If you release your foot from the
accelerator pedal at low vehicle
speed, you may feel strong engine
braking, which is similar to manual
transmission.
• When driving downhill, you may
use Sports Mode to downshift to a
lower gear in order to control your
speed without using the brake pedal
excessively.
• When you turn the engine on and off,
you may hear clicking sounds as the
system goes through a self-test. This
is a normal sound for the dual clutch
transmission.
• During the first 1000 miles (1,500 km),
you may feel that the vehicle may not
be smooth when accelerating at low
speed. During this break-in period, the
shift quality and performance of your
new vehicle is continuously optimized.
WARNING
Due to transmission failure, you may
not continue to drive and the position
indicator (D, R) on the cluster will blink.
We recommend you to contact an
authorized HYUNDAI dealer and have
the system checked.
LCD display for transmission
temperature and warning
message
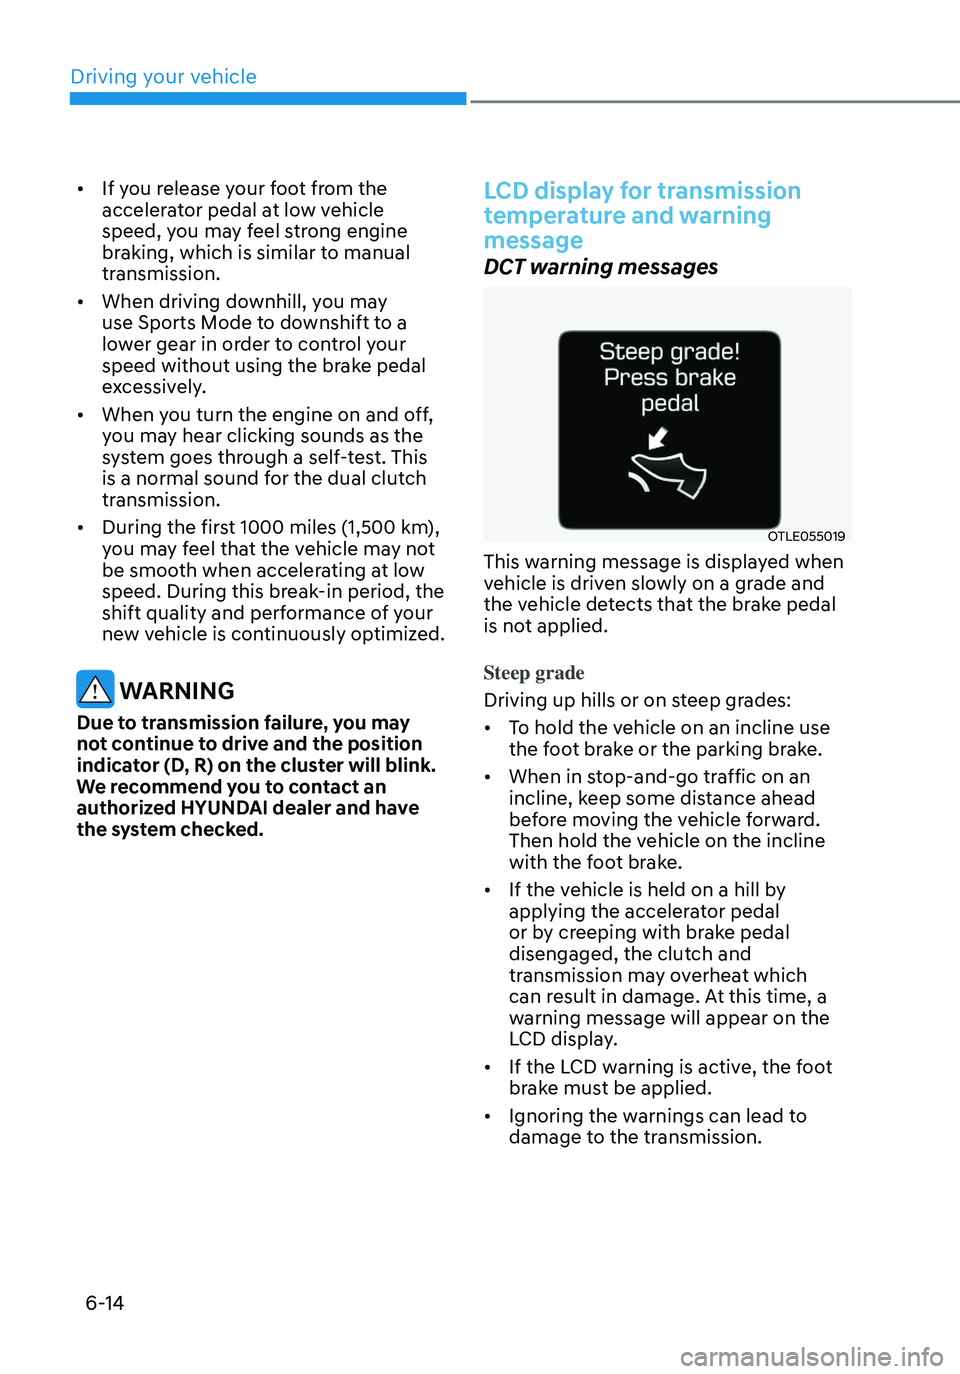
DCT warning messages
OTLE055019
This warning message is displayed when
vehicle is driven slowly on a grade and
the vehicle detects that the brake pedal
is not applied.
Steep grade
Driving up hills or on steep grades:
• To hold the vehicle on an incline use
the foot brake or the parking brake.
• When in stop-and-go traffic on an
incline, keep some distance ahead
before moving the vehicle forward.
Then hold the vehicle on the incline
with the foot brake.
• If the vehicle is held on a hill by
applying the accelerator pedal
or by creeping with brake pedal
disengaged, the clutch and
transmission may overheat which
can result in damage. At this time, a
warning message will appear on the
LCD display.
• If the LCD warning is active, the foot
brake must be applied.
• Ignoring the warnings can lead to
damage to the transmission.
Driving your vehicle