Page 492 of 555
09
9-23
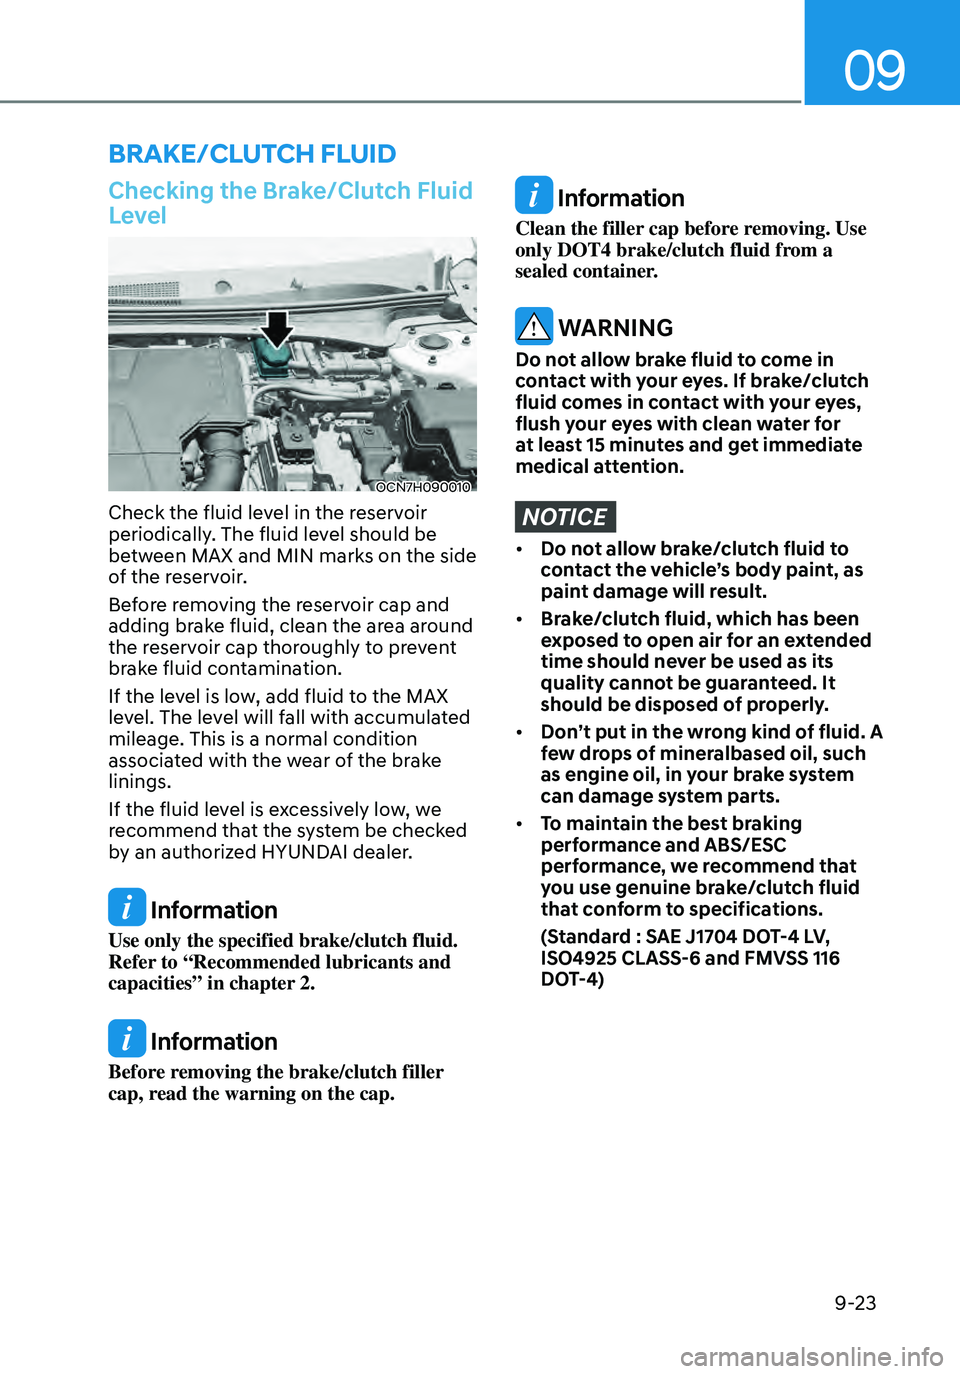
Checking the Brake/Clutch Fluid
Level
OCN7H090010
Check the fluid level in the reservoir
periodically. The fluid level should be
between MAX and MIN marks on the side
of the reservoir.
Before removing the reservoir cap and
adding brake fluid, clean the area around
the reservoir cap thoroughly to prevent
brake fluid contamination.
If the level is low, add fluid to the MAX
level. The level will fall with accumulated
mileage. This is a normal condition
associated with the wear of the brake
linings.
If the fluid level is excessively low, we
recommend that the system be checked
by an authorized HYUNDAI dealer.
Information
Use only the specified brake/clutch fluid.
Refer to “Recommended lubricants and
capacities” in chapter 2.
Information
Before removing the brake/clutch filler
cap, read the warning on the cap.
Information
Clean the filler cap before removing. Use
only DOT4 brake/clutch fluid from a
sealed container.
WARNING
Do not allow brake fluid to come in
contact with your eyes. If brake/clutch
fluid comes in contact with your eyes,
flush your eyes with clean water for
at least 15 minutes and get immediate
medical attention.
NOTICE
• Do not allow brake/clutch fluid to
contact the vehicle’s body paint, as
paint damage will result.
• Brake/clutch fluid, which has been
exposed to open air for an extended
time should never be used as its
quality cannot be guaranteed. It
should be disposed of properly.
• Don’t put in the wrong kind of fluid. A
few drops of mineralbased oil, such
as engine oil, in your brake system
can damage system parts.
• To maintain the best braking
performance and ABS/ESC
performance, we recommend that
you use genuine brake/clutch fluid
that conform to specifications.
(Standard : SAE J1704 DOT-4 LV,
ISO4925 CLASS-6 and FMVSS 116
DOT-4)
BRAKE/CLUTCH FLUID
Page 493 of 555
Maintenance
9-24
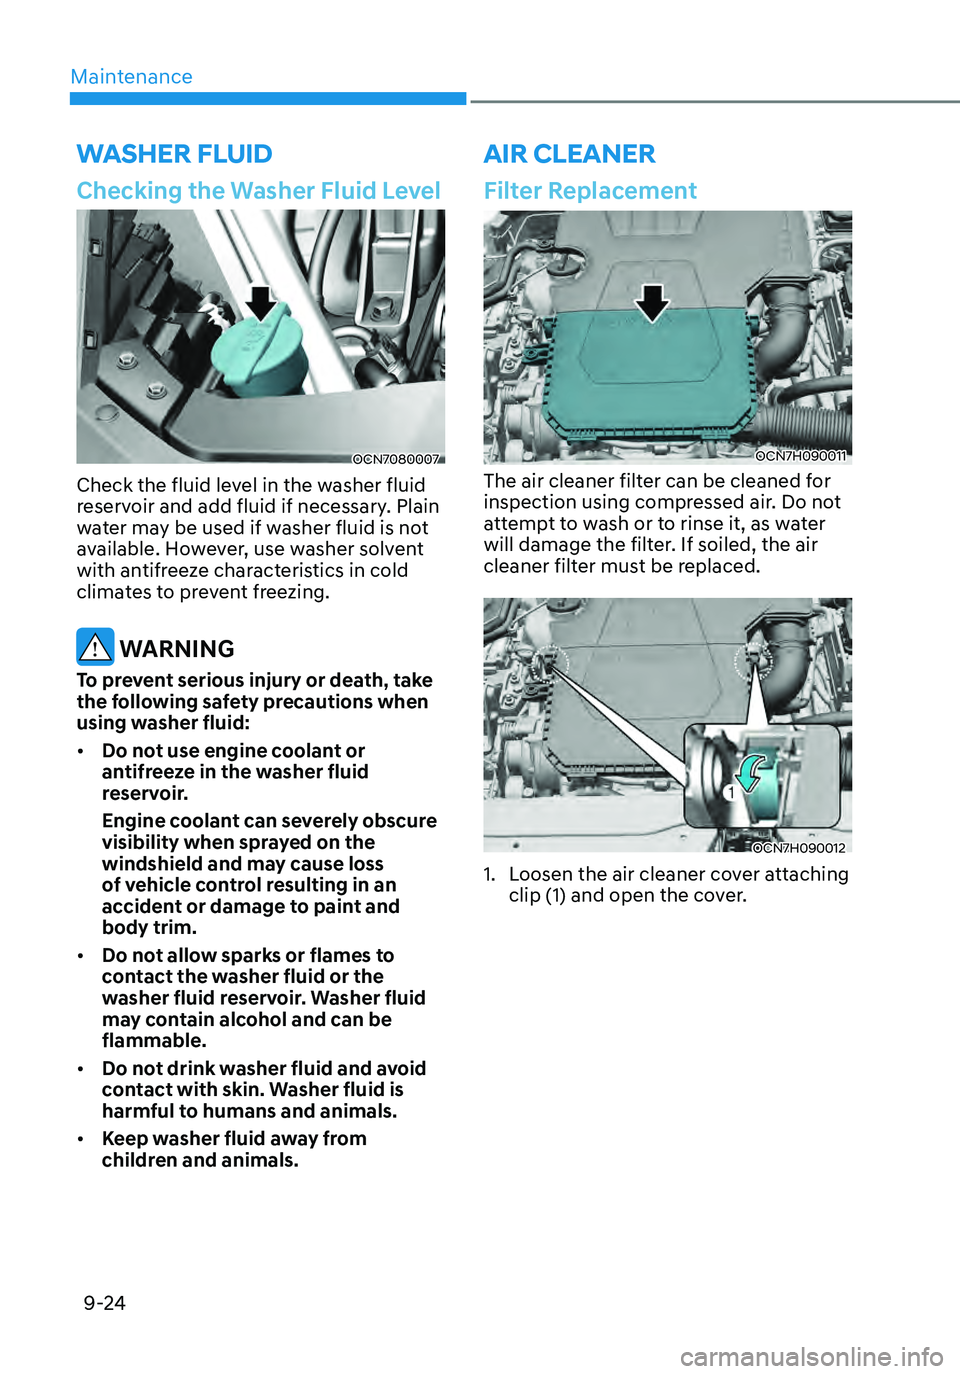
Checking the Washer Fluid Level
OCN7080007
Check the fluid level in the washer fluid
reservoir and add fluid if necessary. Plain
water may be used if washer fluid is not
available. However, use washer solvent
with antifreeze characteristics in cold
climates to prevent freezing.
WARNING
To prevent serious injury or death, take
the following safety precautions when
using washer fluid:
• Do not use engine coolant or
antifreeze in the washer fluid
reservoir.
Engine coolant can severely obscure
visibility when sprayed on the
windshield and may cause loss
of vehicle control resulting in an
accident or damage to paint and
body trim.
• Do not allow sparks or flames to
contact the washer fluid or the
washer fluid reservoir. Washer fluid
may contain alcohol and can be
flammable.
• Do not drink washer fluid and avoid
contact with skin. Washer fluid is
harmful to humans and animals.
• Keep washer fluid away from
children and animals.
WASHER FLUID
Filter Replacement
OCN7H090011
The air cleaner filter can be cleaned for
inspection using compressed air. Do not
attempt to wash or to rinse it, as water
will damage the filter. If soiled, the air
cleaner filter must be replaced.
OCN7H090012
1. Loosen the air cleaner cover attaching
clip (1) and open the cover.
AIR CLEANER
Page 494 of 555
09
9-25
OCN7H090013
OCN7H090023
2. Replace the air cleaner filter. Insert (2)
completely into (3).
OCN7H090022
OCN7H090021
3. Insert the air cleaner cover in the
hinge (4) and engage the clip (5) after
closing the cover.
4. Check that the cover is firmly
installed.
Information
If the vehicle is operated in extremely
dusty or sandy areas, replace the element
more often than the usual recommended
intervals (refer to “Maintenance Under
Severe Usage Conditions” in this chapter).
NOTICE
• Do not drive with the air cleaner filter
removed. This will result in excessive
engine wear.
• When removing the air cleaner filter,
be careful that dust or dirt does not
enter the air intake, or damage may
result.
• Use HYUNDAI genuine parts. Use of
non-genuine parts could damage the
engine.
Page 511 of 555
Maintenance
9-42
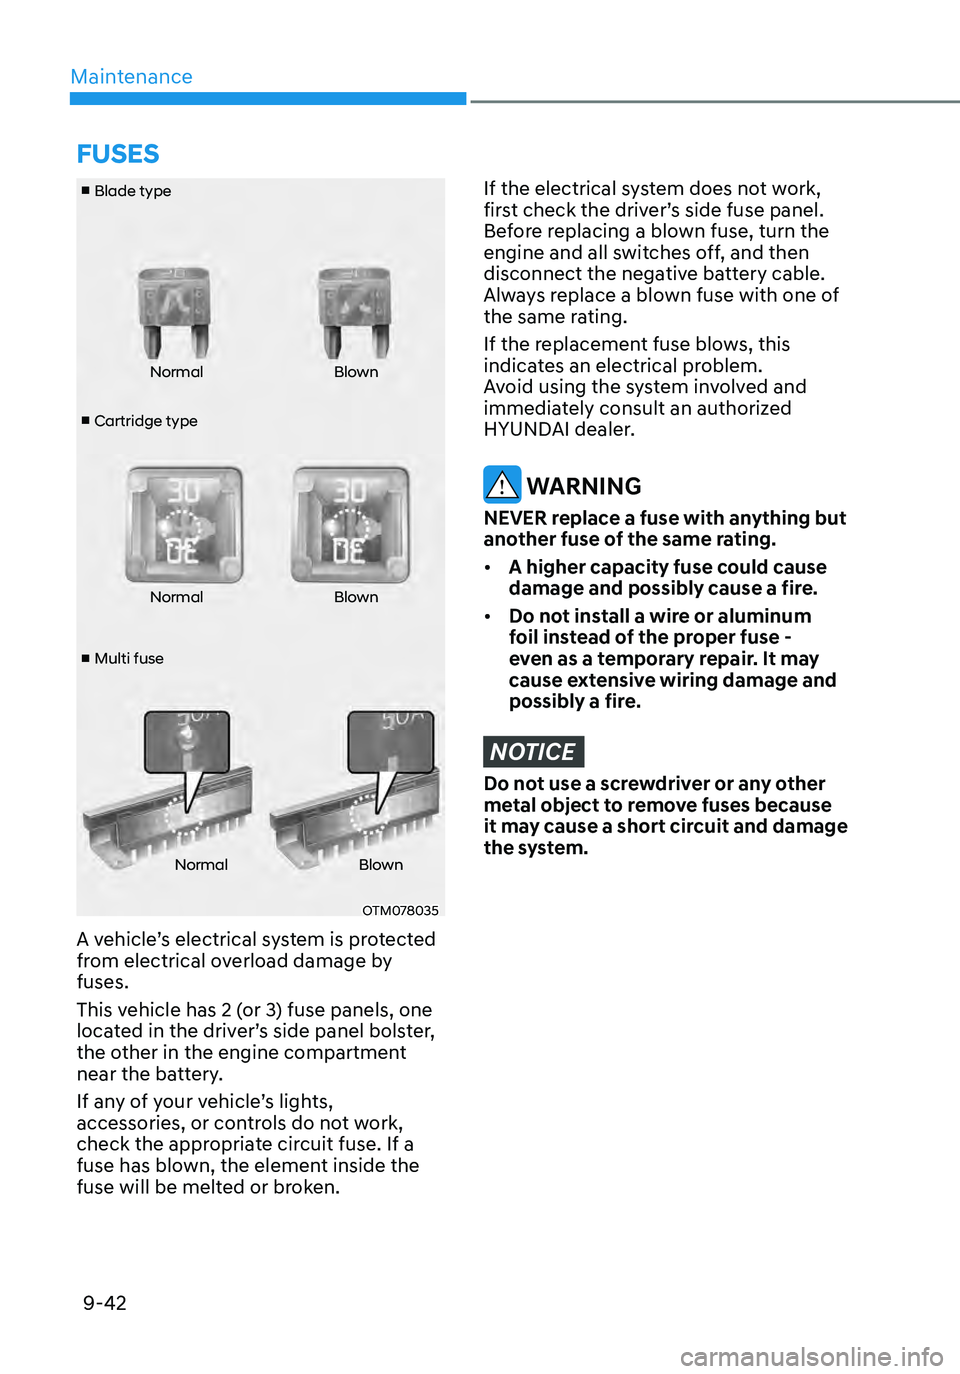
■ Cartridge type
■ Blade type
■ Multi fuse Normal
Blown
Normal Blown
Normal Blown
OTM078035
A vehicle’s electrical system is protected
from electrical overload damage by
fuses.
This vehicle has 2 (or 3) fuse panels, one
located in the driver’s side panel bolster,
the other in the engine compartment
near the battery.
If any of your vehicle’s lights,
accessories, or controls do not work,
check the appropriate circuit fuse. If a
fuse has blown, the element inside the
fuse will be melted or broken.
If the electrical system does not work,
first check the driver’s side fuse panel.
Before replacing a blown fuse, turn the
engine and all switches off, and then
disconnect the negative battery cable.
Always replace a blown fuse with one of
the same rating.
If the replacement fuse blows, this
indicates an electrical problem.
Avoid using the system involved and
immediately consult an authorized
HYUNDAI dealer.
WARNING
NEVER replace a fuse with anything but
another fuse of the same rating.
• A higher capacity fuse could cause
damage and possibly cause a fire.
• Do not install a wire or aluminum
foil instead of the proper fuse -
even as a temporary repair. It may
cause extensive wiring damage and
possibly a fire.
NOTICE
Do not use a screwdriver or any other
metal object to remove fuses because
it may cause a short circuit and damage
the system.
FUSES
Page 512 of 555
09
9-43
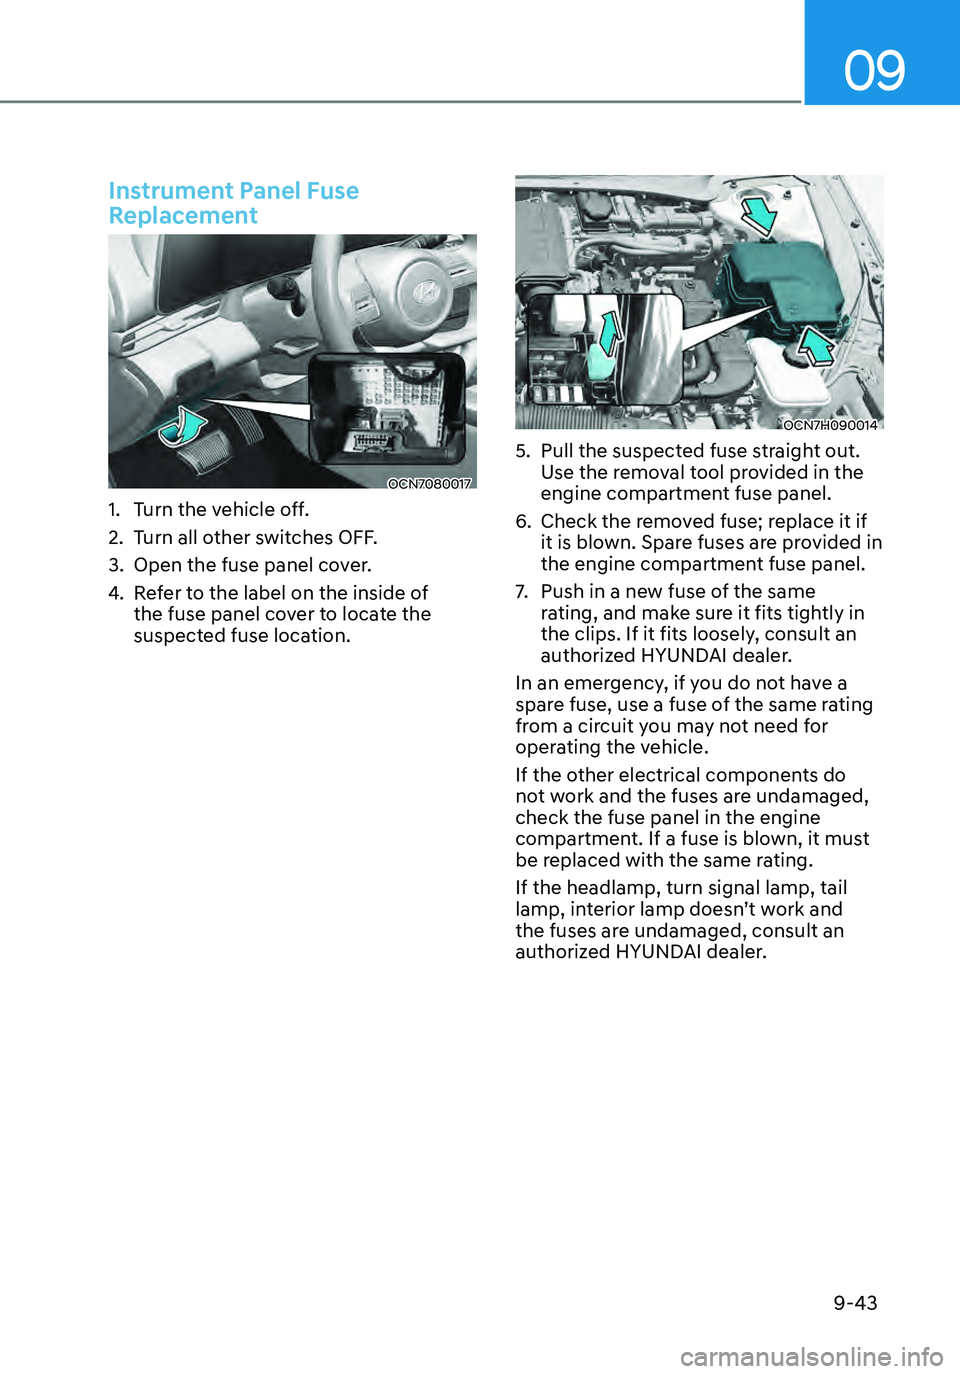
Instrument Panel Fuse
Replacement
OCN7080017
1. Turn the vehicle off.
2. Turn all other switches OFF.
3. Open the fuse panel cover.
4. Refer to the label on the inside of
the fuse panel cover to locate the
suspected fuse location.
OCN7H090014
5. Pull the suspected fuse straight out.
Use the removal tool provided in the
engine compartment fuse panel.
6. Check the removed fuse; replace it if
it is blown. Spare fuses are provided in
the engine compartment fuse panel.
7. Push in a new fuse of the same
rating, and make sure it fits tightly in
the clips. If it fits loosely, consult an
authorized HYUNDAI dealer.
In an emergency, if you do not have a
spare fuse, use a fuse of the same rating
from a circuit you may not need for
operating the vehicle.
If the other electrical components do
not work and the fuses are undamaged,
check the fuse panel in the engine
compartment. If a fuse is blown, it must
be replaced with the same rating.
If the headlamp, turn signal lamp, tail
lamp, interior lamp doesn’t work and
the fuses are undamaged, consult an
authorized HYUNDAI dealer.
Page 513 of 555
Maintenance
9-44
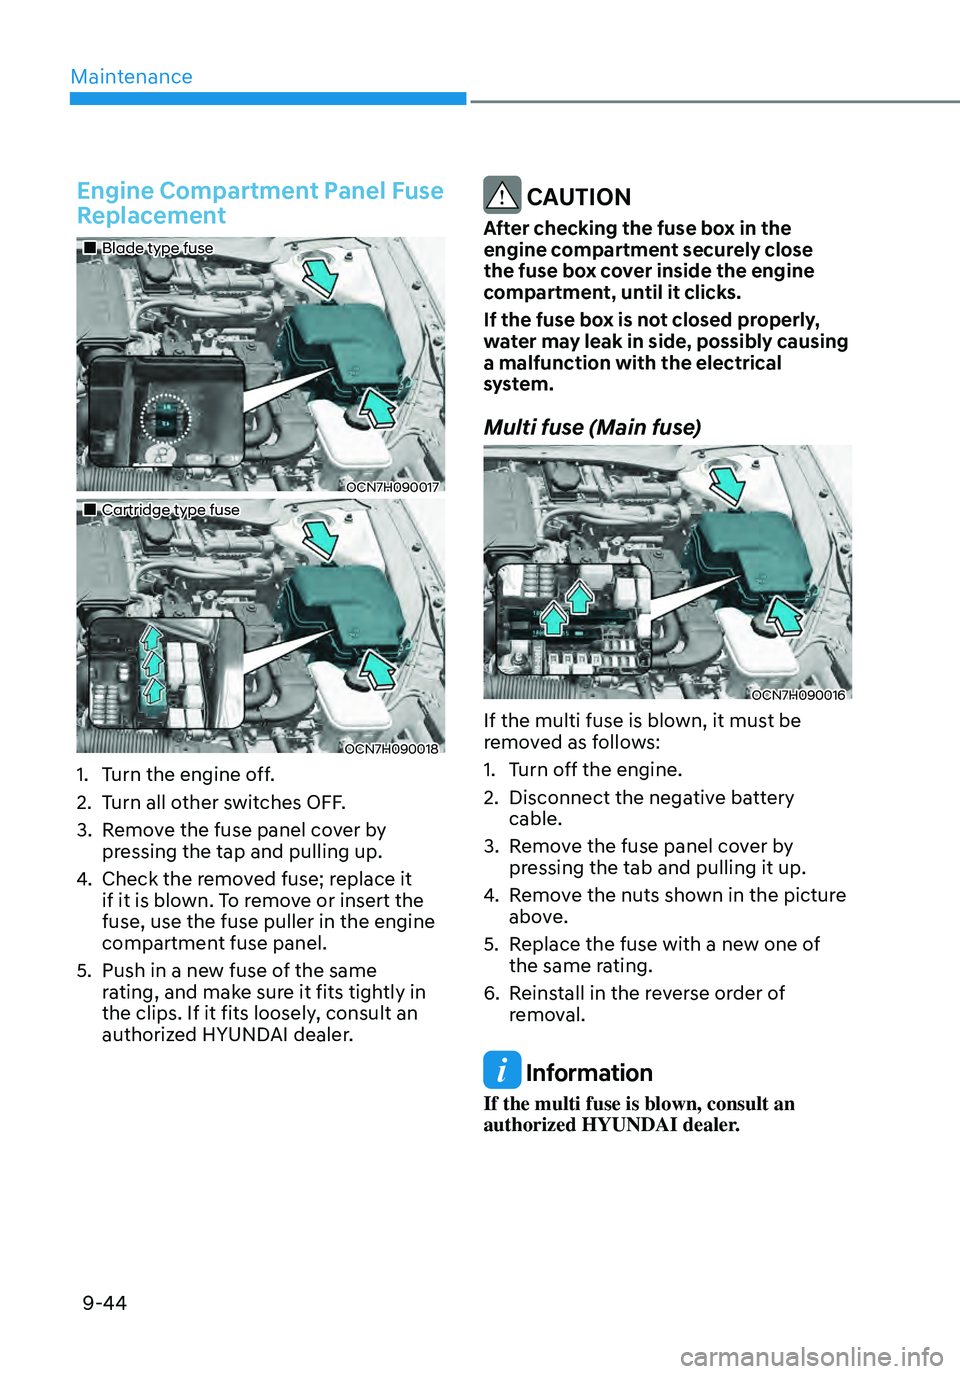
Engine Compartment Panel Fuse
Replacement
„„Blade type fuse
OCN7H090017
„„Cartridge type fuse
OCN7H090018
1. Turn the engine off.
2. Turn all other switches OFF.
3. Remove the fuse panel cover by
pressing the tap and pulling up.
4. Check the removed fuse; replace it
if it is blown. To remove or insert the
fuse, use the fuse puller in the engine
compartment fuse panel.
5. Push in a new fuse of the same
rating, and make sure it fits tightly in
the clips. If it fits loosely, consult an
authorized HYUNDAI dealer.
CAUTION
After checking the fuse box in the
engine compartment securely close
the fuse box cover inside the engine
compartment, until it clicks.
If the fuse box is not closed properly,
water may leak in side, possibly causing
a malfunction with the electrical
system.
Multi fuse (Main fuse)
OCN7H090016
If the multi fuse is blown, it must be
removed as follows:
1. Turn off the engine.
2. Disconnect the negative battery
cable.
3. Remove the fuse panel cover by
pressing the tab and pulling it up.
4. Remove the nuts shown in the picture
above.
5. Replace the fuse with a new one of
the same rating.
6. Reinstall in the reverse order of
removal.
Information
If the multi fuse is blown, consult an
authorized HYUNDAI dealer.
Page 518 of 555
09
9-49
Engine compartment fuse panel
TypeFuse Name Fuse Rating
Circuit Protected
MULTI
FUSE-3 MDPS
80A
MDPS Unit
MULTI
FUSE-2 COOLING FAN
60A
Cooling Fan Motor
IEB 3 60A
IDB Unit
PTC HEATER 2 50A
PTC Heater 2 Relay
MULTI
FUSE-1 B+5
60APCB Block (Engine Control Relay, Fuse -
ECU 2/HORN/WIPER)
B+1 60AICU Junction Block (IPS2/IPS5/IPS6/IPS7/
IPS14)
B+2 60AICU Junction Block (IPS1/IPS4/IPS8/IPS9/
IPS10)
B+3 50AFuse - EWP 2, ICU Junction Block (Fuse -
SAFETY P/WINDOW DRV, TRUNK, AMP, P/
SEAT DRV, P/SEAT PASS, S/HEATER FRT, S/
HEATER RR, Long Term Load Latch Relay
(Fuse - MEMORY 1/MULTIMEDIA))
IEB 2 60A
IDB Unit
PTC HEATER 1 50A
PTC Heater 1 Relay
BLOWER 40ABlower Relay, Multipurpose Check
Connector
IG1 40A
Ignition Switch, PDM (IG1/ACC) Relay
IG2 40A
Ignition Switch, PDM (IG2) Relay
Page 519 of 555
Maintenance
9-50
Engine compartment fuse panel
TypeFuse Name Fuse Rating
Circuit Protected
FUSE BATTERY C/
FAN 1 15A
Battery C/Fan Relay
IEB1 40A
IDB Unit, Multipurpose Check Connector
CLUTCH
ACTUATOR 30A
Clutch Actuator
POWER
OUTLET 1 40A
Power Outlet Relay
EWP 2 10A
Auxiliary Electric Water Pump
EWP 1 10A
Electric Water Pump
POWER
OUTLET 2 20A
Front Power Outlet
DCT 1 40A
TCM
DCT 2 40A
TCM
REAR
HEATED 40A
Rear Heated Relay
B+4 40AICU Junction Block (Power Window Relay,
Fuse - AIR BAG 2, IBU 1, BRAKE SWITCH,
DOOR LOCK, MODULE 1, SUNROOF, IAU,
BMS)
HEV ECU 1 10A
HPCU
IG3 20A
IG3 Relay
TCU 1 10A
TCM
FUEL PUMP 20A
Fuel Pump Relay
HEV ECU 2 10A
HPCU, BMS Control Module
Sub Block FUSE BATTERY C/
FAN 2 10A
Battery C/Fan Relay