2021 HONDA ODYSSEY audio
[x] Cancel search: audioPage 539 of 787

537
Features
CabinWatch®*
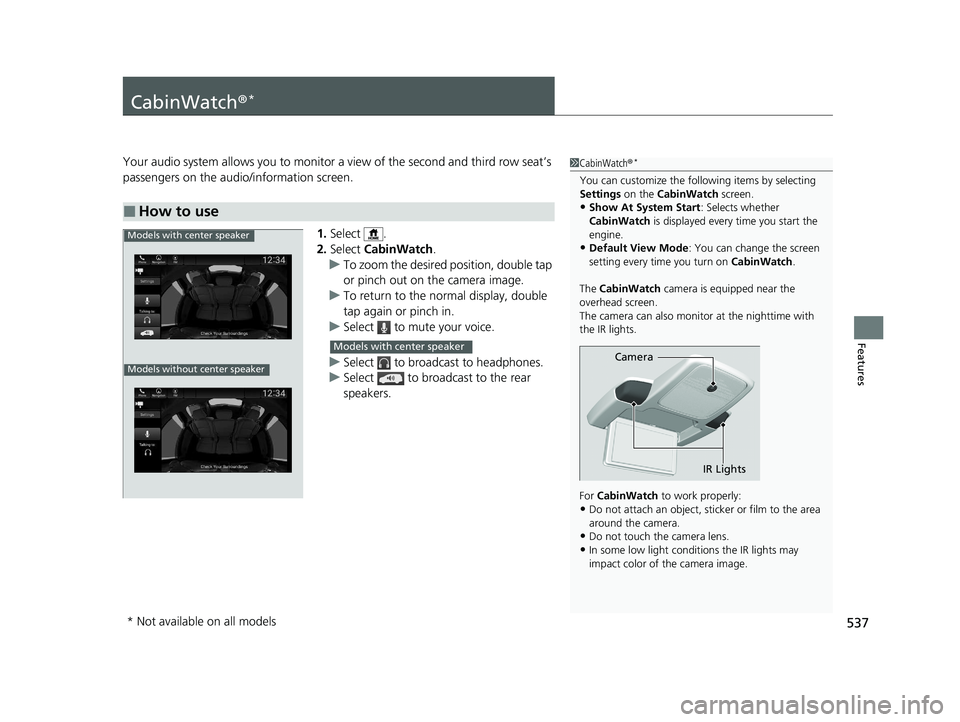
Your audio system allows you to monitor a view of the second and third row seat’s
passengers on the audio/information screen.
1.Select .
2. Select CabinWatch .
u To zoom the desired position, double tap
or pinch out on the camera image.
u To return to the normal display, double
tap again or pinch in.
u Select to mute your voice.
u Select to broadcast to headphones.
u Select to broadcast to the rear
speakers.
■How to use
1CabinWatch ®*
You can customize the foll owing items by selecting
Settings on the CabinWatch screen.
•Show At System Start : Selects whether
CabinWatch is displayed every time you start the
engine.
•Default View Mode : You can change the screen
setting every time you turn on CabinWatch.
The CabinWatch camera is equipped near the
overhead screen.
The camera can also monitor at the nighttime with
the IR lights.
For CabinWatch to work properly:
•Do not attach an object, sticker or film to the area
around the camera.
•Do not touch the camera lens.
•In some low light conditions the IR lights may
impact color of the camera image.
Camera
IR Lights
Models with center speaker
Models without center speaker
Models with center speaker
* Not available on all models
21 US ODYSSEY-31THR6310.book 537 ページ 2020年6月17日 水曜日 午後2時46分
Page 540 of 787

538
Features
CabinTalk®*
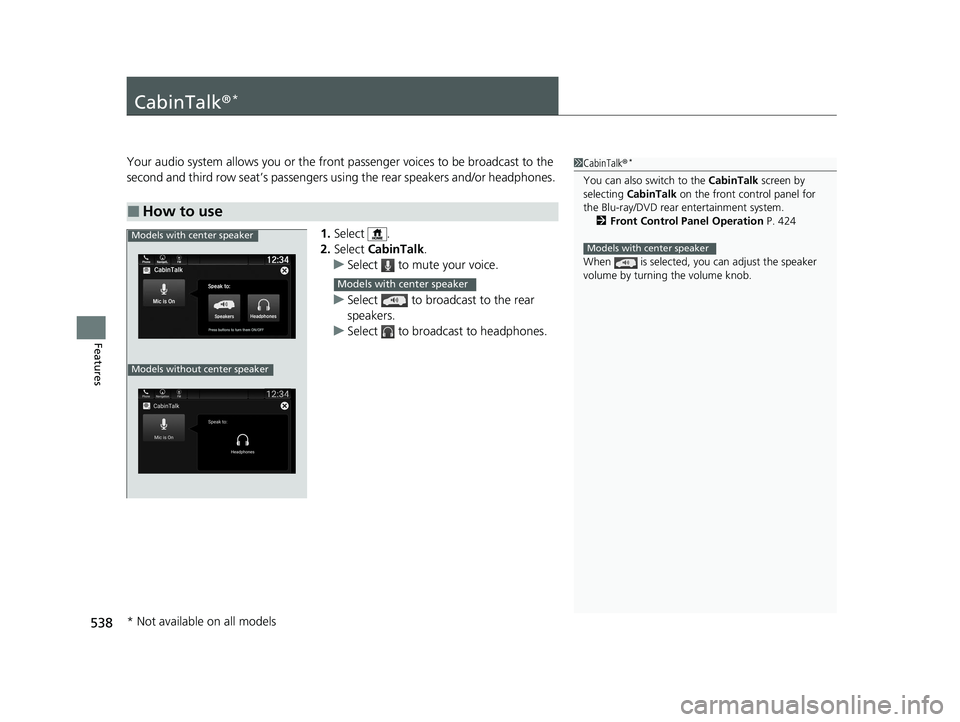
Your audio system allows you or the front passenger voices to be broadcast to the
second and third row seat’s passengers us ing the rear speakers and/or headphones.
1. Select .
2. Select CabinTalk .
u Select to mute your voice.
u Select to broadcast to the rear
speakers.
u Select to broadcast to headphones.
■How to use
1CabinTalk ®*
You can also switch to the CabinTalk screen by
selecting CabinTalk on the front control panel for
the Blu-ray/DVD rear entertainment system. 2 Front Control Panel Operation P. 424
When is selected, you can adjust the speaker
volume by turning the volume knob.
Models with center speakerModels with center speaker
Models without center speaker
Models with center speaker
* Not available on all models
21 US ODYSSEY-31THR6310.book 538 ページ 2020年6月17日 水曜日 午後2時46分
Page 556 of 787

uuWhen Driving uStarting the Engine
554
Driving
You can remotely start the engine using the button on the remote.
■To start the engine
When started remotely, the engine automati cally shuts off after 10 minutes of idling
and/or the brake pedal and ENGINE START/STOP button have not been pressed
simultaneously.
To extend the run time for another 10 minutes during the first run, press the
button, then press and hold the button.
u Some exterior lights flash six times if a 10-minute extension request was
transmitted successfully.
■Remote Engine Start with Vehicle Feedback*1Remote Engine Start with Vehicle Feedback*
The remote engine start may violate local laws.
Before using the remote e ngine start, check your
local laws.
If there are buildings an d obstacles between your
vehicle and the remote, th e range will be reduced.
This distance may vary by external electrical
interference.
The engine may not start by the remote engine start if:
•You have disabled a remote engine start setting
using the audio/information screen.
•The power mode is not in VEHICLE OFF.
•The transmission is in a position other than ( P.
•The hood is open, or any door or the tailgate is
unlocked.
•You have already used the remote twice to start
the engine.
•The battery temp is too low or the battery charge is
too low.
3WARNING
Carbon monoxide ga s is toxic and can
rapidly accumulate in closed or even partly
enclosed areas.
Breathing it can cause unconsciousness and
even kill you.
Never use the remote engine starter with
the vehicle parked in a garage or other
areas with limited ventilation.
Press the button, then press and
hold the button.
Some exterior lights flash once.
LED: Blinks when any button is pressed. Go within the range,
and try again.
Some exterior lights will
not flash if the engine runs
unsuccessfully.
Some exterior lights flash
six times if the engine runs
successfully.
* Not available on all models
21 US ODYSSEY-31THR6310.book 554 ページ 2020年6月17日 水曜日 午後2時46分
Page 564 of 787

uuWhen Driving uShifting
562
Driving
■Shift Operation1Shift Operation
NOTICE
When you change (D to (R and vice versa, depress
the brake pedal to come to a complete stop, then
select the intended gear position while maintaining
brake pressure.
Use the gear position indicator and the shift button
indicator to check the gear position before selecting
a shift button.
If the indicator of the currently selected gear position,
or all the gear position indicators are blinking
simultaneously, there is a problem with the
transmission.
Avoid sudden acceleration and have the transmission
checked by a dealer as soon as possible.
The fuel supply may be cut of f if you drive at engine
speeds in or over the tac hometer’s red zone (engine
speed limit). If this happe ns, you may experience a
slight jolt.
When the engine speed is increased while the
transmission is in
( N, (P or (R, the fuel supply may
be cut off even without the engine speed entering
the tachometer’s red zone.
The beeper sounds once when you change to
( R.
2 Vehicle Customization P. 143
2 Customized Features P. 465Models with color audio system
Models with Display Audio
Press the (P button.
Pull back the
( R button.
Press the
( N button.
Press the button.
Each time you pre ss the button, the
mode switches between Drive and S
Position mode.
D/S
Shift Button
Indicator
M (sequential mode) Indicator
Tachometer’s red zone
Sequential Mode Gear Selection
Indicator
Gear Position Indicator
21 US ODYSSEY-31THR6310.book 562 ページ 2020年6月17日 水曜日 午後2時46分
Page 588 of 787

586
uuWhen Driving uLaneWatchTM*
Driving
LaneWatchTM*
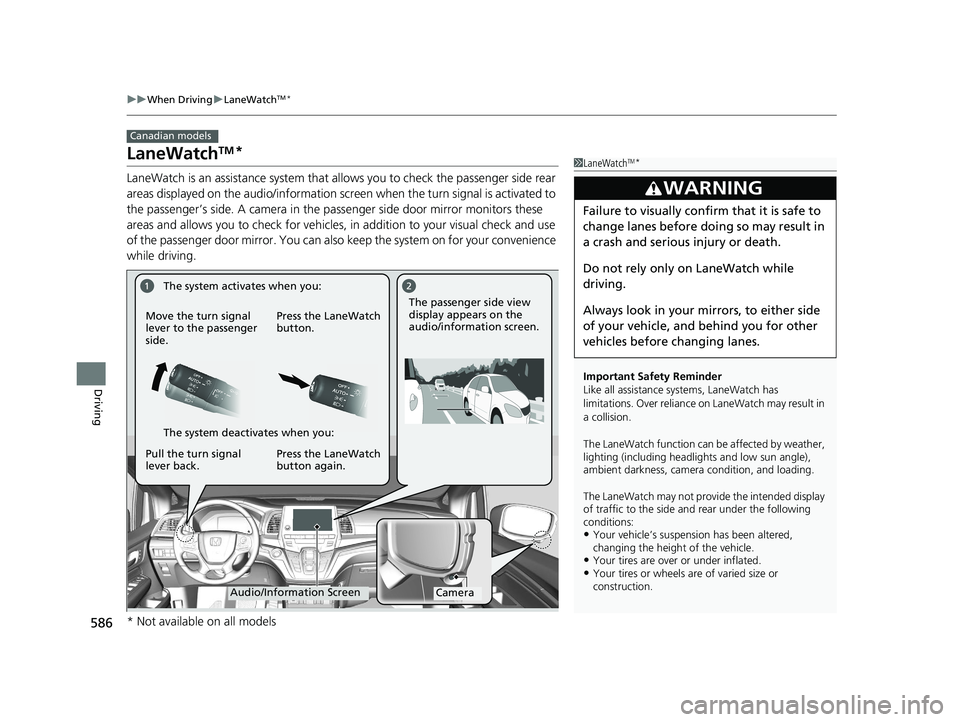
LaneWatch is an assistance system that allows you to check the passenger side rear
areas displayed on the audio/information screen when the turn signal is activated to
the passenger’s side. A camera in the pass enger side door mirror monitors these
areas and allows you to chec k for vehicles, in addition to your visual check and use
of the passenger door mirror. You can also keep the system on for your convenience
while driving.
Canadian models
1 LaneWatchTM*
Important Safety Reminder
Like all assistance systems, LaneWatch has
limitations. Over reliance on LaneWatch may result in
a collision.
The LaneWatch function can be affected by weather,
lighting (including headli ghts and low sun angle),
ambient darkness, camera condition, and loading.
The LaneWatch may not prov ide the intended display
of traffic to the side and rear under the following
conditions:
•Your vehicle’s suspensi on has been altered,
changing the height of the vehicle.
•Your tires are over or under inflated.•Your tires or wheels are of varied size or
construction.
3WARNING
Failure to visually confirm that it is safe to
change lanes before doing so may result in
a crash and serious injury or death.
Do not rely only on LaneWatch while
driving.
Always look in your mi rrors, to either side
of your vehicle, and behind you for other
vehicles before changing lanes.
CameraAudio/Information Screen
Move the turn signal
lever to the passenger
side.
Press the LaneWatch
button.
Pull the turn signal
lever back. Press the LaneWatch
button again. The passenger side view
display appears on the
audio/information screen.
The system activates when you:
The system deactivates when you:
* Not available on all models
21 US ODYSSEY-31THR6310.book 586 ページ 2020年6月17日 水曜日 午後2時46分
Page 589 of 787

587
uuWhen Driving uLaneWatchTM*
Driving
■Customizing the La neWatch settings
You can customize the following items using the audio/information screen.
• Show with Turn Signal : Selects whether LaneWatch monitor comes on when
you operate the tu rn signal lever.
• Show Reference Line : Selects whether the reference lines appear on the
LaneWatch monitor.
2 Customized Features P. 465
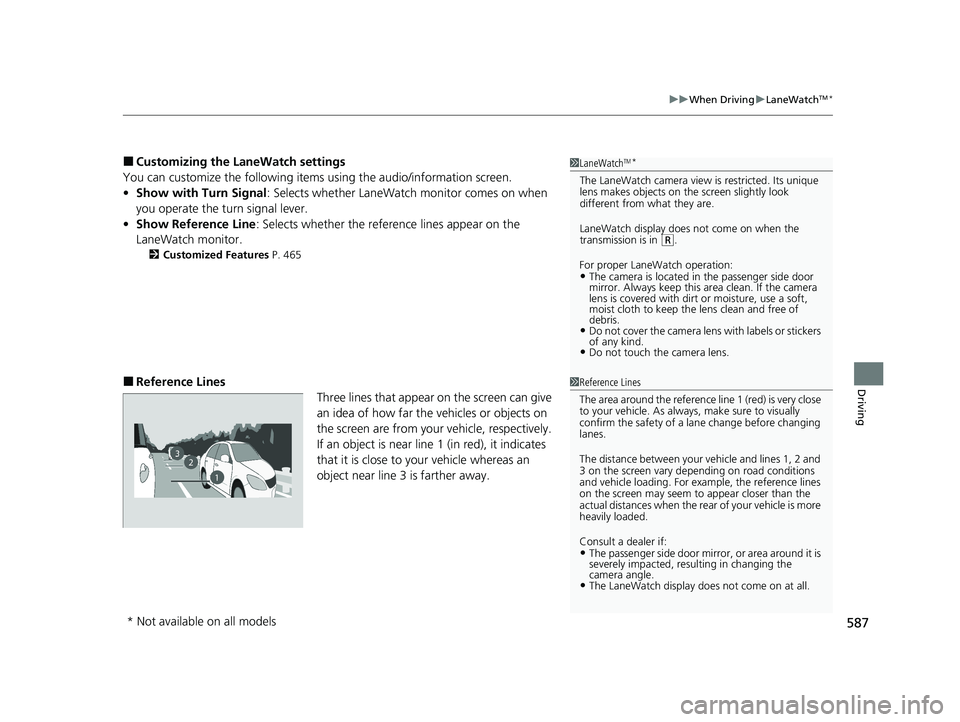
■Reference Lines
Three lines that appear on the screen can give
an idea of how far the vehicles or objects on
the screen are from your vehicle, respectively.
If an object is near line 1 (in red), it indicates
that it is close to your vehicle whereas an
object near line 3 is farther away.
1LaneWatchTM*
The LaneWatch camera view is restricted. Its unique
lens makes objects on the screen slightly look
different from what they are.
LaneWatch display does not come on when the
transmission is in
( R.
For proper LaneWatch operation:
•The camera is located in the passenger side door
mirror. Always keep this area clean. If the camera
lens is covered with dirt or moisture, use a soft,
moist cloth to keep the lens clean and free of
debris.
•Do not cover the camera lens with labels or stickers
of any kind.
•Do not touch the camera lens.
1 Reference Lines
The area around the reference line 1 (red) is very close
to your vehicle. As always, make sure to visually
confirm the safety of a la ne change before changing
lanes.
The distance betwee n your vehicle and lines 1, 2 and
3 on the screen vary depending on road conditions
and vehicle loading. For ex ample, the reference lines
on the screen may seem to appear closer than the
actual distances when the rear of your vehicle is more
heavily loaded.
Consult a dealer if:
•The passenger side door mirr or, or area around it is
severely impacted, resulting in changing the
camera angle.
•The LaneWatch display doe s not come on at all.
23
1
* Not available on all models
21 US ODYSSEY-31THR6310.book 587 ページ 2020年6月17日 水曜日 午後2時46分
Page 595 of 787

Continued593
uuHonda Sensing ®u Collision Mitigation Braking SystemTM (CMBSTM)
Driving
■When the system activates
At system’s earliest collision alert st age, you can change the distance (Long/
Normal /Short ) between vehicles at which alerts will come on through the driver
information interface
* or audio/information screen* setting options.
2 List of customizable options P. 146, 472
1When the system activates
The camera in the CMBS
TM is also designed to detect
pedestrians.
However, this pedestrian detection feature may not
activate or may not detect a pedestrian in front of
your vehicle under certain conditions.
Refer to the ones indicating the pedestrian detection
limitations from the list. 2 CMBS
TM Conditions and Limitations P. 596
The system provides visual and audible alerts of a possible collision, and stops if the
collision is avoided.
●Take appropriate action to prevent a collision (apply the brakes, change lanes,
etc.)
Visual Alerts
Beep
Audible Alert
* Not available on all models
21 US ODYSSEY-31THR6310.book 593 ページ 2020年6月17日 水曜日 午後2時46分
Page 630 of 787

uuHonda Sensing ®u Road Departure Mitigation (RDM) System
628
Driving
The system becomes ready to start sear ching for lane markings when all the
following conditions are met:
• The vehicle is traveling between about 45 and 90 mph (72 and 145 km/h).
• The vehicle is on a straight or slightly curved road.
• The turn signals are off.
• The brake pedal is not depressed.
• The wipers are not in high speed operation.
• The vehicle is not accelerating or braking, and the steering wheel is not being
turned.
• The system makes a determination that th e driver is not actively accelerating,
braking or steering.
■How the System Activates1 Road Departure Mitigation (RDM) System
If LKAS is off and you have selected Narrow from the
customised options using the driver information interface
*
or audio/information screen*, the message below will
appear in case the system dete rmines a possibility of your
vehicle crossing over de tected lane markings.
2 Driver Information Interface Warning and
Information Messages P. 108
2 Vehicle Customization P. 143
2 Customized Features P. 465
1How the System Activates
The RDM system may automa tically shut off and the
safety support indicator (a mber) comes and stays on.
2 Indicators P. 88
RDM system function can be impacted when the
vehicle is:
•Not driven within a traffic lane.
•Driven on the inside edge of a curve, or outside of
a lane.
•Driven in a narrow lane.
* Not available on all models
21 US ODYSSEY-31THR6310.book 628 ページ 2020年6月17日 水曜日 午後2時46分