2021 HONDA INSIGHT transmission
[x] Cancel search: transmissionPage 571 of 687

569
uuMaintenance MinderTMuTo Use Maintenance MinderTM
Continued
Maintenance
■Maintenance Service Items1Maintenance Service Items
•Adjust the valves during services A, B, 1, 2, or 3 if
they are noisy.
Maintenance Minder Message
System Message
Indicator
Sub Items
Main Item
U.S. models
*1: If a Maintenance Minder message does not appear more than 12 months after the display is reset,
change the engine oil every year.
# : See information on maintenance and emissions warranty in the first column on page 668.
*2: If you drive in dusty conditions, replace the air cleaner element every 15,000 miles (24,000 km).
CODEMaintenance Main Items
A
●Replace engine oil*1
B●Replace engine oil*1 and oil filter●Inspect front and rear brakes●Check expiry date for tire repair kit bottle●Inspect tie rod ends, steering gearbox, and boots●Inspect suspension components●Inspect driveshaft boots●Inspect brake hoses and li nes (Including ABS/VSA®)●Inspect all fluid levels and condition of fluids●Inspect exhaust system#
●Inspect fuel lines and connections#
*3: If you drive primarily in urban areas that have high concentrations of soot in the air from industry and
from diesel-powered vehicles, replace the dust and pollen filter every 15,000 miles (24,000 km).
*4: Driving in mountainous areas at very low vehicle speeds results in higher transmission temperatures. This requires transmission fluid changes more frequently than recommended by the Maintenance
Minder. If you regularly drive your vehicle under these conditions, have the transmission fluid changed
every 47,500 miles or 3 years (76,000 km or 3 years).
*5: If a Maintenance Minder message does not appear more than 36 months after the display for item 7 is reset, change the brake fluid every 3 years.
CODEMaintenance Sub Items
1
●Rotate tires
2●Replace air cleaner element*2
●Replace dust and pollen filter*3
3●Replace transmission fluid*4
4●Replace spark plugs●Inspect valve clearance
5
●Replace engine coolant
7●Replace brake fluid*5
21 INSIGHT-31TXM6200.book 569 ページ 2020年2月5日 水曜日 午前10時0分
Page 572 of 687
570
uuMaintenance MinderTMuTo Use Maintenance MinderTM
Maintenance
1Maintenance Service Items
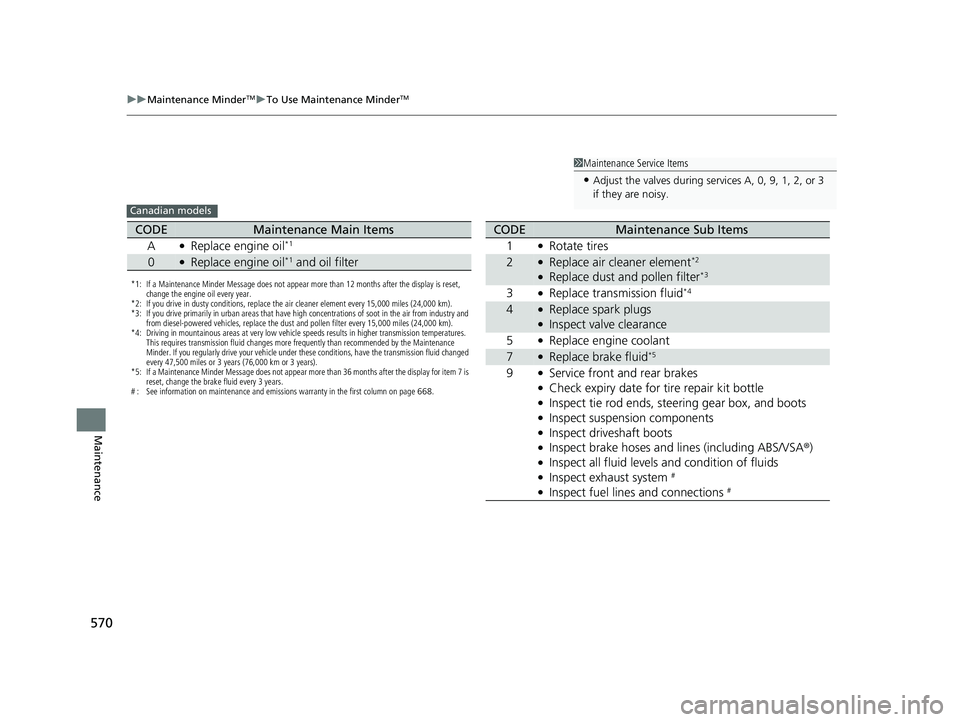
•Adjust the valves during services A, 0, 9, 1, 2, or 3
if they are noisy.
Canadian models
*1: If a Maintenance Minder Message does not appear more than 12 months after the display is reset,
change the engine oil every year.
*2: If you drive in dusty conditions, replace the air cleaner element every 15,000 miles (24,000 km).
*3: If you drive primarily in urban areas that have high concentrations of soot in the air from industry and from diesel-powered vehicles, replace the dust and pollen filter every 15,000 miles (24,000 km).
*4: Driving in mountainous areas at very low vehicle speeds results in higher transmission temperatures. This requires transmission fluid changes more frequently than recommended by the Maintenance
Minder. If you regularly drive your vehicle under these conditions, have the transmission fluid changed
every 47,500 miles or 3 years (76,000 km or 3 years).
*5: If a Maintenance Minder Message does not appear more than 36 months after the display for item 7 is reset, change the brake fluid every 3 years.
# : See information on maintenance and emissions warranty in the first column on page 668.
CODEMaintenance Main Items
A
●Replace engine oil*1
0●Replace engine oil*1 and oil filter
CODEMaintenance Sub Items
1
●Rotate tires
2●Replace air cleaner element*2
●Replace dust and pollen filter*3
3●Replace transmission fluid*4
4●Replace spark plugs●Inspect valve clearance
5
●Replace engine coolant
7●Replace brake fluid*5
9●Service front and rear brakes●Check expiry date for tire repair kit bottle●Inspect tie rod ends, steer ing gear box, and boots●Inspect suspension components●Inspect driveshaft boots●Inspect brake hoses and li nes (including ABS/VSA®)●Inspect all fluid levels and condition of fluids●Inspect exhaust system #
●Inspect fuel lines and connections #
21 INSIGHT-31TXM6200.book 570 ページ 2020年2月5日 水曜日 午前10時0分
Page 584 of 687

582
uuMaintenance Under the Hood uTransmission Fluid
Maintenance
Transmission Fluid
Have a dealer check the fluid level and replace if necessary.
Do not attempt to check or change the transmission fluid yourself.
Specified fluid: Honda ATF DW-11Transmission Fluid
NOTICE
Do not mix Honda ATF DW-1 with other
transmission fluids.
Using a transmission flui d other than Honda ATF
DW-1 may adversely af fect the operation and
durability of your vehicle’ s transmission, and damage
the transmission.
Any damage caused by using a transmission fluid that
is not equivalent to Honda ATF DW-1 is not covered
by Honda’s new vehi cle limited warranty.
21 INSIGHT-31TXM6200.book 582 ページ 2020年2月5日 水曜日 午前10時0分
Page 609 of 687

607
uuCleaning uExterior Care
Continued
Maintenance
Exterior Care
Dust off the vehicle body after you drive. Regularly inspect your vehicle for scratches
on painted surfaces. A scratch on a painted surface can result in body rust. If you
find a scratch, promptly repair it.
Wash the vehicle regularly. Wash more frequently when driving in the following
conditions:
• If driving on roads with road salt.
• If driving in coastal areas.
• If tar, soot, bird droppings, insects, or tree sap are stuck to painted surfaces.
• Make sure to follow the instructions indicated on the automated car wash.
• Fold in the door mirrors.
• For models equipped with automatic inte rmittent wipers, turn the wipers off.
• Keep sufficient distance between the cleaning nozzle and the vehicle body.
• Take particular care around the windows. Standing too close may cause water to
enter the vehicle interior.
• Do not spray high pressure water directly into the engine compartment. Instead,
use low pressure water and a mild detergent.
■Washing the Vehicle
■Using an Automated Car Wash
■Using High Pressure Cleaners
1 Washing the Vehicle
Do not spray water into the air intake vents. It can
cause a malfunction.
If you need to lift the wiper arms away from the
windshield, first set the wiper arms to the
maintenance position. 2 Changing the Wiper Blade Rubber P. 589
Air Intake Vents
1Using an Automated Car Wash
When using an automated car wash that pulls the
vehicle through with a convey or, make sure vehicle is
in car wash mode.
2 If you want to keep the transmission in
(N
position [car wash mode] P. 467
21 INSIGHT-31TXM6200.book 607 ページ 2020年2月5日 水曜日 午前10時0分
Page 615 of 687
613
Handling the Unexpected
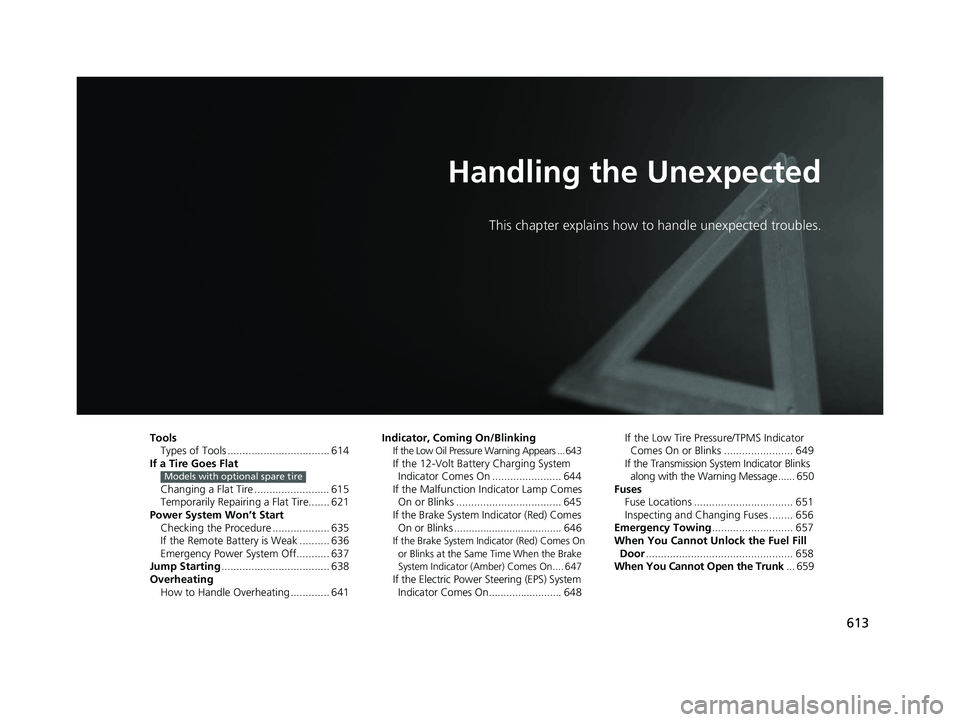
This chapter explains how to handle unexpected troubles.
ToolsTypes of Tools .................................. 614
If a Tire Goes Flat
Changing a Flat Tire ......................... 615
Temporarily Repairi ng a Flat Tire....... 621
Power System Won’t Start Checking the Procedure ................... 635
If the Remote Battery is Weak .......... 636
Emergency Power System Off........... 637
Jump Starting .................................... 638
Overheating
How to Handle Overheating ............. 641
Models with optional spare tire
Indicator, Coming On/BlinkingIf the Low Oil Pressure Warning Appears ... 643If the 12-Volt Battery Charging System Indicator Comes On ....................... 644
If the Malfunction Indicator Lamp Comes On or Blinks ................................... 645
If the Brake System Indicator (Red) Comes On or Blinks ..................................... 646
If the Brake System Indicator (Red) Comes On
or Blinks at the Same Time When the Brake
System Indicator (Amber) Comes On.... 647
If the Electric Power Steering (EPS) System Indicator Comes On......................... 648 If the Low Tire Pressure/TPMS Indicator
Comes On or Blinks ....................... 649
If the Transmission System Indicator Blinks
along with the Warning Message ...... 650
Fuses Fuse Locations ................................. 651
Inspecting and Changing Fuses ........ 656
Emergency Towing ........................... 657
When You Cannot Unlock the Fuel Fill
Door ................................................. 658
When You Cannot Open the Trunk ... 659
21 INSIGHT-31TXM6200.book 613 ページ 2020年2月5日 水曜日 午前10時0分
Page 617 of 687

615Continued
Handling the Unexpected
If a Tire Goes Flat
Changing a Flat Tire
If a tire goes flat while driving, grasp the steering wheel firmly, and brake gradually
to reduce speed. Then, stop in a safe plac e. Replace the flat tire with a compact
spare tire. Go to a dealer as soon as possib le to have the full-size tire repaired or
replaced.
1. Park the vehicle on firm, level, non-slip pery surface and apply the parking brake.
2. Put the transmission into
(P.
3. Turn on the hazard warning lights an d set the power mode to VEHICLE OFF.
Models with optional spare tire
1Changing a Flat Tire
Follow compact spare precautions:
Periodically check the tire pressure of the compact
spare. It should be set to the specified pressure.
Specified Pressure: 60 psi (420 kPa, 4.2 kgf/cm
2)
When driving with the compact spare tire, keep the
vehicle speed under 50 mph (80 km/h). Replace with
a full-size tire as soon as possible.
The compact spare tire and wheel in your vehicle are
specifically for this model. Do not use them with
another vehicle. Do not us e another type of compact
spare tire or wheel with your vehicle.
Do not mount tire chains on a compact spare tire.
If a chain-mounted front tire goes flat, remove one of
the full-size rear tires and replace it with the compact
spare tire. Remove the flat front tire and replace it
with the full-size tire that was removed from the rear.
Mount the tire chains on the front tire.
NOTICE
Do not use the jack if it doesn’t work properly.
Call your dealer or a pr ofessional towing service.
21 INSIGHT-31TXM6200.book 615 ページ 2020年2月5日 水曜日 午前10時0分
Page 623 of 687

621
uuIf a Tire Goes Flat uTemporarily Repairing a Flat Tire
Continued
Handling the Unexpected
Temporarily Repairing a Flat Tire
If the tire has a large cut or is otherwise severely damaged, you will need to have the
vehicle towed. If the tire only has a small puncture, from a nail for instance, you can
use the temporary tire repair kit so that you can drive to the nearest service station
for a more permanent repair.
If a tire goes flat while driving, grasp the steering wheel firmly, and brake gradually
to reduce speed. Then stop in a safe place.
1. Park the vehicle on a firm, level, and n on-slippery surface, and apply the parking
brake.
2. Put the transmission into
(P.
3. Turn on the hazard warning lights an d set the power mode to VEHICLE OFF
(LOCK).
1 Temporarily Repairing a Flat Tire
The kit should not be used in the following situations.
Instead, contact a dealer or roadside assistance to
have the vehicle towed.
•The tire sealant has expired.
•More than one tire is punctured.
•The puncture or cut is larger than 3/16 inch (4 mm).•The tire side wall is da maged or the puncture is
outside the contact area.
•Damage has been caused by driving with the tires
extremely under inflated.
•The tire bead is no longer seated.
•The rim is damaged.
Do not remove a nail or screw that punctured the
tire. If you remove it from the tire, you may not be
able to repair the puncture using the kit.
When the puncture is:Use Kit
Smaller than 3/16 inch (4 mm)Yes
Larger than 3/16 inch (4 mm)No
Contact
Area
21 INSIGHT-31TXM6200.book 621 ページ 2020年2月5日 水曜日 午前10時0分
Page 637 of 687
635
Handling the Unexpected
Power System Won’t Start
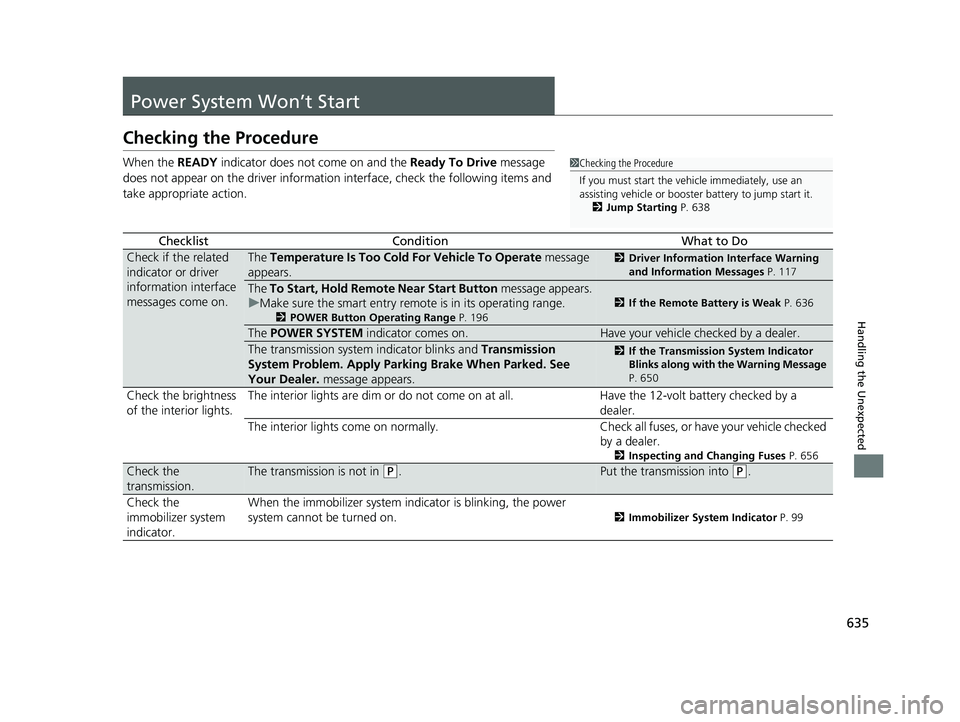
Checking the Procedure
When the READY indicator does not come on and the Ready To Drive message
does not appear on the driver informatio n interface, check the following items and
take appropriate action.
ChecklistConditionWhat to Do
Check if the related
indicator or driver
information interface
messages come on.The Temperature Is Too Cold For Vehicle To Operate message
appears.2 Driver Information Interface Warning
and Information Messages P. 117
The To Start, Hold Remote Near Start Button message appears.
u Make sure the smart entry remote is in its operating range.
2 POWER Button Operating Range P. 196
2If the Remote Battery is Weak P. 636
The POWER SYSTEM indicator comes on.Have your vehicle checked by a dealer.
The transmission system indicator blinks and Transmission
System Problem. Apply Parking Brake When Parked. See
Your Dealer. message appears.2If the Transmission System Indicator
Blinks along with the Warning Message
P. 650
Check the brightness
of the interior lights. The interior lights are dim or do not come on at all. Have the 12-volt battery checked by a
dealer.
The interior lights come on normally. Check all fuses, or have your vehicle checked
by a dealer.
2 Inspecting and Changing Fuses P. 656
Check the
transmission.The transmission is not in (P.Put the transmission into (P.
Check the
immobilizer system
indicator. When the immobilizer system indicator is blinking, the power
system cannot be turned on.
2
Immobilizer System Indicator P. 99
1Checking the Procedure
If you must start the vehi cle immediately, use an
assisting vehicle or booster battery to jump start it.
2 Jump Starting P. 638
21 INSIGHT-31TXM6200.book 635 ページ 2020年2月5日 水曜日 午前10時0分