Page 224 of 687

222
Controls
Interior Lights/Interior Convenience Items
Interior Lights
■ON
The interior lights come on regardless of
whether the doors are open or closed.
■Door activated
The interior lights come on in the following
situations:
• When any of the doors are opened.
• You unlock the driver’s door.
• When the power mode is set to VEHICLE
OFF (LOCK).
■OFF
The interior lights remain off regardless of
whether the doors are open or closed.
■Interior Light Switches1 Interior Light Switches
In the door activated position, the interior lights fade
out and go off about 30 se conds after the doors are
closed.
The lights go off after about 30 seconds in the
following situations:
•When you unlock the driver’s door but do not open it.
•When you set the power mode to VEHICLE OFF
(LOCK) but do not open a door.
You can change the interi or lights dimming time.
2 Customized Features
* P. 158, 372
The interior lights go off im mediately in the following
situations:
•When you lock the driver’s door.•When you close the driver’s door in ACCESSORY
mode.
•When you set the power mode to ON.
To avoid draining the 12-vo lt battery, do not leave
the interior lights on for an extended length of time
when the power system is off.
If you leave any of the doors open in VEHICLE OFF
(LOCK) mode, the interior lights go off after about 15
minutes.
Door Activated Position
OFF
Front*
Door Activated
Position
ON
OFF
Rear
* Not available on all models
21 INSIGHT-31TXM6200.book 222 ページ 2020年2月5日 水曜日 午前10時0分
Page 249 of 687

247
Features
Audio System Basic Operation
To use the audio system, the power mode must be in ACCESSORY or ON.Use the selector knob or MENU/CLOCK
button to access some audio functions.
Press to switch between the normal and
extended display fo r some functions.
Selector knob: Rotate left or right to scroll
through the available ch oices. Press to set
your selection.
MENU/CLOCK button: Press to select any
mode.
The available modes include wallpaper,
display, clock, language setup, and play
modes. Play mode choices include scan,
random, repeat, and so on.
(Back) button: Press to go back to the previous display.
(Sound) button: Press to select the sound setting mode.
(Day/Night) button: Press to change the audio/information screen
brightness.
Press the button, then adjust the brightness using . u Each time you press the button, the mode switches between the daytime
mode, nighttime mode and off mode.
Models with color audio1 Audio System Basic Operation
These indications are used to show how to operate
the selector knob.
Rotate to select.
Press to enter.
Menu Items 2 Adjust Clock P. 170
2 Wallpaper Setup P. 250
2 Adjusting the Sound P. 252
2 Display Setup P. 253
2 Customized Features P. 365
Press the button on the stee ring wheel to change any
audio setting. 2 Audio Remote Controls P. 243
(Back)
Button
Selector Knob MENU/
CLOCK
Button
(Day/Night) Button
(Sound) Button
Menu Display
21 INSIGHT-31TXM6200.book 247 ページ 2020年2月5日 水曜日 午前10時0分
Page 252 of 687

uuAudio System Basic Operation uAudio/Information Screen
250
Features
You can change, store, and delete the wa llpaper on the audio/information screen.
■Import wallpaper
You can import up to three images, one at a time, for wallpaper from a USB flash
drive. 1.Connect the USB flash drive to the USB
port.
2 USB Port(s) P. 241
2.Press the MENU/CLOCK button.
3. Rotate to select Settings, then press
.
4. Rotate to select Wallpaper , then press
.
5. Rotate to select Import, then press .
u The picture name is displayed on the list.
6. Rotate to select a desired picture, then
press .
u The selected picture is displayed.
7. Press to save the picture.
8. Press to select OK.
9. Rotate to select a location to save the
picture, then press .
u The display will return to the wallpaper
setting screen.
■Wallpaper Setup1Wallpaper Setup
•When importing wallpaper files, the image must be
in the USB flash drive’s root directory. Images in a
folder cannot be imported.
•The file name must be fewer than 64 characters.•The file format of the im age that can be imported
is BMP (bmp) or JPEG (jpg).
•The individual file size limit is 2 MB.•The maximum image size is 1,920 × 936 pixels. If
the image size is less than 480 × 234 pixels, the
image is displayed in the middle of the screen with
the extra area appearing in black.
•Up to 255 files can be selected.
•The wallpaper setup is limited while driving.
21 INSIGHT-31TXM6200.book 250 ページ 2020年2月5日 水曜日 午前10時0分
Page 257 of 687

255
uuAudio System Basic Operation uPlaying AM/FM Radio
Features
Provides text data information related to your selected RDS capable FM station.
■To find an RDS station from Station List
1. Press while listening to an FM station.
2. Rotate to select the station, then press .
■Update List
Updates your available st ation list at any time.
1. Press while listening to an FM station.
2. Rotate to select Update List, then press .
■Radio text
Displays the radio text informat ion of the selected RDS station.
1. Press the MENU/CLOCK button.
2. Rotate to select Settings, then press .
3. Rotate to select RDS Settings, then press .
4. Rotate to select Radio Text, then press .
■Scan
Samples each of the strongest stations on the selected band for 10 seconds.
1. Press the MENU/CLOCK button.
2. Rotate to select Scan, then press .
To turn off scan, press .
■Radio Data System (RDS)1 Playing AM/FM Radio
The ST indicator appears on the display indicating
stereo FM broadcasts.
Stereo reproduction in AM is not available.
You can store 6 AM stations and 12 FM stations into
the preset memory. FM1 and FM2 let you store 6
stations each.
Switching the Audio Mode
Press the SOURCE button on the steering wheel.
2 Audio Remote Controls P. 243
1Radio Data System (RDS)
When you select an RDS-capable FM station, the RDS
automatically turns on, and the frequency display
changes to the station name. However, when the
signals of that station become weak, the display
changes from the statio n name to the frequency.
21 INSIGHT-31TXM6200.book 255 ページ 2020年2月5日 水曜日 午前10時0分
Page 266 of 687

264
uuAudio System Basic Operation uPlaying Bluetooth ® Audio
Features
Playing Bluetooth ® Audio
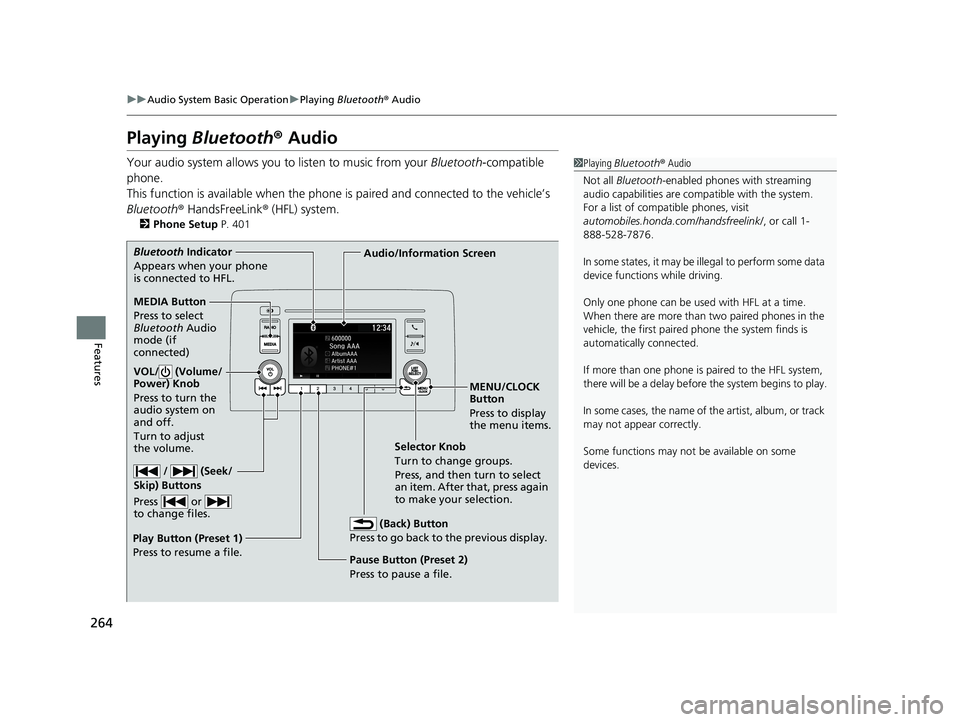
Your audio system allows you to listen to music from your Bluetooth-compatible
phone.
This function is available when the phone is paired and connected to the vehicle’s
Bluetooth ® HandsFreeLink ® (HFL) system.
2 Phone Setup P. 401
1Playing Bluetooth ® Audio
Not all Bluetooth -enabled phones with streaming
audio capabilities are compatible with the system.
For a list of compatible phones, visit
automobiles.honda.com /handsfreelink/, or call 1-
888-528-7876.
In some states, it may be il legal to perform some data
device functions while driving.
Only one phone can be used with HFL at a time.
When there are more than two paired phones in the
vehicle, the first paired phone the system finds is
automatically connected.
If more than one phone is paired to the HFL system,
there will be a delay before the system begins to play.
In some cases, the name of the artist, album, or track
may not appear correctly.
Some functions may not be available on some
devices.
MEDIA Button
Press to select
Bluetooth Audio
mode (if
connected)
VOL/ (Volume/
Power) Knob
Press to turn the
audio system on
and off.
Turn to adjust
the volume.
MENU/CLOCK
Button
Press to display
the menu items.
Audio/Information Screen
Bluetooth
In
dicator
Appears when your phone
is connected to HFL.
/ (Seek/
Skip) Buttons
Press or
to change files.
Play Button (Preset 1)
Press to resume a file. Pause Button (Preset 2)
Press to pause a file.Selector Knob
T
urn to change groups.
Press, and then turn to select
an item. After that, press again
to make your selection.
(Back) Button
Press to go back to the previous display.
21 INSIGHT-31TXM6200.book 264 ページ 2020年2月5日 水曜日 午前10時0分
Page 270 of 687
268
Features
Audio System Basic Operation
To use the audio system function, the power mode must be in ACCESSORY or ON.
(Home) Button: Press to go to the home
screen.
2 Switching the Display P. 136
(Back) Button: Press to go back to the
previous display when it is displayed.
/ (Seek/Skip) Buttons: Press to
change station, chan nel, song or file.
(Day/Night) Button: Press to change
the audio/information screen brightness.
Press once and select or to make
an adjustment.
u Each time you press , the mode
switches among the daytime mode,
nighttime mode and off mode.
Models with Display Audio
(Day/Night) Button
(Home) Button
(Back) Button
/ (Seek/Skip)
Buttons
21 INSIGHT-31TXM6200.book 268 ページ 2020年2月5日 水曜日 午前10時0分
Page 272 of 687
270
uuAudio System Basic Operation uAudio/Information Screen
Features
■Trip Computer
Displays the trip co mputer information.
• Current Drive tab: Displays the current trip information.
• Trip A /Trip B tab: Displays information for the current and three previous drives.
The information is stored every time you reset Trip A/B.
To reset the Trip A/B, select Settings, then select Delete Trip History .
To change the setting of how to reset Trip A/B, select Trip A Reset Method or
Trip B Reset Method .
■Clock
Displays the clock.
■System Updates
Updates the software version of the audio system.
2 System Updates P. 284
■FM/AM/Sirius XM*/USB1/USB2/Bluetooth Audio/Smartphone Connection
Displays the audio information for each.
■Settings
Enters the customiz ing menu screen.
2Customized Features P. 372
■Navigation*
Displays the navigation screen.
2Refer to the Navigation System Manual
* Not available on all models
21 INSIGHT-31TXM6200.book 270 ページ 2020年2月5日 水曜日 午前10時0分
Page 277 of 687

Continued275
uuAudio System Basic Operation uAudio/Information Screen
Features
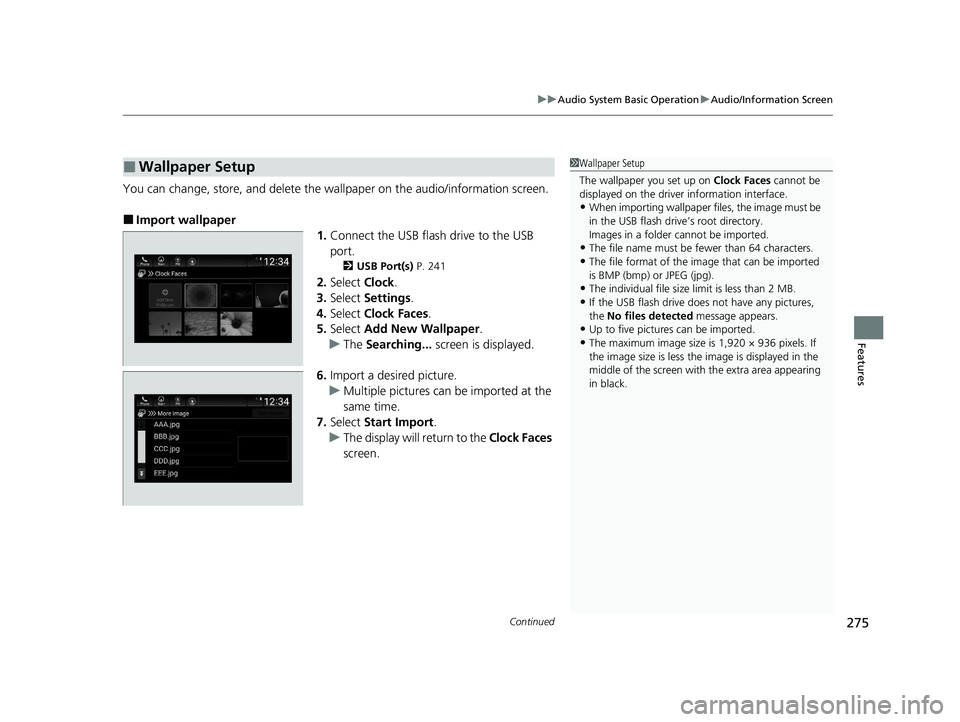
You can change, store, and delete the wa llpaper on the audio/information screen.
■Import wallpaper
1.Connect the USB flash drive to the USB
port.
2 USB Port(s) P. 241
2.Select Clock.
3. Select Settings .
4. Select Clock Faces .
5. Select Add New Wallpaper .
u The Searching... screen is displayed.
6. Import a desired picture.
u Multiple pictures can be imported at the
same time.
7. Select Start Import .
u The display will return to the Clock Faces
screen.
■Wallpaper Setup1 Wallpaper Setup
The wallpaper you set up on Clock Faces cannot be
displayed on the driver information interface.
•When importing wallpaper files, the image must be
in the USB flash drive’s root directory.
Images in a folder cannot be imported.
•The file name must be fewer than 64 characters.
•The file format of the im age that can be imported
is BMP (bmp) or JPEG (jpg).
•The individual file size limit is less than 2 MB.
•If the USB flash drive doe s not have any pictures,
the No files detected message appears.
•Up to five pictur es can be imported.
•The maximum image size is 1,920 × 936 pixels. If
the image size is less the image is displayed in the
middle of the screen with the extra area appearing
in black.
21 INSIGHT-31TXM6200.book 275 ページ 2020年2月5日 水曜日 午前10時0分