2021 HONDA ACCORD SEDAN fuel
[x] Cancel search: fuelPage 425 of 659

Continued423
uuWhen Driving uShifting
Driving
■Shift Operation1Shift Operation
NOTICE
When you change (D to (R and vice versa, depress
the brake pedal to come to a complete stop, then
select the intended shift position while maintaining
brake pressure.
Use the shift position indi cator and the shift button
indicator to check the shift position before selecting a
shift button.
If the indicator of the currently selected shift position,
or all the shift position indicators are blinking
simultaneously, there is a problem with the
transmission.
Avoid sudden acceleration and have the transmission
checked by a dealer as soon as possible.
The fuel supply may be cut of f if you drive at engine
speeds in or over the tac hometer’s red zone (engine
speed limit). If this happe ns, you may experience a
slight jolt.
When the engine speed is increased while the
transmission is in
( N, (P or (R, the fuel supply may
be cut off even without the engine speed entering
the tachometer’s red zone.
The beeper sounds once when you change to
( R.
2 Customized Features P. 352
Press the (P button.
Pull back the
( R button.
Press the
( N button.
Press the
( D button.
Shift Button Indicator M
(sequential mode) Indicator
Tachometer’s red zone Gear Selection Indicator
Shift Position Indicator
Page 432 of 659

uuWhen Driving uShifting
430
Driving
■Shift Lever Operation1Shift Lever Operation
NOTICE
When you change the shift position from (D to ( R
and vice versa, come to a complete stop and keep the
brake pedal depressed.
Operating the shift lever be fore the vehicle has come
to a complete standstill can damage the transmission.
Use the shift position indicator to check the lever
position before pulling away.
If the transmission system indicator blinks when
driving, in any shift positi on, there is a problem with
the transmission.
Avoid sudden acceleration and have the transmission
checked by a dealer as soon as possible.
The fuel supply may be cut of f if you drive at engine
speeds in or over the tac hometer’s red zone (engine
speed limit). If this happe ns, you may experience a
slight jolt.
It may not be possible to operate the shift lever if the
brake pedal is applied while the shift lever release
button is held down.
Depress the brake pedal first.
When shifting positions in extremely low
temperatures (-22°F/-30°C), there may be a short
delay before the shift posit ion is displayed. Always
confirm you are in the corr ect shift position before
driving.
Depress the brake pedal and press the shift lever release
button to shift.
Shift without pres sing the shift lever release button.
Press the shift lever release button and shift.
Shift Position Indicator
(Transmission System Indicator)
Tachometer’s red zone
Page 434 of 659

uuWhen Driving uShifting
432
Driving
■Shift Lever Operation1Shift Lever Operation
NOTICE
When you change the shift position from (D to ( R
and vice versa, come to a complete stop and keep the
brake pedal depressed.
Operating the shift lever be fore the vehicle has come
to a complete standstill can damage the transmission.
Use the shift position indicator to check the lever
position before pulling away.
If the transmission system indicator blinks when
driving, in any shift positi on, there is a problem with
the transmission.
Avoid sudden acceleration and have the transmission
checked by a dealer as soon as possible.
The fuel supply may be cut of f if you drive at engine
speeds in or over the tac hometer’s red zone (engine
speed limit). If this happe ns, you may experience a
slight jolt.
It may not be possible to operate the shift lever if the
brake pedal is applied while the shift lever release
button is held down.
Depress the brake pedal first.
When shifting positions in extremely low
temperatures (-22°F/-30°C), there may be a short
delay before the shift posit ion is displayed. Always
confirm you are in the corr ect shift position before
driving.
Depress the brake pedal and press the shift lever release
button to shift.
Shift without pressing the shift lever release button. Press the shift lever re lease button and shift.
Shift Position Indicator
(Transmission System Indicator)
Tachometer’s red zone
M
(7-Speed Manual Shift Mode)
Indicator
Gear Selection Indicator
Page 438 of 659

436
uuWhen Driving uECON Mode
Driving
ECON Mode
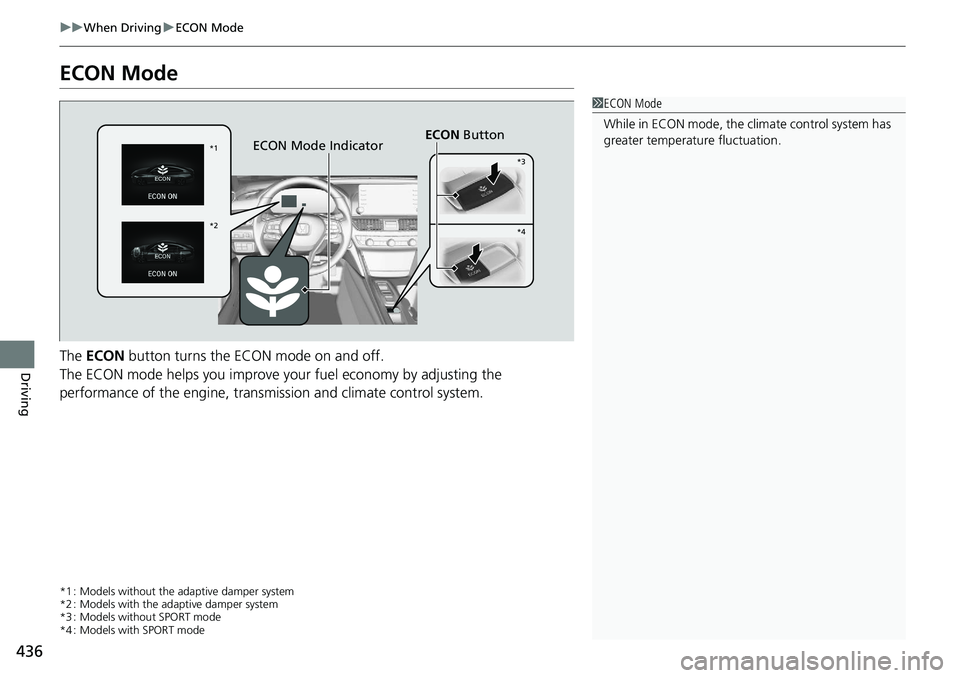
The ECON button turns the ECON mode on and off.
The ECON mode helps you improve your fuel economy by adjusting the
performance of the engine, transmiss ion and climate control system.
*1 : Models without the adaptive damper system
*2 : Models with the adaptive damper system
*3 : Models without SPORT mode
*4 : Models with SPORT mode
1ECON Mode
While in ECON mode, the climate control system has
greater temperature fluctuation.
*1
*2 *3
*4ECON
Button
ECON Mode Indicator
Page 439 of 659

437
uuWhen Driving uAuto Idle Stop*
Continued
Driving
Auto Idle Stop*
To help maximize fuel economy, the engine automatically stops when the vehicle
comes to a stop, depending on environmental and vehicle operating conditions. The
indicator (green) comes on at this time.
The environmental and vehicle conditions that
impact Auto Idle Stop system operation are
varied.
2Auto Idle Stop Activates When: P. 439
The engine then restarts once the vehicle is
about to move again, and the indicator
(green) goes off.
2The Engine Automatically Restarts When:
P. 441
If the driver’s door is opened while the
indicator (green) come s on, a buzzer sounds
to notify you that the Auto Idle Stop function
is in operation.
1 Auto Idle Stop*
The 12-volt battery insta lled in this vehicle is
specifically designed for a m odel with Auto Idle Stop.
Using a 12-volt battery other than this specified type
may shorten the 12-volt ba ttery life, and prevent
Auto Idle Stop from activati ng. If you need to replace
the 12-volt battery, make sure to select the specified
type. Ask a dealer for more details.
The duration of the Au to Idle Stop operation:
•Increase in the ECON mode, compared to when the
ECON mode is off, with climate control in use.
2 ECON Mode P. 436
Auto Idle Stop
Indicator (Green)
* Not available on all models
Page 452 of 659

450
uuWhen Driving uTire Pressure Monitoring System (TPMS) - Required Federal Explanation
Driving
Tire Pressure Monitoring System (TPMS) - Required
Federal Explanation
Each tire, including the spare (i f provided), should be checked
monthly when cold and inflated to the inflation pressure
recommended by the vehicle manufacturer on the vehicle placard
or tire inflation pressure label.
(If your vehicle has tires of a different size than the size indicated
on the vehicle placard or tire infl ation pressure label, you should
determine the proper tire inflat ion pressure for those tires.)
As an added safety feature, your vehicle has been equipped with
a tire pressure monitoring system (TPMS) that illuminates a low
tire pressure telltale
when one or more of your tire s is significantly under-inflated.
Accordingly, when the low tire pr essure telltale illuminates, you
should stop and check your tires as soon as possible, and inflate
them to the proper pressure.
Driving on a significantly under-in flated tire causes the tire to
overheat and can lead to tire failure. Under-inflat ion also reduces
fuel efficiency and tire tread li fe, and may affect the vehicle's
handling and stopping ability.
U.S. models
Page 535 of 659

533
Driving
Refueling
Fuel Information
■Fuel recommendation
Use of a lower octane gasoline can cause a persistent, heavy metallic knocking noise
that can lead to engine damage.
■Top tier detergent gasoline
Because the level of detergency and additive s in gasoline vary in the market, Honda
endorses the use of “TOP TIER Detergent Gasoline” where available to help
maintain the performance and reliability of your vehicle. TOP TIER Detergent
Gasoline meets a new gasoline standard jointly established by leading automotive
manufacturers to meet the needs of today’s advanced engines.
Qualifying gasoline retailers will, in most cases, identify their gasoline as having met
“TOP TIER Detergent Gasoline” standards at the retail location. This fuel is
guaranteed to contain the proper level of de tergent additives and be free of metallic
additives. The proper level of detergent additives, and absence of harmful metallic
additives in gasoline, help avoid build-up of deposits in your engine and emission
control system.
For further important fuel-related informati on for your vehicle, or on information on
gasoline that does not contain MMT, visit www.hondacars.com. In Canada, visit
www.honda.ca for additional information on gaso line. For more information on top
tier gasoline, visit www.toptiergas.com .
■Fuel tank capacity: 14.8 US gal (56 L)
Unleaded gasoline, pump octane number 87 or higher
1Fuel Information
NOTICE
We recommend quality ga soline containing
detergent additives that help prevent fuel system and
engine deposits. In addition, in order to maintain
good performance, fuel economy, and emissions
control, we strongly reco mmend the use of gasoline
that does NOT contain harmful manganese-based
fuel additives such as MMT, if such gasoline is
available.
Use of gasoline with these additives may adversely
affect performance, a nd cause the malfunction
indicator lamp on your inst rument panel to come on.
If this happens, contact a dealer for service.
Some gasoline today is blended with oxygenates such
as ethanol. Your vehicle is designed to operate on
oxygenated gasoline containing up to 15% ethanol
by volume. Do not use ga soline containing methanol.
If you notice any undesira ble operating symptoms, try
another service station or sw itch to another brand of
gasoline.
Page 536 of 659

534
uuRefueling uHow to Refuel
Driving
How to Refuel
Your fuel tank is not equipped with a fuel filler cap. You can insert the filler nozzle
directly into the filler neck. The tank seal s itself again when you pull out the filler
nozzle.
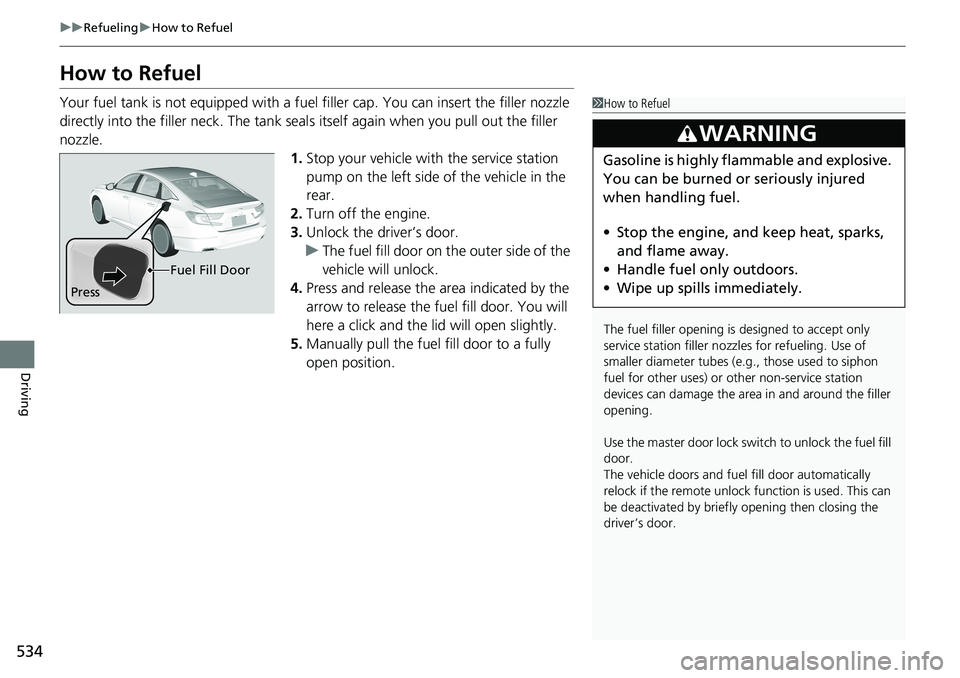
1.Stop your vehicle with the service station
pump on the left side of the vehicle in the
rear.
2. Turn off the engine.
3. Unlock the driver’s door.
u The fuel fill door on the outer side of the
vehicle will unlock.
4. Press and release the area indicated by the
arrow to release the fu el fill door. You will
here a click and the lid will open slightly.
5. Manually pull the fuel fill door to a fully
open position.1How to Refuel
The fuel filler opening is designed to accept only
service station filler nozzles for refueling. Use of
smaller diamet er tubes (e.g., those used to siphon
fuel for other uses) or other non-service station
devices can damage the area in and around the filler
opening.
Use the master door lock switch to unlock the fuel fill
door.
The vehicle doors and fuel fill door automatically
relock if the remote unlock function is used. This can
be deactivated by briefl y opening then closing the
driver’s door.
3WARNING
Gasoline is highly flammable and explosive.
You can be burned or seriously injured
when handling fuel.
• Stop the engine, and keep heat, sparks,
and flame away.
• Handle fuel only outdoors.
• Wipe up spills immediately.
Press Fuel Fill Door