2021 HONDA ACCORD SEDAN charging
[x] Cancel search: chargingPage 84 of 659

82
Instrument Panel
Indicators
ECON Mode Indicator
M
(sequential mode
*/
7-speed manual shift
mode
*) Indicator*/
Gear Selection
Indicator
*
P. 88
Parking Brake and
Brake System
Indicator (Red)
Parking Brake and
Brake System
Indicator (Amber)
U.S.
Canada
U.S.
Canada Automatic Brake
Hold System Indicator
Automatic Brake Hold
IndicatorU.S.
Canada
*1 : When you set the power mode to ON, these indicators come on to indicate that system checks are being performed. They go off a few seconds later or after the engine
has started. If an indicator does not come on or turn off, ther e may be a malfunction in the corresponding system. To resolve the issue, follow the instructions in the
owner's manual.
P. 83*1
Malfunction Indicator
Lamp
Charging System
Indicator
Anti-lock Brake System
(ABS) Indicator
Seat Belt Reminder
Indicator
Low Fuel Indicator
Vehicle Stability AssistTM (VSA®) System Indicator
Vehicle Stability Assist
TM (VSA®) OFF Indicator
Supplemental Restraint
System Indicator
Auto High-Beam
Indicator
Low Tire Pressure/TPMS
Indicator
Electric Power Steering
(EPS) System Indicator
Turn Signal and Hazard
Warning Indicators
Lights On Indicator High Beam Indicator
Fog Light Indicator*
System Message Indicator Auto Idle Stop Indicator
(Green)
*
Lane Keeping Assist
System (LKAS) Indicator
(Amber)
Safety Support Indicator
(Amber)
Safety Support Indicator
(Green/Gray)
P. 84
P.86
P.86
P.87
P.88
*1
*1 *1 *1
P.
96*1
*1
Shift Position IndicatorP. 88
Transmission System
Indi
catorP.89, 91
P.92
P.93
P.93
P.93
P.94
P.94
*1
*1
*1
*1
P. 95
*1P.95
P.97
P.102
*1
P.97
P.97
P.97 Security System Alarm
Indi
cator P.99
P.99
P. 104
P.105
P.108
*1
Auto Idle Stop System
Indicator (Amber)*P.102
*1Lane Keeping Assist
System (LKAS) Indicator
(White/Green)P.104
*1
Immobilizer System
IndicatorP.98
SPORT Mode Indicator*P.101
P.100
Cruise Mode Indicator
(White/Green)P. 104
Adaptive Cruise Control
(
ACC) with Low Speed
Follow Indicator (Amber)P. 103
*1Adaptive Cruise Control
(ACC) with Low Speed
Follow Indicator
(White/Green)P.104
* Not available on all models
Page 90 of 659
88
uuIndicators u
Instrument Panel
IndicatorNameOn/BlinkingExplanationMessage
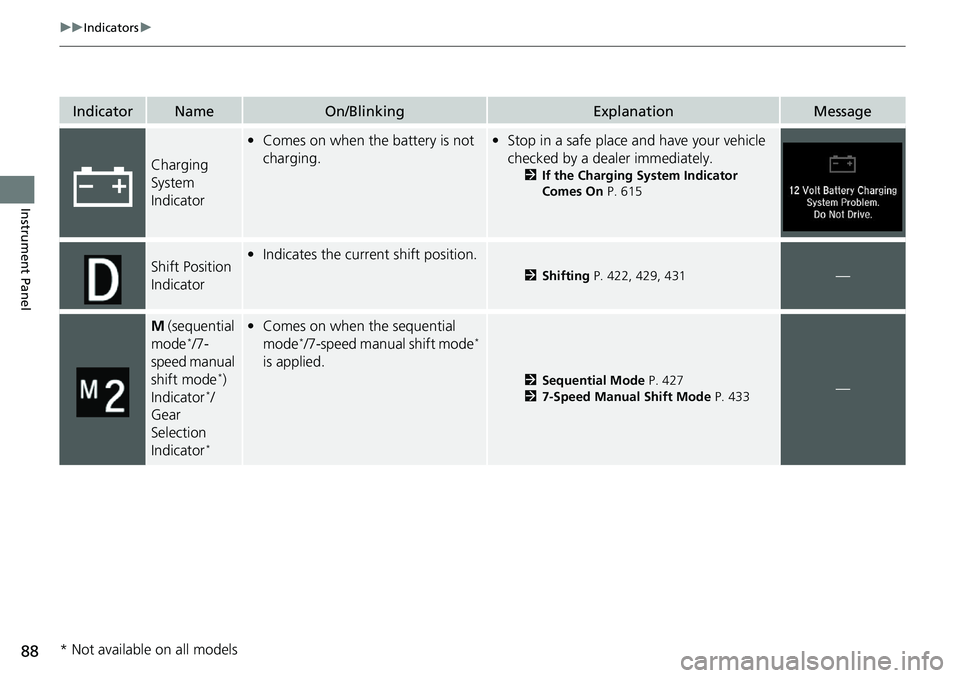
Charging
System
Indicator
•Comes on when the battery is not
charging.• Stop in a safe place and have your vehicle
checked by a dealer immediately.
2 If the Charging System Indicator
Comes On P. 615
Shift Position
Indicator•Indicates the current shift position.
2 Shifting P. 422, 429, 431—
M (sequential
mode*/7-
speed manual
shift mode
*)
Indicator*/
Gear
Selection
Indicator
*
• Comes on when the sequential
mode*/7-speed manual shift mode*
is applied.
2 Sequential Mode P. 427
2 7-Speed Manual Shift Mode P. 433—
* Not available on all models
Page 113 of 659
111
uuIndicators uDriver Information Interface Wa rning and Information Messages
Continued
Instrument Panel
MessageConditionExplanation
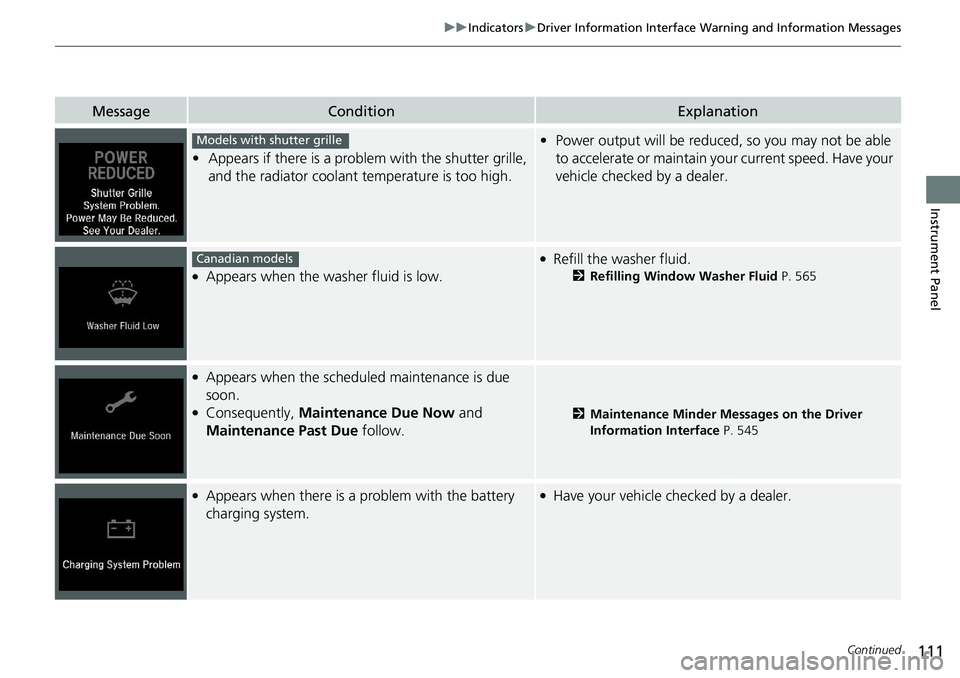
•Appears if there is a problem with the shutter grille,
and the radiator coolant temperature is too high.
•Power output will be reduced , so you may not be able
to accelerate or maintain yo ur current speed. Have your
vehicle checked by a dealer.
●Appears when the washer fluid is low.
●Refill the washer fluid.
2 Refilling Window Washer Fluid P. 565
●Appears when the scheduled maintenance is due
soon.
●Consequently, Maintenance Due Now and
Maintenance Past Due follow.2Maintenance Minder Messages on the Driver
Information Interface P. 545
●Appears when there is a problem with the battery
charging system.●Have your vehicle checked by a dealer.
Models with shutter grille
Canadian models
Page 234 of 659
uuInterior Convenience Items uOther Interior Convenience Items
232
Controls
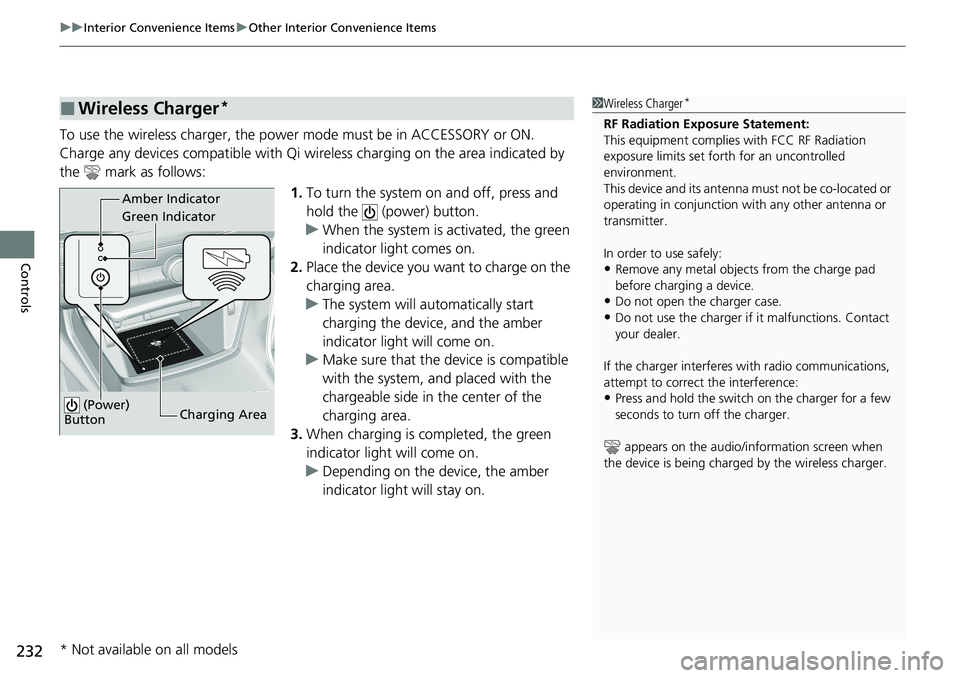
To use the wireless charger, the powe r mode must be in ACCESSORY or ON.
Charge any devices compatible with Qi wi reless charging on the area indicated by
the mark as follows:
1.To turn the system on and off, press and
hold the (power) button.
u When the system is activated, the green
indicator light comes on.
2. Place the device you want to charge on the
charging area.
u The system will automatically start
charging the device, and the amber
indicator light will come on.
u Make sure that the device is compatible
with the system, a nd placed with the
chargeable side in the center of the
charging area.
3. When charging is completed, the green
indicator light will come on.
u Depending on the device, the amber
indicator light will stay on.
■Wireless Charger*1Wireless Charger*
RF Radiation Exposure Statement:
This equipment complies with FCC RF Radiation
exposure limits set forth for an uncontrolled
environment.
This device and its antenna must not be co-located or
operating in conjunction with any other antenna or
transmitter.
In order to use safely:
•Remove any metal objects from the charge pad
before charging a device.
•Do not open the charger case.
•Do not use the charger if it malfunctions. Contact
your dealer.
If the charger interferes with radio communications,
attempt to correct the interference:
•Press and hold the switch on the charger for a few
seconds to turn off the charger.
appears on the audio/information screen when
the device is being charge d by the wireless charger.
Green Indicator Amber Indicator
Charging Area
(Power)
Button
* Not available on all models
Page 235 of 659

Continued233
uuInterior Convenience Items uOther Interior Convenience Items
Controls
■When charging does not start
Perform one of the solutions in the following table.
IndicatorCauseSolution
Green &
AmberBlinking
simulta- neously
There is an obstacle(s) between
the charging area and the
device.Remove the
obstacle(s).
The device is not within the
charging area. Reset the device to the
center of the charging
area where is
located.
The temperature of the wireless
charger pad increases. Temporary suspend
charging the device.
Wait for temperature
to drop and attempt to
charge the device
again.
AmberBlinkingThe wireless charger is faulty.Contact a dealer for
repairs.
1
Wireless Charger*
This system consumes a lot of power. Do not use the
system for a long time when the engine is not
running. This may weaken the battery, making it
difficult to start the engine.
When using the wireless charger, check the user’s
manual that came with th e compatible device you
want to charge.
3CAUTION
Metal objects between the charge pad
and the device to be charged will get
hot and can burn you.
• Always remove foreign objects from
the charge pad before charging the
device.
• Be sure the surface is clear of dust and
other debris before charging.
• Do not spill liquids (i. e. water, drinks,
etc.) on the charger and the device.
• Do not use oil, grease, alcohol,
benzine or thinner for cleaning the
charge pad.
• Do not cover the system with towels,
clothing, or other objects while
charging etc.
• Avoid spraying aerosols which may
come in contact with the charge pad
surface.
* Not available on all models
Page 236 of 659
uuInterior Convenience Items uOther Interior Convenience Items
234
Controls
1Wireless Charger*
The wireless charger can su pport up to 15 W, but the
charging rate varies base d on the device and other
conditions.
NOTICE
Do not place any magnetic re cording media or precision
machines within the charging area while charging.
The data on your cards such as credit cards can be
lost because of the magneti c effect. Also precision
machines such as watches can go wrong.
“Qi” and marks are the registered trademarks
owned by Wire less Power Consortium (WPC).
In the following cases, ch arging may stop or not start:
•The device is already fully charged.•The temperature of the device is extremely high
while charging.
•You are at a place that emits strong
electromagnetic waves or noises, such as a TV
station, electric power plant, or gas station.
•The device has a cover, case or accessories which
are not compatible with wireless charging.
A device may not charge if the size or shape of its
chargeable side is not a ppropriate for use with the
charging area.
Not all devices are compatible with the system.
During the charging phase, it is normal for the
charging area and de vice to heat up.
* Not available on all models
Page 237 of 659
Continued235
uuInterior Convenience Items uOther Interior Convenience Items
Controls
1Wireless Charger*
Charging may be briefl y interrupted when:•All the doors and the trunk are closed
- to avoid interference with the proper functioning
of the smart entry system.
•The position of the device is altered.
Do not charge more than one device at a time on a
charging area.
If the device becomes too hot and its battery
protection function activa tes, it may charge
extremely slowly or no longer charge.
The temperature at which the battery protection
function activates de pends on the device.
* Not available on all models
Page 249 of 659
247
uuAudio System uUSB Ports
Continued
Features
USB Ports
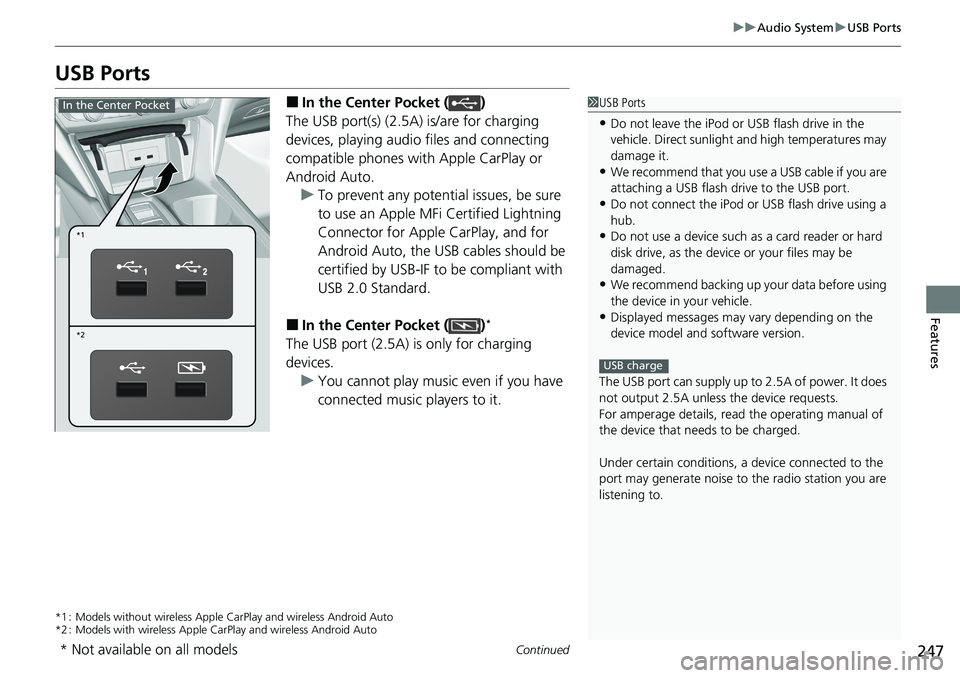
■In the Center Pocket ( )
The USB port(s) (2.5A) is/are for charging
devices, playing audio files and connecting
compatible phones with Apple CarPlay or
Android Auto. u To prevent any potenti al issues, be sure
to use an Apple MFi Certified Lightning
Connector for Apple CarPlay, and for
Android Auto, the USB cables should be
certified by USB-IF to be compliant with
USB 2.0 Standard.
■In the Center Pocket ( )*
The USB port (2.5A) is only for charging
devices. u You cannot play music even if you have
connected music players to it.
*1 : Models without wireless Apple Ca rPlay and wireless Android Auto
*2 : Models with wireless Apple CarPlay and wireless Android Auto
1USB Ports
•Do not leave the iPod or USB flash drive in the
vehicle. Direct sunlight and high temperatures may
damage it.
•We recommend that you us e a USB cable if you are
attaching a USB flash drive to the USB port.
•Do not connect the iPod or USB flash drive using a
hub.
•Do not use a device such as a card reader or hard
disk drive, as the device or your files may be
damaged.
•We recommend backing up yo ur data before using
the device in your vehicle.
•Displayed messages may vary depending on the
device model and software version.
The USB port can supply up to 2.5A of power. It does
not output 2.5A unless the device requests.
For amperage details, read the operating manual of
the device that ne eds to be charged.
Under certain condi tions, a device connected to the
port may generate noise to the radio station you are
listening to.
USB charge
*1
*2
In the Center Pocket
* Not available on all models