2021 GENESIS GV80 charging
[x] Cancel search: chargingPage 181 of 632

05
5-39
Electric Power Steering (EPS)
The system assists you with steering the
vehicle. If the vehicle is turned off or
if the power steering system becomes
inoperative, you may still steer the
vehicle, but it will require increased
steering effort.
Should you notice any change in the
effort required to steer during normal
vehicle operation, have the system
checked by an authorized retailer of
Genesis Branded products.
CAUTION
If Electric Power Steering does not
operate normally, the warning light and the message ‘Check motor driven
power steering’ will illuminate on the
instrument cluster. You may steer the
vehicle, but it will require increased
steering efforts. Take the vehicle to an
authorized retailer of Genesis Branded
products and have the system checked
as soon as possible.
Information
The following symptoms may occur during
normal vehicle operation:
• The steering effort may be high
immediately after pressing the Engine
Start/Stop button to the ON position.
This happens as the system performs
the EPS system diagnostics. When the
diagnostics are completed, the steering
wheel effort will return to its normal
condition.
• When the battery voltage is low, you
may have to put more steering effort.
However, it is a temporary condition so
that it will return to normal condition
after charging the battery.
• A click noise may be heard from the
EPS relay after the Engine Start/Stop
button is in the ON or OFF position.
• Motor noise may be heard when the
vehicle is at a stop or at a low driving
speed.
• When you operate the steering wheel
in low temperatures, abnormal noise
may occur. If the temperature rises, the
noise will disappear. This is a normal
condition.
• When an error is detected from EPS,
the steering effort assist function will
not be activated in order to prevent
accidents. Instrument cluster warning
lights may be on or the steering effort
may be high. If these symptoms occur,
drive the vehicle to a safe area as soon
as it is safe to do so. Have the system
checked by an authorized retailer of
Genesis Branded products as soon as
possible.
STEERING WHEEL
Page 260 of 632
Convenient Features
5-118
Disconnect the USB cable from the USB
port after use.
• A smart phone or a tablet PC may
get warmer during the re-charging
process. It does not indicate any
malfunction with the charging system.
• A smart phone or a tablet PC, which
adopts a different re-charging
method, may not be properly re-
charged. In this case, use an exclusive
charger of your device.
• The charging terminal is only to
recharge a device. Do not use the
charging terminal either to turn ON
an audio or to play media In the
infotainment system.
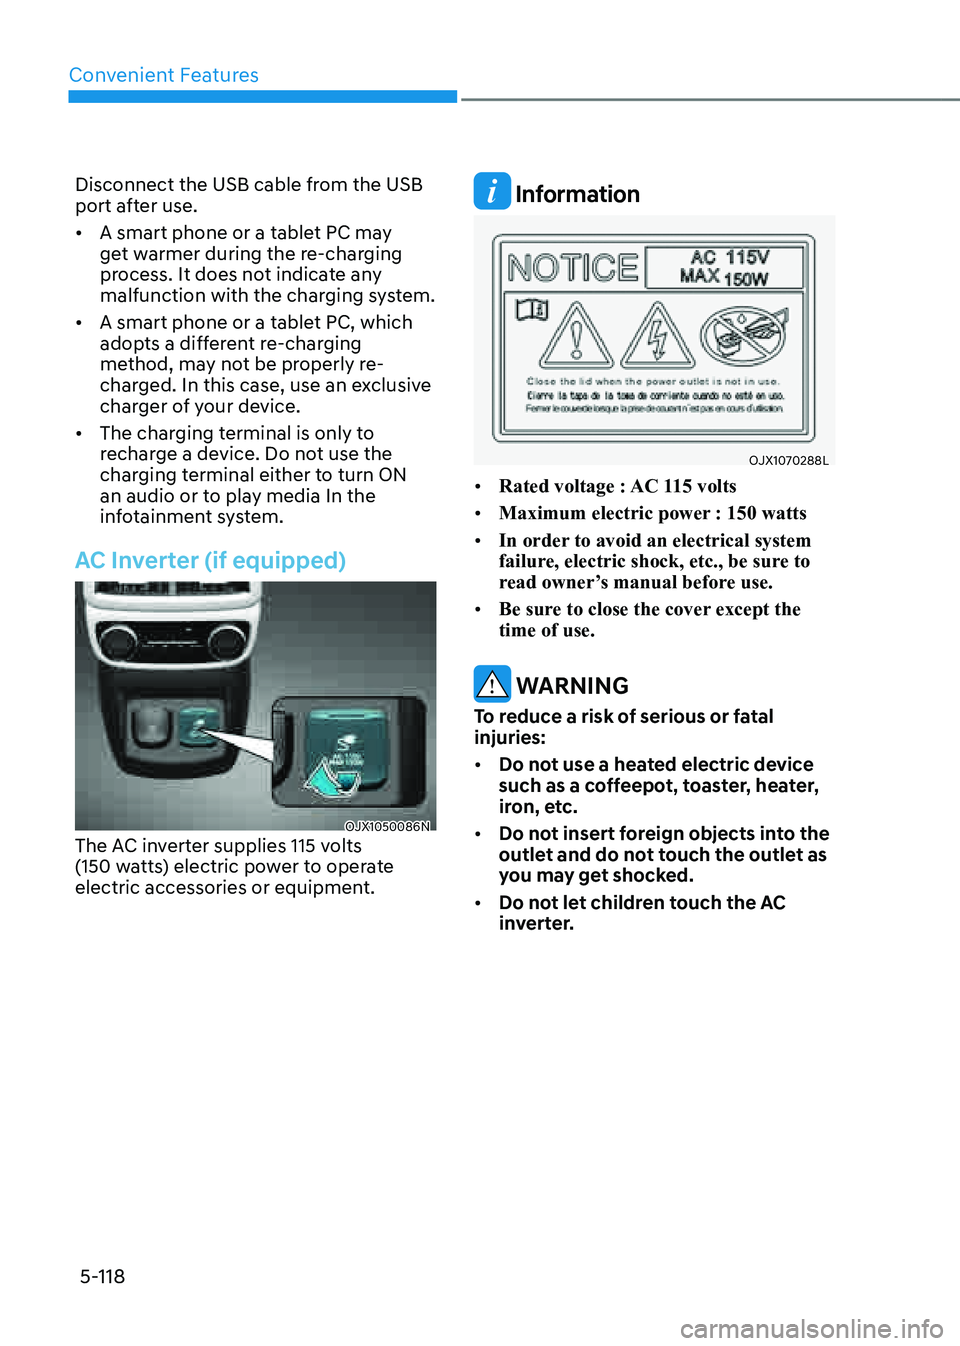
AC Inverter (if equipped)
OJX1050086NOJX1050086NThe AC inverter supplies 115 volts (150 watts) electric power to operate electric accessories or equipment.
Information
OJX1070288LOJX1070288L
• Rated voltage : AC 115 volts
• Maximum electric power : 150 watts
• In order to avoid an electrical system
failure, electric shock, etc., be sure to
read owner’s manual before use.
• Be sure to close the cover except the
time of use.
WARNING
To reduce a risk of serious or fatal
injuries:
• Do not use a heated electric device
such as a coffeepot, toaster, heater,
iron, etc.
• Do not insert foreign objects into the
outlet and do not touch the outlet as
you may get shocked.
• Do not let children touch the AC
inverter.
Page 261 of 632
05
5-119
NOTICE
• To prevent the battery from being
discharged, do not use the AC
inverter while the engine is not
running.
• When not using the AC inverter,
make sure to close the AC inverter
cover.
• After using an electric accessory
or equipment, pull the plug out.
Leaving the accessory or equipment
plugged in for a long time may cause
battery discharge.
• Do not use an electric accessory or
equipment the power consumption
of which is greater than 115 volts
(150 watts).
• Some electric accessories or
equipment can cause electronic
interference. It may cause excessive
audio noise and malfunctions in
other electric systems or devices in
the vehicle.
• Do not use broken electric
accessories or equipment, which
may damage the AC inverter and
electrical systems of the vehicle.
• Do not use two or more electric
accessories or equipment at the
same time. It may cause damage to
the electrical systems of the vehicle.
• When the input voltage is lower,
outlet LED will blink and the AC
inverter will turn off automatically. If
the input voltage goes up to normal,
the AC inverter will turn on again.
Wireless Smart Phone Charging
System (if equipped)
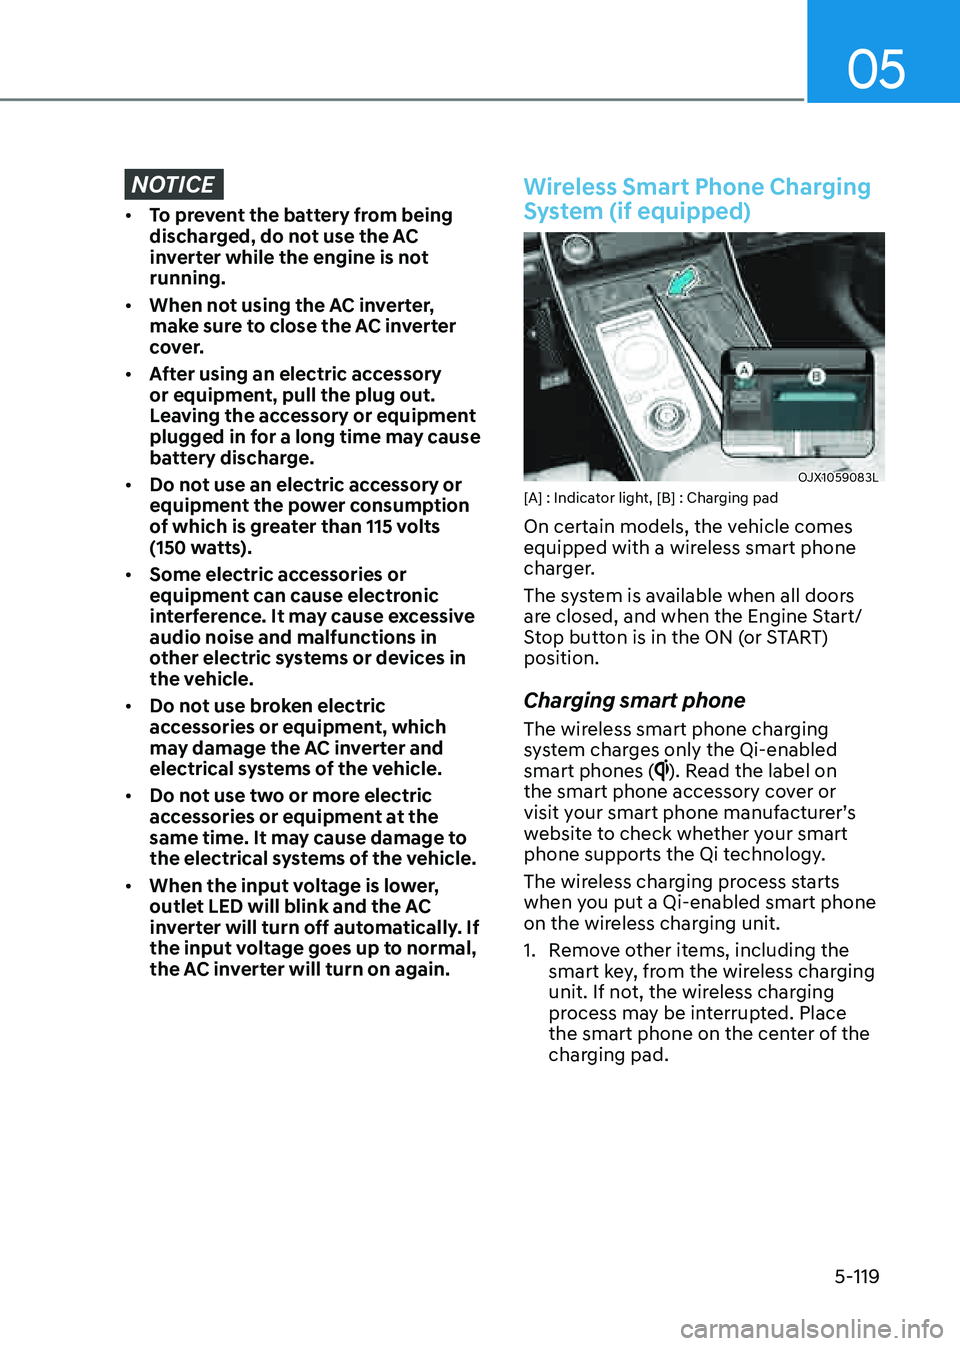
OJX1059083LOJX1059083L[A] : Indicator light, [B] : Charging pad
On certain models, the vehicle comes
equipped with a wireless smart phone
charger.
The system is available when all doors
are closed, and when the Engine Start/
Stop button is in the ON (or START)
position.
Charging smart phone
The wireless smart phone charging
system charges only the Qi-enabled
smart phones (
). Read the label on
the smart phone accessory cover or
visit your smart phone manufacturer’s
website to check whether your smart
phone supports the Qi technology.
The wireless charging process starts
when you put a Qi-enabled smart phone
on the wireless charging unit.
1. Remove other items, including the
smart key, from the wireless charging
unit. If not, the wireless charging
process may be interrupted. Place
the smart phone on the center of the
charging pad.
Page 262 of 632
Convenient Features
5-120
2. The indicator light is orange when the
smart phone is charging. The indicator
light will turn blue when phone
charging is complete.
3. You can turn ON or OFF the wireless
charging function from the Settings
menu in the infotainment system
screen. Select:
-Setup → Vehicle → Convenience →
Wireless Charging
See additional information in
supplied Infotainment Manual.
If your smart phone is not charging:
- Slightly change the position of the
smart phone on the charging pad.
-Make sure the indicator light is
orange.
The indicator light will blink orange for 10
seconds if there is a malfunction in the
wireless charging system.
In this case, temporarily stop the
charging process, and re-attempt to
charge your smart phone again.
The system warns you with a message on
the LCD display if the smart phone is still
on the wireless charging unit after the
vehicle is turned OFF and the front door
is opened.
For some manufacturer’s smart phones,
the system may not warn you even
though the smart phone is left on the
wireless charging unit. This is due to the
particular characteristic of the smart
phone and not a malfunction of the
wireless charging.
NOTICE
• The wireless smart phone charging
system may not support certain
smart phones, which are not verified
for the Qi specification (
).
• When placing your smart phone on
the charging pad, position the phone
in the middle of the mat for optimal
charging performance. If your smart
phone is off to the side, the charging
rate may be less and in some cases
the smart phone may experience
higher heat conduction.
• In some cases, the wireless charging
may stop temporarily when the
smart key is used, either when
starting the vehicle or locking/
unlocking the doors, etc.
• When charging certain smart
phones, the charging indicator may
not change to blue when the smart
phone is fully charged.
• The wireless charging process may
temporarily stop, when temperature
abnormally increases inside the
wireless smart phone charging
system. The wireless charging
process restarts, when temperature
falls to a certain level.
• The wireless charging process may
temporarily stop when there is
any metallic item, such as a coin,
between the wireless smart phone
charging system and smart phone.
Page 263 of 632
05
5-121
• When charging some smart phones
with a self-protection feature,
the wireless charging speed may
decrease and the wireless charging
may stop.
• If the smart phone has a thick cover,
the wireless charging may not be
possible.
• If the smart phone is not completely
contacting the charging pad,
wireless charging may not operate
properly.
• Some magnetic items like credit
cards, phone cards or rail tickets may
be damaged if left with the smart
phone during the charging process.
• When any smart phone without
a wireless charging function or a
metallic object is placed on the
charging pad, a small noise may
sound. This small sound is due to the
vehicle discerning compatibility of
the object placed on the charging
pad. It does not affect your vehicle or
the smart phone in any way.
Information
If the Engine Start/Stop button is in the
OFF position, the charging also stops.
Clock
The clock can be set from the
infotainment system.
See additional information in supplied
Infotainment Manual.
WARNING
Do not attempt to adjust the clock
while driving. Doing so may result in
distracted driving which may lead to
an accident involving personal injury or
death.
Coat Hook
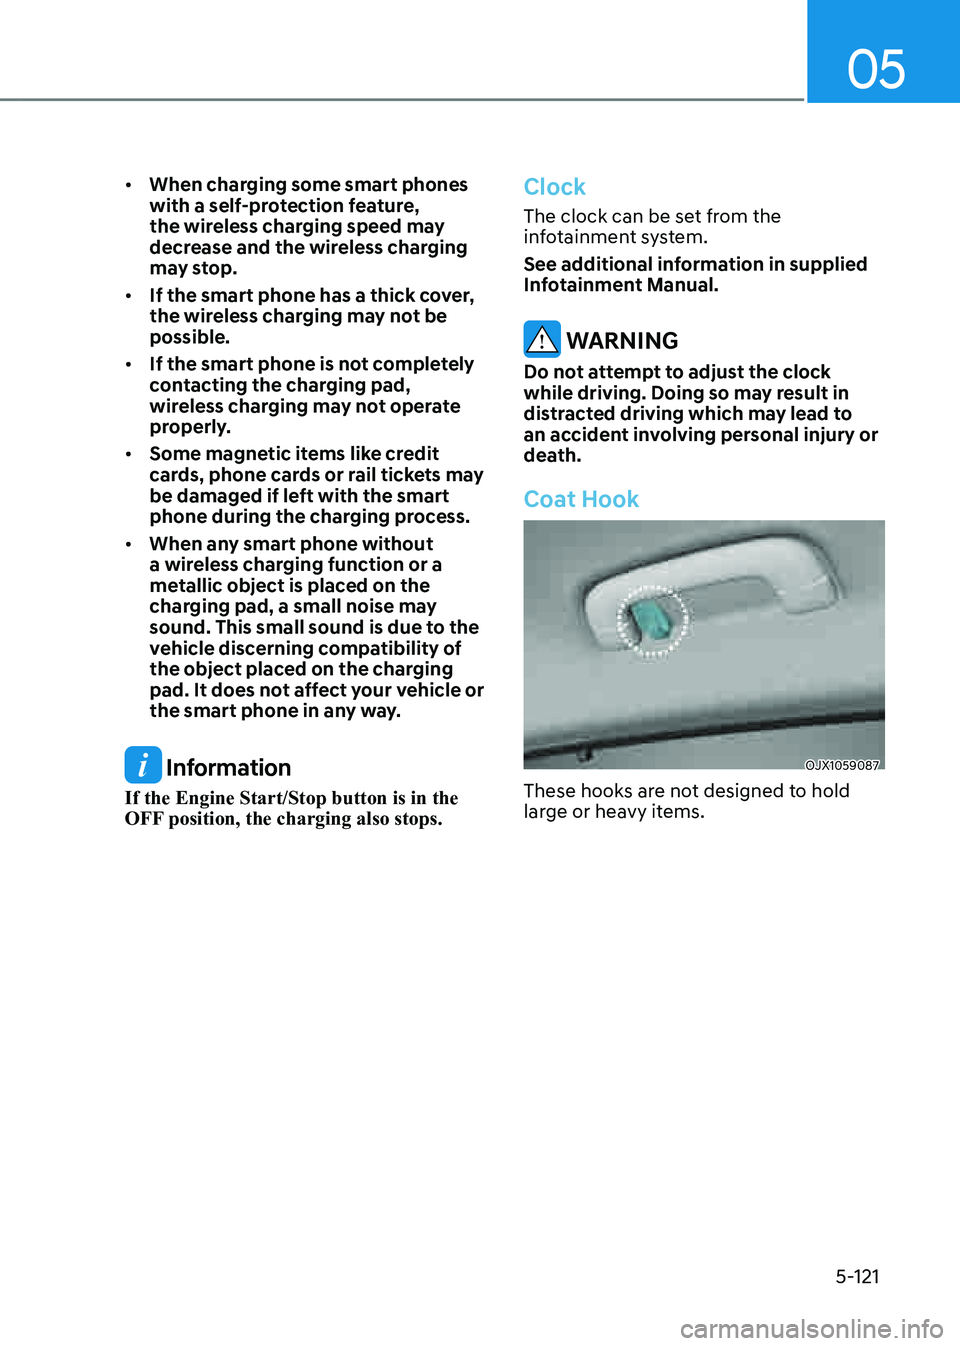
OJX1059087OJX1059087
These hooks are not designed to hold
large or heavy items.
Page 279 of 632
06
6 -7
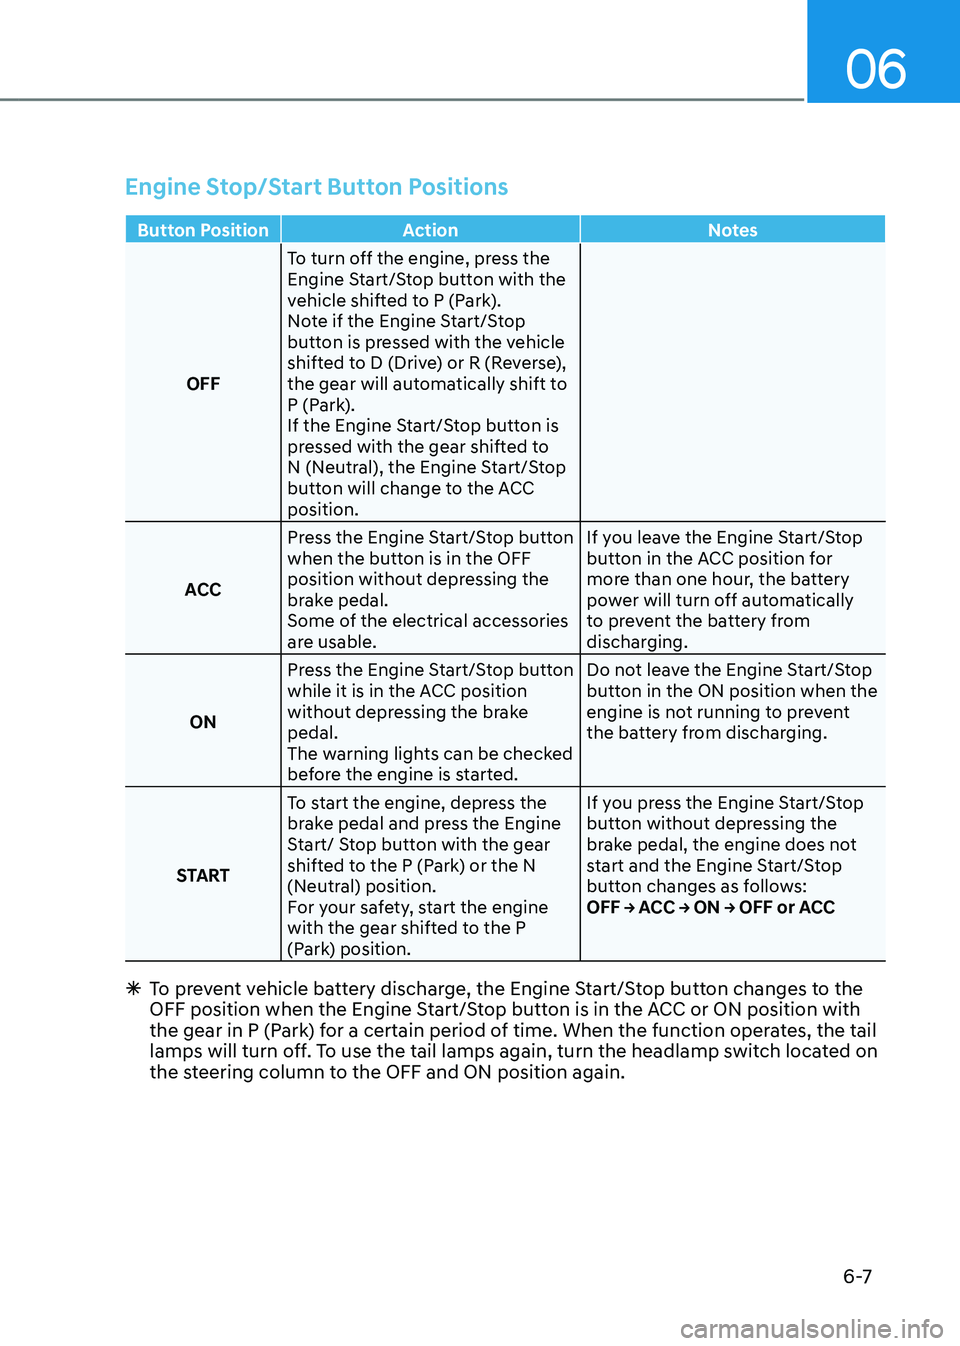
Engine Stop/Start Button Positions
Button PositionAction Notes
OFF To turn off the engine, press the
Engine Start/Stop button with the
vehicle shifted to P (Park).
Note if the Engine Start/Stop
button is pressed with the vehicle
shifted to D (Drive) or R (Reverse),
the gear will automatically shift to
P (Park).
If the Engine Start/Stop button is
pressed with the gear shifted to
N (Neutral), the Engine Start/Stop
button will change to the ACC
position.
ACC Press the Engine Start/Stop button
when the button is in the OFF
position without depressing the
brake pedal.
Some of the electrical accessories
are usable. If you leave the Engine Start/Stop
button in the ACC position for
more than one hour, the battery
power will turn off automatically
to prevent the battery from
discharging.
ON Press the Engine Start/Stop button
while it is in the ACC position
without depressing the brake
pedal.
The warning lights can be checked
before the engine is started. Do not leave the Engine Start/Stop
button in the ON position when the
engine is not running to prevent
the battery from discharging.
START To start the engine, depress the
brake pedal and press the Engine
Start/ Stop button with the gear
shifted to the P (Park) or the N
(Neutral) position.
For your safety, start the engine
with the gear shifted to the P
(Park) position. If you press the Engine Start/Stop
button without depressing the
brake pedal, the engine does not
start and the Engine Start/Stop
button changes as follows:
OFF → ACC → ON → OFF or ACC
Ã
To prevent vehicle battery discharge, the Engine Start/Stop button changes to the
OFF position when the Engine Start/Stop button is in the ACC or ON position with
the gear in P (Park) for a certain period of time. When the function operates, the tail
lamps will turn off. To use the tail lamps again, turn the headlamp switch located on
the steering column to the OFF and ON position again.
Page 334 of 632

Driving Your Vehicle
6-62
Chain Installation
When installing tire chains, follow the
manufacturer’s instructions and mount
them as tightly possible. Drive slowly
(less than 20 mph (30 km/h)) with
chains installed. If you hear the chains
contacting the body or chassis, stop and
tighten them. If they still make contact,
slow down until the noise stops. Remove
the tire chains as soon as you begin
driving on cleared roads.
When mounting snow chains, park the
vehicle on level ground away from traffic.
Turn on the vehicle Hazard Warning
Flasher and place a triangular emergency
warning device behind the vehicle (if
available). Always place the vehicle in P
(Park), apply the parking brake and turn
off the engine before installing snow
chains.
NOTICE
When using tire chains:
• Wrong size chains or improperly
installed chains can damage your
vehicle’s brake lines, suspension,
body and wheels.
• Use SAE “S” class or wire chains.
• If you hear noise caused by chains
contacting the body, retighten the
chain to prevent contact with the
vehicle body.
• To prevent body damage, retighten
the chains after driving 0.3~0.6 miles
(0.5~1.0 km).
• Do not use tire chains on vehicles
equipped with aluminum wheels. If
unavoidable, use a wire type chain.
• Use wire chains less than 0.47 in. (12 mm) thick to prevent damage to the chain’s connection.
Winter Precautions
Use high quality ethylene glycol coolant
Your vehicle is delivered with high
quality ethylene glycol coolant in the
cooling system. It is the only type of
coolant that should be used because it
helps prevent corrosion in the cooling
system, lubricates the water pump and
prevents freezing. Be sure to replace or
replenish your coolant in accordance
with the maintenance schedule in
chapter 9. Before winter, have your
coolant tested to assure that its freezing
point is sufficient for the temperatures
anticipated during the winter.
Check battery and cables
Winter temperatures affect battery
performance. Inspect the battery and
cables, as specified in chapter 9. The
battery charging level can be checked by
an authorized retailer of Genesis Branded
products or in a service station.
Change to “winter weight” oil if
necessary
In some regions during winter, it is
recommended to use the “winter
weight” oil with lower viscosity. In
addition, replace the engine oil and filter
if it is close to the next maintenance
interval. Fresh engine oil ensures
optimum engine operation during the
winter months. For further information,
refer to chapter 2. When you are not sure
about a type of winter weight oil, consult
an authorized retailer of Genesis Branded
products.
Page 516 of 632
![GENESIS GV80 2021 Owners Manual 08
8-5
OJX1080003NOJX1080003N[A] : Negative (-) Terminal,
[B] : Positive (+) Terminal
5. Open the small service cover with a
screwdriver.
6. Remove the engine compartment fuse
box cover.
OJX1080004 GENESIS GV80 2021 Owners Manual 08
8-5
OJX1080003NOJX1080003N[A] : Negative (-) Terminal,
[B] : Positive (+) Terminal
5. Open the small service cover with a
screwdriver.
6. Remove the engine compartment fuse
box cover.
OJX1080004](/manual-img/46/35616/w960_35616-515.png)
08
8-5
OJX1080003NOJX1080003N[A] : Negative (-) Terminal,
[B] : Positive (+) Terminal
5. Open the small service cover with a
screwdriver.
6. Remove the engine compartment fuse
box cover.
OJX1080004LOJX1080004L
7. Connect the jumper cables in
the exact sequence shown in the
illustration. First connect one jumper
cable to the red, positive (+) jumper
terminal of your vehicle (1).
8. Connect the other end of the jumper
cable to the red, positive (+) battery/
jumper terminal of the assisting
vehicle (2).
9. Connect the second jumper cable to
the black, negative (-) battery/ chassis
ground of the assisting vehicle (3).
10. Connect the other end of the second
jumper cable to the black, negative (-)
chassis ground of your vehicle (4).
Do not allow the jumper cables to
contact anything except the correct
battery or jumper terminals or the
correct ground. Do not lean over the
battery when making connections.
11. Start the engine of the assisting
vehicle and let it run at approximately
2,000 rpm for a few minutes. Then
start your vehicle.
12. Keep your vehicle operating for at
least 30 minutes at idle or driving to
assure your battery receives enough
charge to be able to start on its
own after the vehicle is shut off. A
complete dead battery may require
as long as 60 minutes runtime to fully
recharge it. If vehicle is run for less,
the battery may not restart.
If your vehicle will not start after a few
attempts, it probably requires servicing.
In this event please seek qualified
assistance. If the cause of your battery
discharging is not apparent, have your
vehicle checked by an authorized retailer
of Genesis Branded products.