2021 GENESIS GV80 battery discharge
[x] Cancel search: battery dischargePage 236 of 632

Convenient Features
5-94
Information
OJX1059073OJX1059073
Never place anything near the ambient
light/solar sensor to ensure better control
of the heating and cooling system.
Manual Temperature Control
Mode
The heating and cooling system can be
controlled manually by pushing buttons
other than the AUTO button. In this case,
the system works sequentially according
to the order of buttons selected.
When pressing any button except the
AUTO button while using automatic
operation, the functions not selected will
be controlled automatically.
1. Start the vehicle.
2. Set the mode to the desired position.
To improve the effectiveness of
heating and cooling, select the mode
according to the following:
-Heating:
-Cooling:
3. Set the temperature control to the
desired position.
4. Set the air intake control to Fresh or
Recirculation mode.
5. Set the fan speed control to the
desired speed.
6. If air conditioning is desired, turn the
air conditioning system on.
7. Press the AUTO button to revert
back to full automatic control of the
system.
The climate control system settings
will be maintained, even when the
vehicle is turned OFF. However, the
climate control system settings will be
initialized when the battery has been
discharged, or when the cables have
been disconnected.
In this case, adjust the climate control
system settings again.
When starting the vehicle in cold
weather using manual temperature
control, operate the system in the
following method to improve heating.
• Turn off or lower the blower, right
after starting the engine.
• Allow the engine to warm up during
this time since the air flow from the
heater is still cold.
• After a few minutes of engine warm
up, turn on or set the fan to a higher
level and adjust the temperature
setting to hot.
Page 249 of 632

05
5-107
To Defrost Outside Windshield
OJX1050179NOJX1050179N
1. Set the fan speed to the highest
(extreme right) position.
2. Set the temperature to the extreme
hot (HI) position.
3. Press the defroster button ().
4. Fresh mode will be selected
automatically.
Check to make sure the air intake control
is in Fresh mode. If the air intake control
indicator light is illuminated, press the
button once to enable Fresh mode
(indicator light OFF).
If the
position is selected, lower fan speed is adjusted to a higher fan speed.
Defogging Logic
To reduce the probability of fogging
up the inside of the windshield, the air
intake or air conditioning are controlled
automatically according to certain
conditions such as
positions. To cancel or reset the defogging logic, do
the following.
1. Press the Engine Start/Stop button to
the ON position.
2. Press the defroster button () or
().
3. While pressing the air conditioning
button (A/C), press the air intake
control button at least 5 times within
3 seconds.
The air intake control button indicator
will blink 3 times to indicate that the
defogging logic has been disabled.
Repeat the steps again to re-enable the
defogging logic.
If the battery has been discharged or
disconnected, it resets to the defog logic
status.
Page 259 of 632

05
5-117
WARNING
Avoid electrical shocks. Do not place
your fingers or foreign objects (pin, etc.)
into a power outlet or touch the power
outlet with a wet hand.
NOTICE
To prevent damage to the power
outlets:
• Use the power outlet only when the
engine is running and remove the
accessory plug after use. Using the
accessory plug for prolonged periods
of time with the engine off could
cause the battery to discharge.
• Only use 12 volts electric accessories
which are less than 180 watts in
electric capacity.
• Adjust the air-conditioner or heater
to the lowest operating level when
using the power outlet.
• Close the cover when not in use.
• Some electronic devices can
cause electronic interference
when plugged into a vehicle’s
power outlet. These devices may
cause excessive audio static and
malfunctions in other electronic
systems or devices used in your
vehicle.
• Push the plug in as far as it will go. If
good contact is not made, the plug
may overheat and the fuse may open.
• Plug in battery equipped electrical/
electronic devices with reverse
current protection. The current
from the battery may flow into the
vehicle’s electrical/electronic system
and cause system malfunction.
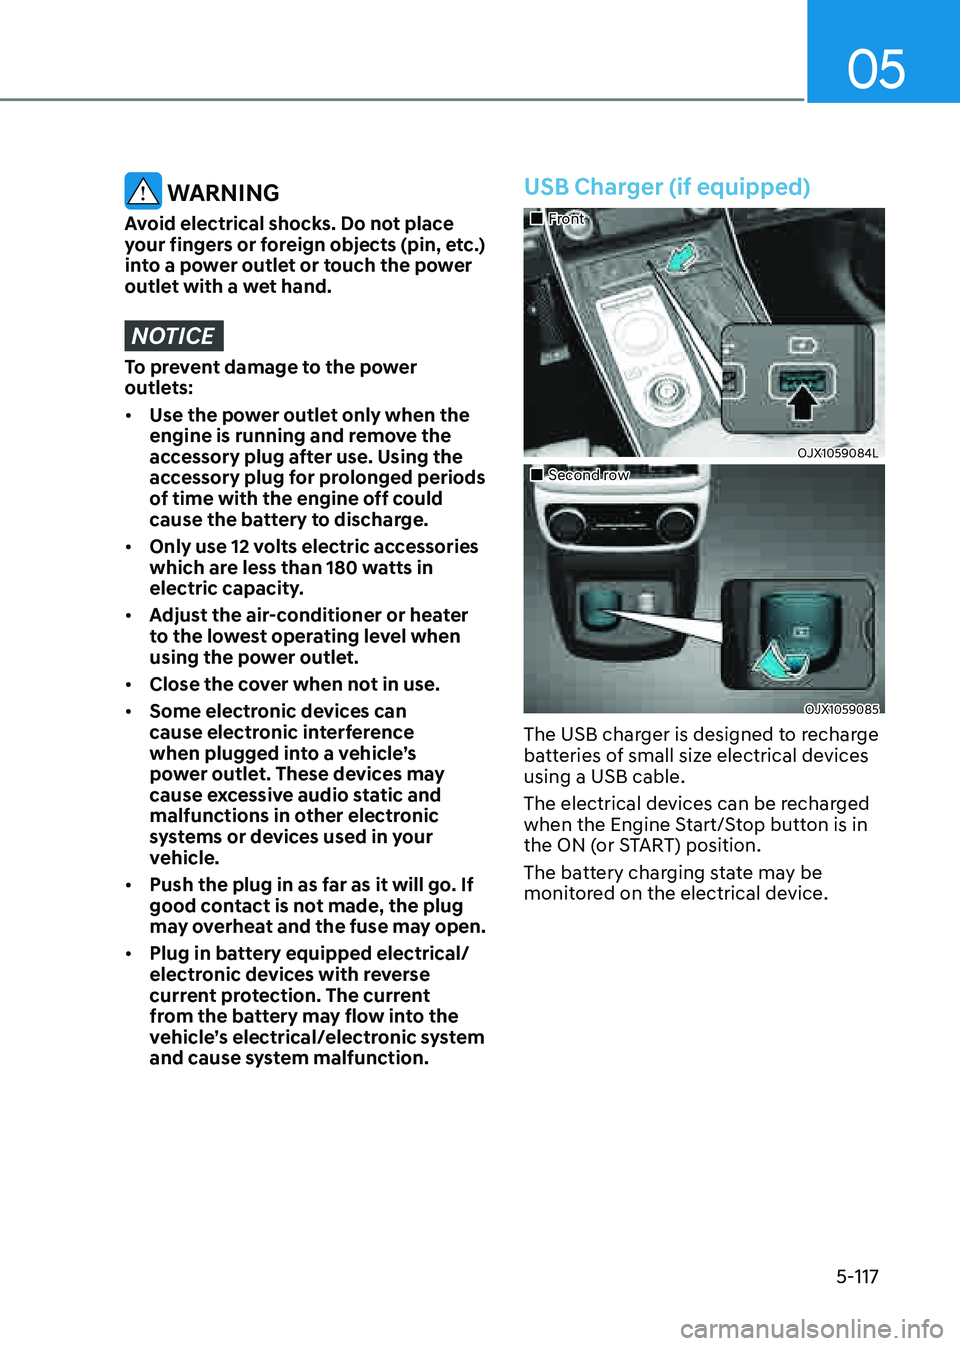
USB Charger (if equipped)
�
Page 261 of 632

05
5-119
NOTICE
• To prevent the battery from being
discharged, do not use the AC
inverter while the engine is not
running.
• When not using the AC inverter,
make sure to close the AC inverter
cover.
• After using an electric accessory
or equipment, pull the plug out.
Leaving the accessory or equipment
plugged in for a long time may cause
battery discharge.
• Do not use an electric accessory or
equipment the power consumption
of which is greater than 115 volts
(150 watts).
• Some electric accessories or
equipment can cause electronic
interference. It may cause excessive
audio noise and malfunctions in
other electric systems or devices in
the vehicle.
• Do not use broken electric
accessories or equipment, which
may damage the AC inverter and
electrical systems of the vehicle.
• Do not use two or more electric
accessories or equipment at the
same time. It may cause damage to
the electrical systems of the vehicle.
• When the input voltage is lower,
outlet LED will blink and the AC
inverter will turn off automatically. If
the input voltage goes up to normal,
the AC inverter will turn on again.
Wireless Smart Phone Charging
System (if equipped)
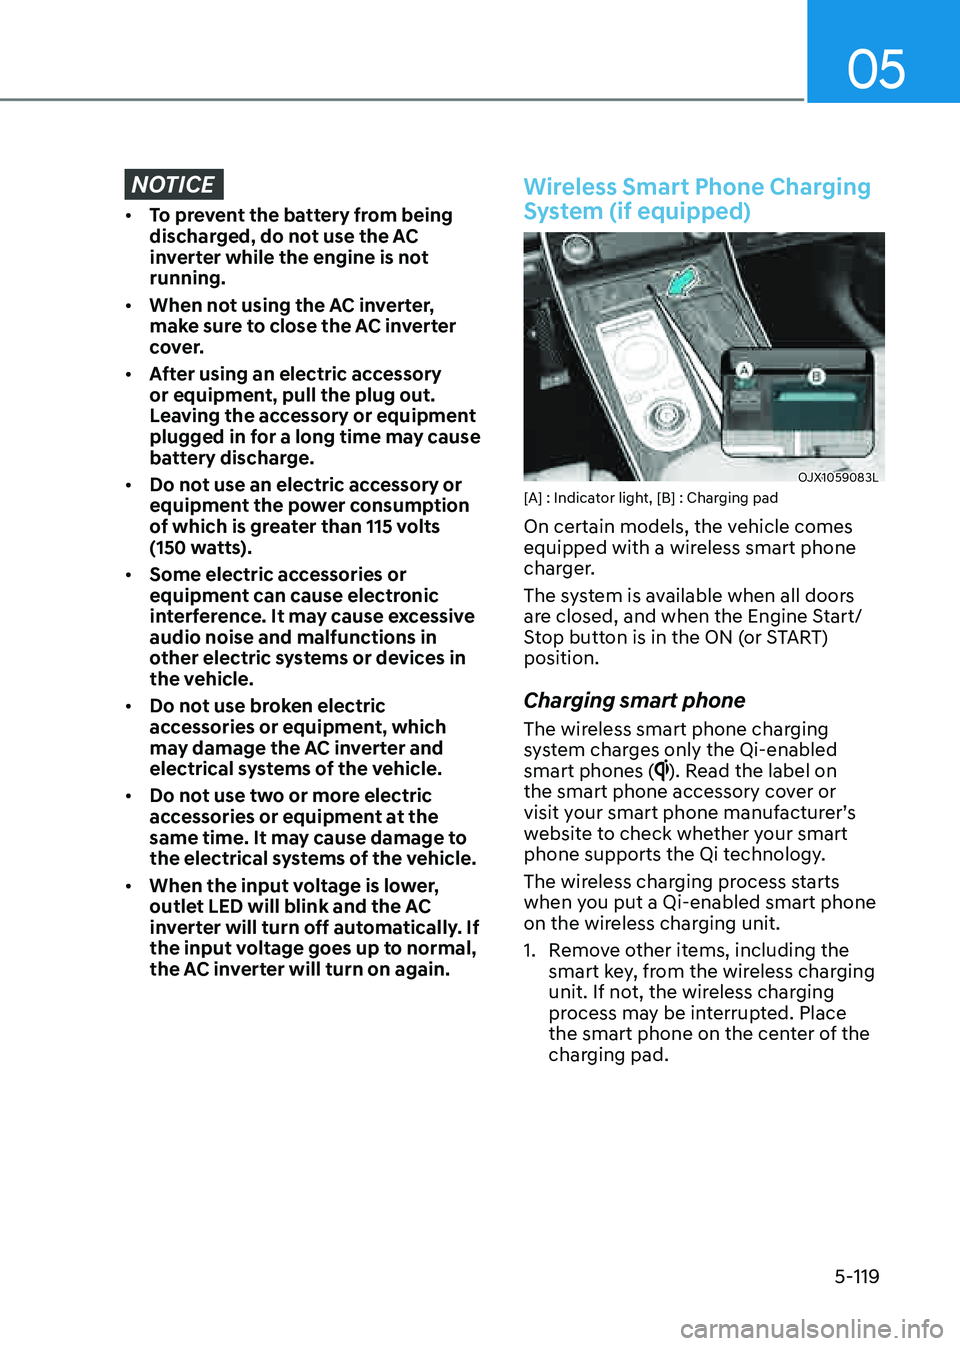
OJX1059083LOJX1059083L[A] : Indicator light, [B] : Charging pad
On certain models, the vehicle comes
equipped with a wireless smart phone
charger.
The system is available when all doors
are closed, and when the Engine Start/
Stop button is in the ON (or START)
position.
Charging smart phone
The wireless smart phone charging
system charges only the Qi-enabled
smart phones (
). Read the label on
the smart phone accessory cover or
visit your smart phone manufacturer’s
website to check whether your smart
phone supports the Qi technology.
The wireless charging process starts
when you put a Qi-enabled smart phone
on the wireless charging unit.
1. Remove other items, including the
smart key, from the wireless charging
unit. If not, the wireless charging
process may be interrupted. Place
the smart phone on the center of the
charging pad.
Page 279 of 632

06
6 -7
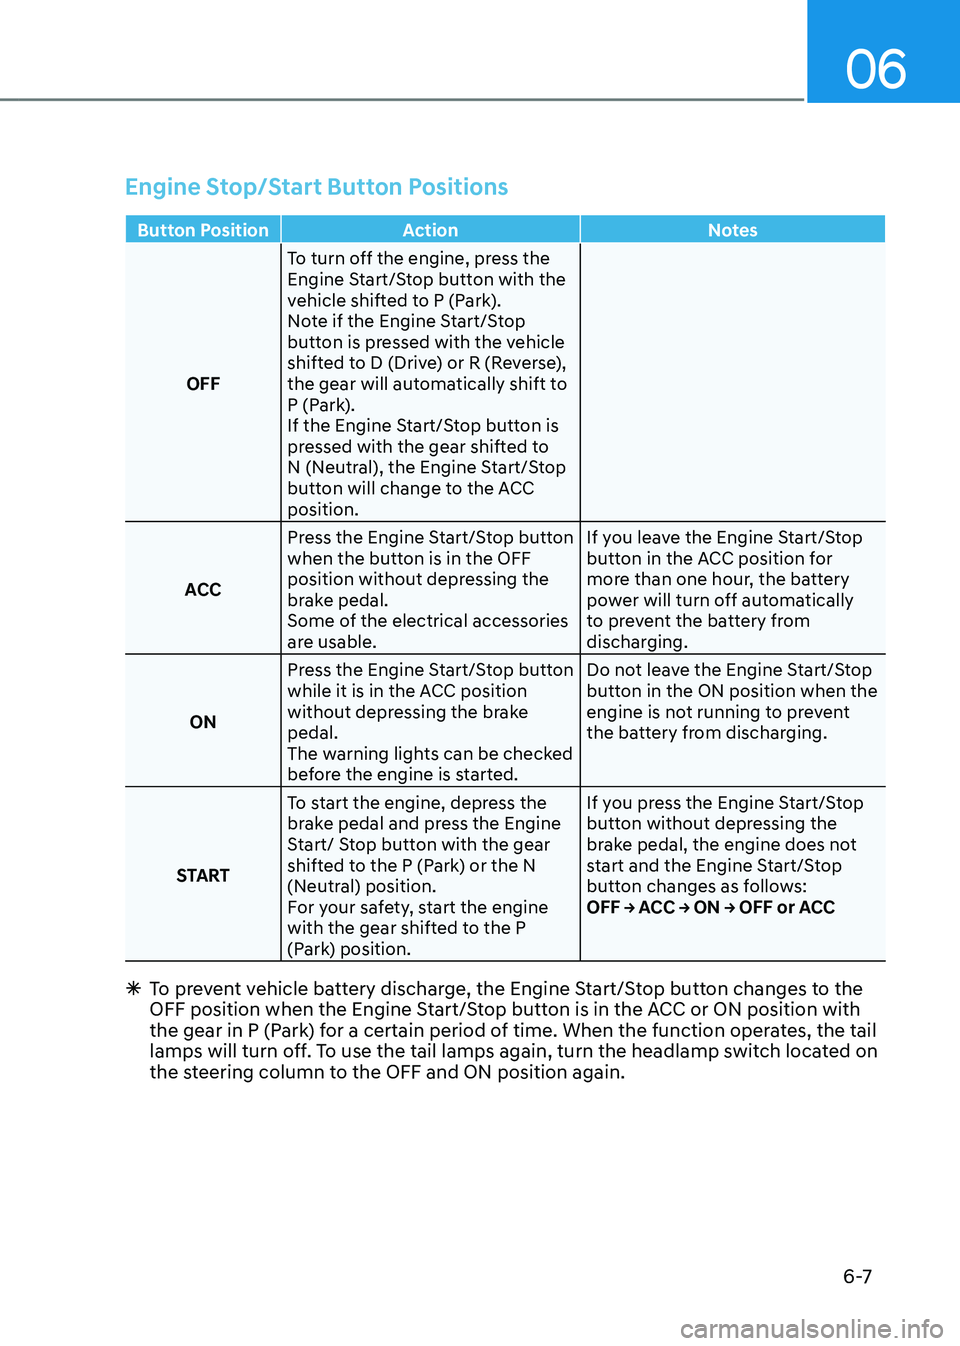
Engine Stop/Start Button Positions
Button PositionAction Notes
OFF To turn off the engine, press the
Engine Start/Stop button with the
vehicle shifted to P (Park).
Note if the Engine Start/Stop
button is pressed with the vehicle
shifted to D (Drive) or R (Reverse),
the gear will automatically shift to
P (Park).
If the Engine Start/Stop button is
pressed with the gear shifted to
N (Neutral), the Engine Start/Stop
button will change to the ACC
position.
ACC Press the Engine Start/Stop button
when the button is in the OFF
position without depressing the
brake pedal.
Some of the electrical accessories
are usable. If you leave the Engine Start/Stop
button in the ACC position for
more than one hour, the battery
power will turn off automatically
to prevent the battery from
discharging.
ON Press the Engine Start/Stop button
while it is in the ACC position
without depressing the brake
pedal.
The warning lights can be checked
before the engine is started. Do not leave the Engine Start/Stop
button in the ON position when the
engine is not running to prevent
the battery from discharging.
START To start the engine, depress the
brake pedal and press the Engine
Start/ Stop button with the gear
shifted to the P (Park) or the N
(Neutral) position.
For your safety, start the engine
with the gear shifted to the P
(Park) position. If you press the Engine Start/Stop
button without depressing the
brake pedal, the engine does not
start and the Engine Start/Stop
button changes as follows:
OFF → ACC → ON → OFF or ACC
Ã
To prevent vehicle battery discharge, the Engine Start/Stop button changes to the
OFF position when the Engine Start/Stop button is in the ACC or ON position with
the gear in P (Park) for a certain period of time. When the function operates, the tail
lamps will turn off. To use the tail lamps again, turn the headlamp switch located on
the steering column to the OFF and ON position again.
Page 287 of 632

06
6-15
4. Press and hold the OK button on
the steering wheel for more than 1
second.
5. When the message ‘Vehicle will stay
in (N). Change gear to cancel’ appears
on the cluster LCD display, press
the Engine Start/Stop button while
depressing the brake pedal.
If you wish to cancel, change gear to
P (Park), D (Drive) or R (Reverse), or N
(Neutral) will stay engaged when the
vehicle is Off.
Also, if you open the driver's door, the
gear will automatically shift to P (Park)
and the Engine Start/Stop button will
change to the OFF position.
NOTICE
With the gear in N (Neutral) the Engine
Start/Stop button will be in the ACC
position. Note that the doors cannot
be locked in the ACC position or the
battery may discharge if left in the ACC
position for a long period.
D (Drive)
This is the normal driving position.
The transmission will automatically shift
through an 8-gear sequence, providing
the best fuel economy and power.
For extra power when passing another
vehicle or driving uphill, depress the
accelerator pedal further until you feel
the transmission downshift to a lower
gear.
OJX1069007LOJX1069007L
To shift the gear to D (Drive), rotate the
shift dial clockwise while depressing the
brake pedal.
When the vehicle is stopped in the D
(Drive) position, if you open the driver's
door with the seat belt unfastened, the
gear will automatically shift to P (Park).
However, if the vehicle is in motion, the
gear may not automatically shift to P
(Park) to prevent automatic transmission
damage.
NOTICE
Always come to a complete stop before
shifting into D (Drive).
Page 288 of 632

Driving Your Vehicle
6-16
CAUTION
When you start after stopping on a
steep incline, even if the gear is in
D (Drive), if you do not depress the
accelerator or brake pedal, the vehicle
may roll backwards, which can cause an
accident.
When the battery is discharged
You cannot shift gears, when the battery
is discharged.
In emergencies, do the following to shift
the gear to N (Neutral) on a level ground.
1. Connect the battery cables from
another vehicle or from a another
battery to the jump-starting terminals
inside the engine compartment.
For more details, refer to "Jump
Starting" section in chapter 8.
2. Release the Electronic Parking Brake
with the Engine Start/Stop button in
the ON position.
3. Press the Engine Start/Stop button to
the OFF position.
OJX1069010LOJX1069010L
4. Remove the cap-cover (1) and press
the button (2) while depressing the
brake pedal.
Then, the gear will change to the N
(Neutral) position. The button must
be pressed within 3 minutes after
the engine is turned off. The button
(2) operates only for 20 seconds to
change the gear between P (Park) and
N (Neutral) from the time when the
button (2) is first pressed.
Information
In situations when the gear needs to be
shifted from P (Park) to N (Neutral) when
the Engine Start/Stop button is in the OFF
position, refer to step 4.
Page 504 of 632

Driver Assistance System
7-156
• When remotely moving forward
using method (1), it is recognized
as an exit situation, and the
vehicle moves 13 ft. (4 m) to
check for pedestrians, animals or
objects around the vehicle. After
confirmation, the steering wheel
is controlled according to the
condition ahead.
• When remotely moving forward
using method (2), it is recognized
as a parking situation, and will
immediately control the steering
wheel according to the condition
ahead to assist with entering the
parking space and aligning the
vehicle. However, performance
may reduce depending on the
pedestrians, animals, shape of
objects, location, etc. around the
vehicle.
• For moving remotely in reverse,
both method (1) and (2) aligns the
steering wheel first, and then will
only move the vehicle straight.
• When remotely moving forward or
in reverse is completed, the vehicle
will automatically shift to P (Park)
and engage EPB (Electronic Parking
Brake).
CAUTION
• When using Remote Entry/Exit
Parking function with the digital key,
the smart key should be within 13 ft.
(4 m) from the vehicle.
• When using Remote Entry/Exit
Parking function, make sure that all
passengers have gotten out of the
vehicle.
• Before leaving the vehicle, close
windows and sunroofs, and make
sure the engine is off before locking
the doors.
• If the vehicle’s battery is discharged
or Remote Smart Parking Assist
malfunctions when parked in a
narrow parking space, Remote
Entry/Exit Parking function will not
operate. Always park your vehicle in
a space wide enough for you to get in
or out of your vehicle.
• Please note that depending on the
parking space, you may not be able
to exit from the space you have
entered by using Remote Entry/Exit
Parking function.
• After parking, the surrounding may
change due to the movement of
surrounding vehicles. If this occurs,
Remote Entry/Exit Parking function
may not operate.
How to turn off Remote Entry/Exit
Parking function while operating
• Press the Remote Start () button on
the smart key.
• Press the Parking/View () button.
• Press the Parking Safety () button
or select ‘Cancel’ on the infotainment
system screen.
• Press the Remote Start () button
on the smart key. Remote Entry/Exit
Parking function will turn off. At this
time, the engine will turn off.
• Get in the vehicle with the smart key.
Remote Entry/Exit Parking function
will turn off. At this time, the engine
will remain on.