Page 7 of 31

Quick Reference Guide I 0807 I Quick Reference Guide
DRIVER’S MAIN CONTROLS
Scan to view a video of: Outside mirrors adjustmentHeated steering wheel button
Pressing the heated steering wheel button warms the steering wheel. The indicator light on the button is illuminated when this feature is turned on.
HEATED STEERING WHEEL
SEAT WARMERS AND COOLERS (FRONT SEATS)
SEAT WARMERS AND COOLERS (REAR SEATS)(if equipped)
NOTES: Heated steering wheel
includes Smart Logic that automatically
adjust setting. Please refer to your
Owner’s Manual for further information.
NOTES: Vehicle may be equipped with Auto Heated/Ventilated features
located in the vehicle setting options. Please refer to your Owner’s Manual
for further information.
Each time you push the button,
the setting is changed as follows:
– Heat
– Air Ventilation
OFFHIGHMEDIUM
LOW
Type AType BType C
To turn off immediately, press and hold the button.
• Front power window switches.
•Press switch left/right to unfold/fold
mirrors.
•
Rear power window switches.
• Press the L or R button to adjust the
mirror by using the directional switch.
If L or R button is still selected, both
mirrors will tilt downward when
reversing. Deselect L or R will disable
the auto tilt down feature.
Outside Rearview Mirror
Press the lock or unlock button on the
smart key, and the mirrors will be
folded or unfolded when AUTO is set.
Power window lock button
•Disables the power window switches
on the rear passenger doors.
Door Lock
•Locks/unlocks all doors.
Window Switches
GENESIS G90
FEATURES AND CONTROLS
Page 13 of 31

Quick Reference Guide I 2019 I Quick Reference Guide
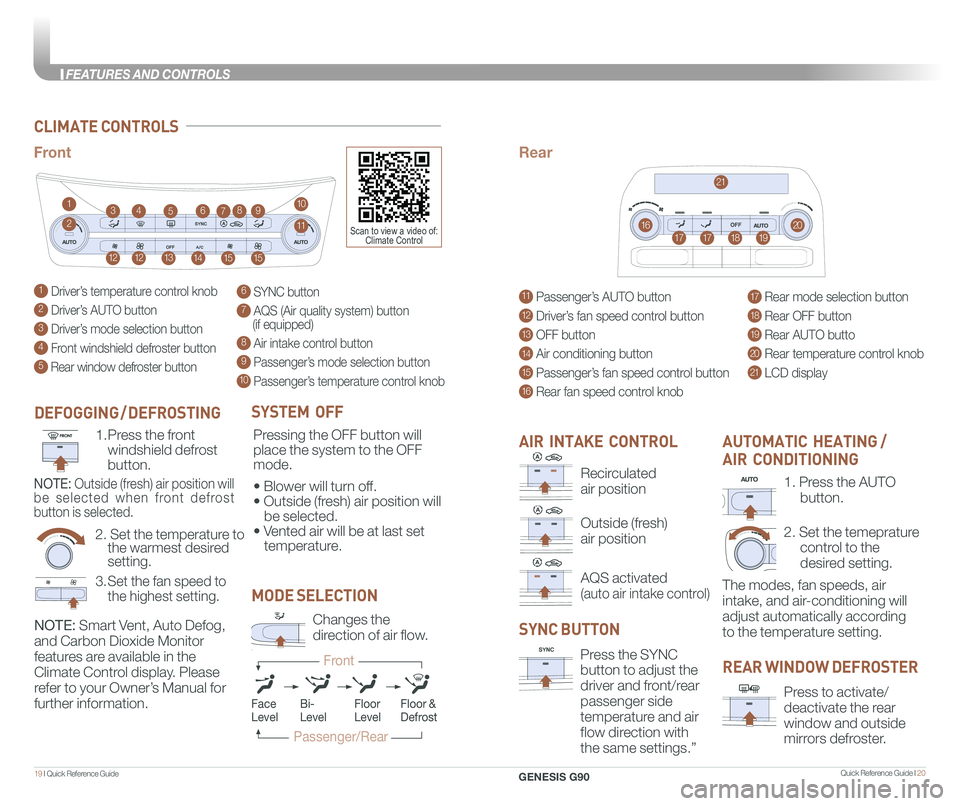
CLIMATE CONTROLS
1 Driver’s temperature control knob
2 Driver’s AUTO button
3 Driver’s mode selection button
4 Front windshield defroster button
5 Rear window defroster button
11 Passenger’s AUTO button
12 Driver’s fan speed control button
13 OFF button
14 Air conditioning button
15 Passenger’s fan speed control button
16 Rear fan speed control knob
6 SYNC button
7 AQS (Air quality system) button (if equipped)
8 Air intake control button
9 Passenger’s mode selection button
10 Passenger’s temperature control knob
17 Rear mode selection button
18 Rear OFF button
19 Rear AUTO butto
20 Rear temperature control knob
21 LCD display
1
1515
23
14
764910
16111717
1212
21
20
13
18
85
19
FrontRear
SYSTEM OFF
Pressing the OFF button will
place the system to the OFF
mode.
• Blower will turn off.
• Outside (fresh) air position will
be selected.
• Vented air will be at last set
temperature.
NOTE: Smart Vent, Auto Defog,
and Carbon Dioxide Monitor
features are available in the
Climate Control display. Please
refer to your Owner’s Manual for
further information.
AIR INTAKE CONTROL
SYNC BUTTON
Press the SYNC
button to adjust the
driver and front/rear
passenger side
temperature and air
flow direction with
the same settings.”
REAR WINDOW DEFROSTER
Press to activate/
deactivate the rear
window and outside
mirrors defroster.
1. Press the AUTO
button.
2. Set the temeprature
control to the
desired setting.
The modes, fan speeds, air
intake, and air-conditioning will
adjust automatically according
to the temperature setting.
AUTOMATIC HEATING /
AIR CONDITIONING
MODE SELECTION
Changes the
direction of air flow.
FaceLevelFloorLevelFloor &Defrost
Passenger/Rear
Front
Bi-Level
Scan to view a video of: Climate Control
Recirculated
air position
Outside (fresh)
air position
AQS activated
(auto air intake control)
DEFOGGING / DEFROSTING
2. Set the temperature to the warmest desired setting.
1. Press the front
windshield defrost
button.
3. Set the fan speed to
the highest setting.
NOTE: Outside (fresh) air position will
be selected when front defrost
button is selected.
GENESIS G90
FEATURES AND CONTROLS
Page 14 of 31

Quick Reference Guide I 2221 I Quick Reference Guide
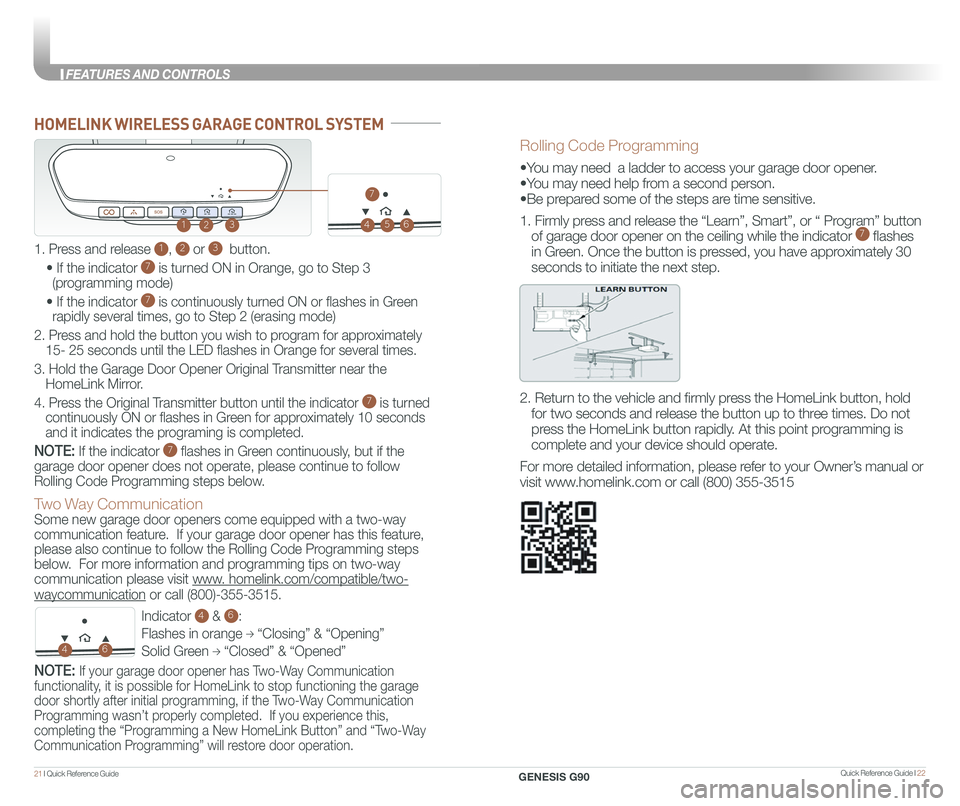
HOMELINK WIRELESS GARAGE CONTROL SYSTEM
Indicator 4 & 6:
Flashes in orange → “Closing” & “Opening”
Solid Green → “Closed” & “Opened”
123
46
Two Way Communication
Some new garage door openers come equipped with a two-way
communication feature. If your garage door opener has this feature,
please also continue to follow the Rolling Code Programming steps
below. For more information and programming tips on two-way
communication please visit www. homelink.com/compatible/two-
waycommunication or call (800)-355-3515.
NOTE: If your garage door opener has Two-Way Communication
functionality, it is possible for HomeLink to stop functioning the garage
door shortly after initial programming, if the Two-Way Communication
Programming wasn’t properly completed. If you experience this,
completing the “Programming a New HomeLink Button” and “Two-Way
Communication Programming” will restore door operation.
Rolling Code Programming
•You may need a ladder to access your garage door opener.
•You may need help from a second person.
•Be prepared some of the steps are time sensitive.
1. Firmly press and release the “Learn”, Smart”, or “ Program” button
of garage door opener on the ceiling while the indicator 7 flashes
in Green. Once the button is pressed, you have approximately 30
seconds to initiate the next step.
2. Return to the vehicle and firmly press the HomeLink button, hold
for two seconds and release the button up to three times. Do not
press the HomeLink button rapidly. At this point programming is
complete and your device should operate.
For more detailed information, please refer to your Owner’s manual or
visit www.homelink.com or call (800) 355-3515
1. Press and release 1, 2 or 3 button.
• If the indicator 7 is turned ON in Orange, go to Step 3
(programming mode)
• If the indicator 7 is continuously turned ON or flashes in Green
rapidly several times, go to Step 2 (erasing mode)
2. Press and hold the button you wish to program for approximately
15- 25 seconds until the LED flashes in Orange for several times.
3. Hold the Garage Door Opener Original Transmitter near the
HomeLink Mirror.
4. Press the Original Transmitter button until the indicator 7 is turned
continuously ON or flashes in Green for approximately 10 seconds
and it indicates the programing is completed.
NOTE: If the indicator 7 flashes in Green continuously, but if the
garage door opener does not operate, please continue to follow
Rolling Code Programming steps below.
45
7
6
GENESIS G90
FEATURES AND CONTROLS