2021 FORD POLICE INTERCEPTOR transmission
[x] Cancel search: transmissionPage 170 of 412
BLIND SPOT INFORMATION
SYSTEM (IF EQUIPPED)
WARNING:
Do not use the blind
spot information system as a
replacement for using the interior and
exterior mirrors or looking over your
shoulder before changing lanes. The
blind spot information system is not a
replacement for careful driving. WARNING:
The system may not
operate properly during severe weather
conditions, for example snow, ice, heavy
rain and spray. Always drive with due
care and attention. Failure to take care
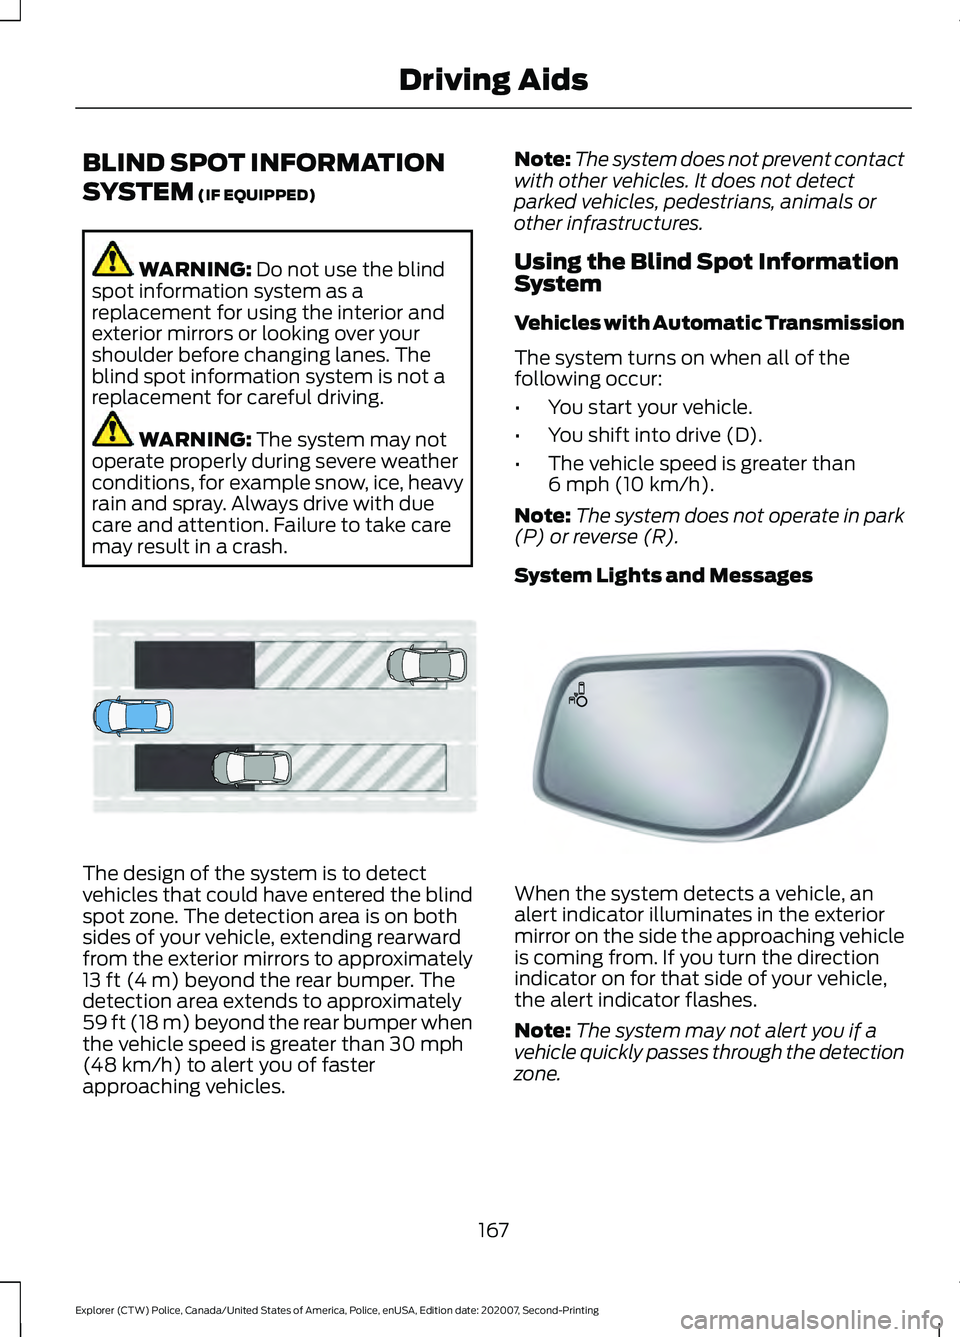
may result in a crash. The design of the system is to detect
vehicles that could have entered the blind
spot zone. The detection area is on both
sides of your vehicle, extending rearward
from the exterior mirrors to approximately
13 ft (4 m)
beyond the rear bumper. The
detection area extends to approximately
59 ft (18 m)
beyond the rear bumper when
the vehicle speed is greater than 30 mph
(48 km/h) to alert you of faster
approaching vehicles. Note:
The system does not prevent contact
with other vehicles. It does not detect
parked vehicles, pedestrians, animals or
other infrastructures.
Using the Blind Spot Information
System
Vehicles with Automatic Transmission
The system turns on when all of the
following occur:
• You start your vehicle.
• You shift into drive (D).
• The vehicle speed is greater than
6 mph (10 km/h)
.
Note: The system does not operate in park
(P) or reverse (R).
System Lights and Messages When the system detects a vehicle, an
alert indicator illuminates in the exterior
mirror on the side the approaching vehicle
is coming from. If you turn the direction
indicator on for that side of your vehicle,
the alert indicator flashes.
Note:
The system may not alert you if a
vehicle quickly passes through the detection
zone.
167
Explorer (CTW) Police, Canada/United States of America, Police, enUSA, Edition date: 202007, Second-Printing Driving AidsE255695 E142442
Page 181 of 412
WHAT IS DRIVE MODE
CONTROL
The system delivers a driving experience
through a suite of sophisticated electronic
vehicle systems. These systems optimize
steering, handling and powertrain
response. This provides a single location
to control multiple systems performance
settings.
Changing the drive mode changes the
functionality of the following systems:
•
Electric power-assisted steering
system adjusts steering effort and feel
based on the mode you select. See
Steering (page 174).
• Electronic stability control and traction
control maintain your vehicle control
in adverse conditions or high
performance driving. See
Stability
Control (page 157).
• Electronic throttle control enhances
the powertrain response to your driving
inputs.
• Transmission controls become
optimized with shift schedules tuned
to each mode.
• Four-wheel drive settings are optimized
and tuned to each mode.
• Electric vehicle mode selections may
be limited. See
Hybrid Vehicle
Operation (page 123).
The system tailors your vehicle
configuration for each mode you select.
Note: Not all settings may be available.
Note: The system has diagnostic checks
that continuously monitor the system for
proper operation. If a mode is unavailable
due to a system fault or change in gear
shifter position, the mode defaults to
Normal. SELECTING A DRIVE MODE
Police Pursuit Mode This mode does not use a switch.
This system is a temporary
driving enhancement that senses
the driver is demanding high performance
from the vehicle. On all Police Interceptor
applications, the transmission holds lower
gears and the engine holds higher engine
speeds longer than normal driving. The
mode terminates when the vehicle senses
the driver is no longer in high performance
demand. The vehicle then returns to
normal operation.
Note: Drive mode changes may not be
available when the ignition is off or when
the engine is not running. Press the drive mode button underneath
the information display to select or change
a drive mode.
DRIVE MODES
Deep Snow/Sand
For snow or soft dry sand. When
stuck in deep snow, use this
mode to help get unstuck.
Note: Using deep snow/sand mode on dry,
hard surfaces could produce some vibration,
driveline bind up, and potential excessive
tire wear. This mode is for slippery and loose
surfaces.
178
Explorer (CTW) Police, Canada/United States of America, Police, enUSA, Edition date: 202007, Second-Printing Drive Mode ControlE271854 E298239 E295420
Page 188 of 412

TOWING A TRAILER
WARNING: Towing trailers
beyond the maximum
recommended gross trailer
weight exceeds the limit of your
vehicle and could result in engine
damage, transmission damage,
structural damage, loss of
vehicle control, vehicle rollover
and personal injury. WARNING:
Do not exceed
the GVWR or the GAWR
specified on the certification
label.
Note: See
Recommended
Towing Weights (page 186).
Your vehicle may have electrical
items, such as fuses or relays,
related to towing. See
Fuses
(page 208).
Your vehicle's load capacity
designation is by weight, not by
volume, so you cannot necessarily
use all available space when
loading a vehicle or trailer.
Towing a trailer places an extra
load on your vehicle's engine,
transmission, axle, brakes, tires
and suspension. Inspect these
components periodically during,
and after, any towing operation. Load Placement
To help minimize how trailer
movement affects your vehicle
when driving:
•
Load the heaviest items closest
to the trailer floor.
• Load the heaviest items
centered between the left and
right side trailer tires.
• Load the heaviest items above
the trailer axles or just slightly
forward toward the trailer
tongue. Do not allow the final
trailer tongue weight to go
above or below 10-15% of the
loaded trailer weight.
• Select a ball mount with the
correct rise or drop and load
capacity. When both the
loaded vehicle and trailer are
connected, the trailer frame
should be level, or slightly
angled down toward your
vehicle, when viewed from the
side.
When driving with a trailer or
payload, a slight takeoff vibration
or shudder may be present due to
the increased payload weight.
Additional information regarding
proper trailer loading and setting
your vehicle up for towing is
located in another chapter of this
manual. See
Load Limit (page
180).
You can also find information in
the
RV & Trailer Towing Guide
available at your authorized
dealer, or online.
185
Explorer (CTW) Police, Canada/United States of America, Police, enUSA, Edition date: 202007, Second-Printing Towing
Page 190 of 412
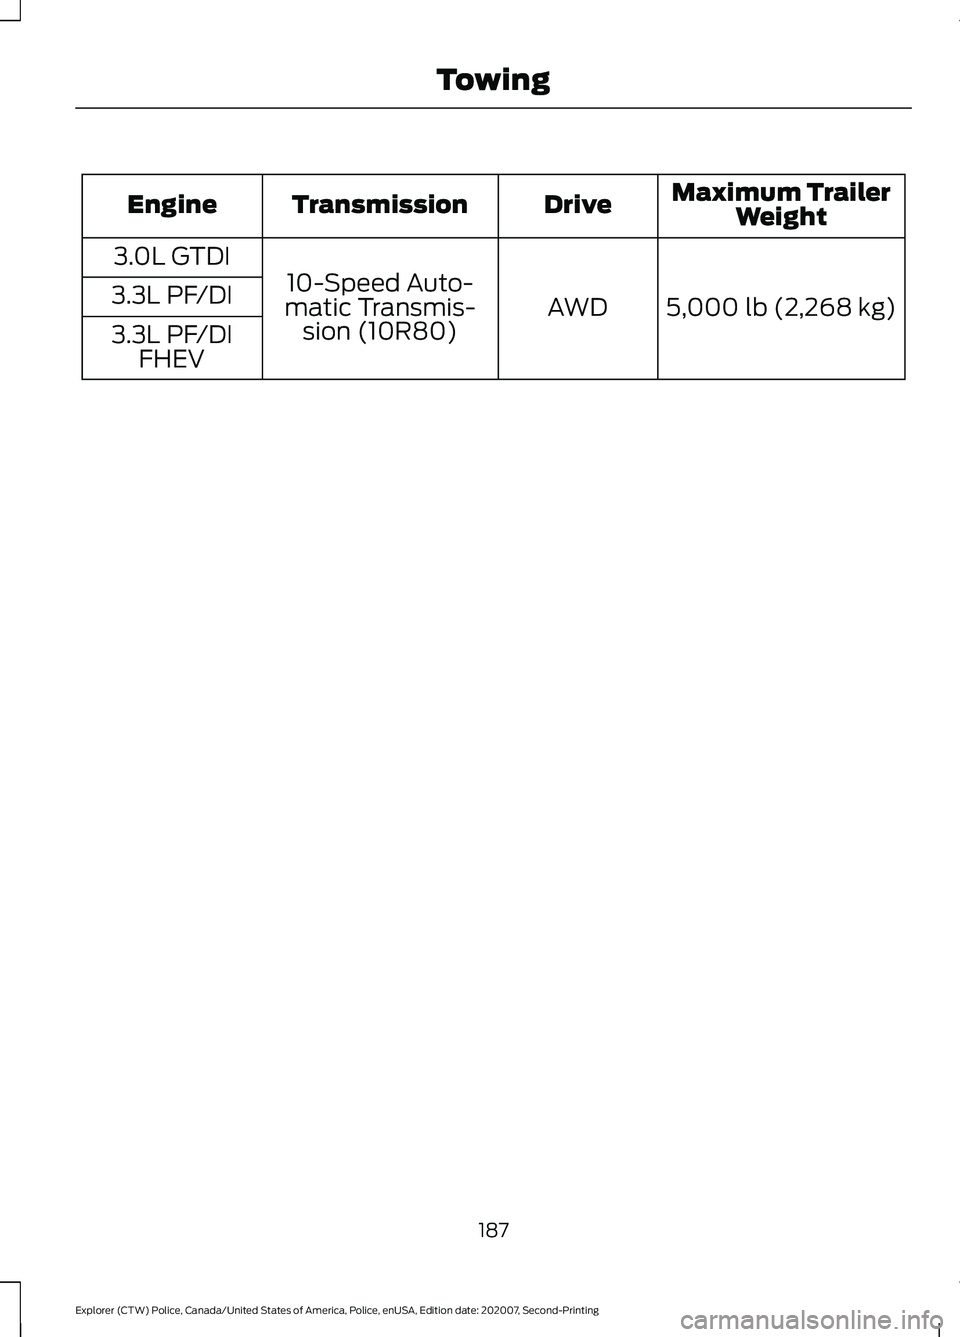
Maximum Trailer
Weight
Drive
Transmission
Engine
5,000 lb (2,268 kg)
AWD
10-Speed Auto-
matic Transmis- sion (10R80)
3.0L GTDI
3.3L PF/DI
3.3L PF/DI FHEV
187
Explorer (CTW) Police, Canada/United States of America, Police, enUSA, Edition date: 202007, Second-Printing Towing
Page 192 of 412
Before Towing a Trailer
Practice turning, stopping and backing up
to get the feel of your vehicle-trailer
combination before starting on a trip.
When turning, make wider turns so the
trailer wheels clear curbs and other
obstacles.
When Towing a Trailer
•
Do not drive faster than 70 mph
(113 km/h) during the first 500 mi
(800 km).
• Do not make full-throttle starts.
• Check your hitch, electrical connections
and trailer wheel lug nuts thoroughly
after you have traveled 50 mi (80 km).
• When stopped in congested or heavy
traffic during hot weather, place the
gearshift in park (P) to aid engine and
transmission cooling and to help A/C
performance.
• Turn off the speed control with heavy
loads or in hilly terrain. The speed
control may turn off automatically
when you are towing on long, steep
grades.
• Shift to a lower gear when driving down
a long or steep hill. Do not apply the
brakes continuously, as they may
overheat and become less effective.
• If your transmission is equipped with a
Grade Assist or Tow/Haul feature, use
this feature when towing. This provides
engine braking and helps eliminate
excessive transmission shifting for
optimum fuel economy and
transmission cooling.
• Allow more distance for stopping with
a trailer attached. Anticipate stops and
brake gradually.
• Avoid parking on a grade. However, if
you must park on a grade:
1. Turn the steering wheel to point your vehicle tires away from traffic flow. 2. Set your vehicle parking brake.
3. Place the automatic transmission in
park (P).
4. Place wheel chocks in front and back of the trailer wheels. (Chocks not
included with vehicle.)
Launching or Retrieving a Boat or
Personal Watercraft (PWC)
Note: Disconnect the wiring to the trailer
before backing the trailer into the water.
Note: Reconnect the wiring to the trailer
after
removing the trailer from the water.
When backing down a ramp during boat
launching or retrieval:
• Do not allow the static water level to
rise above the bottom edge of the rear
bumper.
• Do not allow waves to break higher
than
6 in (15 cm) above the bottom
edge of the rear bumper.
Exceeding these limits may allow water to
enter vehicle components:
• Causing internal damage to the
components.
• Affecting driveability, emissions, and
reliability.
Replace the rear axle lubricant anytime
the rear axle has been submerged in water.
Water may have contaminated the rear
axle lubricant, which is not normally
checked or changed unless a leak is
suspected or other axle repair is required.
189
Explorer (CTW) Police, Canada/United States of America, Police, enUSA, Edition date: 202007, Second-Printing Towing
Page 193 of 412
TOWING THE VEHICLE ON
FOUR WHEELS
Emergency Towing
WARNING: If your vehicle has a
steering wheel lock make sure the
ignition is in the accessory or on position
when being towed.
If your vehicle becomes inoperable without
access to wheel dollies or a vehicle
transport trailer, it can be flat-towed with
all wheels on the ground, regardless of the
powertrain and transmission configuration,
under the following conditions:
• Your vehicle is facing forward for
towing in a forward direction.
• Place the transmission in neutral (N).
If you cannot shift the transmission into
neutral (N), you may need to override
the gear shifter. See
Transmission
(page 142). Failing to do so may result
in damage to the transmission.
• Maximum speed is 35 mph (56 km/h).
• Maximum distance is
50 mi (80 km).
Recreational Towing
You cannot recreational tow your vehicle
with all wheels on the ground because
vehicle or transmission damage could
occur. You must recreational tow your
vehicle with all four wheels off the ground
such as when using a car-hauling trailer.
Otherwise, you cannot recreational tow
your vehicle.
190
Explorer (CTW) Police, Canada/United States of America, Police, enUSA, Edition date: 202007, Second-Printing Towing
Page 195 of 412
![FORD POLICE INTERCEPTOR 2021 Owners Manual •
Carry unnecessary weight
(approximately 1 mpg [0.4 km/L] is
lost for every 395 lb (180 kg) of weight
carried).
• Driving with the wheels out of
alignment.
Conditions
• Heavily loading a vehicl FORD POLICE INTERCEPTOR 2021 Owners Manual •
Carry unnecessary weight
(approximately 1 mpg [0.4 km/L] is
lost for every 395 lb (180 kg) of weight
carried).
• Driving with the wheels out of
alignment.
Conditions
• Heavily loading a vehicl](/manual-img/11/40632/w960_40632-194.png)
•
Carry unnecessary weight
(approximately 1 mpg [0.4 km/L] is
lost for every 395 lb (180 kg) of weight
carried).
• Driving with the wheels out of
alignment.
Conditions
• Heavily loading a vehicle or towing a
trailer may reduce fuel economy at any
speed.
• Adding certain accessories to your
vehicle (for example bug deflectors,
rollbars, light bars, running boards, ski
racks or luggage racks) may reduce
fuel economy.
• To maximize the fuel economy, drive
with the tonneau cover installed (if
equipped).
• Using fuel blended with alcohol may
lower fuel economy.
• Fuel economy may decrease with lower
temperatures during the first
5–10 mi
(12 –16 km) of driving.
• Driving on flat terrain offers improved
fuel economy as compared to driving
on hilly terrain.
• Transmissions give their best fuel
economy when operated in the top
cruise gear and with steady pressure
on the gas pedal.
• Four-wheel-drive operation (if
equipped) is less fuel efficient than
two-wheel-drive operation.
• Close the windows for high-speed
driving.
COLD WEATHER
PRECAUTIONS
The functional operation of some
components and systems can be affected
at temperatures below approximately
-13°F (-25°C)
. BREAKING-IN
Note:
Vehicles used for driver training or on
an emergency vehicle operator course must
also complete the
1,000 mi (1,600 km)
break-in process before training can begin.
You need to break in new tires for
approximately
300 mi (480 km). During
this time, your vehicle could exhibit some
unusual driving characteristics.
Do not tow during the first
1,000 mi
(1,600 km).
DRIVING THROUGH WATER WARNING:
Do not drive through
flowing or deep water as you may lose
control of your vehicle.
Note: Driving through standing water can
cause vehicle damage.
Note: Engine damage can occur if water
enters the air filter.
Before driving through standing water,
check the depth. Never drive through water
that is higher than the bottom of the front
rocker area of your vehicle. 192
Explorer (CTW) Police, Canada/United States of America, Police, enUSA, Edition date: 202007, Second-Printing Driving HintsE259345
Page 199 of 412

4. You can attempt to start the vehicle
by pressing the brake pedal and
START/STOP, or press START/STOP
without pressing the brake pedal.
5. If the vehicle does not start, repeat steps 1 through 4.
JUMP STARTING THE VEHICLE WARNING:
Batteries normally
produce explosive gases which can
cause personal injury. Therefore, do not
allow flames, sparks or lighted
substances to come near the battery.
When working near the battery, always
shield your face and protect your eyes.
Always provide correct ventilation. WARNING:
Keep batteries out of
reach of children. Batteries contain
sulfuric acid. Avoid contact with skin,
eyes or clothing. Shield your eyes when
working near the battery to protect
against possible splashing of acid
solution. In case of acid contact with skin
or eyes, flush immediately with water for
a minimum of 15 minutes and get prompt
medical attention. If acid is swallowed,
call a physician immediately. WARNING:
Use only adequately
sized cables with insulated clamps.
Preparing Your Vehicle
Do not attempt to push-start your
automatic transmission vehicle.
Note: Attempting to push-start a vehicle
with an automatic transmission may cause
transmission damage.
Note: Use only a 12-volt supply to start your
vehicle. Note:
Do not disconnect the battery of the
disabled vehicle as this could damage the
vehicle electrical system.
Park the booster vehicle close to the hood
of the disabled vehicle, making sure the
two vehicles do not touch.
Locating the Jump Starting
Connection Points 1. Open the hood. See
Opening and
Closing the Hood (page 218).
2. Remove the access cover.
3. Remove the red protective cover from the positive lead jump connection
point.
4. Locate the negative jump connection point on the rear mounting bolt for the
cross brace, as shown.
Connecting the Jumper Cables WARNING: If the engine is running
while the hood is open, stay clear of
moving engine components. Failure to
follow this warning could result in serious
personal injury or death. WARNING:
Do not connect the
negative jumper cable to any other part
of your vehicle. Use the ground point.
196
Explorer (CTW) Police, Canada/United States of America, Police, enUSA, Edition date: 202007, Second-Printing Roadside EmergenciesE288229