2021 FORD F650/750 tires
[x] Cancel search: tiresPage 7 of 390

Fuses
Fuse Specification Chart
..........................193
Changing a Fuse ..........................................
201
Vehicle Inspection Guide
Vehicle Inspection Information .............
203
Maintenance
General Information ....................................
212
Opening and Closing the Hood ..............
213
Under Hood Overview - 6.7L Diesel ......
215
Under Hood Overview - 7.3L ....................
216
Engine Oil Dipstick - 7.3L ...........................
217
Engine Oil Dipstick - 6.7L Diesel .............
217
Engine Oil Check - 7.3L ...............................
217
Engine Oil Check - 6.7L Diesel ................
218
Changing the Engine Oil and Oil Filter ........................................................................\
.
219
Oil Change Indicator Reset .....................
220
Changing the Engine Air Filter - 6.7L Diesel ............................................................
221
Changing the Engine Air Filter - 7.3L .....
223
Draining the Fuel Filter Water Trap - 6.7L Diesel ...........................................................
225
Engine Coolant Check - 7.3L ...................
226
Engine Coolant Check - 6.7L Diesel ......
231
Automatic Transmission Fluid Check ........................................................................\
236
Brake Fluid Check ........................................
237
Power Steering Fluid Check ....................
238
Changing the 12V Battery ........................
239
Adjusting the Headlamps .......................
240
Washer Fluid Check ...................................
242
Fuel Filter - 7.3L ............................................
242
Checking the Wiper Blades .....................
242
Changing the Wiper Blades ....................
242
Removing a Headlamp .............................
243
Changing a Bulb ..........................................
243Changing the Engine-Mounted and
Diesel Fuel Conditioner Module Fuel
Filters - 6.7L Diesel .................................
244
Electrical System Inspection ..................
247
Air Induction System Inspection ...........
247
Exhaust System Inspection ....................
248
Brake System Inspection .........................
248
Axle Inspection .............................................
251
Steering System Inspection ....................
252
Suspension System Inspection .............
252
Frame and Tow Hook Inspection ..........
253
Rear Axle Fluid Check ................................
253
Spring U-Bolt Check ..................................
253
Vehicle Care
General Information ..................................
255
Cleaning Products ......................................
255
Cleaning the Exterior .................................
256
Waxing .............................................................
257
Cleaning the Engine ...................................
257
Cleaning the Windows and Wiper Blades ........................................................................\
257
Cleaning the Interior ..................................
258
Cleaning the Instrument Panel and Instrument Cluster Lens ......................
258
Repairing Minor Paint Damage .............
259
Cleaning the Wheels .................................
259
Vehicle Storage ...........................................
260
Wheels and Tires
Tire Care .........................................................
262
Using Snow Chains .....................................
277
Changing a Road Wheel ...........................
277
Technical Specifications ..........................
279
Capacities and Specifications
Engine Specifications - 6.7L Diesel .......
281
Engine Specifications - 7.3L ....................
282
Motorcraft Parts - 6.7L Diesel ................
283
4
F650750 (TBC) , enUSA, Edition date: 202010, Second-Printing Table of Contents
Page 60 of 390

DAYTIME RUNNING LAMPS (IF
EQUIPPED) WARNING:
The daytime running
lamps system does not activate the rear
lamps and may not provide adequate
lighting during low visibility driving
conditions. Make sure you switch the
headlamps on, as appropriate, during all
low visibility conditions. Failure to do so
may result in a crash.
The system turns the lamps on in daylight
conditions.
To switch the system on, switch the
lighting control to any position except
headlamps.
AUTOMATIC HIGH BEAM
CONTROL
(IF EQUIPPED) WARNING:
The system does not
relieve you of your responsibility to drive
with due care and attention. You may
need to override the system if it does not
turn the high beams on or off.
The system turns on high beams if it is dark
enough and no other traffic is present. If it
detects an approaching vehicle ’s
headlamps or tail lamps, or street lighting
ahead, the system turns off high beams
before they can distract other road users.
Low beams remain on.
Note: The system may not operate properly
if the sensor is blocked. Keep the windshield
free from obstruction or damage.
Note: The system may not operate properly
in cold or inclement conditions. You can
switch on the high beams by overriding the
system. Note:
If the system detects a blockage, for
example bird droppings, bug splatter, snow
or ice, the system goes into low beam mode
until you clear the blockage. A message may
appear in the information display if the
camera is blocked.
Note: Using much larger tires or equipping
vehicle accessories such as snowplows can
modify your vehicle's ride height and
degrade automatic high beam control
performance.
A camera sensor, centrally mounted
behind the windshield of your vehicle,
continuously monitors conditions to turn
the high beams on and off.
Once the system is active, the high beams
turn on if:
• The ambient light level is low enough.
• There is no traffic in front of your
vehicle.
• The vehicle speed is greater than
approximately
32 mph (51 km/h).
The system turns the high beams off if:
• The ambient light level is high enough
that high beams are not required.
• The system detects an approaching
vehicle's headlamps or tail lamps.
• The vehicle speed falls below
approximately
27 mph (44 km/h).
• The system detects severe rain, snow
or fog.
• The camera is blocked.
Switching the System On and Off
Switch the system on using the information
display. See Information Displays (page
70
).
57
F650750 (TBC) , enUSA, Edition date: 202010, Second-Printing Lighting
Page 129 of 390

If you do not have a blown fuse and the
brake lamps are properly working, the
following procedure allows you to move
the gearshift lever from park (P):
1. Apply the parking brake. Switch the
ignition key to off, then remove the key.
2. Move the steering column to the full down and full rearward position,
toward the driver seat.
3. Remove the gearshift lever boot.
4. Place your fingers into the hole where you removed the gearshift lever boot
and pull the top half of the shroud up
and forward to separate it from the
lower half of the shroud. There is a
hinge at the forward edge of the top of
the shroud. Roll the top half of the
shroud upward on the hinge point, then
pull straight rearward toward the driver
seat to remove.
5. Remove the top half of the shroud.
6. Remove the three fasteners under the column that secure the lower shroud
half to the column. 7.
Pull the lock lever into the full unlocked
position and remove the lower shroud
cover by pulling the lever handle
through the slot in the cover.
8. Apply the brake. Gently lift the override
disk and move the gearshift lever into
neutral (N). 9. Start your vehicle.
Perform Steps 4 through 8 in reverse order,
making sure to engage the hinge pivots
between the upper and lower halves of the
shroud. Keep slight pressure in the forward
direction as you rotate the halves together.
If Your Vehicle Gets Stuck in Mud
or Snow
If your vehicle is stuck in mud or snow, you
could rock it out by shifting between
forward and reverse gears, stopping
between shifts in a steady pattern. Press
lightly on the accelerator in each gear.
Note:
Do not rock your vehicle if the engine
is not at normal operating temperature or
damage to the transmission could occur.
Note: Do not rock your vehicle for more
than a minute or damage to the
transmission and tires could occur, or the
engine could overheat.
POWER TAKE-OFF (IF EQUIPPED)
Auxiliary equipment called power take-off,
or PTO, is often added to the engine or
transmission to operate utility equipment.
Examples include a wheel-lift for tow
trucks, cranes, tools for construction or tire
service and pumping fluids. PTO
applications draw auxiliary horsepower
from the powertrain, often while the
126
F650750 (TBC) , enUSA, Edition date: 202010, Second-Printing TransmissionE163185 E163186
Page 131 of 390

GENERAL INFORMATION
WARNING: Exceeding these ratings
by overloading can cause component
failure resulting in property damage,
personal injury or death.
Fluid Temperature
If the operating temperature exceeds
250°F (121°C), the rate of axle lubrication
oxidation increases and shortens the life
of the lubricant and seals, requiring axle
lubrication changes to become more
frequent to preserve the axle. Do not
consistently run extreme pressure (EP)
lubricants above
250°F (121°C).
Axle Conversions WARNING:
When operating a
loaded vehicle, the driver must keep all
adjustable axles on the ground at all
times, supporting their share of the
vehicle ’s load. Failure to do so can
overload other axles, tires, wheels,
springs, steering components, brakes
and frames, resulting in early component
failure, loss of vehicle control, possible
property damage and personal injury.
We do not recommend, or approve,
performing axle conversions. However, we
understand that, on occasion, others install
aftermarket add-on axles on the truck
chassis that allow operator control for
weight transfer from other axles (such as
air lift axles). ELECTRONIC LOCKING
DIFFERENTIAL
(IF EQUIPPED)
Driver-Controlled Electronic
Locking Differential
Note: Never use the differential lock at
vehicle speeds above
25 mph (40 km/h).
Some drive axles have a driver-controlled
differential lock. The differential lock can
lock or unlock the differential when your
vehicle is moving or stopped. When you
require extra traction, the differential lock
provides full power to both wheels.
When you lock the differential, your
vehicle ’s turning radius increases
(under-steer).
Take care to avoid sudden accelerations
when both drive wheels are on a slippery
surface. WARNING:
Sudden acceleration
on slippery surfaces could cause the
wheels to spin, the vehicle to turn
sideways on a crowned road surface or
in a turn, possibly resulting in loss of
vehicle control and personal injury.
Activating the Electronic Locking
Differential
You can lock and unlock the differential
when your vehicle is moving at a constant
speed of less than 25 mph (40 km/h) and
while the wheels are not slipping. Do not
lock the differential when your vehicle is
traveling down steep grades and when
traction is minimal.
The differential lock and differential lock
light automatically disengage at speeds
above
25 mph (40 km/h). The differential
lock remains off until either you restart your
vehicle, or you turn the differential lock
switch off then back on.
128
F650750 (TBC) , enUSA, Edition date: 202010, Second-Printing Rear Axle
Page 132 of 390

Servicing a Vehicle with an
Electronic Locking Differential
Turn the engine off and raise all drive
wheels of the locker differential axle to
prevent your vehicle from moving when
servicing the wheels, tires or brakes. Axles
equipped with a driver-controlled
differential deliver power to both wheels
even when only one wheel is on the ground.
WARNING: Failure to raise all drive
wheels with this type of differential could
cause the vehicle to move unexpectedly,
resulting in property damage, personal
injury or death.
2-SPEED REAR AXLE (IF EQUIPPED) WARNING: Never shift a
two-speed axle when descending a
steep grade as this may cause loss of
vehicle control and result in personal
injury.
Note: Do not shift between ranges when
the speed control is on.
A two-speed rear axle allows the driver to
select a low range for greater pulling power
and a high range for greater road speed
and fuel economy. You can also use these
ranges to provide extra steps between
transmission shifts when driving on steep
grades or fuel economy may be factors. Axle Shifting Note:
Do not shift the axle to LOW when
your vehicle is moving. Use LOW when you
drive a fully loaded vehicle on a severe grade
or in congested traffic. Use HIGH for all
normal driving conditions with a lightly
loaded or partially loaded vehicle.
Note: The axle is set to HIGH by default.
To shift the axle between HIGH and LOW
with the vehicle stopped, place the
transmission in position N, then press and
hold the button for two seconds.
129
F650750 (TBC) , enUSA, Edition date: 202010, Second-Printing Rear AxleE208228
Page 145 of 390

PRINCIPLE OF OPERATION
The traction control system helps avoid
drive wheel spin and loss of traction.
If your vehicle begins to slide, the system
applies the brakes to individual wheels
and, when needed, reduces engine power
at the same time. If the wheels spin when
accelerating on slippery or loose surfaces,
the system reduces engine power in order
to increase traction.
Note:
The system does not apply the brakes
when vehicle speed is above 25 mph
(40 km/h).
USING TRACTION CONTROL -
VEHICLES WITH: AIR BRAKES WARNING:
The stability and
traction control light illuminates steadily
if the system detects a failure. Make sure
you did not manually disable the traction
control system using the information
display controls or the switch. If the
stability control and traction control light
is still illuminating steadily, have the
system serviced by an authorized dealer
immediately. Operating your vehicle with
the traction control disabled could lead
to an increased risk of loss of vehicle
control, vehicle rollover, personal injury
and death. Press the TCS Off button on the
instrument panel to enable the
mud/snow mode.
This is beneficial when your vehicle is stuck
in snow or on a slippery road surface. This
mode allows wheel spin to dig your vehicle
out and allows you to rock your vehicle. Press the switch again to select standard
traction control. The system automatically
selects standard traction control at the
next ignition cycle.
System Indicator Light
Note:
If the traction control light does not
flash during a traction control event or stays
illuminated, the system is not functioning
properly. Take your vehicle to an authorized
dealer for service.
During traction control operation, the
traction control light flashes rapidly and
the engine does not rev-up when you press
further on the accelerator. This is normal
and is no reason for concern.
In Mud/Snow mode, the TCS OFF light
illuminates on the instrument cluster. If a
traction event occurs in either mode, the
Stability Control and Traction Control light
flashes rapidly.
USING TRACTION CONTROL -
VEHICLES WITH: HYDRAULIC
BRAKES WARNING:
Aggressive driving in
any road conditions can cause you to
lose control of your vehicle increasing
the risk of severe personal injury or
property damage. The traction control
activating is an indication that at least
some of the tires have exceeded their
ability to grip the road; this may lead to
an increased risk of loss of vehicle
control, vehicle rollover, personal injury
and death. If you experience a severe
road event, slow down
.
The system turns on each time you switch
the ignition on.
142
F650750 (TBC) , enUSA, Edition date: 202010, Second-Printing Traction ControlE330660
Page 147 of 390

PRINCIPLE OF OPERATION -
VEHICLES WITH: HYDRAULIC
BRAKES
WARNING: Vehicle modifications
involving braking system, aftermarket
roof racks, suspension, steering system,
tire construction and wheel and tire size
may change the handling characteristics
of your vehicle and may adversely affect
the performance of the electronic
stability control system. In addition,
installing any stereo loudspeakers may
interfere with and adversely affect the
electronic stability control system. Install
any aftermarket stereo loudspeaker as
far as possible from the front center
console, the tunnel, and the front seats
in order to minimize the risk of interfering
with the electronic stability control
sensors. Reducing the effectiveness of
the electronic stability control system
could lead to an increased risk of loss of
vehicle control, vehicle rollover, personal
injury and death. WARNING:
Remember that even
advanced technology cannot defy the
laws of physics. It's always possible to
lose control of a vehicle due to
inappropriate driver input for the
conditions. Aggressive driving on any
road condition can cause you to lose
control of your vehicle increasing the risk
of personal injury or property damage.
Activation of the electronic stability
control system is an indication that at
least some of the tires have exceeded
their ability to grip the road; this could reduce the operator's ability to control
the vehicle potentially resulting in a loss
of vehicle control, vehicle rollover,
personal injury and death. If your
electronic stability control system
activates, SLOW DOWN.
The system turns on each time you switch
the ignition on.
If a fault occurs in either the stability
control or the traction control system, the
following conditions are possible:
• The stability and traction control light
illuminate.
• The stability control and traction
control systems are not maintaining
traction of the wheels.
If a driving condition activates either the
stability control or the traction control
system, the following conditions are
possible:
• The stability and traction control light
flash.
• Your vehicle slows down.
• The system reduces engine power.
• A vibration in the brake pedal.
• The brake pedal is stiffer than usual.
• If the driving condition is severe and
your foot is not on the brake, the brake
pedal could move as the system
applies higher brake force.
The stability control system has several
features built into it to help you maintain
control of your vehicle:
Electronic Stability Control
The system assists in preventing skids or
lateral slides by applying the brakes to one
or more of the wheels individually and, if
necessary, decreases engine power.
144
F650750 (TBC) , enUSA, Edition date: 202010, Second-Printing Stability Control
(If Equipped)
Page 148 of 390

Traction Control
The system helps maintain traction of the
wheels by detecting and controlling wheel
spin. See Using Traction Control (page
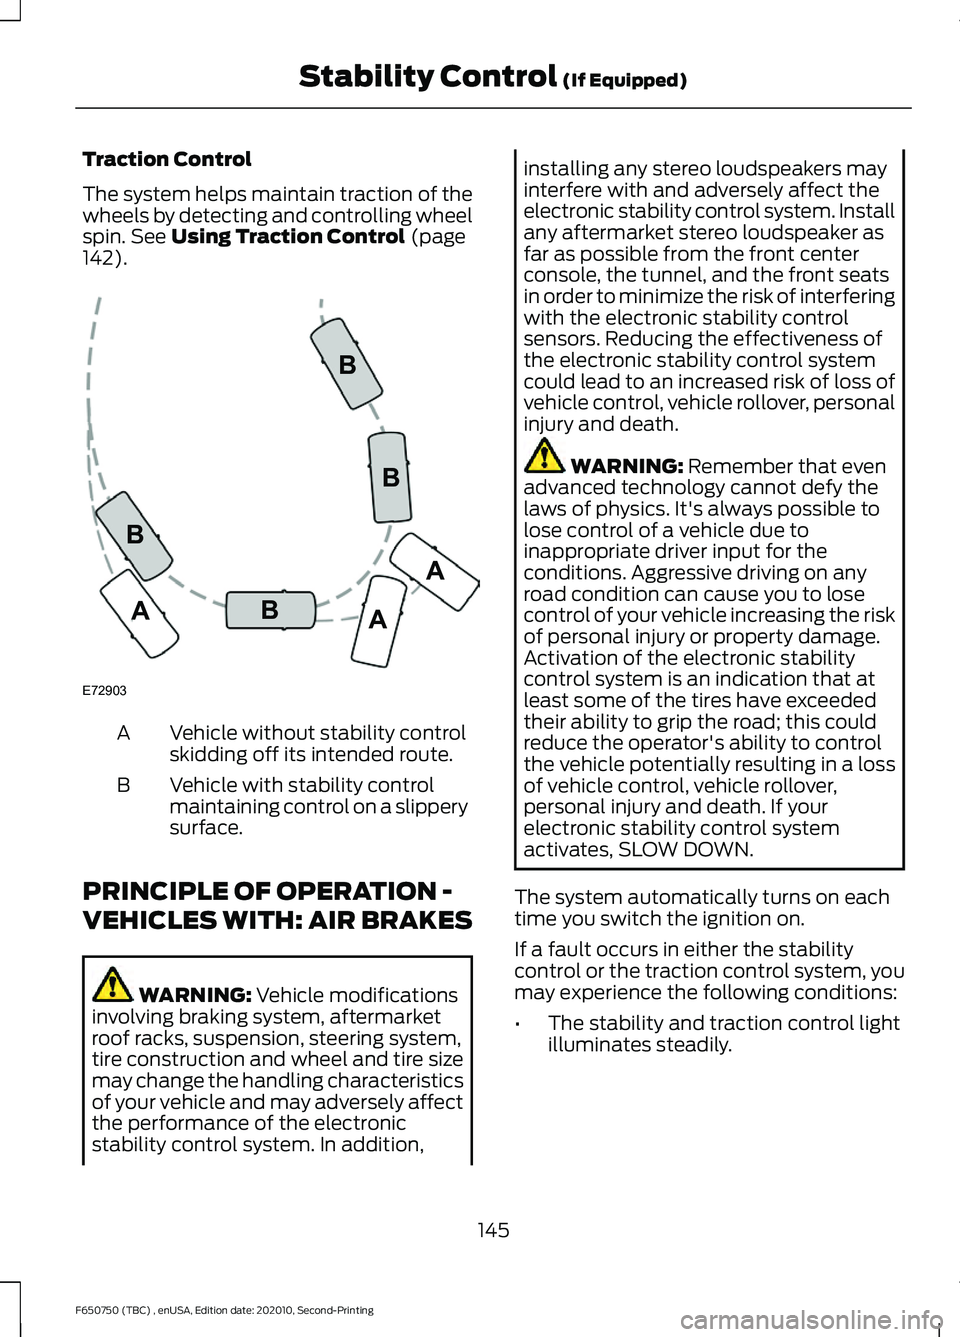
142). Vehicle without stability control
skidding off its intended route.
A
Vehicle with stability control
maintaining control on a slippery
surface.
B
PRINCIPLE OF OPERATION -
VEHICLES WITH: AIR BRAKES WARNING:
Vehicle modifications
involving braking system, aftermarket
roof racks, suspension, steering system,
tire construction and wheel and tire size
may change the handling characteristics
of your vehicle and may adversely affect
the performance of the electronic
stability control system. In addition, installing any stereo loudspeakers may
interfere with and adversely affect the
electronic stability control system. Install
any aftermarket stereo loudspeaker as
far as possible from the front center
console, the tunnel, and the front seats
in order to minimize the risk of interfering
with the electronic stability control
sensors. Reducing the effectiveness of
the electronic stability control system
could lead to an increased risk of loss of
vehicle control, vehicle rollover, personal
injury and death.
WARNING:
Remember that even
advanced technology cannot defy the
laws of physics. It's always possible to
lose control of a vehicle due to
inappropriate driver input for the
conditions. Aggressive driving on any
road condition can cause you to lose
control of your vehicle increasing the risk
of personal injury or property damage.
Activation of the electronic stability
control system is an indication that at
least some of the tires have exceeded
their ability to grip the road; this could
reduce the operator's ability to control
the vehicle potentially resulting in a loss
of vehicle control, vehicle rollover,
personal injury and death. If your
electronic stability control system
activates, SLOW DOWN.
The system automatically turns on each
time you switch the ignition on.
If a fault occurs in either the stability
control or the traction control system, you
may experience the following conditions:
• The stability and traction control light
illuminates steadily.
145
F650750 (TBC) , enUSA, Edition date: 202010, Second-Printing Stability Control
(If Equipped)E72903A
AA
B
BB
B