2021 FORD F650/750 cooling
[x] Cancel search: coolingPage 176 of 390

ESSENTIAL TOWING CHECKS
See Load limits in the Load Carrying
chapter for load specification terms found
on the tire label and Safety Compliance
label and instructions on calculating your
vehicle's load.
Remember to account for the trailer
tongue weight as part of your vehicle load
when calculating the total vehicle weight.
Hitches
Do not use a hitch that either clamps onto
the bumper or attaches to the axle. You
must distribute the load in your trailer so
that 10-15% of the total weight of the
trailer is on the tongue.
Safety Chains
Note: Do not attach safety chains to the
bumper.
Always connect the safety chains to the
frame or hook retainers of your vehicle
hitch.
To connect the safety chains, cross the
chains under the trailer tongue and allow
enough slack for turning tight corners. Do
not allow the chains to drag on the ground.
Trailer Brakes WARNING:
Do not connect a
trailer's hydraulic brake system directly
to your vehicle's brake system. Your
vehicle may not have enough braking
power and your chances of having a
collision greatly increase.
Electric brakes and manual, automatic or
surge-type trailer brakes are safe if you
install them properly and adjust them to
the manufacturer's specifications. The
trailer brakes must meet local and federal
regulations. The rating for the tow vehicle's braking
system operation is at the gross vehicle
weight rating, not the gross combined
weight rating.
Trailer Lamps
WARNING:
Never connect any
trailer lamp wiring to the vehicle's tail
lamp wiring; this may damage the
electrical system resulting in fire. Contact
your authorized dealer as soon as
possible for assistance in proper trailer
tow wiring installation. Additional
electrical equipment may be required.
Trailer lamps are required on most towed
vehicles. Make sure all running lights, brake
lights, turn signals and hazard lights are
working.
Before Towing a Trailer
Practice turning, stopping and backing up
to get the feel of your vehicle-trailer
combination before starting on a trip.
When turning, make wider turns so the
trailer wheels clear curbs and other
obstacles.
When Towing a Trailer
• Check your hitch, electrical connections
and trailer wheel lug nuts thoroughly
after you have traveled
50 mph
(80 km/h).
• When stopped in congested or heavy
traffic during hot weather, place the
transmission in park (P) or neutral (N)
to aid engine and transmission cooling
and to help air conditioning
performance.
• Turn off the speed control with heavy
loads or in hilly terrain. The speed
control may turn off automatically
when you are towing on long, steep
grades.
173
F650750 (TBC) , enUSA, Edition date: 202010, Second-Printing Towing
Page 177 of 390

•
Shift to a lower gear when driving down
a long or steep hill. Do not apply the
brakes continuously, as they may
overheat and become less effective.
• If your transmission is equipped with
the Tow/Haul feature, use this feature
when towing. This provides engine
braking and helps eliminate excessive
transmission shifting for optimum fuel
economy and transmission cooling.
• Allow more distance for stopping with
a trailer attached. Anticipate stops and
brake gradually.
FIFTH WHEEL OPERATION WARNING: Failure to follow the
fifth wheel manufacturer ’s instructions
for hooking and unhooking as well as
sliding the fifth wheel could result in an
accident, personal injury or death. WARNING:
When the tractor and
trailer are parked unattended, the trailer
brake hand control should never be used
to apply the brake, since air may leak
from the system, allowing vehicle
movement, resulting in possible property
damage, personal injury or death.
Before hook-up, make sure:
• The fifth wheel jaws are fully open.
• The fifth wheel is fully tilted back to
prevent body damage when the tractor
is backed under a trailer.
• You block the trailer wheels and adjust
and apply the trailer spring brakes.
Never chase a trailer.
• The brake hoses and light cords are
clear of the fifth wheel. Hook-up
1. Back the tractor squarely under the
trailer, engaging the fifth-wheel jaws
on the kingpin. Always back up slowly;
make sure the trailer is neither too high
nor too low. Avoid backing under the
trailer from an angle.
2. Connect the service and emergency brake hoses and trailer light connector.
3. Inspect the jaws of the fifth wheel to be sure they have fully closed on the
trailer kingpin and the trailer plate is
resting securely on the fifth wheel.
4. Make sure the coupler release lever is in the locked position.
5. Charge the trailer brake system. Set the trailer brakes, with either the hand
valve or tractor protection valve. Pull
against the trailer for an extra check of
proper hook-up. Do not pull hard
enough to damage or strain the
equipment.
6. Set the tractor parking brakes and fully
raise the trailer landing gear.
7. Check the operation of all trailer lights
and correct any lights that may be
faulty.
Un-hook
1. Try to keep the tractor and trailer in a straight line.
2. Apply the parking brakes.
3. Lower the trailer landing gear, making sure it is on solid, level ground. The
weight of the trailer is to be on the
landing gear.
4. Block the trailer wheels.
5. Disconnect the brake hoses and light cords. Be sure hoses and cords are
clear.
6. Pull coupler release lever to disengage
the fifth wheel jaws.
174
F650750 (TBC) , enUSA, Edition date: 202010, Second-Printing Towing
Page 182 of 390
The following cold weather idling
guidelines are recommended:
•
You can use Motorcraft® cetane
improvers or non-alcohol-based
cetane improvers from a reputable
manufacturer as needed.
• Maintain the engine cooling system
properly.
• Avoid shutting the engine down after
an extensive idling period. Drive your
vehicle for several miles with the
engine at normal operating
temperatures under a moderate load.
• Consider using an engine block heater.
• For extended idle times use an
approved idle speed increase device.
Winter Operating Tips for Arctic
Operation -20°F (-29°C) and
Below
The following information is a guideline
only and is not to be the only source of
possible solutions in resolving extreme
cold temperature issues.
Starting Aids WARNING: Do not use starting
fluid, such as ether, in the air intake
system (see air filter decal). Such fluid
could cause immediate explosive
damage to the engine and possible
personal injury.
The use of the factory engine block heater
assists in engine starting in extreme cold
ambient temperatures. See
Engine Block
Heater (page 97). Idle Control
Your vehicle may have a factory option for
a stationary elevated idle control through
dash-mounted upfitter switches that
allows the operator to elevate the idle rpm
for extended idle periods, as well as
aftermarket equipment such as PTO
operation. You must configure this feature
even if ordered from the factory. See your
authorized dealer for required upfitting.
Operation in Snow and Rain
Vehicle operation in heavy snowfall or
extreme rain conditions may feed
excessive amounts of snow or water into
the air intake system. This could plug the
air filter with snow and may cause the
engine to lose power and possibly shut
down.
We recommend the following actions after
operating your vehicle up to
199 mi
(320 km) in snowfall or extreme rain:
• Snow: At the earliest opportunity, open
the hood and clear all the snow and ice
from the air filter housing inlet (do not
remove the foam filter) and reset the
air filter restriction gauge.
Note: Removal of the foam filter degrades
your vehicle performance during snow and
hot weather conditions.
• Extreme rain: The air filter dries after
about 15– 30 minutes at highway
speeds. At the earliest opportunity,
open the hood and reset the air filter
restriction gauge.
BREAKING-IN
You need to break in new tires for
approximately
300 mi (480 km). During
this time, your vehicle may exhibit some
unusual driving characteristics.
179
F650750 (TBC) , enUSA, Edition date: 202010, Second-Printing Driving Hints
Page 198 of 390
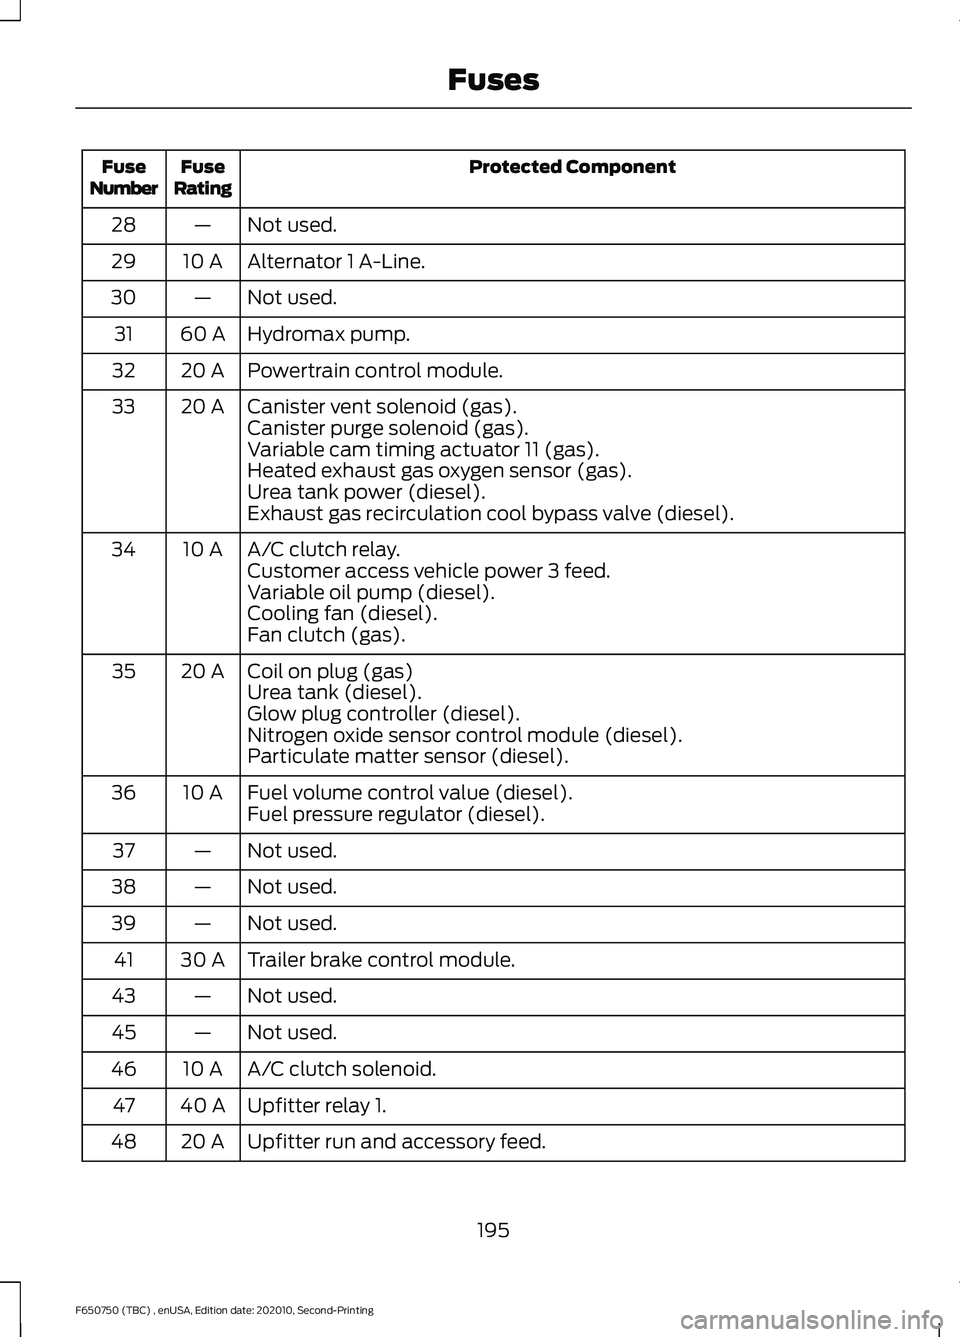
Protected Component
Fuse
Rating
Fuse
Number
Not used.
—
28
Alternator 1 A-Line.
10 A
29
Not used.
—
30
Hydromax pump.
60 A
31
Powertrain control module.
20 A
32
Canister vent solenoid (gas).
20 A
33
Canister purge solenoid (gas).
Variable cam timing actuator 11 (gas).
Heated exhaust gas oxygen sensor (gas).
Urea tank power (diesel).
Exhaust gas recirculation cool bypass valve (diesel).
A/C clutch relay.
10 A
34
Customer access vehicle power 3 feed.
Variable oil pump (diesel).
Cooling fan (diesel).
Fan clutch (gas).
Coil on plug (gas)
20 A
35
Urea tank (diesel).
Glow plug controller (diesel).
Nitrogen oxide sensor control module (diesel).
Particulate matter sensor (diesel).
Fuel volume control value (diesel).
10 A
36
Fuel pressure regulator (diesel).
Not used.
—
37
Not used.
—
38
Not used.
—
39
Trailer brake control module.
30 A
41
Not used.
—
43
Not used.
—
45
A/C clutch solenoid.
10 A
46
Upfitter relay 1.
40 A
47
Upfitter run and accessory feed.
20 A
48
195
F650750 (TBC) , enUSA, Edition date: 202010, Second-Printing Fuses
Page 218 of 390
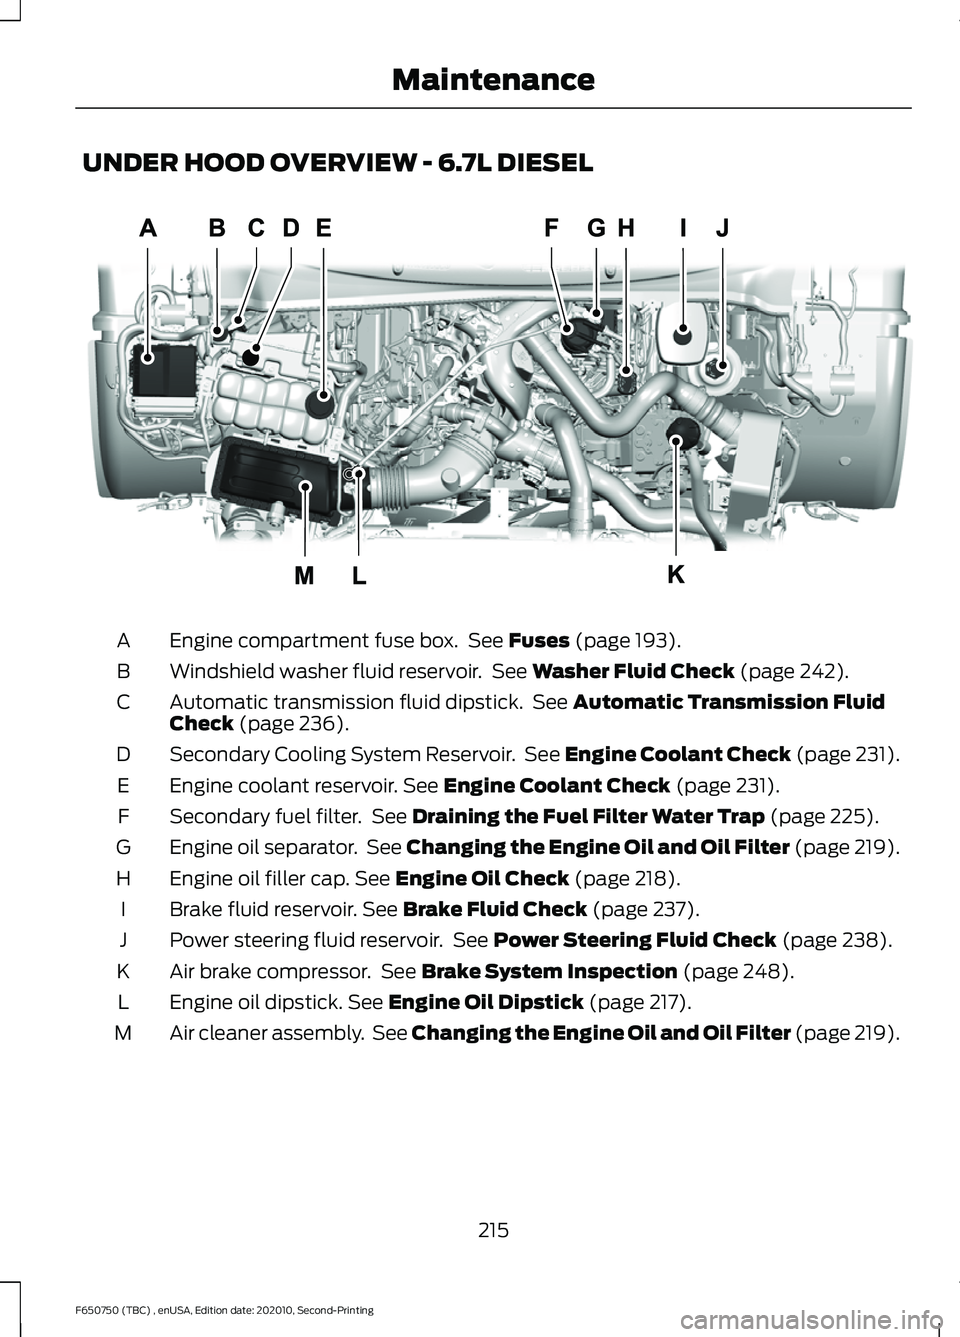
UNDER HOOD OVERVIEW - 6.7L DIESEL
Engine compartment fuse box. See Fuses (page 193).
A
Windshield washer fluid reservoir. See
Washer Fluid Check (page 242).
B
Automatic transmission fluid dipstick. See
Automatic Transmission Fluid
Check (page 236).
C
Secondary Cooling System Reservoir. See Engine Coolant Check (page 231).
D
Engine coolant reservoir.
See Engine Coolant Check (page 231).
E
Secondary fuel filter. See
Draining the Fuel Filter Water Trap (page 225).
F
Engine oil separator. See Changing the Engine Oil and Oil Filter (page 219).
G
Engine oil filler cap.
See Engine Oil Check (page 218).
H
Brake fluid reservoir.
See Brake Fluid Check (page 237).
I
Power steering fluid reservoir. See
Power Steering Fluid Check (page 238).
J
Air brake compressor. See
Brake System Inspection (page 248).
K
Engine oil dipstick.
See Engine Oil Dipstick (page 217).
L
Air cleaner assembly. See Changing the Engine Oil and Oil Filter (page 219).
M
215
F650750 (TBC) , enUSA, Edition date: 202010, Second-Printing MaintenanceE313700
Page 229 of 390
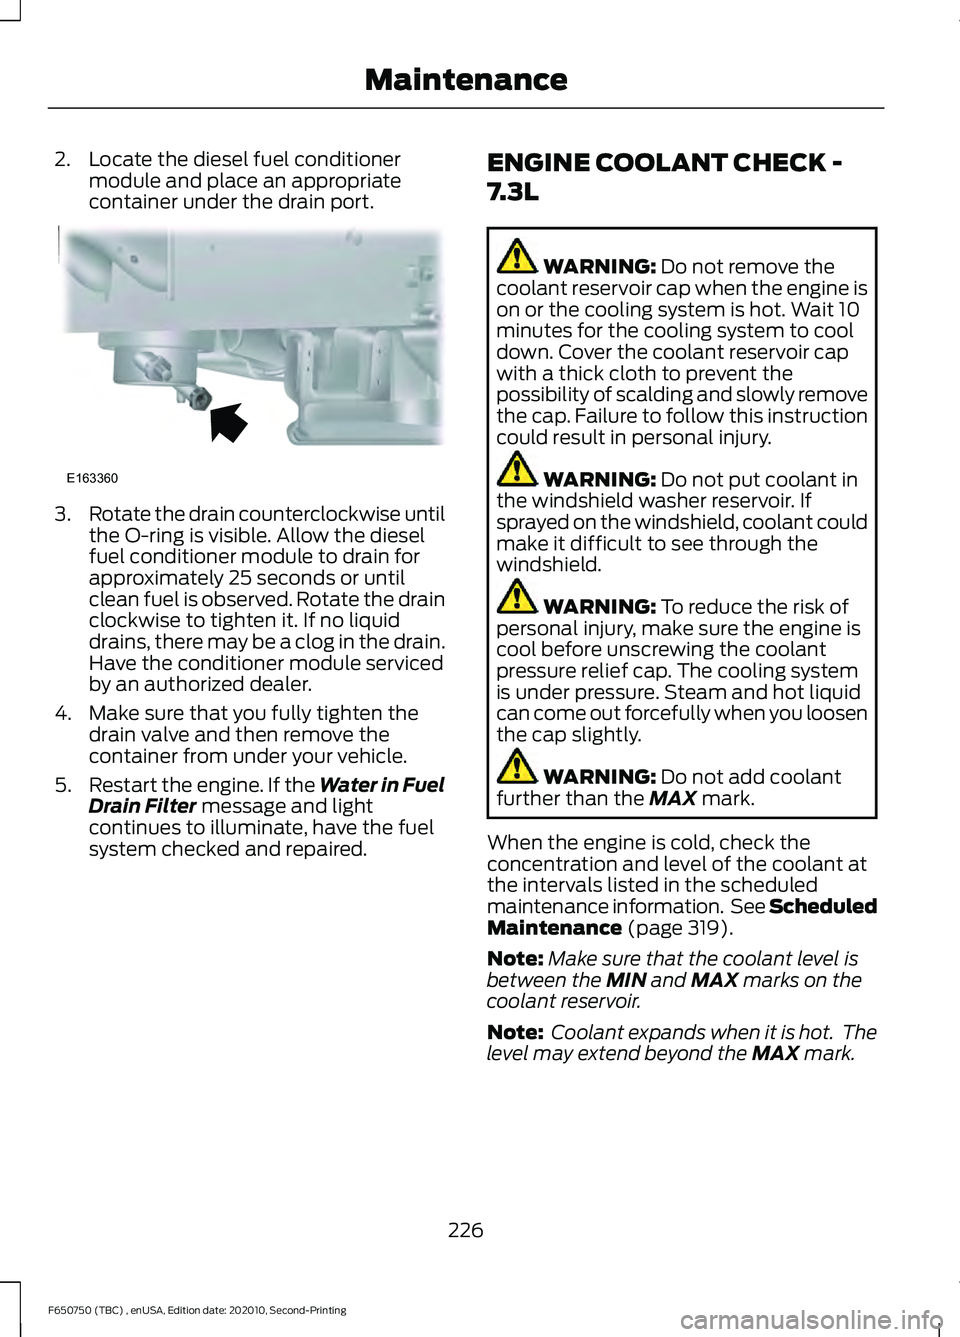
2. Locate the diesel fuel conditioner
module and place an appropriate
container under the drain port. 3.
Rotate the drain counterclockwise until
the O-ring is visible. Allow the diesel
fuel conditioner module to drain for
approximately 25 seconds or until
clean fuel is observed. Rotate the drain
clockwise to tighten it. If no liquid
drains, there may be a clog in the drain.
Have the conditioner module serviced
by an authorized dealer.
4. Make sure that you fully tighten the drain valve and then remove the
container from under your vehicle.
5. Restart the engine. If the Water in Fuel
Drain Filter message and light
continues to illuminate, have the fuel
system checked and repaired. ENGINE COOLANT CHECK -
7.3L WARNING:
Do not remove the
coolant reservoir cap when the engine is
on or the cooling system is hot. Wait 10
minutes for the cooling system to cool
down. Cover the coolant reservoir cap
with a thick cloth to prevent the
possibility of scalding and slowly remove
the cap. Failure to follow this instruction
could result in personal injury. WARNING:
Do not put coolant in
the windshield washer reservoir. If
sprayed on the windshield, coolant could
make it difficult to see through the
windshield. WARNING:
To reduce the risk of
personal injury, make sure the engine is
cool before unscrewing the coolant
pressure relief cap. The cooling system
is under pressure. Steam and hot liquid
can come out forcefully when you loosen
the cap slightly. WARNING:
Do not add coolant
further than the MAX mark.
When the engine is cold, check the
concentration and level of the coolant at
the intervals listed in the scheduled
maintenance information. See Scheduled
Maintenance
(page 319).
Note: Make sure that the coolant level is
between the
MIN and MAX marks on the
coolant reservoir.
Note: Coolant expands when it is hot. The
level may extend beyond the
MAX mark.
226
F650750 (TBC) , enUSA, Edition date: 202010, Second-Printing MaintenanceE163360
Page 230 of 390
Maintain coolant concentration within
48% to 50%, which equates to a freeze
point between -30°F (-34°C) and -34°F
(-37°C). Check the coolant concentration
using a refractometer. We do not
recommend the use of hydrometers or
coolant test strips for measuring coolant
concentration.
Adding Coolant
WARNING: Do not add engine
coolant when the engine is on or the
cooling system is hot. Failure to follow
this instruction could result in personal
injury. WARNING:
Do not remove the
coolant reservoir cap when the engine is
on or the cooling system is hot. Wait 10
minutes for the cooling system to cool
down. Cover the coolant reservoir cap
with a thick cloth to prevent the
possibility of scalding and slowly remove
the cap. Failure to follow this instruction
could result in personal injury.
Note: Automotive fluids are not
interchangeable. Do not use coolant or
windshield washer fluid outside of its
specified function and vehicle location.
Note: Do not use stop leak pellets, cooling
system sealants, or non-specified additives
as they can cause damage to the engine
cooling or heating systems. Resulting
component damage may not be covered by
the vehicle Warranty. It is very important to use prediluted
coolant approved to the correct
specification in order to avoid plugging the
small passageways in the engine cooling
system. See
Capacities and
Specifications (page 288). Do not mix
different colors or types of coolant in your
vehicle. Mixing of engine coolants or using
an incorrect coolant may harm the engine
or cooling system components and may
not be covered by the vehicle Warranty.
Note: Coolants marketed for all makes and
models may not be approved to our
specifications and may cause damage to
the cooling system. Resulting component
damage may not be covered by the vehicle
Warranty.
If the coolant level is at or below the
minimum mark, add prediluted coolant
immediately.
For vehicles with overflow coolant systems
with a non-pressurized cap on the coolant
recovery system, add coolant to the
coolant recovery reservoir when the engine
is cool. Add prediluted coolant to the
maximum level. For all vehicles which have
a coolant degas system with a pressurized
cap, or if it is necessary to remove the
coolant pressure relief cap on the radiator,
follow these steps to add engine coolant:
1. Turn the engine off and let it cool.
2. Unscrew the cap slowly. Any pressure escapes as you unscrew the cap.
3. Fill the coolant reservoir slowly with prediluted engine coolant to within the
minimum and maximum range on the
engine coolant reservoir. If you
removed the radiator cap in an
overflow system, fill the radiator until
the coolant is visible and the radiator
is almost full. If coolant is added to
bring the level within the minimum and
maximum range when the engine is not
cold, the system may remain
underfilled.
227
F650750 (TBC) , enUSA, Edition date: 202010, Second-Printing Maintenance
Page 231 of 390
4.
Replace the coolant reservoir cap. Turn
the cap clockwise until it contacts the
hard stop.
5. Check the coolant level in the coolant reservoir the next few times you drive
your vehicle. If necessary, add enough
prediluted engine coolant to bring the
coolant level to the proper level.
Note: If prediluted coolant is not available,
use the approved antifreeze concentrate
diluting it to 50/50 with distilled water. See
Capacities and Specifications (page 288).
Using water that has not been deionized
may contribute to deposit formation,
corrosion or plugging of the small cooling
system passageways.
If you have to add more than
1.1 qt (1 L) of
engine coolant per month, have your
vehicle checked as soon as possible.
Operating an engine with a low level of
coolant can result in engine overheating
and possible engine damage.
Note: During normal vehicle operation, the
coolant may change color from orange to
pink or light red. As long as the coolant is
clear and uncontaminated, this color change
does not indicate the coolant has degraded
nor does it require the coolant to be drained,
the system to be flushed, or the coolant to
be replaced.
Note: In case of emergency, you can add a
large amount of water without coolant in
order to reach a vehicle service location.
Water alone, without coolant, can cause
engine damage from corrosion, overheating
or freezing. When you reach a service
location, you must have the cooling system
drained, flushed and refilled using the
correct specification prediluted coolant or
antifreeze concentrate. See
Capacities and
Specifications (page 288).
Do not use the following as a coolant
substitute:
• Alcohol.
• Methanol. •
Brine.
• Any coolant mixed with alcohol or
methanol antifreeze.
Alcohol and other liquids can cause engine
damage from overheating or freezing.
Do not add extra inhibitors or additives to
the coolant. These can be harmful and
compromise the corrosion protection of
the coolant.
Recycled Coolant
We do not recommend the use of recycled
coolant as an approved recycling process
is not yet available.
Dispose of used engine coolant in an
appropriate manner. Follow your
community ’s regulations and standards
for recycling and disposing of automotive
fluids.
Severe Climates
If you drive in extremely cold climates:
• It may be necessary to increase the
coolant concentration above 50%.
• A coolant concentration of 60%
provides improved freeze point
protection. Coolant concentrations
above 60% decrease the overheat
protection characteristics of the
coolant and may cause engine
damage.
If you drive in extremely hot climates:
• You can decrease the coolant
concentration to 40%.
• Coolant concentrations below 40%
decrease the freeze and corrosion
protection characteristics of the
coolant and may cause engine
damage.
Vehicles driven year-round in non-extreme
climates should use prediluted engine
coolant for optimum cooling system and
engine protection.
228
F650750 (TBC) , enUSA, Edition date: 202010, Second-Printing Maintenance