2021 FORD F-600 instrument cluster
[x] Cancel search: instrument clusterPage 261 of 666

System Operation
If you select a trailer in the display screen
prior to connecting the trailer, the system
will load that configuration and the
information cluster displays a message
when the trailer is connected. A second
message appears stating Cross Traffic
Alert has been turned off; the Blind Spot
Information System with Trailer Tow still
functions normally when driving forward.
If no trailer has been set up and a trailer is
connected, the instrument cluster provides
a message indicating a trailer is connected
followed by a message asking to select a
trailer from the existing list of trailers or to
add a trailer. In order for the Blind Spot
Information System with Trailer Tow to
function, an existing trailer must be
selected or a new trailer must be added. If
the request is ignored or if you exit the
screen, a message appears prompting you
that the system has been turned off due
to a trailer connect. This message may not
appear until your vehicle speed reaches
22 mph (35 km/h).
The Blind Spot Information System with
Trailer Tow activates when driving forward
for that particular trailer set up. If the
ignition is cycled, the Blind Spot
Information System with Trailer Tow
continues to function using the last trailer
selected.
Trailer Considerations
The Blind Spot Information System with
Trailer Tow is designed to work with any
trailer whose front width is
8.5 ft (2.6 m)
or less and total length from the trailer
hitch ball to the rear of the trailer is
33 ft
(10.1 m) or less. Different trailers may
cause a slight change in performance as
outlined below. Large box trailers may cause false alerts
to trigger when driving next to buildings or
near parking cars. A false alert may also
occur while making a 90-degree turn.
Trailers that are
8.5 ft (2.6 m) wide at the
front and have a total length greater than
20 ft (6 m)
may have delayed alerts from
passing vehicles when the vehicle is
passing at high speed.
A box trailer whose front width is
8.5 ft
(2.6 m) may cause early alerts when you
are over taking a vehicle.
When towing a clam shell or V-Nose box
trailer with a front width of
8.5 ft (2.6 m),
delayed alerts on merging vehicles that are
traveling the same speed as your vehicle
may occur.
System Errors
If the system senses a problem with the
left or right sensor, the telltale illuminates
and a message appears in the display
screen. See
Information Messages
(page 121).
Switching the System Off and On
You can temporarily switch the Blind Spot
Information System off in the display
screen. See
General Information (page
110). When the Blind Spot Information
System switches off, you do not receive
alerts and the display screen shows a
system off message. The telltale in the
cluster also illuminates. When you switch
the Blind Spot Information System on or
off, the alert indicators flash twice.
Note: The Blind Spot Information System
remembers the last selected on or off
setting.
You can also have the Blind Spot
Information System switched off
permanently at an authorized dealer. Once
switched off permanently, the system can
only be switched back on at an authorized
dealer.
258
Super Duty (TFE) Canada/United States of America, enUSA, Edition date: 202008, Third-Printing- Driving Aids
Page 264 of 666

Cross Traffic Alert Behavior When
Trailer is Attached
Note:
The system may not correctly operate
when towing a trailer. For vehicles with an
approved trailer tow module and tow bar,
the system turns off when you attach a
trailer. For vehicles with an aftermarket
trailer tow module or tow bar, we
recommend that you switch the system off
when you attach a trailer.
Cross traffic alert remains on when you
attach a trailer in vehicles that come with
blind spot information system with trailer
tow under the following conditions:
• You connect a trailer.
• The trailer is a bike rack or cargo rack
with a maximum length of 3 ft (1 m).
• You set the trailer length to
3 ft (1 m)
in the information display.
See
Blind Spot Information System
(page 254).
Switching the System On and Off
To switch the system on or off, adjust the
setting. Depending on your vehicle options,
the setting could be in the following: •
Information display. See
General
Information (page 110).
• Touchscreen. See Settings (page 543).
Note: The system turns on every time you
switch the ignition on. To permanently
switch the system off, contact an authorized
dealer.
Cross Traffic Alert Indicator When the system detects an
approaching vehicle, a tone
sounds, a warning lamp
illuminates in the relevant exterior mirror
and arrows appear in the information
display to show which side the
approaching vehicle is coming from.
Note: If arrows do not display, a message
appears in the information display.
If the system malfunctions, a warning lamp
illuminates in the instrument cluster and
a message appears in the information
display. Have your vehicle checked as soon
as possible.
Note: In exceptional conditions, the system
could alert you, even when there is nothing
in the detection zone, for example a vehicle
passing further away from your vehicle.
Cross Traffic Alert Information Messages Action
Message
Displays instead of indication arrows when the system
detects a vehicle. Check for approaching traffic.
Cross Traffic Alert
Indicates blocked cross traffic alert system sensors. Clean
the sensors. If the message continues to appear, have your
vehicle checked as soon as possible.
Cross Traffic Not Avail-
able Sensor Blocked See
Manual
The system has malfunctioned. Have your vehicle checked
as soon as possible.
Cross Traffic System
Fault
Displays if you attach a trailer to your vehicle.
Cross Traffic Alert Deac-
tivated Trailer Attached
261
Super Duty (TFE) Canada/United States of America, enUSA, Edition date: 202008, Third-Printing- Driving AidsE268294
Page 272 of 666
•
Electronic stability control and traction
control maintains your vehicle control
in adverse conditions or
high-performance driving.
• Electronic throttle control enhances
the powertrain response to your inputs.
• Transmission controls are optimized
with shift schedules tuned to each
terrain.
Using the System
The system tailors your vehicle
configuration for each mode you select.
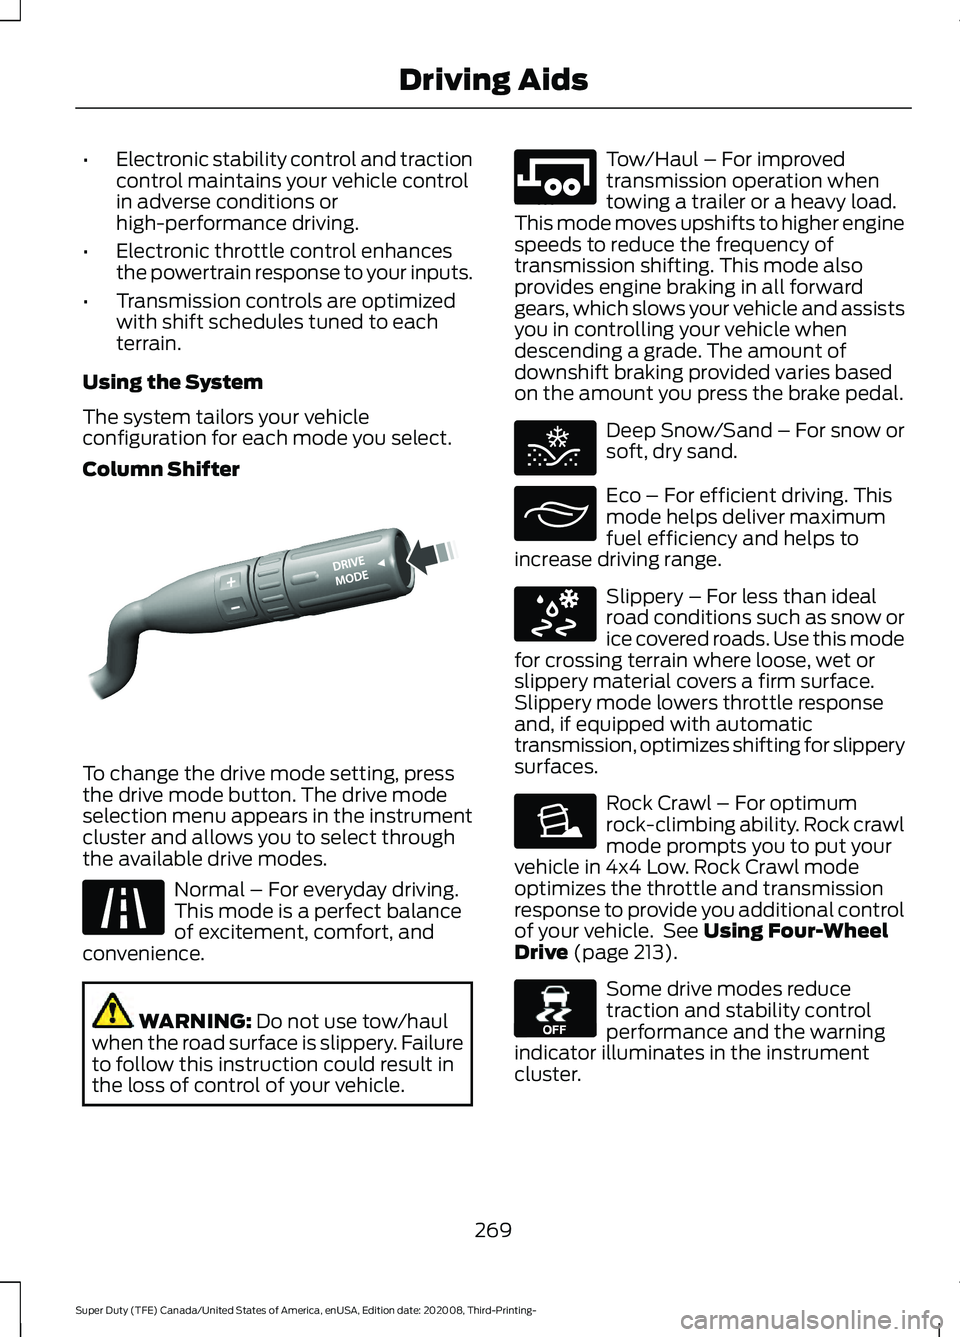
Column Shifter To change the drive mode setting, press
the drive mode button. The drive mode
selection menu appears in the instrument
cluster and allows you to select through
the available drive modes.
Normal – For everyday driving.
This mode is a perfect balance
of excitement, comfort, and
convenience. WARNING: Do not use tow/haul
when the road surface is slippery. Failure
to follow this instruction could result in
the loss of control of your vehicle. Tow/Haul – For improved
transmission operation when
towing a trailer or a heavy load.
This mode moves upshifts to higher engine
speeds to reduce the frequency of
transmission shifting. This mode also
provides engine braking in all forward
gears, which slows your vehicle and assists
you in controlling your vehicle when
descending a grade. The amount of
downshift braking provided varies based
on the amount you press the brake pedal. Deep Snow/Sand – For snow or
soft, dry sand.
Eco – For efficient driving. This
mode helps deliver maximum
fuel efficiency and helps to
increase driving range. Slippery – For less than ideal
road conditions such as snow or
ice covered roads. Use this mode
for crossing terrain where loose, wet or
slippery material covers a firm surface.
Slippery mode lowers throttle response
and, if equipped with automatic
transmission, optimizes shifting for slippery
surfaces. Rock Crawl – For optimum
rock-climbing ability. Rock crawl
mode prompts you to put your
vehicle in 4x4 Low. Rock Crawl mode
optimizes the throttle and transmission
response to provide you additional control
of your vehicle. See
Using Four-Wheel
Drive (page 213). Some drive modes reduce
traction and stability control
performance and the warning
indicator illuminates in the instrument
cluster.
269
Super Duty (TFE) Canada/United States of America, enUSA, Edition date: 202008, Third-Printing- Driving AidsE249567 E225310 E246592 E295420 E295413 E295414 E225315 E130458
Page 273 of 666
Note:
Your vehicle starts in the last selected
drive mode for appropriate modes when
starting the vehicle within two hours of the
last key off. If the vehicle has been off for
more than two hours, a drive mode reminder
prompt displays on the instrument cluster
which requires you to confirm before the
vehicle returns to the last selected drive
mode.
Note: Mode changes are not available when
the vehicle ignition is off. In drive (D), only
some modes may be available.
Note: The system has diagnostic checks
that continuously monitor the system for
proper operation. Certain drive modes are
not available based on the gearshift
position. If a mode is unavailable due to a
system fault or change in gearshift position,
the mode defaults to Normal.
270
Super Duty (TFE) Canada/United States of America, enUSA, Edition date: 202008, Third-Printing- Driving Aids
Page 295 of 666
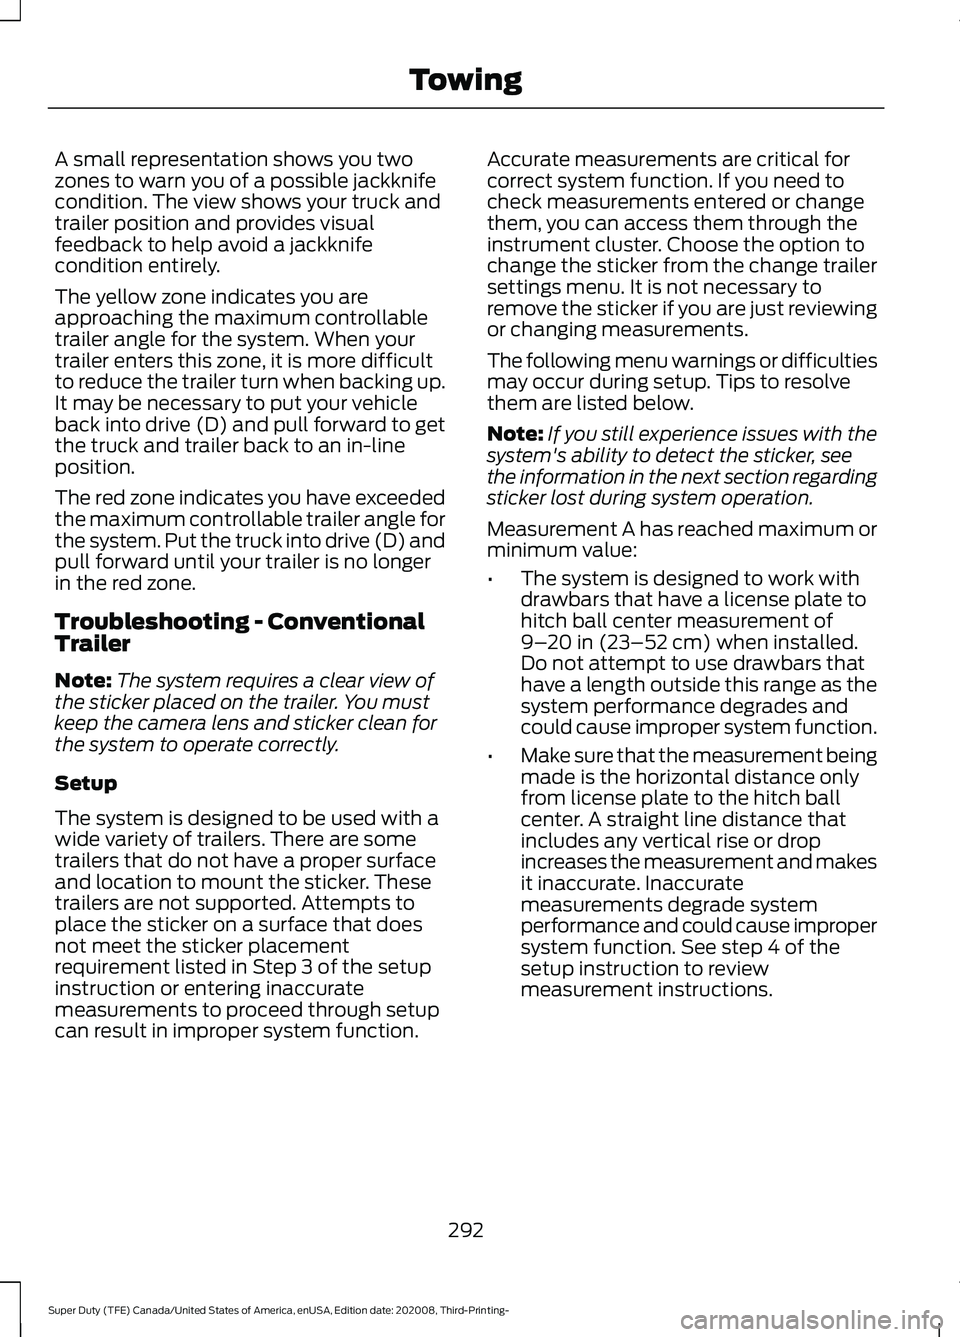
A small representation shows you two
zones to warn you of a possible jackknife
condition. The view shows your truck and
trailer position and provides visual
feedback to help avoid a jackknife
condition entirely.
The yellow zone indicates you are
approaching the maximum controllable
trailer angle for the system. When your
trailer enters this zone, it is more difficult
to reduce the trailer turn when backing up.
It may be necessary to put your vehicle
back into drive (D) and pull forward to get
the truck and trailer back to an in-line
position.
The red zone indicates you have exceeded
the maximum controllable trailer angle for
the system. Put the truck into drive (D) and
pull forward until your trailer is no longer
in the red zone.
Troubleshooting - Conventional
Trailer
Note:
The system requires a clear view of
the sticker placed on the trailer. You must
keep the camera lens and sticker clean for
the system to operate correctly.
Setup
The system is designed to be used with a
wide variety of trailers. There are some
trailers that do not have a proper surface
and location to mount the sticker. These
trailers are not supported. Attempts to
place the sticker on a surface that does
not meet the sticker placement
requirement listed in Step 3 of the setup
instruction or entering inaccurate
measurements to proceed through setup
can result in improper system function. Accurate measurements are critical for
correct system function. If you need to
check measurements entered or change
them, you can access them through the
instrument cluster. Choose the option to
change the sticker from the change trailer
settings menu. It is not necessary to
remove the sticker if you are just reviewing
or changing measurements.
The following menu warnings or difficulties
may occur during setup. Tips to resolve
them are listed below.
Note:
If you still experience issues with the
system's ability to detect the sticker, see
the information in the next section regarding
sticker lost during system operation.
Measurement A has reached maximum or
minimum value:
• The system is designed to work with
drawbars that have a license plate to
hitch ball center measurement of
9–20 in (23–52 cm) when installed.
Do not attempt to use drawbars that
have a length outside this range as the
system performance degrades and
could cause improper system function.
• Make sure that the measurement being
made is the horizontal distance only
from license plate to the hitch ball
center. A straight line distance that
includes any vertical rise or drop
increases the measurement and makes
it inaccurate. Inaccurate
measurements degrade system
performance and could cause improper
system function. See step 4 of the
setup instruction to review
measurement instructions.
292
Super Duty (TFE) Canada/United States of America, enUSA, Edition date: 202008, Third-Printing- Towing
Page 318 of 666
Follow these guidelines if you have a need
for recreational towing, such as towing
your vehicle behind a motorhome. We have
designed these guidelines to prevent
damage to your transmission.
Two-wheel Drive Vehicles
Do not tow your vehicle with any wheels
on the ground, as vehicle or transmission
damage may occur. You must tow your
vehicle with all four (4) wheels off the
ground, such as when using a car-hauling
trailer.
Four-wheel Drive Vehicles
If towing your vehicle with wheels off the
ground it must be all four wheels, such as
when using a car-hauling trailer.
To tow a four-wheel drive vehicle with all
wheels on the ground, place the transfer
case in its neutral position and engage the
four-wheel-down towing feature.
Perform the steps in the following section
after positioning your vehicle behind the
tow vehicle and properly securing them
together.
Note:
Make sure you properly secure your
vehicle to the tow vehicle.
Towing With All Four Wheels On The
Ground
1. Put the ignition in the on position, but do not start the engine.
2. Press and hold the brake pedal.
3. Rotate the four-wheel drive control to 2H.
4. Shift into neutral (N).
5. Using the instrument cluster display controls on the steering wheel, select
Settings
.
6. Select
Advanced Settings.
7. Select
Vehicle.
8. Select
Neutral Tow. 9. Press and hold the
OK button until a
confirmation message appears in the
information display.
Note: You may hear an audible noise as the
transfer case shifts into its neutral position.
10. If you do not see a message in the display, you must perform the
procedure again from the beginning.
11. Leave the transmission in neutral (N)
and turn the ignition off.
12. If your vehicle has an ignition key, you
must leave the key in the ignition
while towing.
Note: To lock and unlock your vehicle, use
the keyless entry keypad or extra set of keys.
13. If your vehicle has intelligent access, switch the vehicle into accessory
mode. See
Starting and Stopping
the Engine (page 174).
Note: You do not need to leave your keys
in the vehicle. You can lock and unlock your
vehicle as you normally do.
14. Release the brake pedal. WARNING:
Do not disconnect the
battery during recreational towing. It
prevents the transfer case from shifting
properly and may cause the vehicle to
roll, even if the transmission is in park
(P). WARNING:
Shifting the transfer
case to its neutral position for
recreational towing may cause the
vehicle to roll, even if the transmission is
in park (P). It may injure the driver and
others. Make sure you press the foot
brake and the vehicle is in a secure, safe
position when you shift to neutral (N).
Note: Failing to put the transfer case in its
neutral position while towing with all four
wheels on the ground will damage vehicle
components.
315
Super Duty (TFE) Canada/United States of America, enUSA, Edition date: 202008, Third-Printing- Towing
Page 319 of 666

Note:
You can check four-wheel-down
towing status at any time by opening the
driver's door or turning the ignition to the
accessory or on position. A message
displays in the information display
confirming your vehicle is in neutral tow.
When finished towing with all four wheels
on the ground return the transfer case to
its 2H position:
1. With your vehicle still properly secured
to the tow vehicle, put the ignition in
the on position, but do not start the
engine. If your vehicle has an ignition
key, switch the key to on. If your vehicle
has intelligent access, switch the
vehicle into accessory mode. See
Starting and Stopping the Engine
(page
174).
2. Press and hold the brake pedal.
3. Shift out of neutral (N).
4. Release the brake pedal.
Note: If completed successfully, the
instrument cluster displays 2H and Neutral
Tow Disabled
.
Note: If the indicator light and message do
not display, you must perform the procedure
again from the beginning.
Note: If
Shift Delayed Pull Forward
displays in the instrument cluster, a transfer
case blockage is present. See resolving the
shift delayed pull forward message
instructions after this section.
5. Apply the parking brake and disconnect
the vehicle from the tow vehicle.
6. Release the parking brake, start the engine and shift the transmission to
drive (D) to make sure the transfer
case is out of neutral (N).
7. If the transfer case does not successfully shift out of neutral (N),
set the parking brake until you can have
your vehicle serviced. Resolving the
Shift Delayed Pull Forward
Message
1. Press and hold the brake pedal.
2. Put the transmission into neutral (N),
and then start the engine.
3. With the engine running, shift the transmission to drive (D) and let the
vehicle roll forward, up to
3 ft (1 m).
4. Make sure the instrument cluster displays that neutral tow is disabled.
316
Super Duty (TFE) Canada/United States of America, enUSA, Edition date: 202008, Third-Printing- Towing
Page 347 of 666
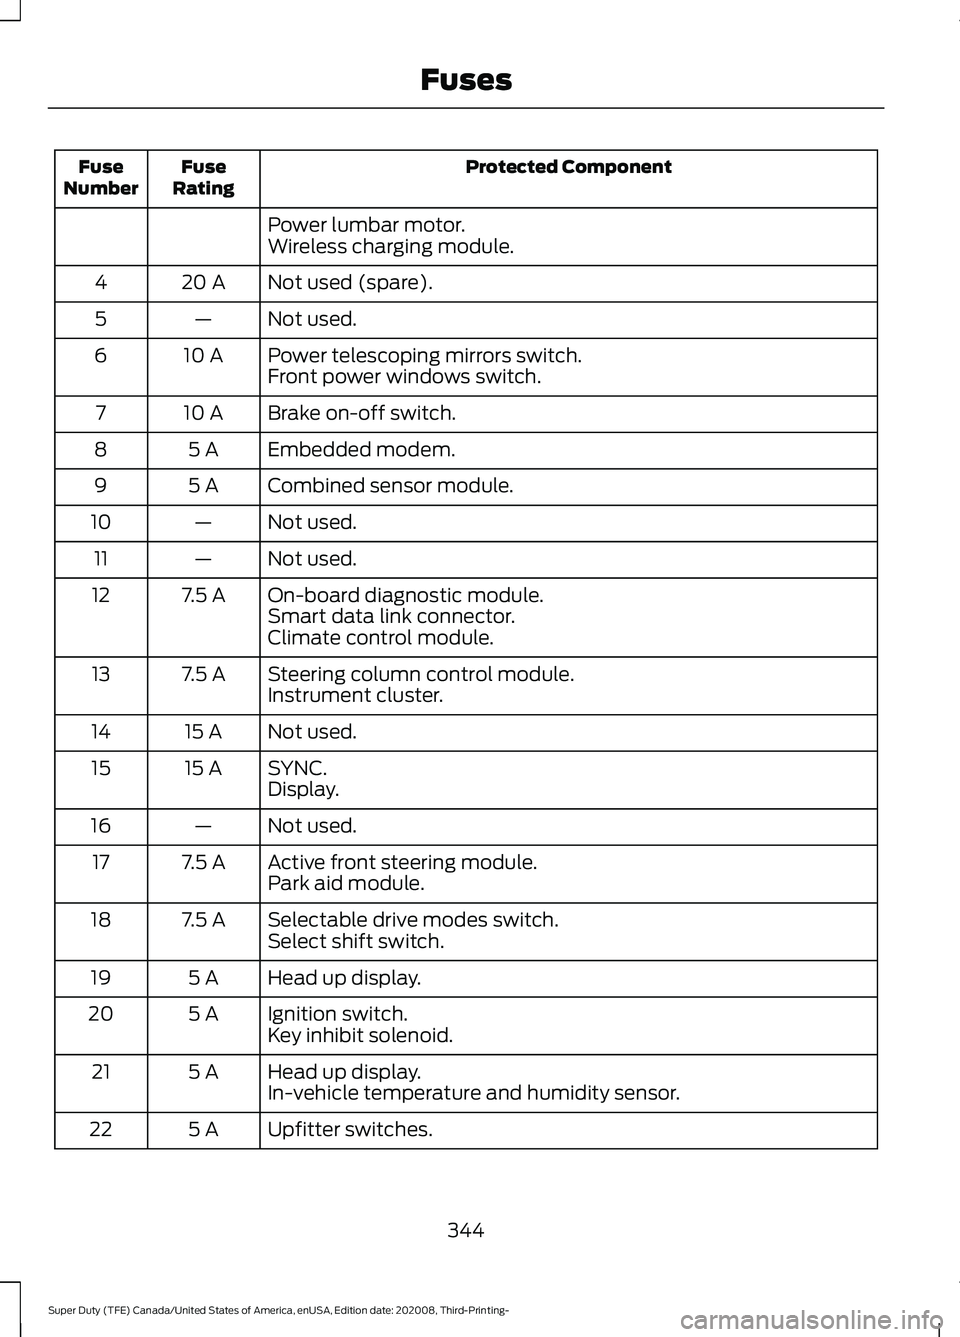
Protected Component
Fuse
Rating
Fuse
Number
Power lumbar motor.
Wireless charging module.
Not used (spare).
20 A
4
Not used.
—
5
Power telescoping mirrors switch.
10 A
6
Front power windows switch.
Brake on-off switch.
10 A
7
Embedded modem.
5 A
8
Combined sensor module.
5 A
9
Not used.
—
10
Not used.
—
11
On-board diagnostic module.
7.5 A
12
Smart data link connector.
Climate control module.
Steering column control module.
7.5 A
13
Instrument cluster.
Not used.
15 A
14
SYNC.
15 A
15
Display.
Not used.
—
16
Active front steering module.
7.5 A
17
Park aid module.
Selectable drive modes switch.
7.5 A
18
Select shift switch.
Head up display.
5 A
19
Ignition switch.
5 A
20
Key inhibit solenoid.
Head up display.
5 A
21
In-vehicle temperature and humidity sensor.
Upfitter switches.
5 A
22
344
Super Duty (TFE) Canada/United States of America, enUSA, Edition date: 202008, Third-Printing- Fuses