2021 FORD F-600 tow bar
[x] Cancel search: tow barPage 307 of 666
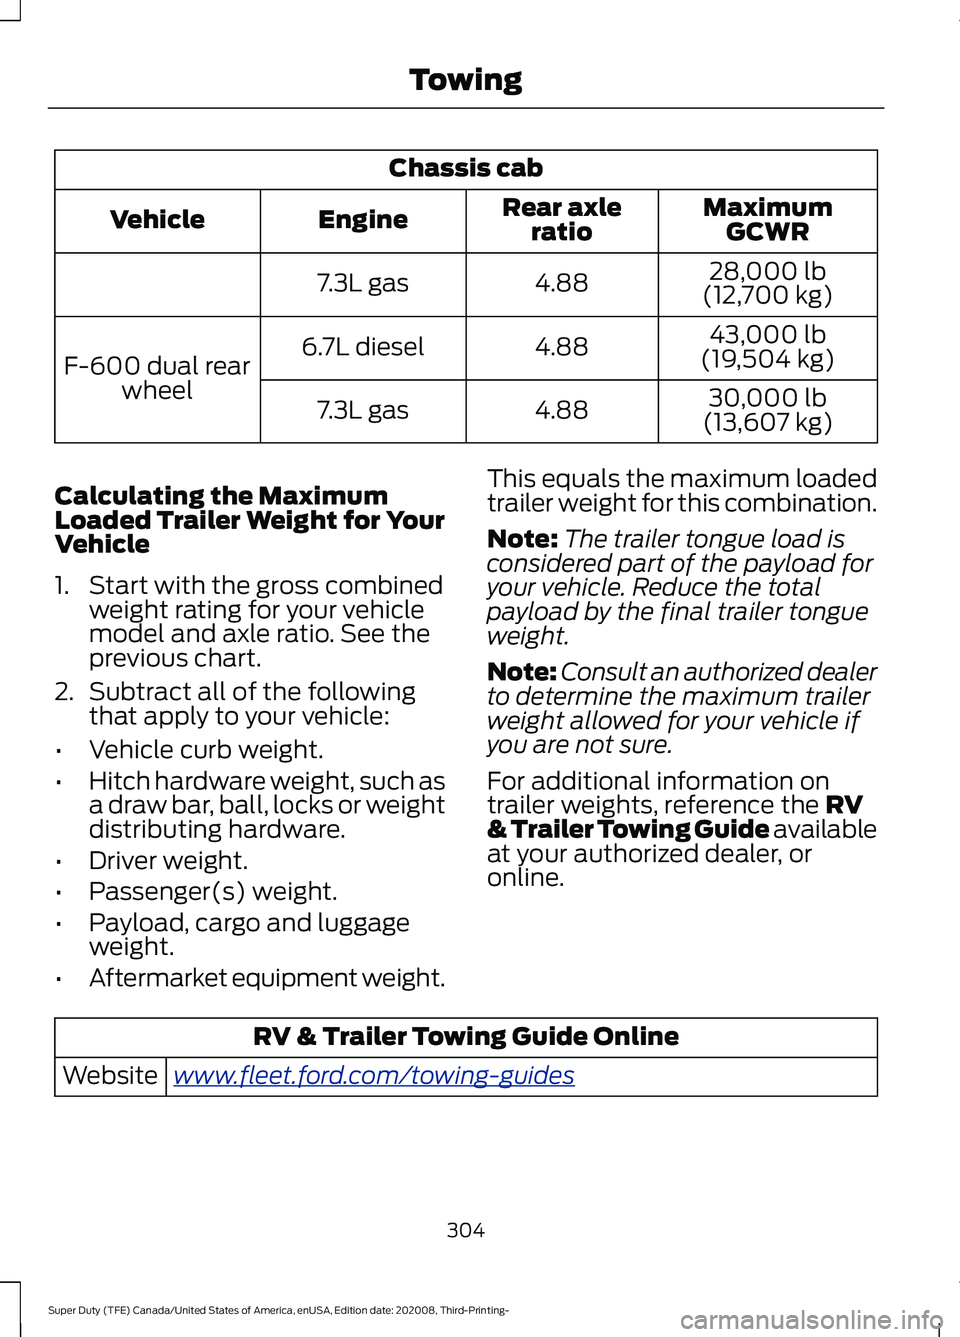
Chassis cab
MaximumGCWR
Rear axle
ratio
Engine
Vehicle
28,000 lb
(12,700 kg)
4.88
7.3L gas
43,000 lb
(19,504 kg)
4.88
6.7L diesel
F-600 dual rear
wheel 30,000 lb
(13,607 kg)
4.88
7.3L gas
Calculating the Maximum
Loaded Trailer Weight for Your
Vehicle
1. Start with the gross combined weight rating for your vehicle
model and axle ratio. See the
previous chart.
2. Subtract all of the following
that apply to your vehicle:
• Vehicle curb weight.
• Hitch hardware weight, such as
a draw bar, ball, locks or weight
distributing hardware.
• Driver weight.
• Passenger(s) weight.
• Payload, cargo and luggage
weight.
• Aftermarket equipment weight. This equals the maximum loaded
trailer weight for this combination.
Note:
The trailer tongue load is
considered part of the payload for
your vehicle. Reduce the total
payload by the final trailer tongue
weight.
Note: Consult an authorized dealer
to determine the maximum trailer
weight allowed for your vehicle if
you are not sure.
For additional information on
trailer weights, reference the RV
& Trailer Towing Guide available
at your authorized dealer, or
online. RV & Trailer Towing Guide Online
www .fl e e t.f or d . c om/ t o wing-g uide sWebsite
304
Super Duty (TFE) Canada/United States of America, enUSA, Edition date: 202008, Third-Printing- Towing
Page 310 of 666
The active guidelines fade in and out
depending on the steering wheel position.
The active guidelines are not shown when
the steering wheel position is straight.
Always use caution while reversing.
Objects in the red zone are closest to your
vehicle and objects in the green zone are
farther away. Objects are getting closer to
your vehicle as they move from the green
zone to the yellow or red zones. Use the
side view mirrors and rear view mirror to
get better coverage on both sides and rear
of your vehicle.
Refer to the Rear View Camera section for
additional information. See Rear View
Camera (page 235).
Hitches
Note: On pick-up trucks, the trailer hitch
provided on this vehicle enhances crash
protection for the fuel system. Do not
remove!
Note: Do not cut, drill, weld or modify trailer
hitches. Modifying trailer hitches can reduce
hitch rating.
Do not use a hitch that either clamps onto
the bumper or attaches to the axle. You
must distribute the load in your trailer so
that 10-15% for conventional towing or
15-25% for fifth wheel towing of the total
weight of the trailer is on the tongue. Do
not exceed the tongue load rating
indicated on the conventional hitch
receiver.
Hitch Components (If Equipped)
The following components are required.
Some are provided in certain vehicles. •
A trailer hitch with a 3 inch receiver and
a 5/8 inch hitch pin. Check the
stamped rating number on the pin to
determine the
21,200 lb (9,616 kg) or
24,200 lb (10,976 kg) hitch pin
capacity.
• A hitch pin sleeve stored in the glove
box to use when mounting the 3 inch
drawbar with the 3/4 inch pin hole.
• A cotter pin to help keep the hitch pin
in place.
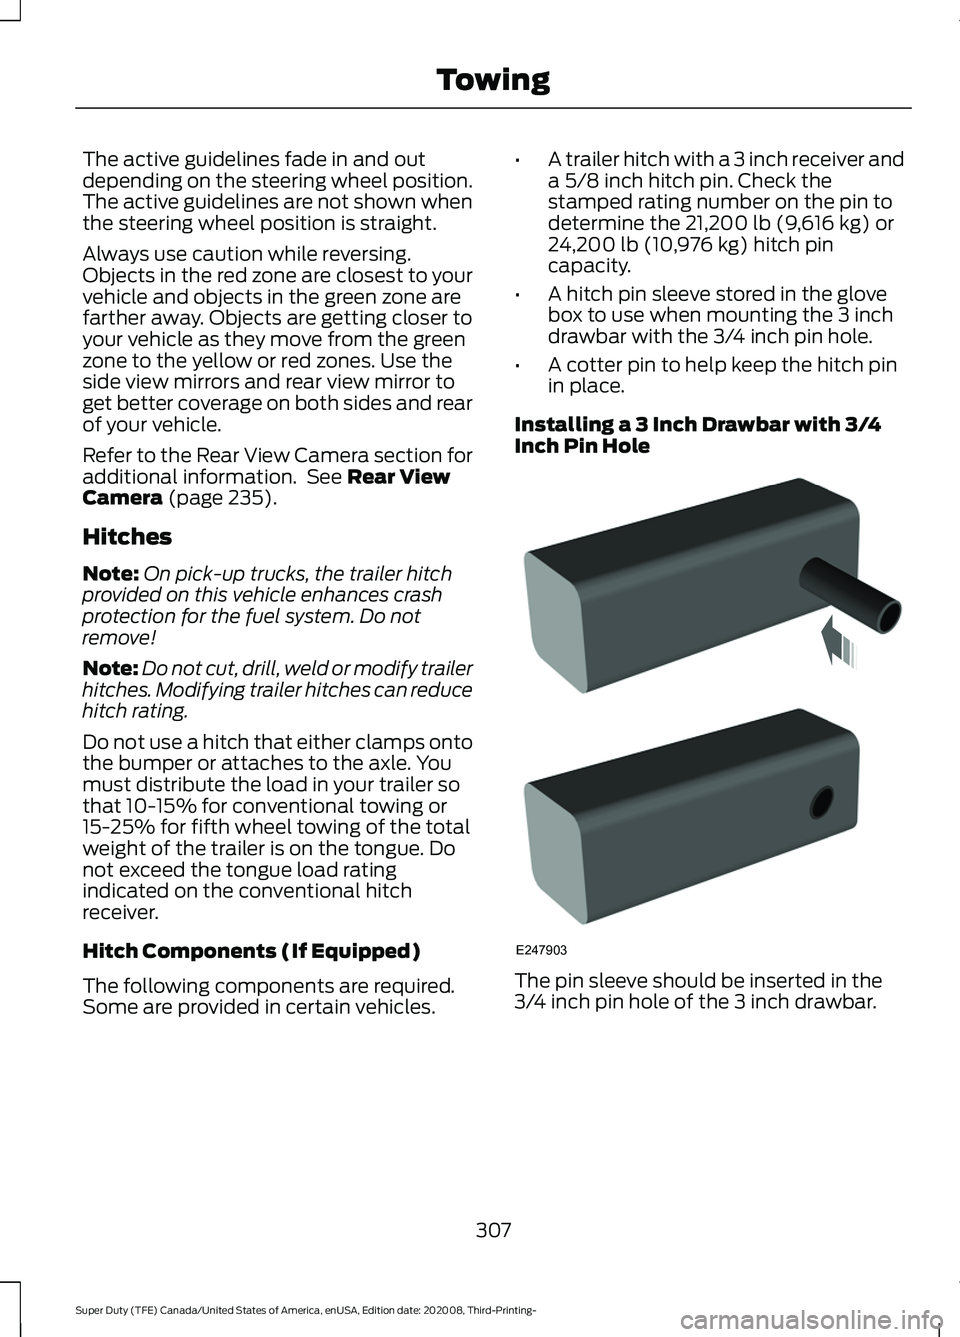
Installing a 3 Inch Drawbar with 3/4
Inch Pin Hole The pin sleeve should be inserted in the
3/4 inch pin hole of the 3 inch drawbar.
307
Super Duty (TFE) Canada/United States of America, enUSA, Edition date: 202008, Third-Printing- TowingE247903
Page 311 of 666
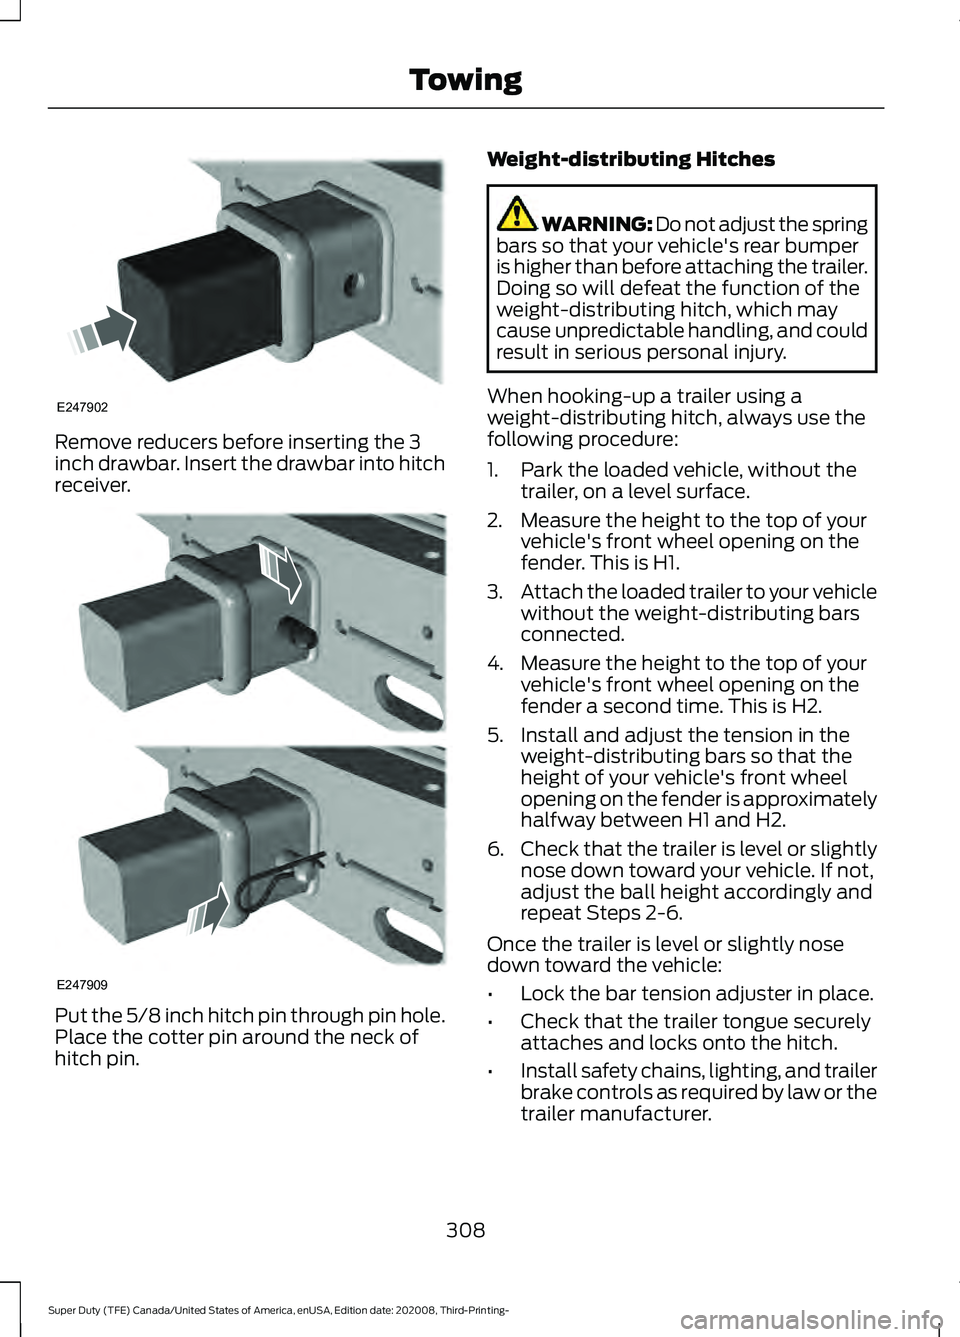
Remove reducers before inserting the 3
inch drawbar. Insert the drawbar into hitch
receiver.
Put the 5/8 inch hitch pin through pin hole.
Place the cotter pin around the neck of
hitch pin. Weight-distributing Hitches WARNING: Do not adjust the spring
bars so that your vehicle's rear bumper
is higher than before attaching the trailer.
Doing so will defeat the function of the
weight-distributing hitch, which may
cause unpredictable handling, and could
result in serious personal injury.
When hooking-up a trailer using a
weight-distributing hitch, always use the
following procedure:
1. Park the loaded vehicle, without the trailer, on a level surface.
2. Measure the height to the top of your vehicle's front wheel opening on the
fender. This is H1.
3. Attach the loaded trailer to your vehicle
without the weight-distributing bars
connected.
4. Measure the height to the top of your vehicle's front wheel opening on the
fender a second time. This is H2.
5. Install and adjust the tension in the weight-distributing bars so that the
height of your vehicle's front wheel
opening on the fender is approximately
halfway between H1 and H2.
6. Check that the trailer is level or slightly
nose down toward your vehicle. If not,
adjust the ball height accordingly and
repeat Steps 2-6.
Once the trailer is level or slightly nose
down toward the vehicle:
• Lock the bar tension adjuster in place.
• Check that the trailer tongue securely
attaches and locks onto the hitch.
• Install safety chains, lighting, and trailer
brake controls as required by law or the
trailer manufacturer.
308
Super Duty (TFE) Canada/United States of America, enUSA, Edition date: 202008, Third-Printing- TowingE247902 E247909
Page 314 of 666
B: Manual control lever: Slide the control
lever to the left to switch on the trailer's
electric brakes independent of the tow
vehicle's. See the following Procedure for
adjusting gain section for instructions on
proper use of this feature. If you use the
manual control while the brake is also
applied, the greater of the two inputs
determines the power sent to the trailer
brakes.
• Stop lamps: Using the manual control
lever lights both the trailer brake lamps
and your vehicle brake lamps.
Trailer brake control messages appear in
the information display as follows:
• TBC GAIN = XX.X NO TRAILER:
Shows the current gain setting.
• TBC GAIN = XX.X OUTPUT=/ / / /
/ /
: Displays when braking. The bars
indicate the amount of power going to
the trailer brakes.
• TRAILER CONNECTED:
Displays
when the system senses a correct
trailer wiring connection.
• TRAILER DISCONNECTED: Displays
when the system senses a trailer
disconnection.
Procedure for Setting Trailer Brake
Controller Effort
Choose either the electric option for trailers
with electromagnetic drum brakes, or the
electric over hydraulic option for trailers
with these brake systems.
Trailer Brake Effort Setting
The trailer brake controller allows the user
to customize how aggressively the trailer
brakes engage. The default value is the low
setting and is the recommended setting
for most trailers. If your trailer's brakes
require more initial voltage, or if you prefer
more aggressive trailer braking, then select
either the medium or the high setting. Procedure for Setting Trailer Brake
Controller Mode
Choose the low, medium or high setting
for the required initial trailer brake output.
Procedure for Adjusting Gain
Note:
Only perform this procedure in a
traffic-free environment at speeds of
approximately
20– 25 mph (30–40 km/h).
The gain setting adjusts the trailer brake
controller for the specific towing condition.
You should change the setting as towing
conditions change. Changes to towing
conditions include trailer load, vehicle load,
road conditions and weather.
The gain should be set to provide the
maximum trailer braking assistance while
making sure the trailer wheels do not lock
when using the brakes. Locked trailer
wheels may lead to trailer instability.
1. Make sure the trailer brakes are in good
working condition, functioning normally
and properly adjusted. See your trailer
dealer if necessary.
2. Hook up the trailer and make the electrical connections according to the
trailer manufacturer's instructions.
3. When you plug in a trailer with electric or electric-over-hydraulic brakes, a
confirmation message appears in the
information display.
4. Use the gain adjustment (+ and -) buttons to increase or decrease the
gain setting to the desired starting
point. A gain setting of 6.0 is a good
starting point for heavier loads.
5. In a traffic-free environment, tow the trailer on a dry, level surface at a speed
of
20– 25 mph (30–40 km/h) and
squeeze the manual control lever
completely.
311
Super Duty (TFE) Canada/United States of America, enUSA, Edition date: 202008, Third-Printing- Towing
Page 320 of 666
ECONOMICAL DRIVING
Your fuel economy is affected by several
things, such as how you drive, the
conditions you drive under, and how you
maintain your vehicle.
You may improve your fuel economy by
keeping these things in mind:
•
Accelerate and slow down in a smooth,
moderate fashion.
• Drive at steady speeds without
stopping.
• Anticipate stops; slowing down may
eliminate the need to stop.
• Combine errands and minimize
stop-and-go driving.
• Close the windows for high-speed
driving.
• Drive at reasonable speeds (traveling
at 55 mph [88 km/h] uses 15% less
fuel than traveling at 65 mph [105
km/h]).
• Keep the tires properly inflated and use
only the recommended size.
• Use the recommended engine oil.
• Perform all regularly scheduled
maintenance.
Avoid these actions; they reduce your fuel
economy:
• Sudden accelerations or hard
accelerations.
• Revving the engine before turning it off.
• Idle for periods longer than one minute.
• Warm up your vehicle on cold
mornings.
• Use the air conditioner or front
defroster.
• Use the speed control in hilly terrain.
• Rest your foot on the brake pedal while
driving. •
Drive a heavily loaded vehicle or tow a
trailer.
• Carry unnecessary weight
(approximately 1 mpg [0.4 km/L] is
lost for every 400 lb [180 kilogram] of
weight carried).
• Driving with the wheels out of
alignment.
Conditions
• Heavily loading a vehicle or towing a
trailer may reduce fuel economy at any
speed.
• Adding certain accessories to your
vehicle (for example bug deflectors,
rollbars, light bars, running boards, ski
racks or luggage racks) may reduce
fuel economy.
• To maximize the fuel economy, drive
with the tonneau cover installed (if
equipped).
• Using fuel blended with alcohol may
lower fuel economy.
• Fuel economy may decrease with lower
temperatures during the first 5–10 mi
(12 –16 km) of driving.
• Driving on flat terrain offers improved
fuel economy as compared to driving
on hilly terrain.
• Transmissions give their best fuel
economy when operated in the top
cruise gear and with steady pressure
on the gas pedal.
• Four-wheel-drive operation (if
equipped) is less fuel efficient than
two-wheel-drive operation.
OFF-ROAD DRIVING
Note: The following off-road driving
information applies to Tremor package
equipped vehicles only.
317
Super Duty (TFE) Canada/United States of America, enUSA, Edition date: 202008, Third-Printing- Driving Hints
Page 359 of 666
3. Add engine oil that meets the correct
specification.
4. Recheck the oil level.
5. If the oil level is correct, replace the dipstick and make sure it is fully seated.
6. Replace the engine oil filler cap. Turn it clockwise until you feel a strong
resistance.
Note: Do not add oil further than the
maximum mark. Oil levels above the
maximum mark may cause engine damage.
Note: Make sure you install the oil filler cap
correctly.
Note: Soak up any spillage with an
absorbent cloth immediately.
CHANGING THE ENGINE OIL
AND OIL FILTER
If your vehicle is equipped with a diesel
engine, an Intelligent Oil Life Monitor™
calculates the proper oil change service
interval. When the information display
indicates: OIL CHANGE REQUIRED, change
the engine oil and oil filter. See
Information Displays (page 110).
The engine oil filter protects your engine
by filtering harmful, abrasive or sludge
particles and particles significantly smaller
than most available will-fit filters. See
Motorcraft Parts
(page 443).
1. Unscrew the oil filter and oil pan drain plug and wait for the oil to drain.
2. Replace the filter.
Note: Do not handle hot oil filter with bare
hands.
3. Reinstall the oil pan drain plug.
4. Refill the engine with new oil. See Engine Oil Capacity and
Specification
(page 449). 5. For diesel engines, you need to reset
the Intelligent Oil Life Monitor™. See
Information Displays
(page 110).
Engine lubrication for severe
service operation
The following conditions define severe
operation for which engine operation with
SAE 5W-40 that meets our specification
WSS-M2C171-F1 is recommended. Oil and
oil filter change intervals will be
determined by the Intelligent Oil Life
Monitor™ as noted previously.
• Frequent or extended idling (over 10
minutes per hour of normal driving).
• Low-speed operation/stationary use.
• If vehicle is operated in sustained
ambient temperatures below
-9°F
(-23°C) or above 100°F (38°C).
• Frequent low-speed operation,
consistent heavy traffic less than
25 mph (40 km/h)
.
• Operating in severe dust conditions.
• Operating the vehicle off road.
• Towing a trailer over
1,000 mi
(1,600 km).
• Sustained, high-speed driving at Gross
Vehicle Weight Rating (maximum
loaded weight for vehicle operation).
• Use of fuels with sulfur content other
than ultra-low sulfur diesel (ULSD).
• Use of high-sulfur diesel fuel.
OIL CHANGE INDICATOR
RESET
Use the information display controls on
the steering wheel to reset the oil change
indicator.
356
Super Duty (TFE) Canada/United States of America, enUSA, Edition date: 202008, Third-Printing- Maintenance
Page 527 of 666
Action and Description
Menu Item
Replay audio on the current channel. You can replay approx-
imately 45 minutes of audio as long as you remain tuned to
the current station. Changing stations erases the previous
audio.
Replay
When you are in replay mode, you are not
able to select a different preset until you
return to live audio. Pressing this button
returns you to the live broadcast.
Live
Save the current song, artist, or team as a favorite. The system
alerts you when it plays again on any channel.
ALERT
Selecting this button allows you to enable and edit alerts.
Memory Presets
To set a preset, tune to the station then
press and hold one of the memory preset
buttons. The audio mutes briefly while the
system saves the station and returns once
the station is stored. You may be able to add additional preset
pages using the settings option on the
feature bar.
SiriusXM Satellite Radio Reception Factors and Troubleshooting Potential Reception Issues
For optimal reception performance, keep the antenna clear
of snow and ice build-up and keep luggage and other
materials as far away from the antenna as possible.
Antenna obstructions
Hills, mountains, tall buildings, bridges, tunnels, freeway
overpasses, parking garages, dense tree foliage and thunder-
storms can interfere with your reception.
Terrain
When you pass a ground-based broadcast-repeating tower,
a stronger signal may overtake a weaker one and the audio
system may mute.
Station overload
Your display may show ACQUIRING... to indicate the interfer-
ence and the audio system may mute.
Satellite radio signal
interference
524
Super Duty (TFE) Canada/United States of America, enUSA, Edition date: 202008, Third-Printing- SYNC™ 3 (If Equipped)