2021 FORD F-600 steering wheel
[x] Cancel search: steering wheelPage 81 of 666

USING POWER RUNNING
BOARDS
WARNING: In extreme climates,
excessive ice buildup may occur, causing
the running boards not to deploy. Make
sure that the running boards have
deployed, and have finished moving
before attempting to step on them. The
running boards will resume normal
function once the blockage is cleared. WARNING:
Switch off the running
boards before jacking or placing any
object under your vehicle. Never place
your hand between the extended running
board and your vehicle. A moving running
board may cause injury.
Note: Do not use the running boards, front
and rear hinge assemblies, running board
motors, or the running board underbody
mounts to lift your vehicle when jacking.
Always use proper jacking points.
Note: The running boards may operate
more slowly in cool temperatures.
Note: The running board mechanism may
trap debris such as mud, dirt, snow, ice and
salt. This may cause unwanted noise. If this
happens, manually set the running boards
to the deployed position. Then, wash the
system, in particular the front and rear hinge
arms, with a high-pressure car wash wand. Automatic Power Deploy The running boards extend down and out
when you open the door. This can help you
enter and exit your vehicle.
Automatic Power Stow
When you close the doors, the running
boards return to the stowed position after
a two-second delay.
Manual Power Deploy
You can manually operate the running
boards in the information display.
1. Using the instrument cluster display
controls on the steering wheel, select
Settings
.
2. Select
Advanced Settings.
3. Select
Vehicle.
4. Select
Power Running Boards.
5. Select a setting.
Set the running boards in the deployed
position to access the roof.
The running boards return to the stowed
position and enter automatic mode when
the vehicle speed exceeds 3 mph (5 km/h).
78
Super Duty (TFE) Canada/United States of America, enUSA, Edition date: 202008, Third-Printing- Power Running Boards
(If Equipped)E166682
Page 83 of 666

ADJUSTING THE STEERING
WHEEL - VEHICLES WITH:
POWER ADJUSTABLE
STEERING COLUMN
WARNING: Do not adjust the
steering wheel when your vehicle is
moving.
Note: Make sure that you are sitting in the
correct position. See
Sitting in the Correct
Position (page 151). Use the control on the side of the steering
column to adjust the position.
To adjust:
•
Tilt: Press the top or bottom of the
control.
• Telescope: Press the front or rear of
the control. End of Travel Position
The steering column sets a stopping
position just short of the end of the column
position to prevent damage to the steering
column. A new stopping position sets if
the steering column encounters an object
when tilting or telescoping.
To reset the steering column to its normal
stopping position:
1. Confirm there is nothing obstructing
the motion of the steering column.
2. Press and hold the steering column control until the steering column stops
moving.
3. Press the steering column control again.
Note: The steering column may begin to
move again.
4. When the steering column stops, continue holding the control for a few
seconds.
5. Repeat for each direction as necessary.
A new stopping position sets. The next
time you tilt or telescope the steering
column, it stops just short of the end of the
column position.
Memory Feature
(If Equipped)
You can save and recall the steering
column position with the memory
function. See
Memory Function (page
157).
Pressing the adjustment control during a
memory recall cancels the operation.
Easy Entry and Exit Feature
The column moves up when you switch
the ignition off. Switch the ignition on to
return the system to its previous settings.
You can switch this feature on or off in the
information display. See
Information
Displays (page 110).
80
Super Duty (TFE) Canada/United States of America, enUSA, Edition date: 202008, Third-Printing- Steering WheelE261582
Page 84 of 666

Note:
If you press any adjustment or
memory button when in easy exit mode, the
system cancels the operation.
Note: Depending on your vehicle, the
column may move up and in.
ADJUSTING THE STEERING
WHEEL - VEHICLES WITH:
MANUAL ADJUSTABLE
STEERING COLUMN WARNING: Do not adjust the
steering wheel when your vehicle is
moving.
Note: Make sure that you are sitting in the
correct position. See
Sitting in the Correct
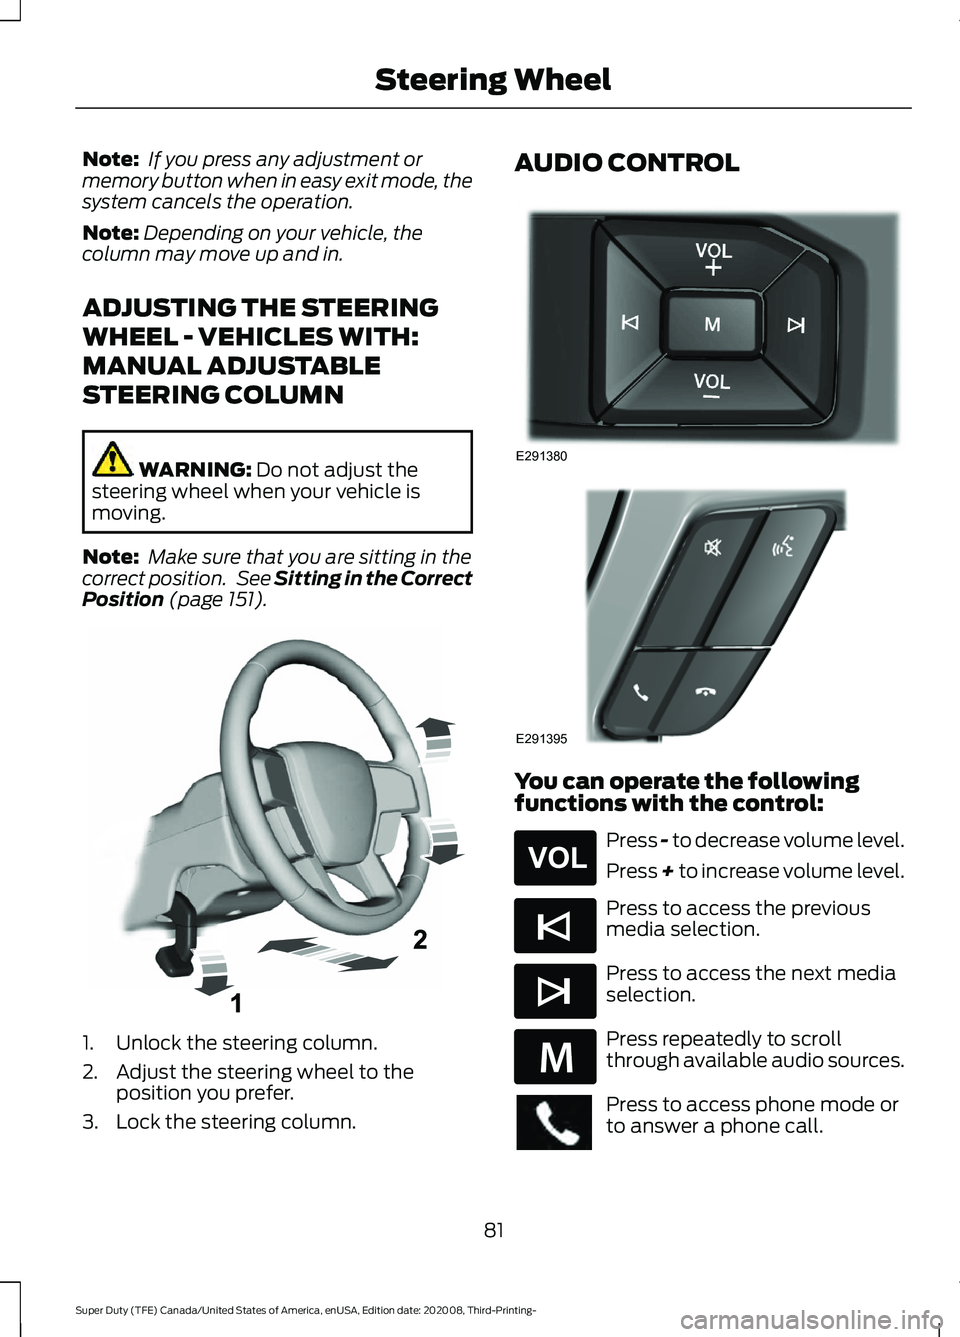
Position (page 151). 1. Unlock the steering column.
2. Adjust the steering wheel to the
position you prefer.
3. Lock the steering column. AUDIO CONTROL
You can operate the following
functions with the control:
Press - to decrease volume level.
Press + to increase volume level.
Press to access the previous
media selection.
Press to access the next media
selection.
Press repeatedly to scroll
through available audio sources.
Press to access phone mode or
to answer a phone call.
81
Super Duty (TFE) Canada/United States of America, enUSA, Edition date: 202008, Third-Printing- Steering WheelE261502 E291380 E291395 E265304 E265045 E265044 E289636
Page 85 of 666

Press to end a phone call.
Press to silence the current
media
VOICE CONTROL
The controls are on the steering wheel. Press and release to activate
voice recognition.
CRUISE CONTROL - VEHICLES
WITH: CRUISE CONTROL See Switching Cruise Control On and
Off (page 242). CRUISE CONTROL - VEHICLES
WITH: ADAPTIVE CRUISE
CONTROL See
Using Adaptive Cruise Control
(page 243).
INFORMATION DISPLAY
CONTROL See
Information Displays (page 110).
HEATED STEERING WHEEL
(IF
EQUIPPED)
Switch the heated steering wheel on and
off using the touchscreen.
82
Super Duty (TFE) Canada/United States of America, enUSA, Edition date: 202008, Third-Printing- Steering WheelE265040 E268549 E142599 E191329 E191337 E191336
Page 86 of 666

Touch the button to switch the
heated steering wheel on and
off.
Note: You can use the heated steering
wheel only when the engine is running.
Note: The system uses a sensor and is
designed to control the temperature of the
steering wheel and to prevent it from
overheating.
Note: In warm temperatures, the steering
wheel quickly reaches its maximum
temperature and the system reduces the
current to the heating element. This could
cause you to think that the system has
stopped working but it has not. This is
normal.
HORN Press on the center of the
steering wheel near the horn icon
to activate the horn.
83
Super Duty (TFE) Canada/United States of America, enUSA, Edition date: 202008, Third-Printing- Steering Wheel E270945
Page 108 of 666

WARNING LAMPS AND
INDICATORS
The following warning lamps and
indicators alert you to a vehicle condition
that may become serious. Some lamps
illuminate when you start your vehicle to
make sure they work. If any lamps remain
on after starting your vehicle, refer to the
respective system warning lamp for further
information.
Note:
Some warning indicators appear in
the information display and operate the
same as a warning lamp but do not
illuminate when you start your vehicle.
Adaptive Cruise Control (If Equipped) The speed control system
indicator light changes color to
indicate what mode the system
is in. See Using Adaptive Cruise Control
(page
243).
On (white light): Illuminates when the
adaptive cruise control system is turned
on. Turns off when the speed control
system is turned off.
Engaged (green light): Illuminates when
the adaptive cruise control system is
engaged. Turns off when the speed control
system is disengaged.
Adaptive Steering
(If Equipped) The adaptive steering system
indicator illuminates if the
system detects a fault during the
continuous diagnostic checks. Adaptive Steering Initialization (yellow,
flashing): The adaptive steering system
has detected a difference between
steering wheel angle and the desired road
wheel angle. The steering wheel adjusts
itself to correct this difference. This
adjustment is part of normal system
operation.
Adaptive Steering Off (yellow, solid): The
adaptive steering system is off. It is
possible that the steering wheel may not
be straight when your vehicle is driving
straight ahead. If this message persists,
have your vehicle checked as soon as
possible.
Adaptive Steering Loss (red, solid): The
adaptive steering system integrity cannot
be verified. Do not drive your vehicle and
have the system checked immediately.
See
Steering (page 262).
Anti-Lock Braking System Illuminates momentarily when
you switch on the ignition to
confirm that the lamp is
functional. If it does not illuminate when
you switch on the ignition or begins to flash
at anytime, have the system checked as
soon as possible.
If it illuminates when you are driving, this
indicates a malfunction. You will continue
to have the normal braking system
(without ABS) unless the brake system
warning lamp also illuminates. Have the
system checked as soon as possible.
Automatic High Beam
(If Equipped) Illuminates when this feature is
on. See
What Is Automatic
High Beam Control (page 93).
105
Super Duty (TFE) Canada/United States of America, enUSA, Edition date: 202008, Third-Printing- Instrument ClusterE144524 E223375
Page 113 of 666

GENERAL INFORMATION
WARNING: Driving while distracted
can result in loss of vehicle control, crash
and injury. We strongly recommend that
you use extreme caution when using any
device that may take your focus off the
road. Your primary responsibility is the
safe operation of your vehicle. We
recommend against the use of any
hand-held device while driving and
encourage the use of voice-operated
systems when possible. Make sure you
are aware of all applicable local laws
that may affect the use of electronic
devices while driving.
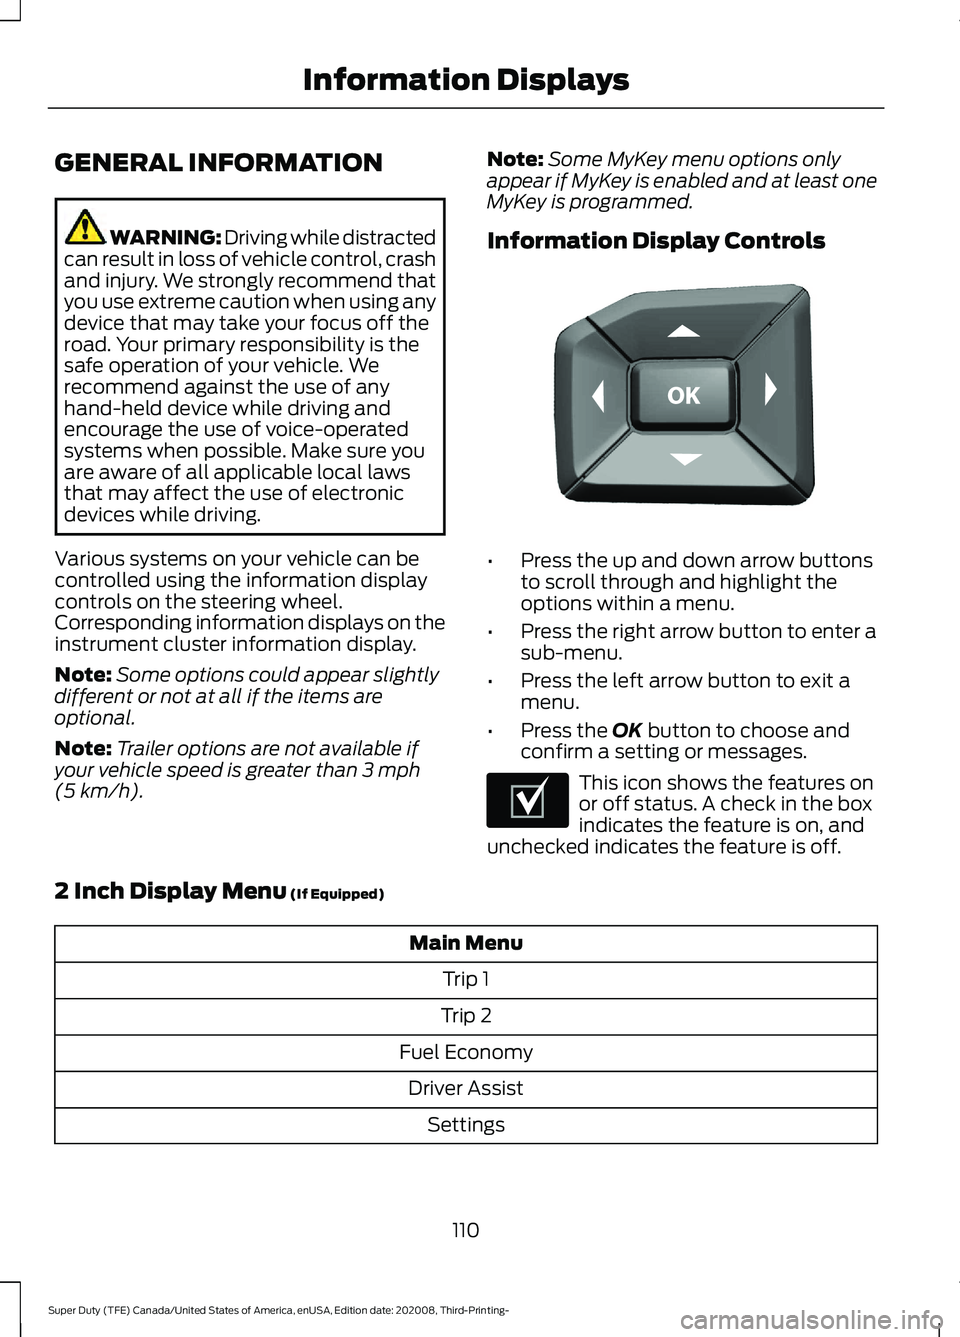
Various systems on your vehicle can be
controlled using the information display
controls on the steering wheel.
Corresponding information displays on the
instrument cluster information display.
Note: Some options could appear slightly
different or not at all if the items are
optional.
Note: Trailer options are not available if
your vehicle speed is greater than 3 mph
(5 km/h). Note:
Some MyKey menu options only
appear if MyKey is enabled and at least one
MyKey is programmed.
Information Display Controls •
Press the up and down arrow buttons
to scroll through and highlight the
options within a menu.
• Press the right arrow button to enter a
sub-menu.
• Press the left arrow button to exit a
menu.
• Press the
OK button to choose and
confirm a setting or messages. This icon shows the features on
or off status. A check in the box
indicates the feature is on, and
unchecked indicates the feature is off.
2 Inch Display Menu
(If Equipped) Main Menu
Trip 1
Trip 2
Fuel Economy Driver Assist Settings
110
Super Duty (TFE) Canada/United States of America, enUSA, Edition date: 202008, Third-Printing- Information DisplaysE184451 E204495
Page 118 of 666

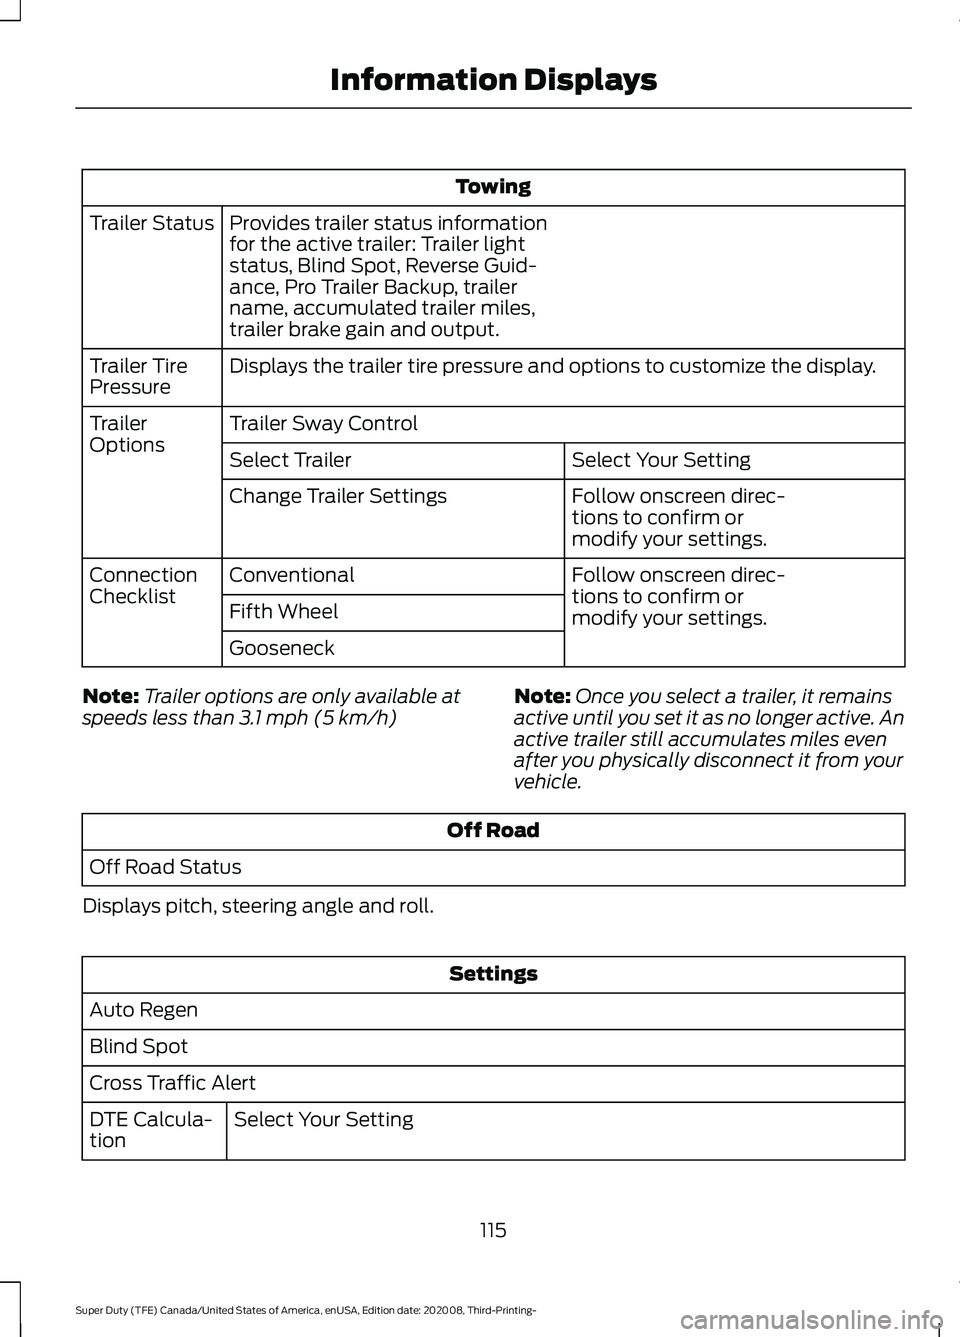
Towing
Provides trailer status information
for the active trailer: Trailer light
status, Blind Spot, Reverse Guid-
ance, Pro Trailer Backup, trailer
name, accumulated trailer miles,
trailer brake gain and output.
Trailer Status
Displays the trailer tire pressure and options to customize the display.
Trailer Tire
Pressure
Trailer Sway Control
Trailer
Options
Select Your Setting
Select Trailer
Follow onscreen direc-
tions to confirm or
modify your settings.
Change Trailer Settings
Follow onscreen direc-
tions to confirm or
modify your settings.
Conventional
Connection
Checklist
Fifth Wheel
Gooseneck
Note: Trailer options are only available at
speeds less than 3.1 mph (5 km/h) Note:
Once you select a trailer, it remains
active until you set it as no longer active. An
active trailer still accumulates miles even
after you physically disconnect it from your
vehicle. Off Road
Off Road Status
Displays pitch, steering angle and roll. Settings
Auto Regen
Blind Spot
Cross Traffic Alert Select Your Setting
DTE Calcula-
tion
115
Super Duty (TFE) Canada/United States of America, enUSA, Edition date: 202008, Third-Printing- Information Displays