2021 FORD F-600 engine
[x] Cancel search: enginePage 209 of 666

Operator Commanded Regeneration
with Automatic Regeneration Control
(If Equipped)
If your vehicle is operated with significant
stationary operation, low speed drive
cycles less than 25 mph (40 km/h), short
drive cycles, drive time less than 15 minutes
or the vehicle does not fully warm up,
passive and active regeneration may not
sufficiently clean the diesel particulate
filter system. You can switch off automatic
regeneration until better driving conditions
are available, for example steady high
speed driving. You can then switch
automatic regeneration back on to clean
the diesel particulate filter.
Switching Automatic Regeneration
Control On and Off
To switch operator commanded
regeneration on and off, use the
information display control on the steering
wheel. See Information Messages (page
121
). Scroll to the exhaust cleaning
message, a check in the box indicates the
feature is enabled, and unchecked
indicates the feature is disabled.
How to Interrupt or Cancel Operator
Commanded Regeneration
If you need to cancel the operator
commanded regeneration, pressing the
brake, accelerator or switching the engine
off stops the procedure. Depending on the
amount of time you allowed the operator
commanded regeneration to operate, soot
may not have had sufficient time to be fully
eliminated, but the exhaust system and
exhaust gas may still be hot. If you shut
your vehicle off during operator
commanded regeneration, you may notice
turbo flutter. This is a normal consequence
caused by shutting off a diesel engine
during boosted operation and is considered
normal. Filter Service and Maintenance
Over time, a slight amount of ash builds
up in the diesel particulate filter, which is
not removed during the regeneration
process. The filter may need to be replaced
with a new or remanufactured part at
approximately 250,000 mi (400,000 km).
Actual mileage varies depending on engine
and vehicle operating conditions.
If filter service is required, the
engine control system warning
lamp illuminates in the
information display. If there are any issues with the
diesel particulate filter system,
the engine control system
warning lamp and a service
engine soon warning lamp
illuminate to inform you that
your vehicle requires service. Have your
vehicle checked as soon as possible.
Resonator and Tailpipe Assembly
Maintenance
Aftermarket devices or modifications to
the exhaust system may reduce the
effectiveness of the exhaust system as
well as cause damage to the exhaust
system or engine. This may also degrade
vehicle performance and could lead to
engine damage that may not be covered
by the vehicle Warranty.
206
Super Duty (TFE) Canada/United States of America, enUSA, Edition date: 202008, Third-Printing- Engine Emission Control
Page 211 of 666
To return to the normal drive (D) position,
move the shift lever from manual (M) to
drive (D).
The transmission operates through the full
range of gears.
Forced downshifts
•
Allowed in drive (D) with the tow/haul
feature on or off.
• Press the accelerator to the floor.
• Allows transmission to select an
appropriate gear.
Understanding Your SelectShift
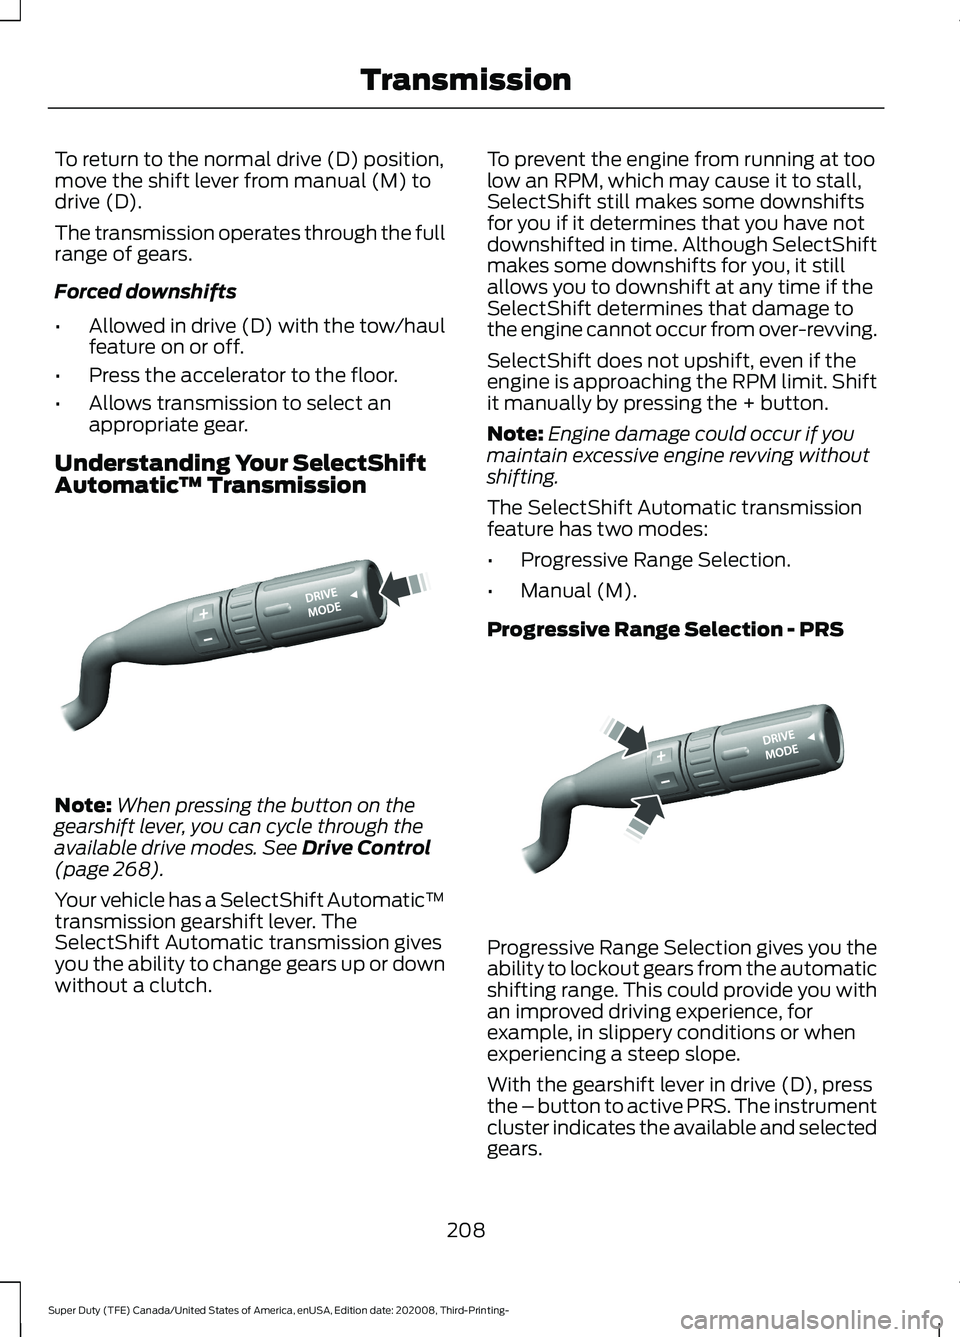
Automatic ™ TransmissionNote:
When pressing the button on the
gearshift lever, you can cycle through the
available drive modes. See Drive Control
(page 268).
Your vehicle has a SelectShift Automatic ™
transmission gearshift lever. The
SelectShift Automatic transmission gives
you the ability to change gears up or down
without a clutch. To prevent the engine from running at too
low an RPM, which may cause it to stall,
SelectShift still makes some downshifts
for you if it determines that you have not
downshifted in time. Although SelectShift
makes some downshifts for you, it still
allows you to downshift at any time if the
SelectShift determines that damage to
the engine cannot occur from over-revving.
SelectShift does not upshift, even if the
engine is approaching the RPM limit. Shift
it manually by pressing the + button.
Note:
Engine damage could occur if you
maintain excessive engine revving without
shifting.
The SelectShift Automatic transmission
feature has two modes:
• Progressive Range Selection.
• Manual (M).
Progressive Range Selection - PRS Progressive Range Selection gives you the
ability to lockout gears from the automatic
shifting range. This could provide you with
an improved driving experience, for
example, in slippery conditions or when
experiencing a steep slope.
With the gearshift lever in drive (D), press
the – button to active PRS. The instrument
cluster indicates the available and selected
gears.
208
Super Duty (TFE) Canada/United States of America, enUSA, Edition date: 202008, Third-Printing- TransmissionE249567 E312894
Page 212 of 666

All available gears display with the current
gear indicated. Press the – button again to
lock out gears beginning with the highest
gear, for example, press the – button twice
to lock out 10th and 9th gears. Only the
available gears display, and the
transmission shifts between the available
gears. Press the + button to unlock gears
to allow the transmission to shift to higher
gears. The transmission shifts within the
gear range you select.
Manual (M)
Moving the gearshift lever to the manual
(M) position allows you to manually select
the gear you prefer. Only the current gear
displays. Use the buttons on the gearshift
lever to manually select gears. Press the
+ button to upshift or the – button to
downshift. Return the transmission to a
different gearshift position to deactivate
manual control.
Recommended shift speeds
Upshift according to the following chart: 6-Speed Transmissions
Upshifts when Accelerating (Recom-
mended for Best Fuel Economy)
Gasoline Engines
Shift from:
8 mph (13 km/h)
1 - 2
16 mph (26 km/h)
2 - 3
22 mph (35 km/h)
3 - 4
35 mph (56 km/h)
4 - 5
44 mph (71 km/h)
5 - 6 Upshifts when Accelerating (Recommended for Best Fuel Economy) 10-Speed
Diesel engines
Gasoline engines
Shift from:
10 mph (16 km/h)
7 mph (11 km/h)
1 - 2
15 mph (24 km/h)
10 mph (16 km/h)
2 - 3
19 mph (31 km/h)
17 mph (27 km/h)
3 - 4
22 mph (35 km/h)
20 mph (32 km/h)
4 - 5
25 mph (40 km/h)
23 mph (37 km/h)
5 - 6
31 mph (50 km/h)
29 mph (47 km/h)
6 - 7
209
Super Duty (TFE) Canada/United States of America, enUSA, Edition date: 202008, Third-Printing- Transmission
Page 213 of 666
Upshifts when Accelerating (Recommended for Best Fuel Economy) 10-Speed
36 mph (58 km/h)
34 mph (55 km/h)
7 - 8
45 mph (72 km/h)
44 mph (71 km/h)
8 - 9
49 mph (79 km/h)
47 mph (76 km/h)
9 - 10
Automatic Transmission Adaptive
Learning
This feature's design is to increase
durability and provide consistent shift feel
over the life of your vehicle. A new vehicle
or transmission may have firm shifts, soft
shifts or both. This operation is normal and
does not affect function or durability of the
transmission. Over time, the adaptive
learning process fully updates transmission
operation. Additionally, whenever you
disconnect the battery or install a new
battery, the system must relearn the
strategy.
Neutral Idle with F350, F450, F550
and F600 Chassis Cab Vehicles
Your transmission could reduce the load
on the engine when the vehicle stops, and
the gear selector is in drive (D) to reduce
fuel consumption and emissions. The
transmission resumes operation when you
release the brake. This feature activates
when the transmission is sufficiently
warmed, and the vehicle is on a level slope.
Brake-Shift Interlock WARNING: When doing this
procedure, you need to take the
transmission out of park (P) which
means your vehicle can roll freely. To
avoid unwanted vehicle movement,
always fully apply the parking brake prior
to doing this procedure. Use wheels
chocks if appropriate. WARNING:
If the parking brake is
fully released, but the brake warning
lamp remains illuminated, the brakes
may not be working properly. Have your
vehicle checked as soon as possible.
Note: Do not drive your vehicle until you
verify that the brake lamps are working.
Your vehicle comes with brake-shift
interlock that prevents the gearshift lever
from moving from park (P) when you
switch the ignition on but have not pressed
the brake pedal.
If you cannot move the gearshift lever out
of the park (P) position when the ignition
is on and the brake pedal pressed, a
malfunction could have occurred. It is
possible that a fuse has blown, or your
vehicle ’s brake lamps are not operating
properly. See
Fuse Specification Chart
(page 339).
If you do not have a blown fuse and the
brake lamps are working properly, the
following procedure allows you to move
the gearshift lever from park (P):
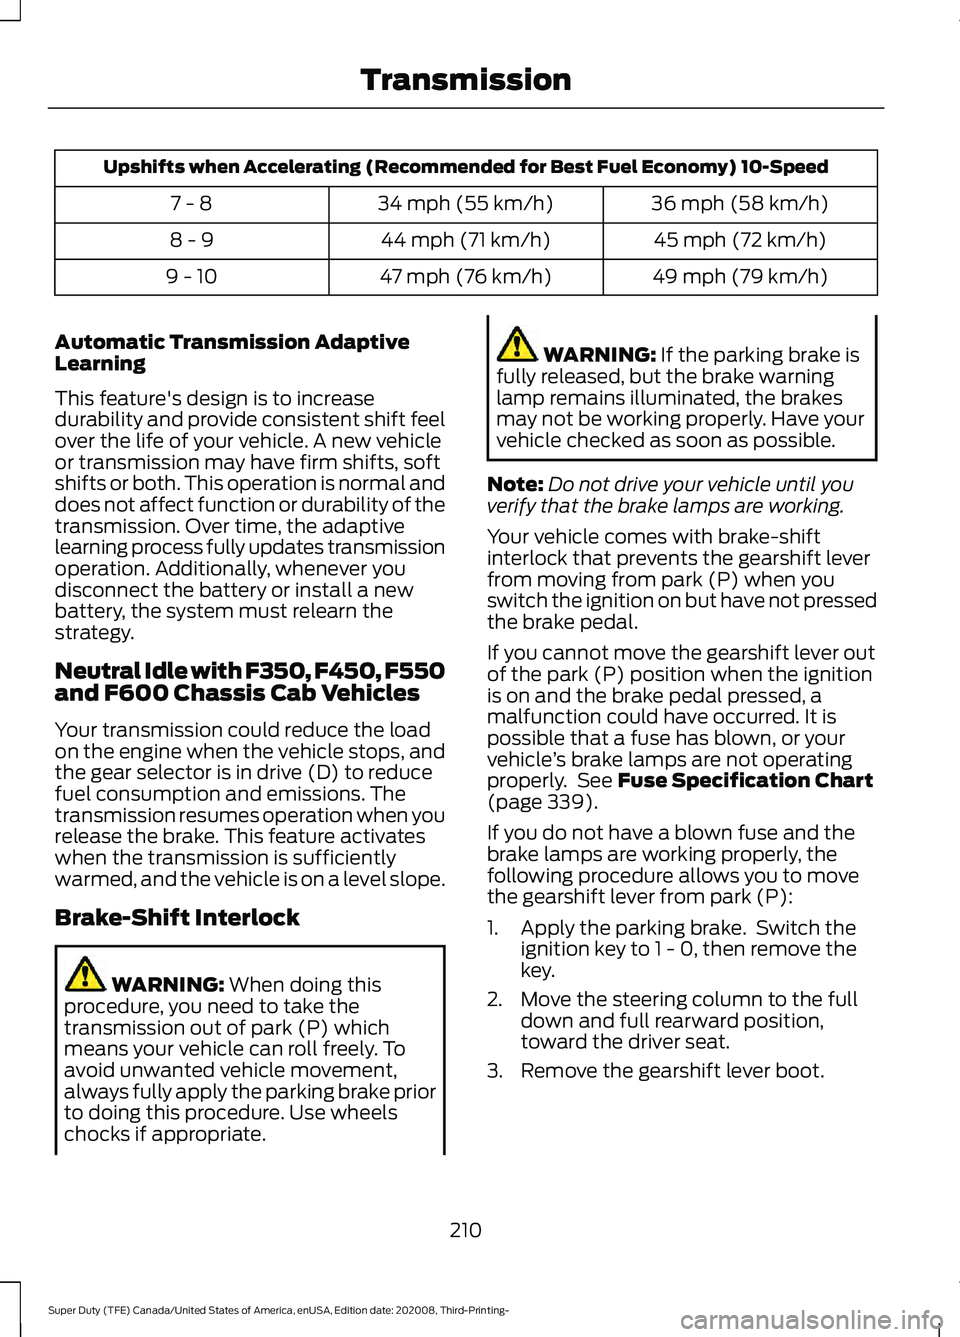
1. Apply the parking brake. Switch the ignition key to 1 - 0, then remove the
key.
2. Move the steering column to the full down and full rearward position,
toward the driver seat.
3. Remove the gearshift lever boot.
210
Super Duty (TFE) Canada/United States of America, enUSA, Edition date: 202008, Third-Printing- Transmission
Page 214 of 666
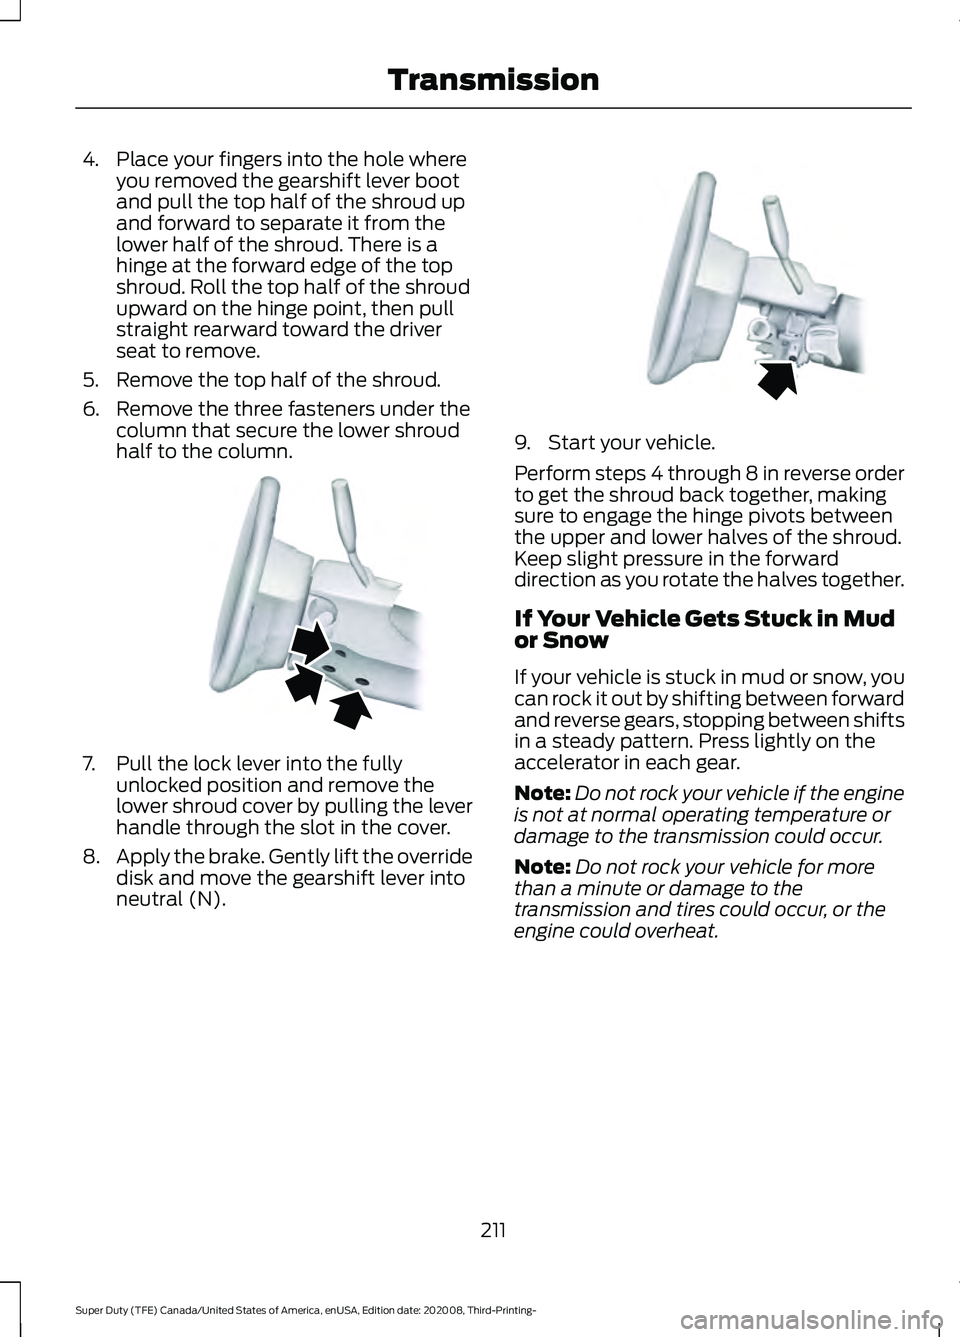
4. Place your fingers into the hole where
you removed the gearshift lever boot
and pull the top half of the shroud up
and forward to separate it from the
lower half of the shroud. There is a
hinge at the forward edge of the top
shroud. Roll the top half of the shroud
upward on the hinge point, then pull
straight rearward toward the driver
seat to remove.
5. Remove the top half of the shroud.
6. Remove the three fasteners under the column that secure the lower shroud
half to the column. 7. Pull the lock lever into the fully
unlocked position and remove the
lower shroud cover by pulling the lever
handle through the slot in the cover.
8. Apply the brake. Gently lift the override
disk and move the gearshift lever into
neutral (N). 9. Start your vehicle.
Perform steps 4 through 8 in reverse order
to get the shroud back together, making
sure to engage the hinge pivots between
the upper and lower halves of the shroud.
Keep slight pressure in the forward
direction as you rotate the halves together.
If Your Vehicle Gets Stuck in Mud
or Snow
If your vehicle is stuck in mud or snow, you
can rock it out by shifting between forward
and reverse gears, stopping between shifts
in a steady pattern. Press lightly on the
accelerator in each gear.
Note:
Do not rock your vehicle if the engine
is not at normal operating temperature or
damage to the transmission could occur.
Note: Do not rock your vehicle for more
than a minute or damage to the
transmission and tires could occur, or the
engine could overheat.
211
Super Duty (TFE) Canada/United States of America, enUSA, Edition date: 202008, Third-Printing- TransmissionE163185 E163186
Page 215 of 666
POWER TAKE-OFF (IF EQUIPPED)
Note: Use of auxiliary equipment that
exceeds the maximum Power Take-Off
(PTO) load specified in our Truck Body
Builders Layout Book can adversely affect
the performance of the powertrain system.
Refer to the Body Builders Layout Book for
instructions about the appropriate
installation of additional equipment.
Auxiliary equipment called power take-off,
or PTO, is often added to the engine or
transmission to operate utility equipment.
Examples include a wheel-lift for tow
trucks, cranes, tools for construction or tire
service, and pumping fluids. PTO
applications draw auxiliary horsepower
from the powertrain, often while the
vehicle is stationary. In this condition, there
is limited cooling air flow through the
radiator and around the vehicle that
normally occurs when a vehicle is moving.
The aftermarket PTO system installer,
having the most knowledge of the final
application, is responsible for determining
whether additional chassis heat protection
or powertrain cooling is required, and
alerting the user to the safe and proper
operation.
Split Shaft Capability
(If Equipped)
Our Super Duty vehicles are approved for
use as a stationary, including split shaft
capability with 6.7L diesel only, or mobile
power source, within limits and operating
guidelines detailed in our Truck Body
Builders Layout Book. For additional
information, visit
www .f or dbb a s. c om .
212
Super Duty (TFE) Canada/United States of America, enUSA, Edition date: 202008, Third-Printing- Transmission
Page 220 of 666
Basic Operating Principles
•
Drive slower in strong crosswinds which
can affect the normal steering
characteristics of your vehicle.
• When driving your vehicle on surfaces
made slippery by loose sand, water,
gravel, snow or ice proceed with care.
• Do not use 4H or 4L on dry, hard
surfaced roads. Doing so will produce
excessive noise, increase tire wear and
may damage drive components. 4H or
4L modes are only intended for
consistently slippery or loose surfaces.
If Your Vehicle Leaves the Road
If your vehicle leaves the road, reduce your
vehicle speed and avoid severe braking.
When your vehicle speed has been
reduced, ease your vehicle back onto the
road. Do not turn the steering wheel
sharply while returning your vehicle to the
road.
It may be safer to stay on the shoulder of
the road and slow down gradually before
returning to the road. You may lose control
if you do not slow down or if you turn the
steering wheel too sharply or abruptly.
It may be less risky to strike small objects,
such as freeway reflectors, with minor
damage to your vehicle rather than
attempt a sudden return to the road which
could cause your vehicle to slide sideways
out of control or roll over. Remember, your
safety and the safety of others should be
your primary concern.
Emergency Maneuvers
In an unavoidable emergency situation
where a sudden sharp turn must be made,
remember to avoid over-driving your
vehicle (i.e. turn the steering wheel only as
rapidly and as far as required to avoid the
emergency). Excessive steering can result
in loss of vehicle control. Apply smooth
pressure to the accelerator pedal or brake pedal when changes in vehicle speed are
required. Avoid abrupt steering,
acceleration and braking. This could result
in an increased risk of vehicle roll over, loss
of vehicle control and personal injury. Use
all available road surface to bring your
vehicle to a safe direction of travel.
In the event of an emergency stop, avoid
skidding the tires and do not attempt any
sharp steering wheel movements.
If your vehicle goes from one type of
surface to another (i.e. from concrete to
gravel) there will be a change in the way
your vehicle responds to a maneuver (i.e.
steering, acceleration or braking).
Sand
When driving over sand, try to keep all four
wheels on the most solid area of the trail.
Avoid reducing the tire pressures but shift
to a lower gear and drive steadily through
the terrain. Apply the accelerator slowly
and avoid excessive wheel slip.
When driving at slow speeds in deep sand
under high outside temperatures, use a low
gear when possible. Low gear operation
will maximize the engine and transmission
cooling capability.
Avoid driving at excessive speeds, this
causes vehicle momentum to work against
you and your vehicle could become stuck
to the point that assistance may be
required from another vehicle. Remember,
you may be able to back out the way you
came if you proceed with caution.
Mud and Water
Mud
Be cautious of sudden changes in vehicle
speed or direction when you are driving in
mud. Even four-wheel drive vehicles can
lose traction in slick mud. If your vehicle
does slide, steer in the direction of the slide
until you regain control of your vehicle.
217
Super Duty (TFE) Canada/United States of America, enUSA, Edition date: 202008, Third-Printing- Four-Wheel Drive (If Equipped)
Page 221 of 666

After driving through mud, clean off residue
stuck to rotating driveshafts and tires.
Excess mud stuck on tires and rotating
driveshafts can cause an imbalance that
could damage drive components.
Water
If you must drive through high water, drive
slowly. Traction or brake capability may
be limited.
When driving through water, determine the
depth and avoid water higher than the
bottom of the hubs. If the ignition system
gets wet, your vehicle may stall.
Once through water, always try the brakes.
Wet brakes do not stop your vehicle as
effectively as dry brakes. Drying can be
improved by applying light pressure to the
brake pedal while moving slowly.
Note:
Driving through deep water may
damage the transmission. If the front or rear
axle is submerged in water, the axle
lubricant and power transfer unit lubricant
should be checked and changed if
necessary.
Driving on Hilly or Sloping Terrain
Although natural obstacles may make it
necessary to travel diagonally up or down
a hill or steep incline, you should always
try to drive straight up or straight down.
Note: Avoid turning on steep slopes or
hills. A danger lies in losing traction, slipping
sideways and possible vehicle roll over.
Whenever driving on a hill, determine
beforehand the route you will use. Do not
drive over the crest of a hill without seeing
what conditions are on the other side. Do
not drive in reverse over a hill without the
aid of an observer.
When climbing a steep slope or hill, start
in a lower gear rather than downshifting to
a lower gear from a higher gear once the
ascent has started. This reduces strain on
the engine and the possibility of stalling. If your vehicle stalls, do not try to turn
around because this could cause vehicle
roll over. It is better to reverse back to a
safe location.
Apply just enough power to the wheels to
climb the hill. Too much power will cause
the tires to slip, spin or lose traction,
resulting in loss of vehicle control.
Descend a hill in the same gear you would
use to climb up the hill to avoid excessive
brake application and brake overheating.
Do not descend in neutral. Disengage
overdrive or move the transmission
selector lever to a lower gear. When
descending a steep hill, avoid sudden hard
braking as you could lose control. The front
wheels have to be turning in order to steer
your vehicle.
If your vehicle has anti-lock brakes, apply
the brakes steadily. Do not pump the
brakes.
Driving on Snow and Ice
WARNING: If you are driving in
slippery conditions that require tire
chains or cables, then it is critical that
you drive cautiously. Keep speeds down,
allow for longer stopping distances and
avoid aggressive steering to reduce the
218
Super Duty (TFE) Canada/United States of America, enUSA, Edition date: 202008, Third-Printing- Four-Wheel Drive
(If Equipped)E143949