2021 FORD F-350 warning
[x] Cancel search: warningPage 132 of 666
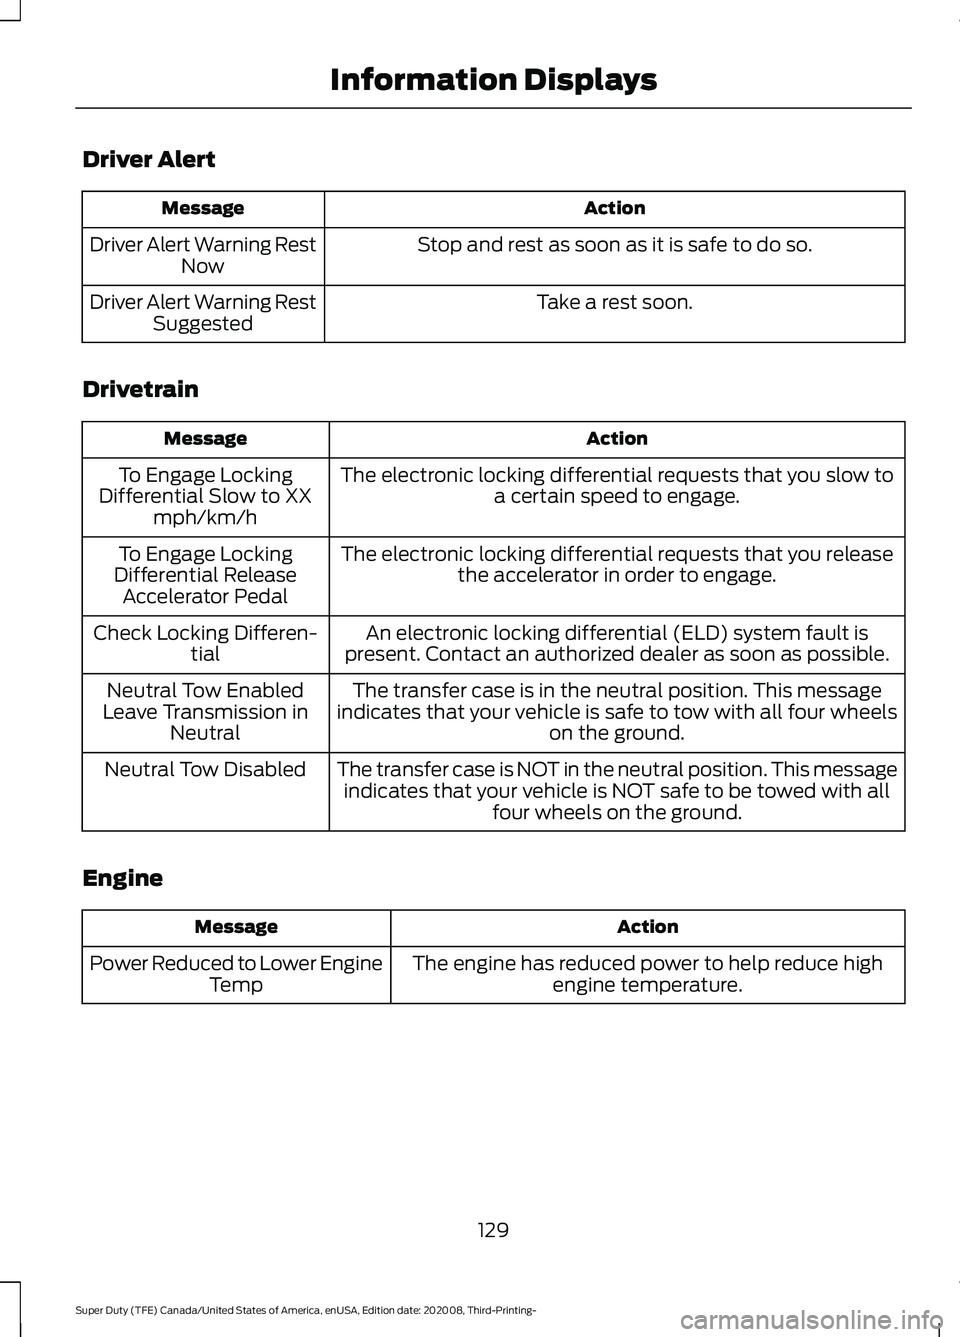
Driver Alert
Action
Message
Stop and rest as soon as it is safe to do so.
Driver Alert Warning Rest
Now
Take a rest soon.
Driver Alert Warning Rest
Suggested
Drivetrain Action
Message
The electronic locking differential requests that you slow toa certain speed to engage.
To Engage Locking
Differential Slow to XX mph/km/h
The electronic locking differential requests that you releasethe accelerator in order to engage.
To Engage Locking
Differential Release Accelerator Pedal
An electronic locking differential (ELD) system fault is
present. Contact an authorized dealer as soon as possible.
Check Locking Differen-
tial
The transfer case is in the neutral position. This message
indicates that your vehicle is safe to tow with all four wheels on the ground.
Neutral Tow Enabled
Leave Transmission in Neutral
The transfer case is NOT in the neutral position. This messageindicates that your vehicle is NOT safe to be towed with all four wheels on the ground.
Neutral Tow Disabled
Engine Action
Message
The engine has reduced power to help reduce highengine temperature.
Power Reduced to Lower Engine
Temp
129
Super Duty (TFE) Canada/United States of America, enUSA, Edition date: 202008, Third-Printing- Information Displays
Page 134 of 666
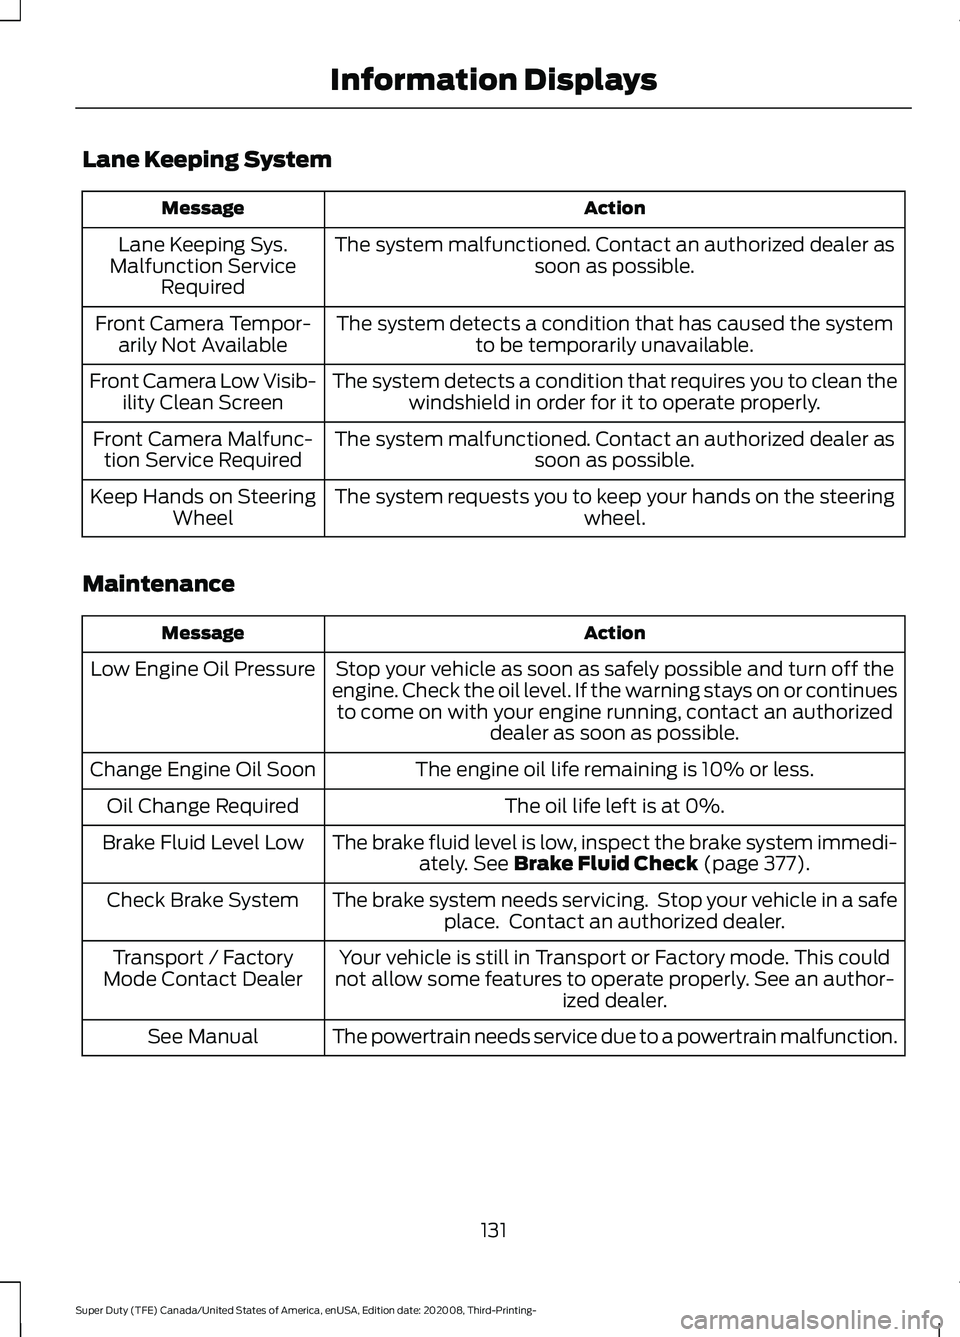
Lane Keeping System
Action
Message
The system malfunctioned. Contact an authorized dealer as soon as possible.
Lane Keeping Sys.
Malfunction Service Required
The system detects a condition that has caused the systemto be temporarily unavailable.
Front Camera Tempor-
arily Not Available
The system detects a condition that requires you to clean thewindshield in order for it to operate properly.
Front Camera Low Visib-
ility Clean Screen
The system malfunctioned. Contact an authorized dealer assoon as possible.
Front Camera Malfunc-
tion Service Required
The system requests you to keep your hands on the steering wheel.
Keep Hands on Steering
Wheel
Maintenance Action
Message
Stop your vehicle as soon as safely possible and turn off the
engine. Check the oil level. If the warning stays on or continues to come on with your engine running, contact an authorized dealer as soon as possible.
Low Engine Oil Pressure
The engine oil life remaining is 10% or less.
Change Engine Oil Soon
The oil life left is at 0%.
Oil Change Required
The brake fluid level is low, inspect the brake system immedi-ately. See Brake Fluid Check (page 377).
Brake Fluid Level Low
The brake system needs servicing. Stop your vehicle in a safeplace. Contact an authorized dealer.
Check Brake System
Your vehicle is still in Transport or Factory mode. This could
not allow some features to operate properly. See an author- ized dealer.
Transport / Factory
Mode Contact Dealer
The powertrain needs service due to a powertrain malfunction.
See Manual
131
Super Duty (TFE) Canada/United States of America, enUSA, Edition date: 202008, Third-Printing- Information Displays
Page 139 of 666

Tire Pressure Monitoring System
Action
Message
One or more tires on your vehicle has low tire pressure. See
Tire Pressure Monitoring System (page 421).
Tire Pressure Low
The tire pressure monitoring system is malfunctioning. If thewarning stays on or continues to come on, contact an
authorized dealer. See
Tire Pressure Monitoring System (page 421).
Tire Pressure Monitor
Fault
A tire pressure sensor is malfunctioning or your spare tire is inuse. See
Tire Pressure Monitoring System (page 421). If
the warning stays on or continues to come on, contact an authorized dealer as soon as possible.
Tire Pressure Sensor
Fault
Trail Control
(If Equipped) Action
Message
You must reduce your vehicle speed to use trail control.
Reduce Speed To Enter Trail
Control
You must release the park brake to use trail control.
Trail Control Not Available with
Park Brake Applied
You successfully enabled trail control and must pressSET to activate.
Trail Control Enabled Use SET
Button to Set Speed
A trail control system fault has occurred, the drivermust resume control.
Trail Control Off Driver Resume
Control
The system has switched off.
Trail Control Off
A system fault is present.
Trail Control Fault See Manual
You must switch the cruise control off to use trailcontrol.
Trail Control Not Available with
Cruise Control Active
You must close the door to use trail control.
Trail Control Not Available with
Driver Door Open
You switched descent control off, causing the systemto turn trail control propulsion off. The vehicle still
brakes if descending a hill. You must press the trail
control switch to reset the system and switch it off.
You can press the switch again to switch this system on.
Descent Control Now Active
Press Trail Control Switch To Exit
136
Super Duty (TFE) Canada/United States of America, enUSA, Edition date: 202008, Third-Printing- Information Displays
Page 141 of 666
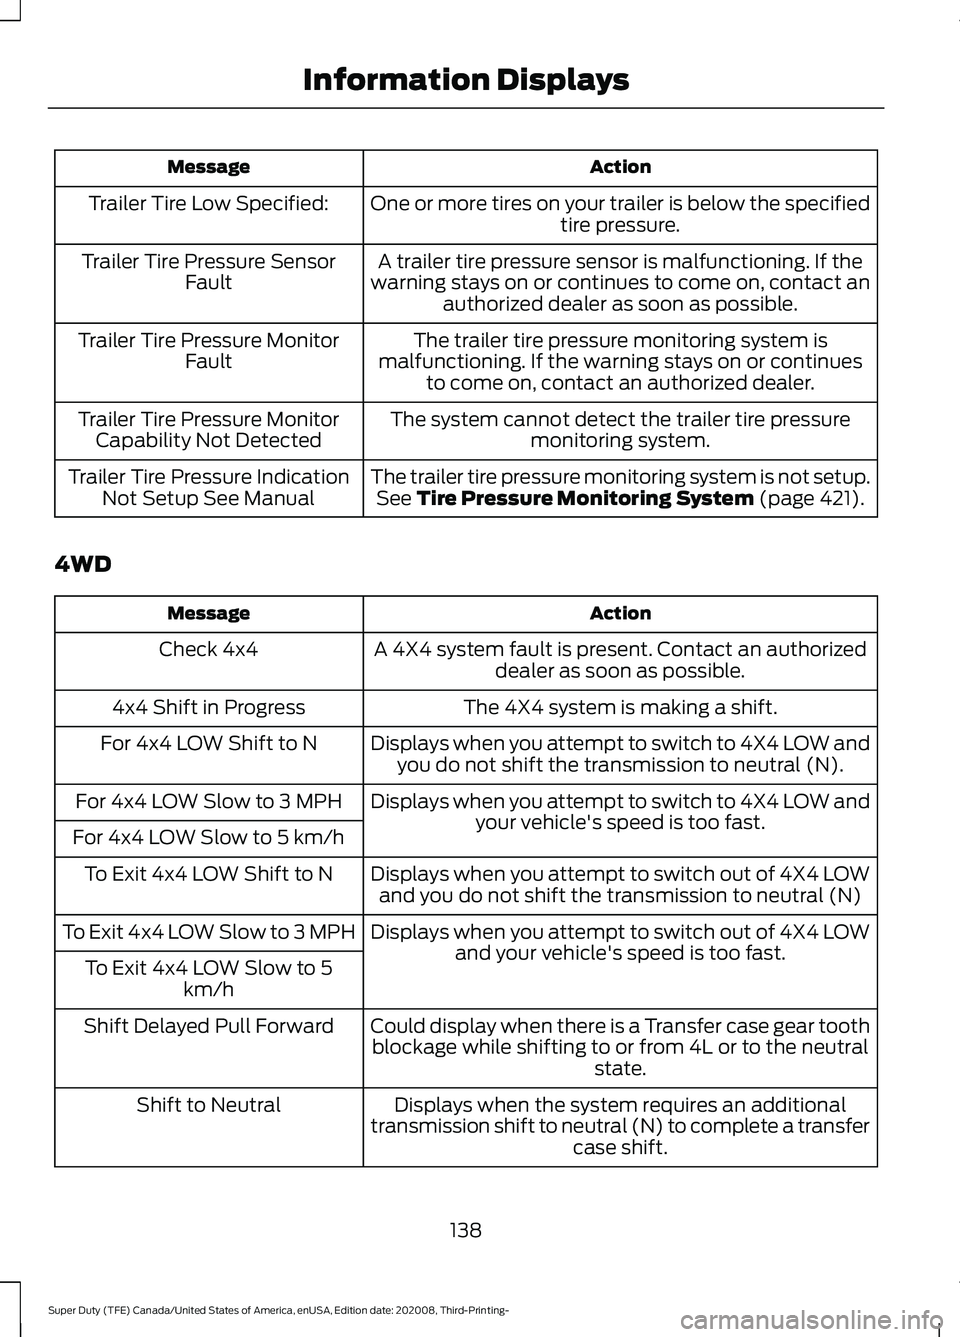
Action
Message
One or more tires on your trailer is below the specifiedtire pressure.
Trailer Tire Low Specified:
A trailer tire pressure sensor is malfunctioning. If the
warning stays on or continues to come on, contact an authorized dealer as soon as possible.
Trailer Tire Pressure Sensor
Fault
The trailer tire pressure monitoring system is
malfunctioning. If the warning stays on or continues to come on, contact an authorized dealer.
Trailer Tire Pressure Monitor
Fault
The system cannot detect the trailer tire pressuremonitoring system.
Trailer Tire Pressure Monitor
Capability Not Detected
The trailer tire pressure monitoring system is not setup.See Tire Pressure Monitoring System (page 421).
Trailer Tire Pressure Indication
Not Setup See Manual
4WD Action
Message
A 4X4 system fault is present. Contact an authorizeddealer as soon as possible.
Check 4x4
The 4X4 system is making a shift.
4x4 Shift in Progress
Displays when you attempt to switch to 4X4 LOW andyou do not shift the transmission to neutral (N).
For 4x4 LOW Shift to N
Displays when you attempt to switch to 4X4 LOW andyour vehicle's speed is too fast.
For 4x4 LOW Slow to 3 MPH
For 4x4 LOW Slow to 5 km/h Displays when you attempt to switch out of 4X4 LOWand you do not shift the transmission to neutral (N)
To Exit 4x4 LOW Shift to N
Displays when you attempt to switch out of 4X4 LOWand your vehicle's speed is too fast.
To Exit 4x4 LOW Slow to 3 MPH
To Exit 4x4 LOW Slow to 5 km/h
Could display when there is a Transfer case gear toothblockage while shifting to or from 4L or to the neutral state.
Shift Delayed Pull Forward
Displays when the system requires an additional
transmission shift to neutral (N) to complete a transfer case shift.
Shift to Neutral
138
Super Duty (TFE) Canada/United States of America, enUSA, Edition date: 202008, Third-Printing- Information Displays
Page 143 of 666
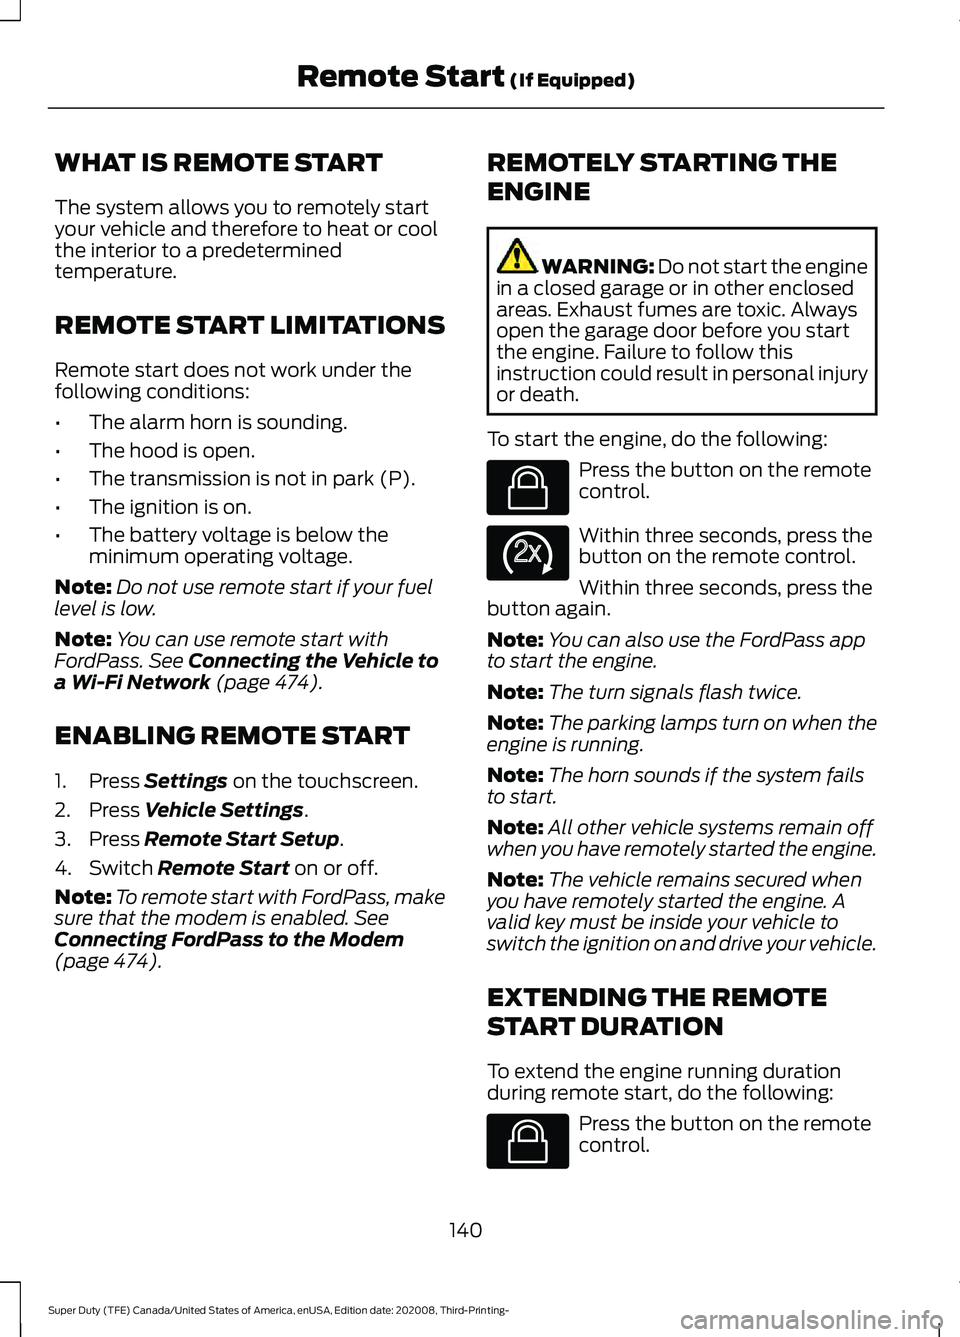
WHAT IS REMOTE START
The system allows you to remotely start
your vehicle and therefore to heat or cool
the interior to a predetermined
temperature.
REMOTE START LIMITATIONS
Remote start does not work under the
following conditions:
•
The alarm horn is sounding.
• The hood is open.
• The transmission is not in park (P).
• The ignition is on.
• The battery voltage is below the
minimum operating voltage.
Note: Do not use remote start if your fuel
level is low.
Note: You can use remote start with
FordPass. See Connecting the Vehicle to
a Wi-Fi Network (page 474).
ENABLING REMOTE START
1. Press
Settings on the touchscreen.
2. Press
Vehicle Settings.
3. Press
Remote Start Setup.
4. Switch
Remote Start on or off.
Note: To remote start with FordPass, make
sure that the modem is enabled.
See
Connecting FordPass to the Modem
(page
474). REMOTELY STARTING THE
ENGINE WARNING: Do not start the engine
in a closed garage or in other enclosed
areas. Exhaust fumes are toxic. Always
open the garage door before you start
the engine. Failure to follow this
instruction could result in personal injury
or death.
To start the engine, do the following: Press the button on the remote
control.
Within three seconds, press the
button on the remote control.
Within three seconds, press the
button again.
Note: You can also use the FordPass app
to start the engine.
Note: The turn signals flash twice.
Note: The parking lamps turn on when the
engine is running.
Note: The horn sounds if the system fails
to start.
Note: All other vehicle systems remain off
when you have remotely started the engine.
Note: The vehicle remains secured when
you have remotely started the engine. A
valid key must be inside your vehicle to
switch the ignition on and drive your vehicle.
EXTENDING THE REMOTE
START DURATION
To extend the engine running duration
during remote start, do the following: Press the button on the remote
control.
140
Super Duty (TFE) Canada/United States of America, enUSA, Edition date: 202008, Third-Printing- Remote Start
(If Equipped)E138623 E138625 E138623
Page 154 of 666
SITTING IN THE CORRECT
POSITION
WARNING: Sitting improperly, out
of position or with the seatback reclined
too far can take weight off the seat
cushion and affect the decision of the
passenger sensing system, resulting in
serious injury or death in the event of a
crash. Always sit upright against your
seat back, with your feet on the floor. WARNING: Do not recline the seat
backrest too far as this can cause the
occupant to slide under the seatbelt,
resulting in personal injury in the event
of a crash. WARNING:
Do not place objects
higher than the top of the seat backrest.
Failure to follow this instruction could
result in personal injury or death in the
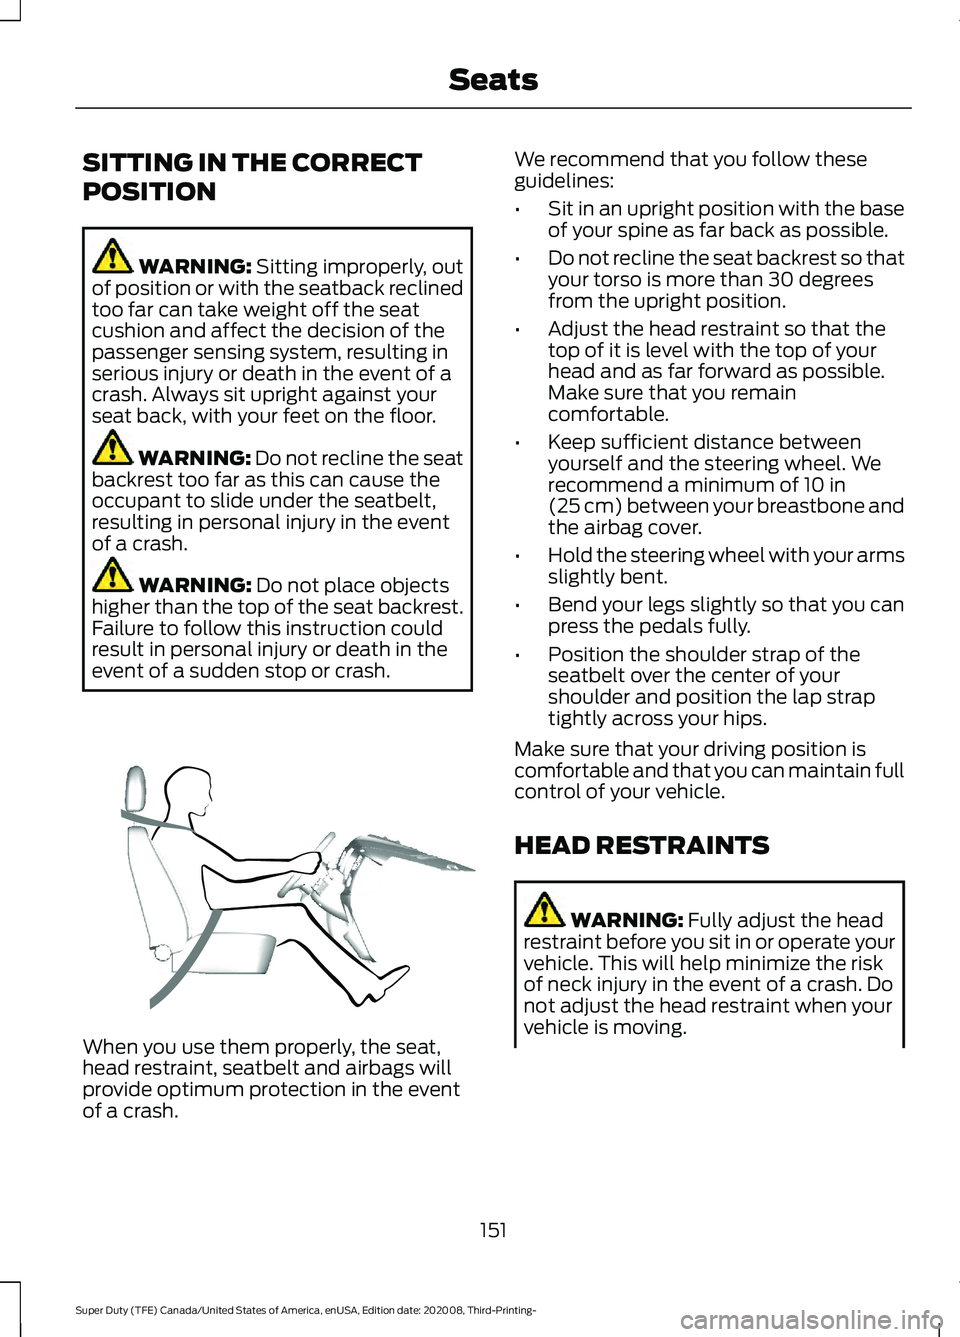
event of a sudden stop or crash. When you use them properly, the seat,
head restraint, seatbelt and airbags will
provide optimum protection in the event
of a crash. We recommend that you follow these
guidelines:
•
Sit in an upright position with the base
of your spine as far back as possible.
• Do not recline the seat backrest so that
your torso is more than 30 degrees
from the upright position.
• Adjust the head restraint so that the
top of it is level with the top of your
head and as far forward as possible.
Make sure that you remain
comfortable.
• Keep sufficient distance between
yourself and the steering wheel. We
recommend a minimum of
10 in
(25 cm) between your breastbone and
the airbag cover.
• Hold the steering wheel with your arms
slightly bent.
• Bend your legs slightly so that you can
press the pedals fully.
• Position the shoulder strap of the
seatbelt over the center of your
shoulder and position the lap strap
tightly across your hips.
Make sure that your driving position is
comfortable and that you can maintain full
control of your vehicle.
HEAD RESTRAINTS WARNING:
Fully adjust the head
restraint before you sit in or operate your
vehicle. This will help minimize the risk
of neck injury in the event of a crash. Do
not adjust the head restraint when your
vehicle is moving.
151
Super Duty (TFE) Canada/United States of America, enUSA, Edition date: 202008, Third-Printing- SeatsE68595
Page 155 of 666
WARNING: The head restraint is a
safety device. Whenever possible it
should be installed and properly
adjusted when the seat is occupied.
Failure to adjust the head restraint
properly could reduce its effectiveness
during certain impacts.
Note: Adjust the seat backrest to an upright
driving position before adjusting the head
restraint. Adjust the head restraint so that
the top of it is level with the top of your head
and as far forward as possible. Make sure
that you remain comfortable. If you are
extremely tall, adjust the head restraint to
its highest position.
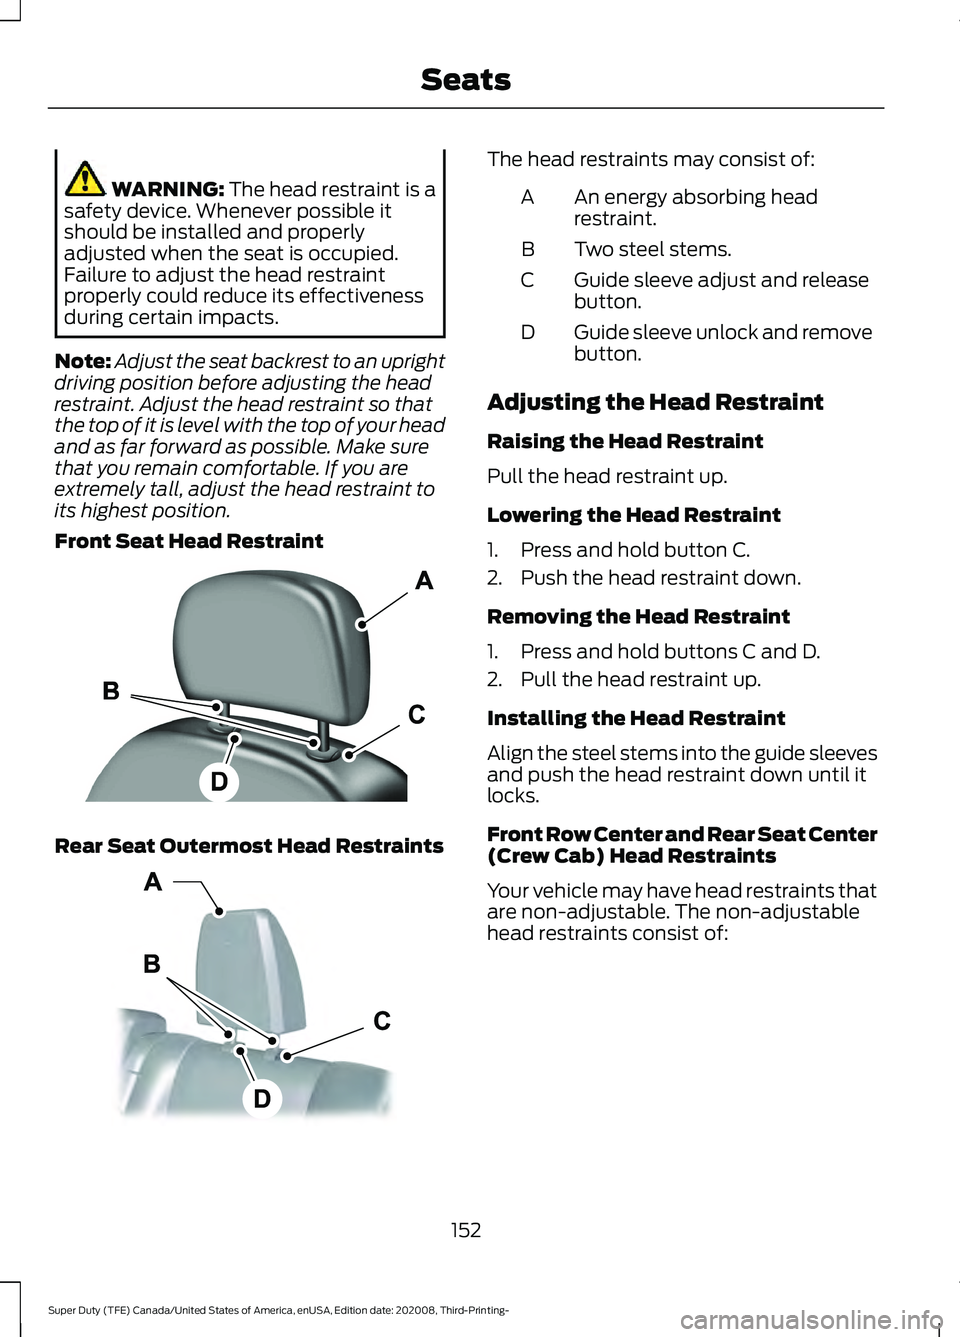
Front Seat Head Restraint Rear Seat Outermost Head Restraints The head restraints may consist of:
An energy absorbing head
restraint.
A
Two steel stems.
B
Guide sleeve adjust and release
button.
C
Guide sleeve unlock and remove
button.
D
Adjusting the Head Restraint
Raising the Head Restraint
Pull the head restraint up.
Lowering the Head Restraint
1. Press and hold button C.
2. Push the head restraint down.
Removing the Head Restraint
1. Press and hold buttons C and D.
2. Pull the head restraint up.
Installing the Head Restraint
Align the steel stems into the guide sleeves
and push the head restraint down until it
locks.
Front Row Center and Rear Seat Center
(Crew Cab) Head Restraints
Your vehicle may have head restraints that
are non-adjustable. The non-adjustable
head restraints consist of:
152
Super Duty (TFE) Canada/United States of America, enUSA, Edition date: 202008, Third-Printing- SeatsE138642 E153105
Page 156 of 666
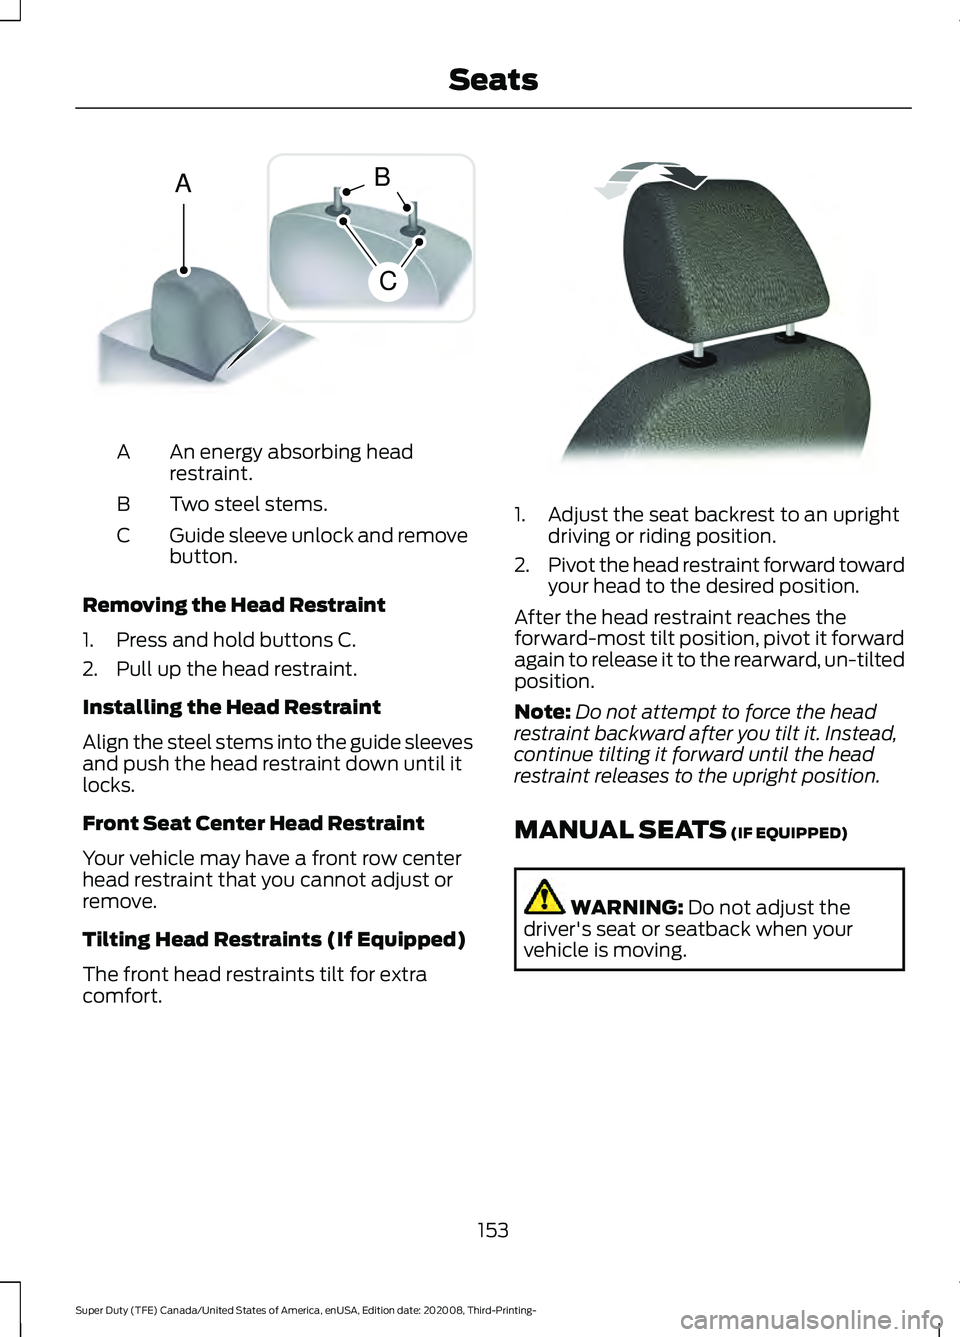
An energy absorbing head
restraint.
A
Two steel stems.
B
Guide sleeve unlock and remove
button.
C
Removing the Head Restraint
1. Press and hold buttons C.
2. Pull up the head restraint.
Installing the Head Restraint
Align the steel stems into the guide sleeves
and push the head restraint down until it
locks.
Front Seat Center Head Restraint
Your vehicle may have a front row center
head restraint that you cannot adjust or
remove.
Tilting Head Restraints (If Equipped)
The front head restraints tilt for extra
comfort. 1. Adjust the seat backrest to an upright
driving or riding position.
2. Pivot the head restraint forward toward
your head to the desired position.
After the head restraint reaches the
forward-most tilt position, pivot it forward
again to release it to the rearward, un-tilted
position.
Note: Do not attempt to force the head
restraint backward after you tilt it. Instead,
continue tilting it forward until the head
restraint releases to the upright position.
MANUAL SEATS (IF EQUIPPED) WARNING:
Do not adjust the
driver's seat or seatback when your
vehicle is moving.
153
Super Duty (TFE) Canada/United States of America, enUSA, Edition date: 202008, Third-Printing- SeatsA
C
B E162872 E144727