2021 FORD F-350 flat tire
[x] Cancel search: flat tirePage 436 of 666

and the cable is slack. You will feel
some resistance when you turn the jack
handle assembly. If not replacing the
spare or flat tire to the underbody
storage area, raise the wheel retainer
up into the installed position.
10. Slide the retainer through the center of the spare tire wheel and remove
the spare tire. 11. Remove the wheel trim with the lug
wrench tip, or use the wheel trim tool
described later in this section.
12. Loosen each wheel lug nut one-half turn counterclockwise, but do not
remove them until the wheel is raised
off the ground. For dual rear wheel,
assemble the lug wrench and
extension tool together to access the
lug nuts. 13. Position the jack under the correct
jacking points according to following
pictures.
Removing Wheel Trim With Single
Wheels
1. Insert the flat end of the lug wrench between the wheel rim and the wheel
trim.
2. Carefully remove the wheel trim.
Vehicles With Dual Rear Alloy Wheels 433
Super Duty (TFE) Canada/United States of America, enUSA, Edition date: 202008, Third-Printing- Wheels and TiresE310417 E309794 E338541
Page 439 of 666
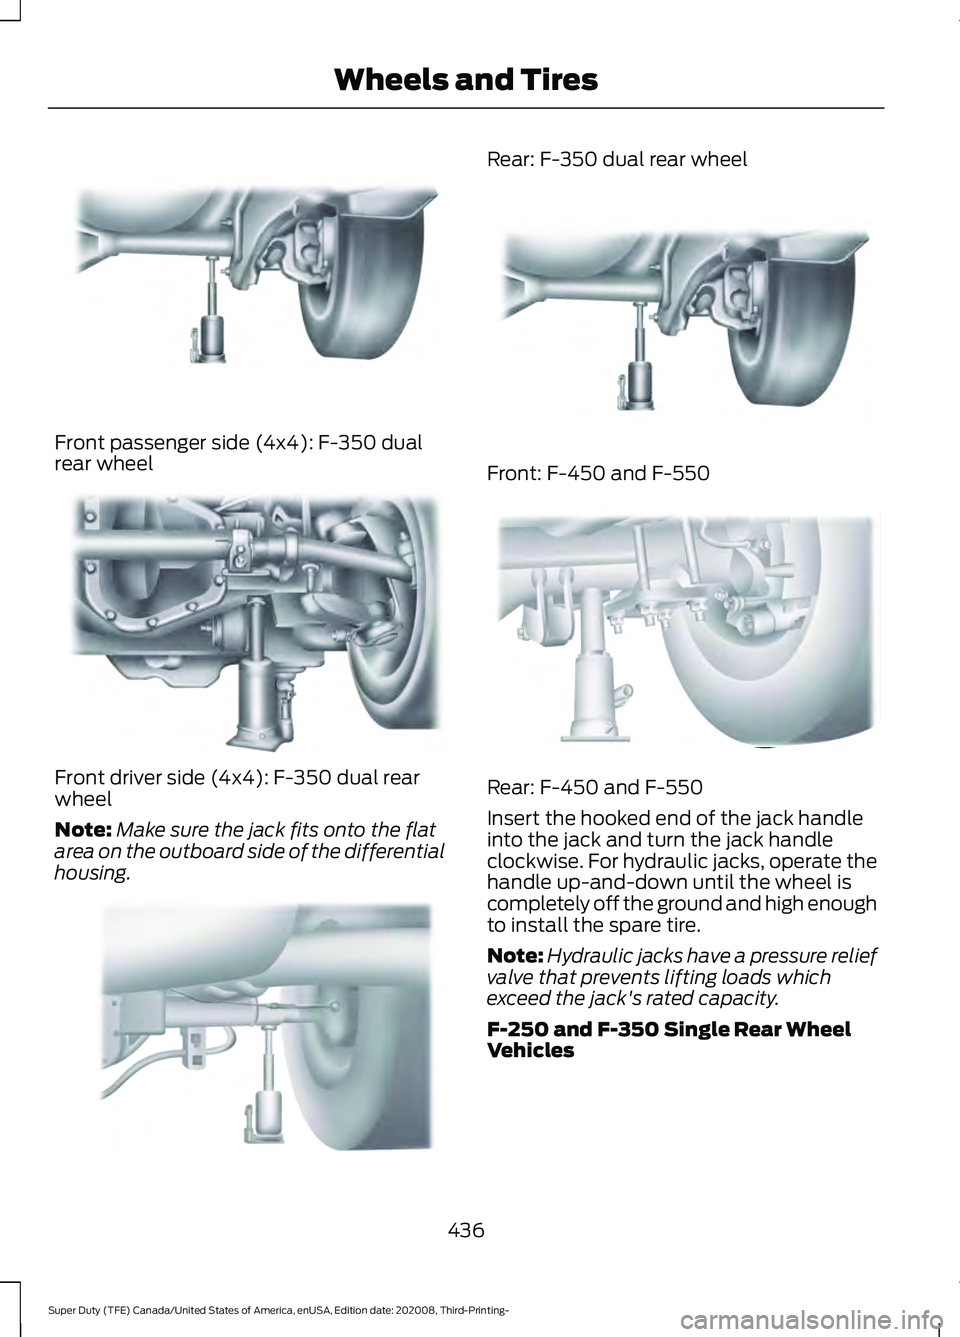
Front passenger side (4x4): F-350 dual
rear wheel
Front driver side (4x4): F-350 dual rear
wheel
Note:
Make sure the jack fits onto the flat
area on the outboard side of the differential
housing. Rear: F-350 dual rear wheel
Front: F-450 and F-550
Rear: F-450 and F-550
Insert the hooked end of the jack handle
into the jack and turn the jack handle
clockwise. For hydraulic jacks, operate the
handle up-and-down until the wheel is
completely off the ground and high enough
to install the spare tire.
Note:
Hydraulic jacks have a pressure relief
valve that prevents lifting loads which
exceed the jack's rated capacity.
F-250 and F-350 Single Rear Wheel
Vehicles
436
Super Duty (TFE) Canada/United States of America, enUSA, Edition date: 202008, Third-Printing- Wheels and TiresE162815 E162814 E162817 E162816 E162818
Page 440 of 666
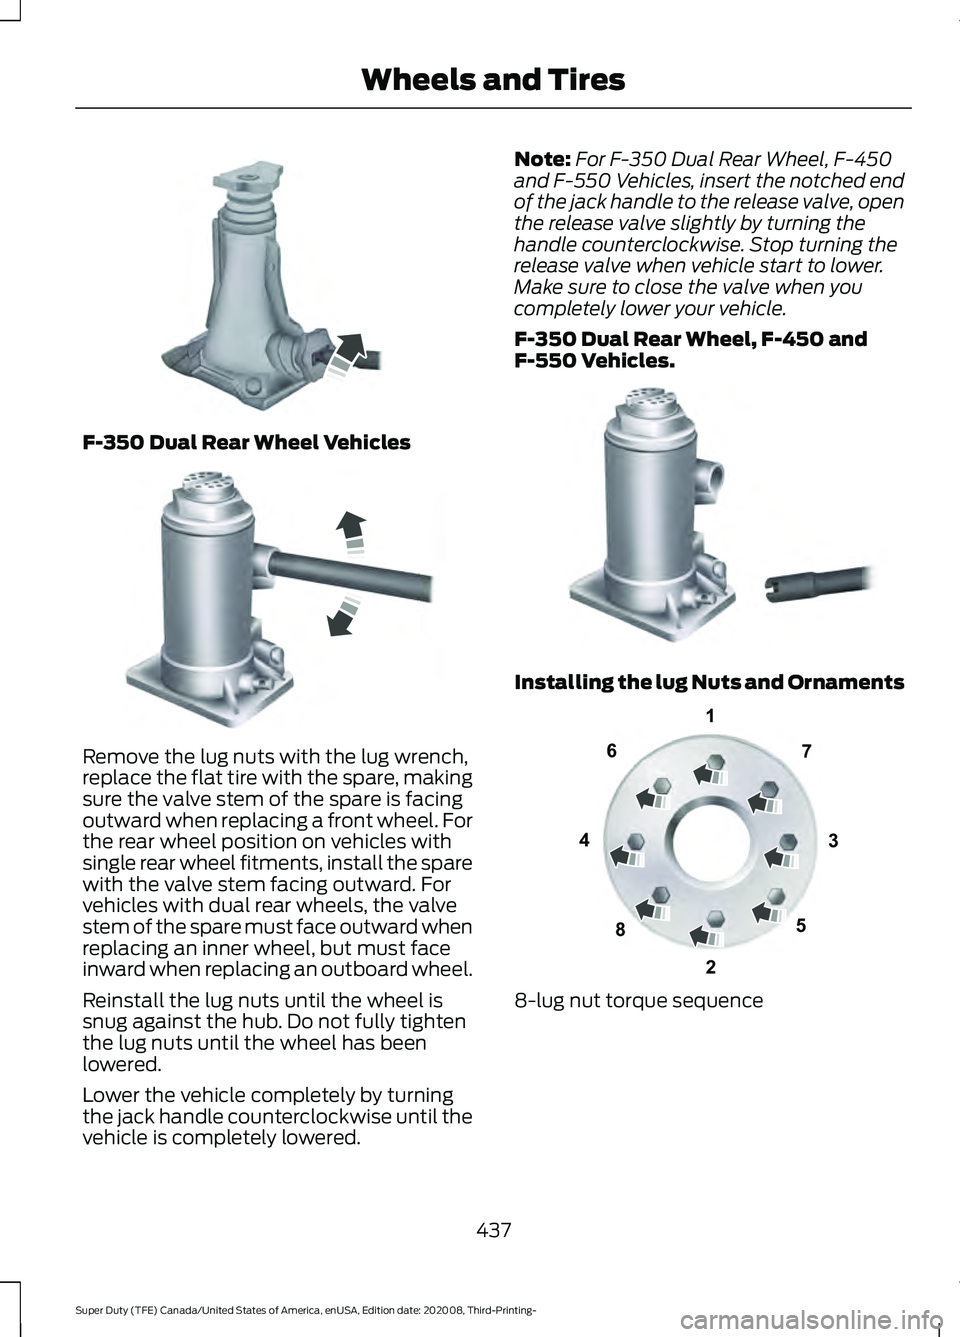
F-350 Dual Rear Wheel Vehicles
Remove the lug nuts with the lug wrench,
replace the flat tire with the spare, making
sure the valve stem of the spare is facing
outward when replacing a front wheel. For
the rear wheel position on vehicles with
single rear wheel fitments, install the spare
with the valve stem facing outward. For
vehicles with dual rear wheels, the valve
stem of the spare must face outward when
replacing an inner wheel, but must face
inward when replacing an outboard wheel.
Reinstall the lug nuts until the wheel is
snug against the hub. Do not fully tighten
the lug nuts until the wheel has been
lowered.
Lower the vehicle completely by turning
the jack handle counterclockwise until the
vehicle is completely lowered. Note:
For F-350 Dual Rear Wheel, F-450
and F-550 Vehicles, insert the notched end
of the jack handle to the release valve, open
the release valve slightly by turning the
handle counterclockwise. Stop turning the
release valve when vehicle start to lower.
Make sure to close the valve when you
completely lower your vehicle.
F-350 Dual Rear Wheel, F-450 and
F-550 Vehicles. Installing the lug Nuts and Ornaments
8-lug nut torque sequence
437
Super Duty (TFE) Canada/United States of America, enUSA, Edition date: 202008, Third-Printing- Wheels and TiresE162811 E162819 E162812 13
4
27
6
5
8E161441
Page 442 of 666
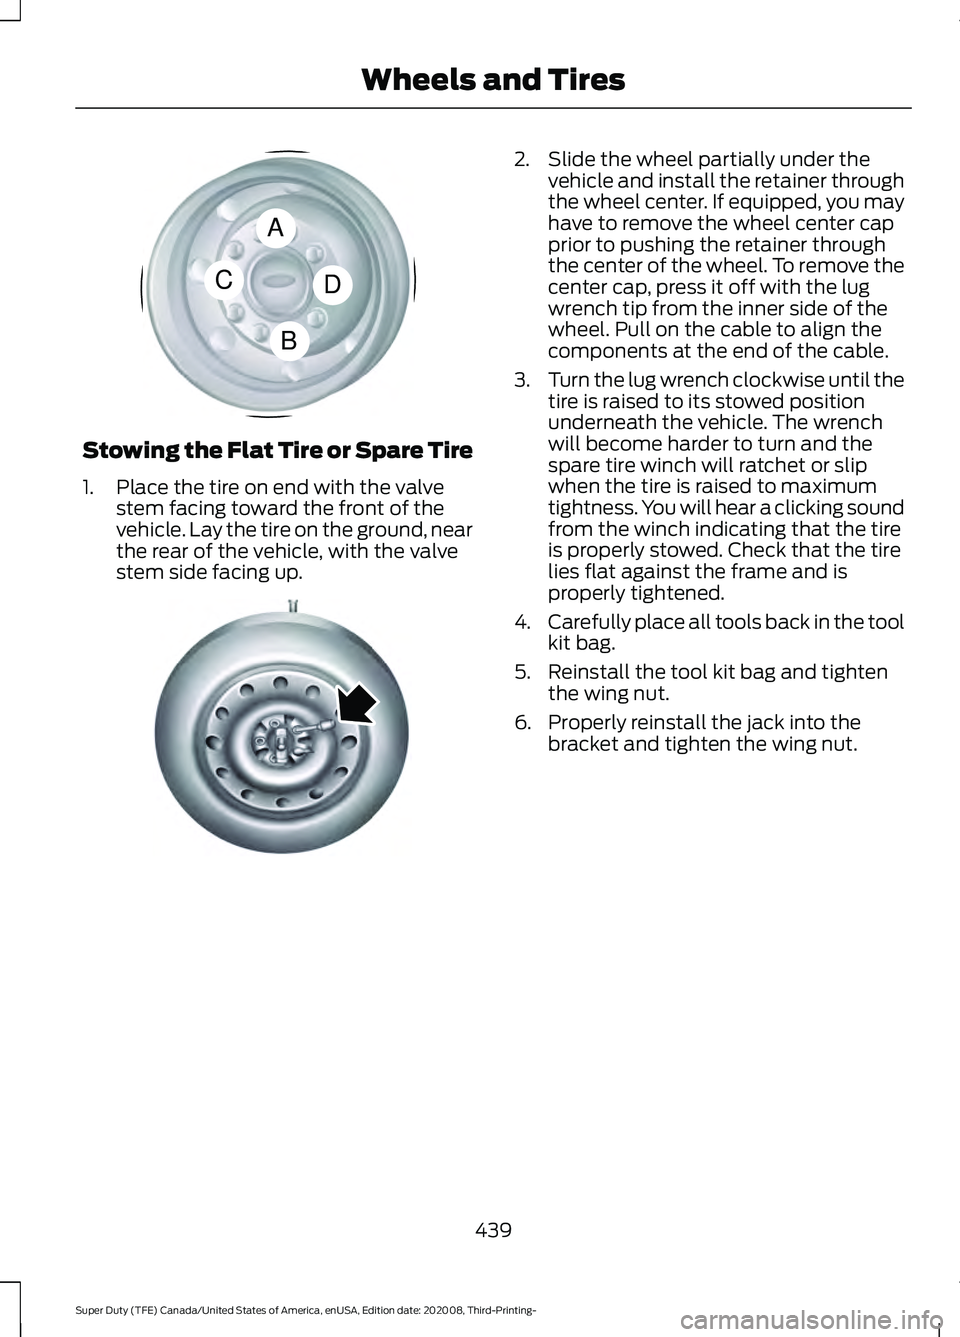
Stowing the Flat Tire or Spare Tire
1. Place the tire on end with the valve
stem facing toward the front of the
vehicle. Lay the tire on the ground, near
the rear of the vehicle, with the valve
stem side facing up. 2. Slide the wheel partially under the
vehicle and install the retainer through
the wheel center. If equipped, you may
have to remove the wheel center cap
prior to pushing the retainer through
the center of the wheel. To remove the
center cap, press it off with the lug
wrench tip from the inner side of the
wheel. Pull on the cable to align the
components at the end of the cable.
3. Turn the lug wrench clockwise until the
tire is raised to its stowed position
underneath the vehicle. The wrench
will become harder to turn and the
spare tire winch will ratchet or slip
when the tire is raised to maximum
tightness. You will hear a clicking sound
from the winch indicating that the tire
is properly stowed. Check that the tire
lies flat against the frame and is
properly tightened.
4. Carefully place all tools back in the tool
kit bag.
5. Reinstall the tool kit bag and tighten the wing nut.
6. Properly reinstall the jack into the bracket and tighten the wing nut.
439
Super Duty (TFE) Canada/United States of America, enUSA, Edition date: 202008, Third-Printing- Wheels and TiresA
C
B
DE162824 E162800
Page 443 of 666
TECHNICAL SPECIFICATIONS
Wheel Lug Nut Torque Specifications
WARNING: When you install a wheel, always remove any corrosion, dirt or foreign
materials present on the mounting surfaces of the wheel or the surface of the wheel
hub, brake drum or brake disc that contacts the wheel. Make sure to secure any fasteners
that attach the rotor to the hub so they do not interfere with the mounting surfaces of
the wheel. Installing wheels without correct metal-to-metal contact at the wheel
mounting surfaces can cause the wheel nuts to loosen and the wheel to come off while
your vehicle is in motion, resulting in loss of vehicle control, personal injury or death. lb.ft (Nm)
1
Bolt size
150 lb.ft (204 Nm)
M14 x 1.5
1 Torque specifications are for nut and bolt threads free of dirt and rust. Use only Ford
recommended replacement fasteners.
On vehicles equipped with single rear wheels, retighten the lug nuts to the specified torque
at 100 mi (160 km) after any wheel disturbance, such as tire rotation, changing a flat tire,
or wheel removal.
On vehicles equipped with dual rear wheels, retighten the wheel lug nuts to the specified
torque at
100 mi (160 km), and again at 500 mi (800 km) of new vehicle operation and
after any wheel disturbance, such as tire rotation, changing a flat tire, or wheel removal.
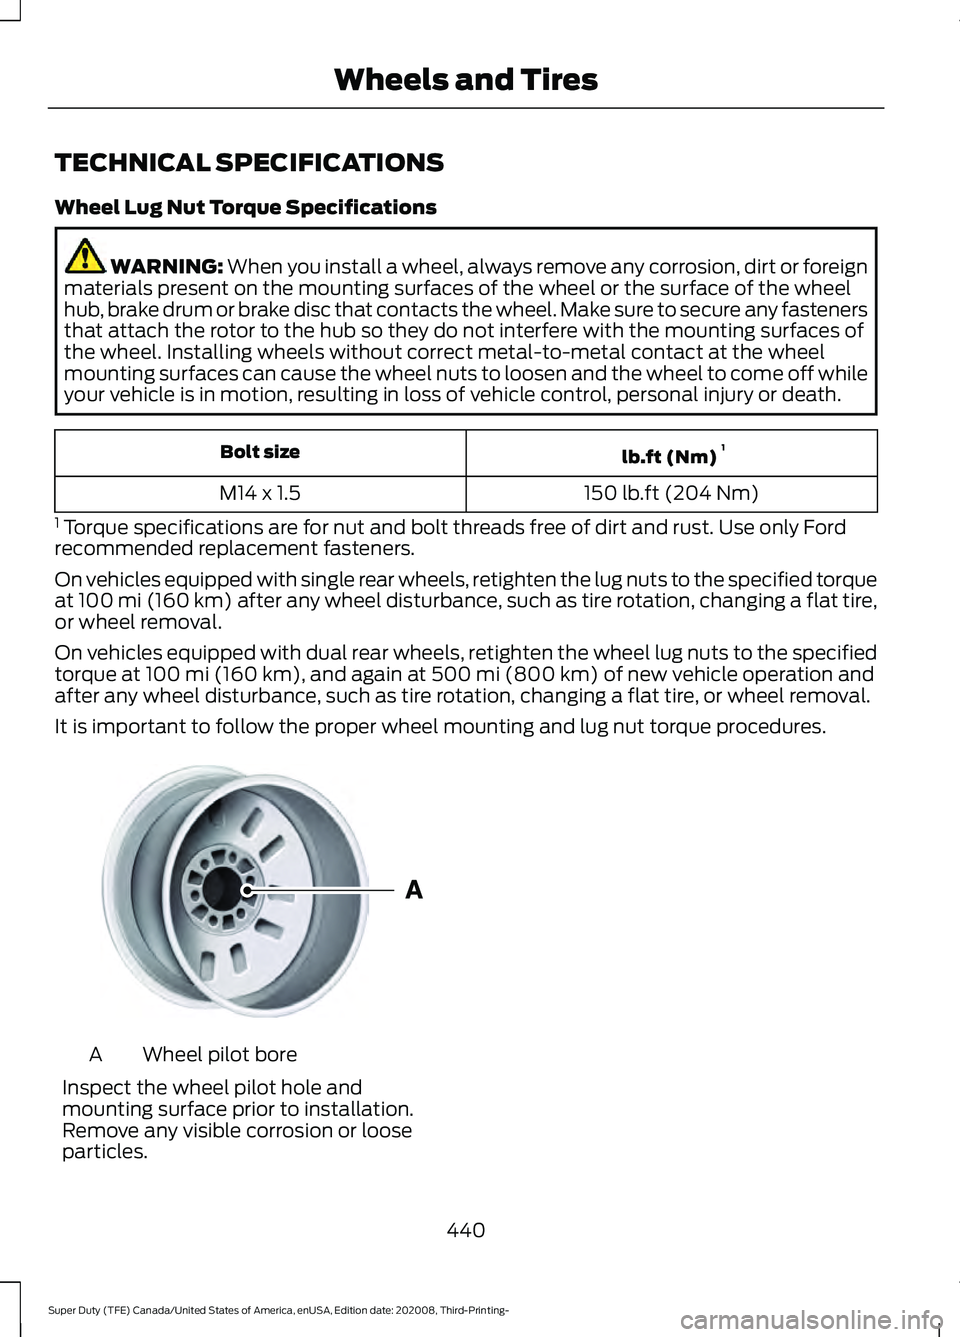
It is important to follow the proper wheel mounting and lug nut torque procedures. Wheel pilot bore
A
Inspect the wheel pilot hole and
mounting surface prior to installation.
Remove any visible corrosion or loose
particles.
440
Super Duty (TFE) Canada/United States of America, enUSA, Edition date: 202008, Third-Printing- Wheels and TiresE145950
Page 566 of 666
PROTECT YOURSELF FROM THE RISING
COST OF VEHICLE REPAIRS WITH A FORD
PROTECT EXTENDED SERVICE PLAN.
Ford Protect Extended Service
Plans (U.S. Only)
Ford Protect extended service plan means
peace of mind. It’
s the extended service
plan backed by Ford Motor Company, and
provides more protection beyond the New
Vehicle Limited Warranty coverage. When
you visit your Ford Dealer, Insist on Ford
Protect extended service plans!
Ford Protect Can Quickly Pay for Itself
One trip to the Service Center could easily
exceed the price of your Ford Protect
extended service plan. With Ford Protect
extended service plan you minimize your
risk for unexpected repair bills and rising
repair costs.
Up to 1,000+ Covered Vehicle
Components
There are four mechanical Ford Protect
extended service plans with different levels
of coverage. Ask your authorized dealer for
details.
1. PremiumCARE - Our most comprehensive coverage. With over
1,000 covered components, this plan
is so complete it’ s probably easier to
list what’ s not covered.
2. ExtraCARE - Covers 113 components, and includes many high-tech items.
3. BaseCARE - Covers 84 components.
4. PowertrainCARE - Covers 29 critical components.
Ford Protect extended service plans are
honored by all authorized Ford dealers in
the U.S., Canada and Mexico. That means you get:
•
Reliable, quality service at any Ford or
Lincoln dealership.
• Repairs performed by factory trained
technicians, using genuine parts.
Rental Car Reimbursement
1st day Rental Benefit
If you bring your car into your dealer for
service, we ’ll give you a loaner to use for
the day.
Extended Rental Benefits
If your vehicle is kept overnight for covered
repairs, you are eligible for rental car
coverage, including warranty repairs, and
Field Service Actions.
Roadside Assistance
Exclusive 24/7 roadside assistance,
including:
• Towing, flat-tire change and battery
jump starts.
• Out of fuel and lock-out assistance.
• Travel expense reimbursement for
lodging, meals and rental car.
• Assistance for taxi, shuttle, rental car
coverage or other transportation.
Transferable Coverage
If you sell your vehicle before your Ford
Protect extended service plan coverage
expires, you can transfer any remaining
coverage to the new owner. Which should
give you and your potential buyer a little
more peace of mind.
563
Super Duty (TFE) Canada/United States of America, enUSA, Edition date: 202008, Third-Printing- Ford Protect
Page 652 of 666

Car Wash
See: Cleaning the Exterior.............................. 392
Catalytic Converter......................................195
On-Board Diagnostics (OBD-II)................... 196
Readiness for Inspection and Maintenance (I/M) Testing.................................................... 197
Center Console
................................................171
Changing a Bulb...........................................383
Cargo Lamp and Central High Mounted
Brake Lamp Bulbs........................................ 385
Fog Lamp Bulbs................................................. 384
Front Park and Direction Indicator Lamp Bulbs.................................................................. 383
Headlamp Bulbs................................................ 383
LED Lamps.......................................................... 386
License Plate Lamp Bulb............................... 386
Rear Lamps, Brake Lamps, Rear Direction Indicator and Reversing Lamp
Bulbs................................................................. 384
Changing a Fuse
..........................................346
Fuses...................................................................... 346
Changing a Road Wheel...........................429 Dissimilar Spare Wheel and Tire Assembly
Information..................................................... 429
Jacking the Vehicle............................................ 434
Location of the Spare Tire and Tools........430
Stowing the Flat Tire or Spare Tire.............439
Tire Change Procedure.................................... 430
Changing the 12V Battery.........................379 Battery Management System...................... 380
Changing the Engine Air Filter - 6.2L
.................................................................357
Changing the Engine Air Filter - 6.7L Diesel............................................................358
Air Filter Restriction Gauge............................ 359
Changing the Engine Air Filter - 7.3L.................................................................360
Changing the Engine-Mounted and Diesel Fuel Conditioner Module Fuel
Filters - 6.7L Diesel...................................386
Diesel Fuel Conditioner Module Filter................................................................... 386
Engine-mounted Fuel Filter.......................... 389
Changing the Engine Oil and Oil Filter...............................................................356
Engine lubrication for severe service operation......................................................... 356Changing the Vehicle Wi-Fi Hotspot
Name or Password...................................478
Changing the Wiper Blades.....................382
Checking MyKey System Status..............64 MyKey Distance.................................................... 64
Number of Admin Keys...................................... 64
Number of MyKeys.............................................. 64
Checking the Wiper Blades.....................382
Child Restraint and Seatbelt Maintenance.................................................44
Child Restraint Positioning.........................35
Child Safety
......................................................22
General Information............................................ 22
Child Safety Locks..........................................37 Left-Hand Side...................................................... 37
Right-Hand Side................................................... 37
Cleaning Leather Seats
.............................397
With King Ranch Edition................................. 398
Without King Ranch Edition........................... 397
Cleaning Products
........................................391
Materials................................................................ 391
Cleaning the Engine
....................................393
Cleaning the Exhaust - 6.7L Diesel.......394
Cleaning the Exterior..................................392 Cleaning the Exterior Lamps......................... 392
Cleaning the Exterior Precautions...............392
Exterior Chrome Parts...................................... 392
Exterior Plastic Parts........................................ 392
Stripes or Graphics............................................ 392
Underbody........................................................... 393
Under Hood......................................................... 393
Cleaning the Instrument Panel and Instrument Cluster Lens
.........................397
Cleaning the Interior...................................395
Cleaning the Wheels..................................399
Cleaning the Windows and Wiper Blades...........................................................394
Clearing All MyKeys.......................................63
Climate.............................................................531 Accessing Rear Climate Controls................533
Accessing the Climate Control Menu..........531
Directing the Airflow.......................................... 531
Rear Climate Control Lock Indicator..........533
Setting the Blower Motor Speed.................. 531
Setting the Temperature.................................. 531
Switching Auto Mode On and Off................531
Switching Dual Zone Mode On and Off....................................................................... 532
649
Super Duty (TFE) Canada/United States of America, enUSA, Edition date: 202008, Third-Printing- Index
Page 656 of 666
Heated Exterior Mirrors .....................................
98
Memory Mirrors ................................................... 98
Power Exterior Mirrors........................................ 96
PowerScope ™ Power Telescoping
Mirrors.................................................................. 97
Puddle Lamps....................................................... 98
Spot Lamps........................................................... 98
Telescoping Mirrors.............................................. 97
Trailer Towing Camera System....................... 98
F
Fastening the Seatbelts..............................39
Fastening the Cinch Tongue............................ 40
Seatbelt Locking Modes..................................... 41
Using Seatbelts During Pregnancy...............40
Using the Seatbelt with Cinch Tongue (Front Center Seat on Super Cab and
Crew Cab).......................................................... 39
Flat Tire See: Changing a Road Wheel....................... 429
Floor Mats
.......................................................323
Fog Lamps - Front See: Front Fog Lamps........................................ 89
Foot Pedals See: Adjusting the Pedals................................. 84
Ford Credit
.........................................................15
US Only..................................................................... 15
Ford Protect...................................................563 Ford Protect Extended Service Plan
(CANADA ONLY).......................................... 564
Ford Protect Extended Service Plans (U.S. Only).................................................................. 563
Four-Wheel Drive
..........................................213
Front Axle Fluid Capacity and Specification..............................................466
Front Fog Lamps
............................................89
Front Fog Lamp Indicator................................. 89
Switching the Front Fog Lamps On or Off........................................................................\
. 89
Fuel and Refueling
.......................................184
Fuel Consumption........................................193
Advertised Capacity.......................................... 193
Fuel Economy...................................................... 193
Fuel Filter - 6.2L/7.3L..................................382
Fuel Quality - Diesel.....................................187 Biodiesel................................................................ 188
Diesel Fuel Additives ........................................ 189Fuel Requirements - Choosing The Right
Fuel: Vehicles Operated Where Ultra Low
Sulfur Diesel Fuel Is Not Required ..........187
Fuel Requirements - Choosing The Right Fuel: Vehicles Operated Where Ultra Low
Sulfur Diesel Fuel Is Required (United
States/Canada/Puerto Rico/U.S. Virgin
Islands And Other Locales) ...................... 187
Fuel Quality - E85........................................185 Choosing the Right Fuel - Flex Fuel
Vehicles............................................................. 185
Switching Between E85 and Gasoline............................................................ 186
Fuel Quality - Gasoline..............................186 Choosing the Right Fuel.................................. 186
Fuel Shutoff...................................................326
Fuel Tank Capacity - Diesel.....................457
Fuel Tank Capacity - Gasoline...............458
Fuses
................................................................339
Fuse Specification Chart..........................339 Engine Compartment Fuse Box................... 339
Passenger Compartment Fuse Panel.................................................................. 343
G
Garage Door Opener
...................................164
Garage Door Opener See: Universal Garage Door Opener...........164
Gauges ..............................................................
102
DEF Gauge............................................................ 104
Engine Coolant Temperature Gauge..........104
Engine Oil Pressure Gauge............................. 104
Fuel Gauge............................................................ 104
Transmission Fluid Temperature Gauge................................................................. 104
Turbo Boost Gauge............................................ 104
Type 1 and 2.......................................................... 102
Type 3..................................................................... 103
Gearbox See: Transmission.............................................. 207
General Information on Radio Frequencies...................................................55
Intelligent Access................................................. 55
General Maintenance Information.......565 Multi-Point Inspection..................................... 568
Owner Checks and Services......................... 566
Protecting Your Investment........................... 565
653
Super Duty (TFE) Canada/United States of America, enUSA, Edition date: 202008, Third-Printing- Index