2021 FORD F-350 mirror
[x] Cancel search: mirrorPage 264 of 666
Cross Traffic Alert Behavior When
Trailer is Attached
Note:
The system may not correctly operate
when towing a trailer. For vehicles with an
approved trailer tow module and tow bar,
the system turns off when you attach a
trailer. For vehicles with an aftermarket
trailer tow module or tow bar, we
recommend that you switch the system off
when you attach a trailer.
Cross traffic alert remains on when you
attach a trailer in vehicles that come with
blind spot information system with trailer
tow under the following conditions:
• You connect a trailer.
• The trailer is a bike rack or cargo rack
with a maximum length of 3 ft (1 m).
• You set the trailer length to
3 ft (1 m)
in the information display.
See
Blind Spot Information System
(page 254).
Switching the System On and Off
To switch the system on or off, adjust the
setting. Depending on your vehicle options,
the setting could be in the following: •
Information display. See
General
Information (page 110).
• Touchscreen. See Settings (page 543).
Note: The system turns on every time you
switch the ignition on. To permanently
switch the system off, contact an authorized
dealer.
Cross Traffic Alert Indicator When the system detects an
approaching vehicle, a tone
sounds, a warning lamp
illuminates in the relevant exterior mirror
and arrows appear in the information
display to show which side the
approaching vehicle is coming from.
Note: If arrows do not display, a message
appears in the information display.
If the system malfunctions, a warning lamp
illuminates in the instrument cluster and
a message appears in the information
display. Have your vehicle checked as soon
as possible.
Note: In exceptional conditions, the system
could alert you, even when there is nothing
in the detection zone, for example a vehicle
passing further away from your vehicle.
Cross Traffic Alert Information Messages Action
Message
Displays instead of indication arrows when the system
detects a vehicle. Check for approaching traffic.
Cross Traffic Alert
Indicates blocked cross traffic alert system sensors. Clean
the sensors. If the message continues to appear, have your
vehicle checked as soon as possible.
Cross Traffic Not Avail-
able Sensor Blocked See
Manual
The system has malfunctioned. Have your vehicle checked
as soon as possible.
Cross Traffic System
Fault
Displays if you attach a trailer to your vehicle.
Cross Traffic Alert Deac-
tivated Trailer Attached
261
Super Duty (TFE) Canada/United States of America, enUSA, Edition date: 202008, Third-Printing- Driving AidsE268294
Page 310 of 666
The active guidelines fade in and out
depending on the steering wheel position.
The active guidelines are not shown when
the steering wheel position is straight.
Always use caution while reversing.
Objects in the red zone are closest to your
vehicle and objects in the green zone are
farther away. Objects are getting closer to
your vehicle as they move from the green
zone to the yellow or red zones. Use the
side view mirrors and rear view mirror to
get better coverage on both sides and rear
of your vehicle.
Refer to the Rear View Camera section for
additional information. See Rear View
Camera (page 235).
Hitches
Note: On pick-up trucks, the trailer hitch
provided on this vehicle enhances crash
protection for the fuel system. Do not
remove!
Note: Do not cut, drill, weld or modify trailer
hitches. Modifying trailer hitches can reduce
hitch rating.
Do not use a hitch that either clamps onto
the bumper or attaches to the axle. You
must distribute the load in your trailer so
that 10-15% for conventional towing or
15-25% for fifth wheel towing of the total
weight of the trailer is on the tongue. Do
not exceed the tongue load rating
indicated on the conventional hitch
receiver.
Hitch Components (If Equipped)
The following components are required.
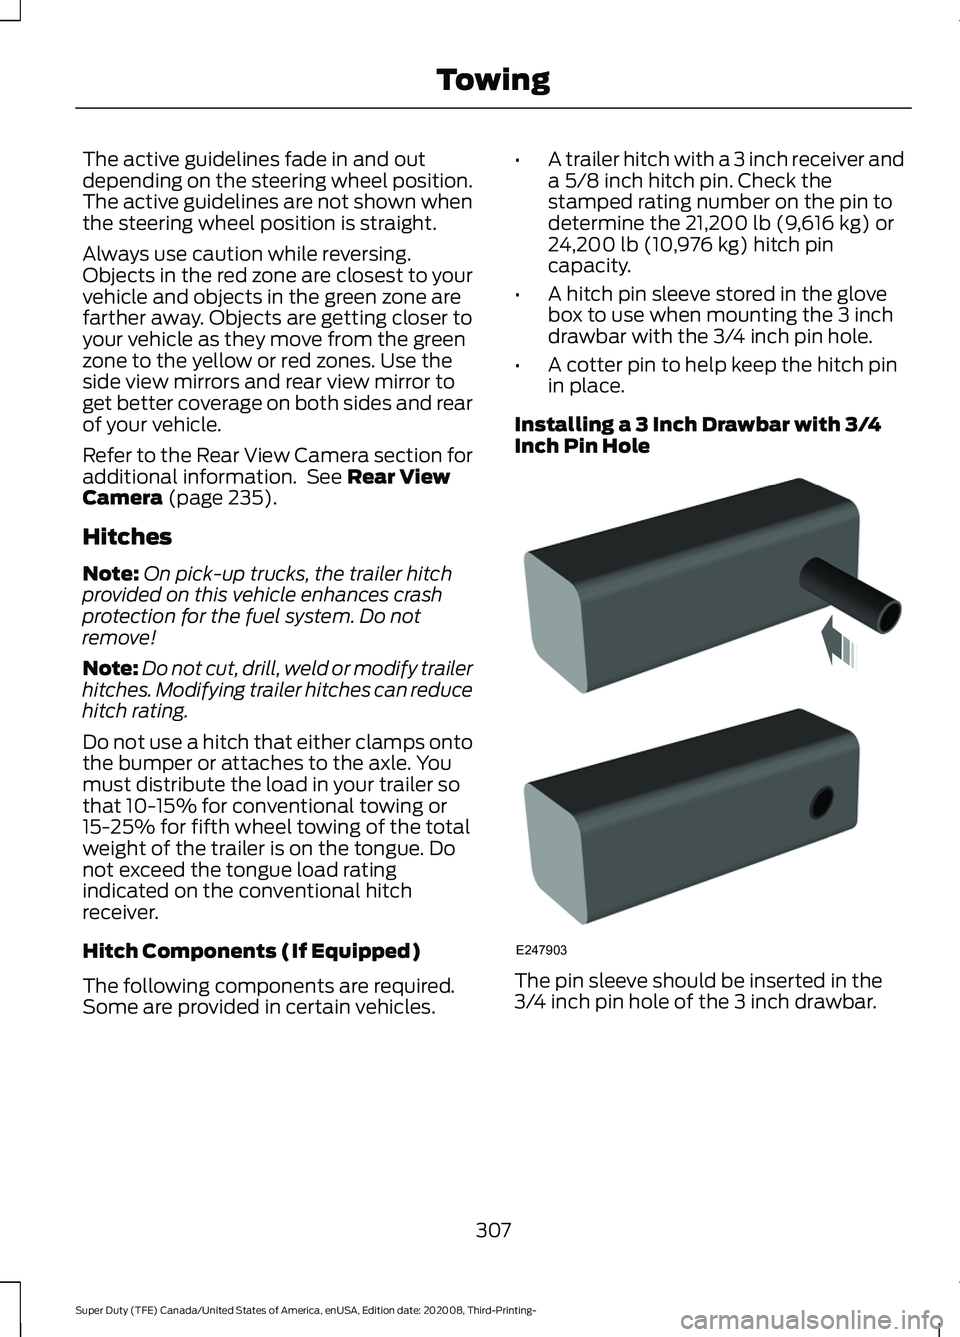
Some are provided in certain vehicles. •
A trailer hitch with a 3 inch receiver and
a 5/8 inch hitch pin. Check the
stamped rating number on the pin to
determine the
21,200 lb (9,616 kg) or
24,200 lb (10,976 kg) hitch pin
capacity.
• A hitch pin sleeve stored in the glove
box to use when mounting the 3 inch
drawbar with the 3/4 inch pin hole.
• A cotter pin to help keep the hitch pin
in place.
Installing a 3 Inch Drawbar with 3/4
Inch Pin Hole The pin sleeve should be inserted in the
3/4 inch pin hole of the 3 inch drawbar.
307
Super Duty (TFE) Canada/United States of America, enUSA, Edition date: 202008, Third-Printing- TowingE247903
Page 343 of 666
Protected Component
Fuse
Rating
Fuse
Number
Power point 4.
20 A
1
Power point 3.
20 A
2
Spot light module.
10 A
3
Four-wheel drive vacuum solenoid.
10 A
4
Active front steering.
40 A
5
Snow plow.
10 A
6
Trailer tow battery charge.
30 A
7
Anti-lock brake system module.
10 A
8
Electronic power assisted steering module.
10 A
9
Trailer tow park lamps.
30 A
10
Horn.
20 A
11
Torque overlay.
30 A
12
Power sliding rear window.
30 A
13
Body control module - battery power in feed 1.
40 A
14
Passenger seat power.
30 A
15
Powertrain control module.
10 A
16
Transmission control module.
Blind spot information system.
10 A
17
Four-wheel drive module.
10 A
18
Adaptive cruise control.
5 A
19
Heated mirrors.
15 A
20
Heated rear window.
40 A
21
On-board diagnostic module.
10 A
22
Smart data link connector.
Transmission control module.
15 A
23
Driver power seat.
30 A
24
Voltage quality module.
25 A
25
340
Super Duty (TFE) Canada/United States of America, enUSA, Edition date: 202008, Third-Printing- Fuses
Page 345 of 666
Protected Component
Fuse
Rating
Fuse
Number
Not used.
—
49
Heated and cooled seats.
30 A
50
Powertrain control module.
20 A
51
Compressed natural gas (gas).
15 A
52
Fuel rail pressure relief control (diesel).
Exhaust gas recirculation stepper motor (gas).
20 A
53
Universal exhaust gas oxygen sensors (gas).
Exhaust gas recirculation cooler bypass (diesel).
Urea pump motor controller (diesel).
Oxygen sensors.
A/C clutch relay power.
20 A
54
Fan clutch.
Rain sensor.
5 A
55
Windshield wipers.
30 A
56
Upfitter interface module.
10 A
57
Alternator sense line.
10 A
58
Power running boards.
30 A
59
Body control module - battery power in feed 2.
40 A
60
Telescopic mirror motors.
10 A
61
Trailer brake control.
40 A
62
Aftermarket e-brake access.
Multi-contour seats.
15 A
63
Ignition coil (gas).
20 A
64
Glow plug module (diesel).
Nitrogen oxide module (diesel).
Urea level and quality sensor (diesel).
Fuel pump.
30 A
65
A/C clutch solenoid.
10 A
66
Auxiliary lighting module.
40 A
67
Powertrain control module.
10 A
68
342
Super Duty (TFE) Canada/United States of America, enUSA, Edition date: 202008, Third-Printing- Fuses
Page 347 of 666
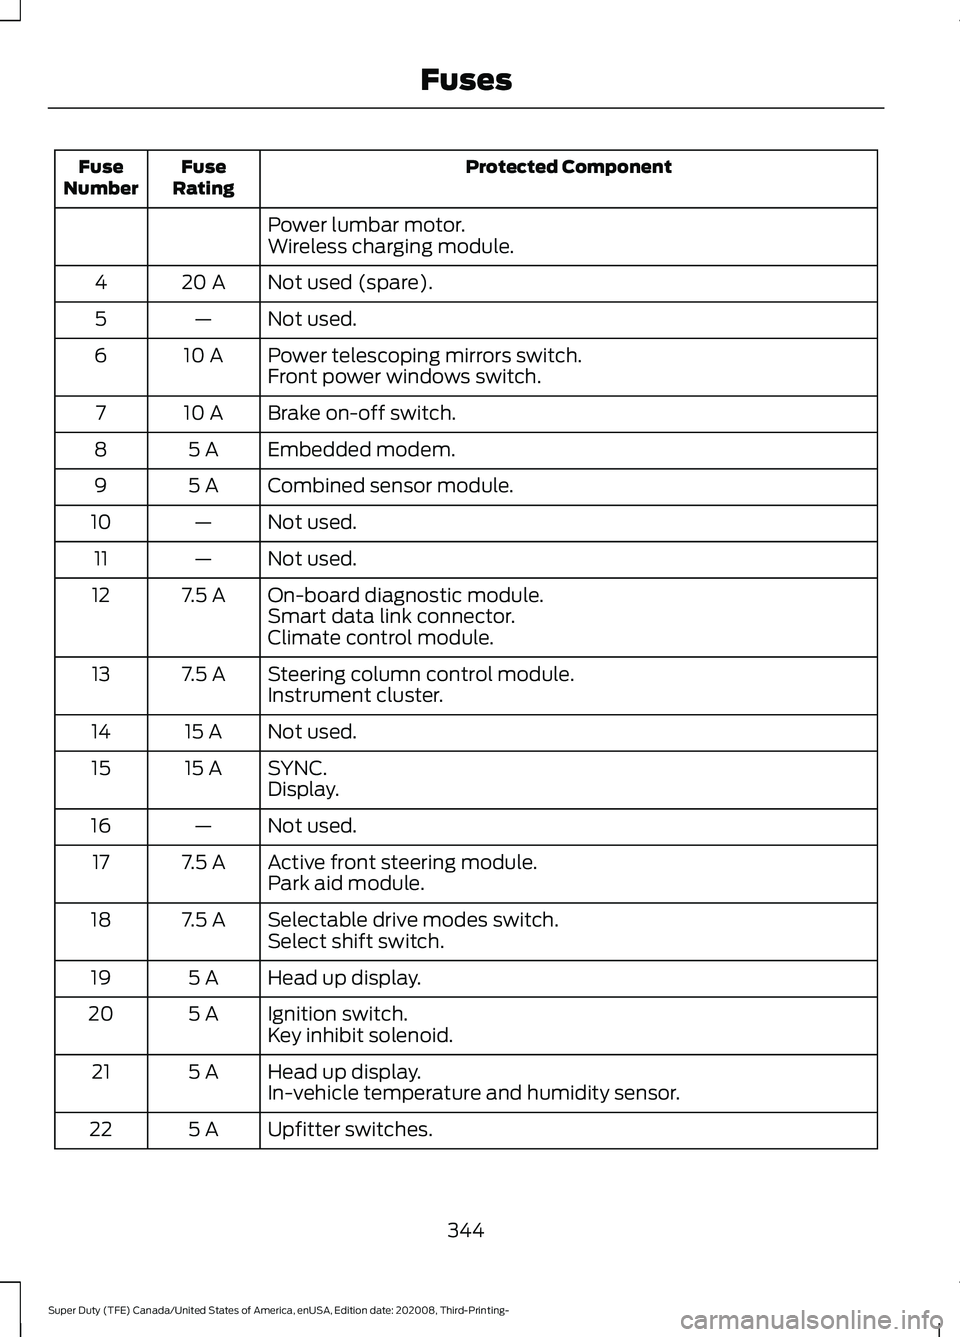
Protected Component
Fuse
Rating
Fuse
Number
Power lumbar motor.
Wireless charging module.
Not used (spare).
20 A
4
Not used.
—
5
Power telescoping mirrors switch.
10 A
6
Front power windows switch.
Brake on-off switch.
10 A
7
Embedded modem.
5 A
8
Combined sensor module.
5 A
9
Not used.
—
10
Not used.
—
11
On-board diagnostic module.
7.5 A
12
Smart data link connector.
Climate control module.
Steering column control module.
7.5 A
13
Instrument cluster.
Not used.
15 A
14
SYNC.
15 A
15
Display.
Not used.
—
16
Active front steering module.
7.5 A
17
Park aid module.
Selectable drive modes switch.
7.5 A
18
Select shift switch.
Head up display.
5 A
19
Ignition switch.
5 A
20
Key inhibit solenoid.
Head up display.
5 A
21
In-vehicle temperature and humidity sensor.
Upfitter switches.
5 A
22
344
Super Duty (TFE) Canada/United States of America, enUSA, Edition date: 202008, Third-Printing- Fuses
Page 348 of 666
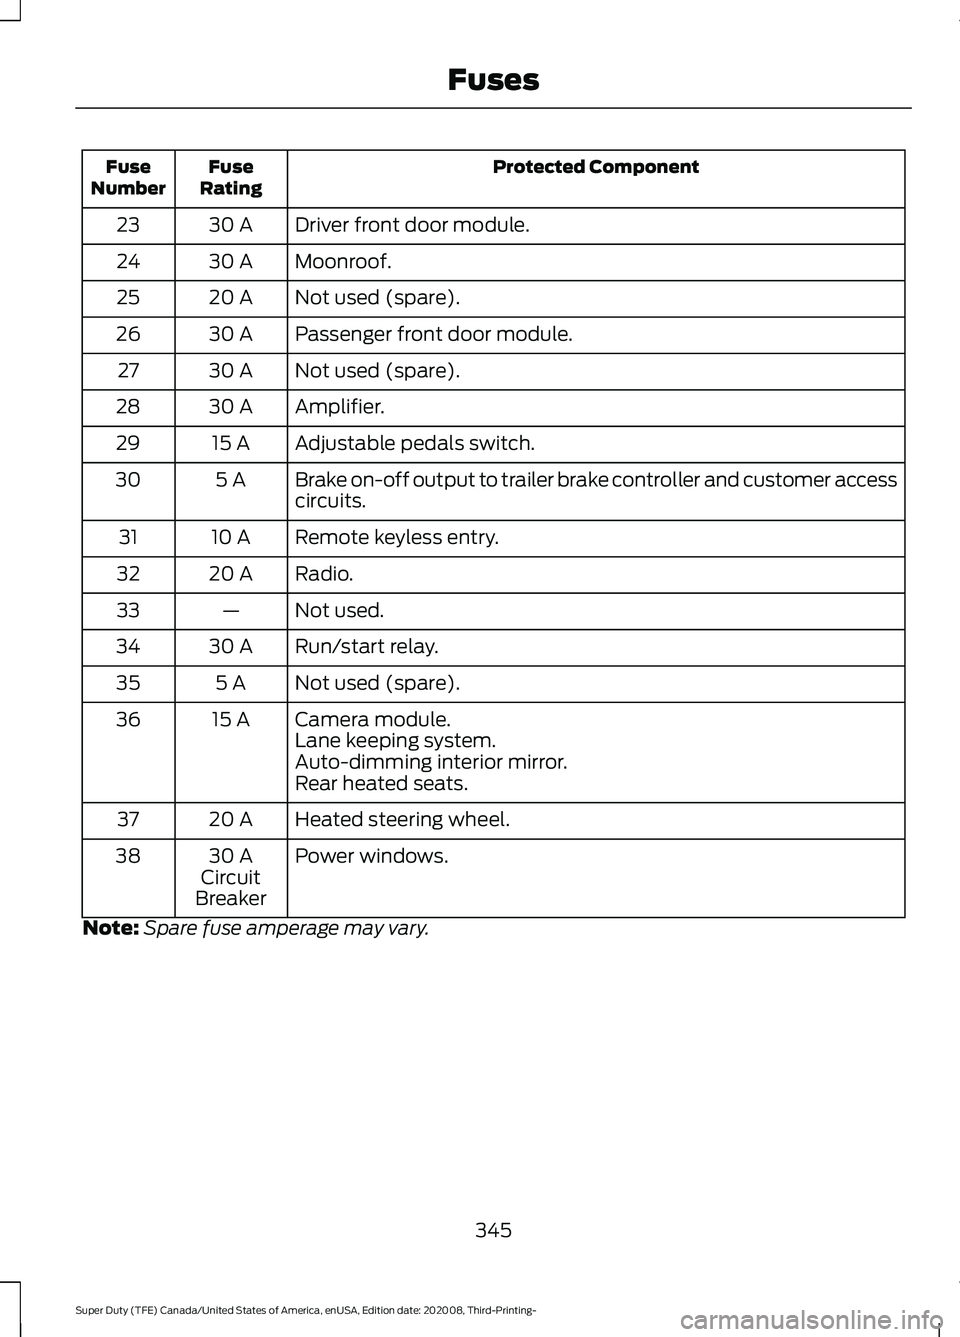
Protected Component
Fuse
Rating
Fuse
Number
Driver front door module.
30 A
23
Moonroof.
30 A
24
Not used (spare).
20 A
25
Passenger front door module.
30 A
26
Not used (spare).
30 A
27
Amplifier.
30 A
28
Adjustable pedals switch.
15 A
29
Brake on-off output to trailer brake controller and customer access
circuits.
5 A
30
Remote keyless entry.
10 A
31
Radio.
20 A
32
Not used.
—
33
Run/start relay.
30 A
34
Not used (spare).
5 A
35
Camera module.
15 A
36
Lane keeping system.
Auto-dimming interior mirror.
Rear heated seats.
Heated steering wheel.
20 A
37
Power windows.
30 A
Circuit
Breaker
38
Note: Spare fuse amperage may vary.
345
Super Duty (TFE) Canada/United States of America, enUSA, Edition date: 202008, Third-Printing- Fuses
Page 383 of 666

4. Press the brake pedal and start your
vehicle.
5. Run the engine until it reaches normal operating temperature. While the
engine is warming up, complete the
following: Reset the clock. Reset the
power windows bounce-back feature.
See Windows and Mirrors (page 95).
Reset the radio station presets. See
Audio System
(page 488).
6. Allow the engine to idle for at least one
minute.
7. Drive the vehicle at least 10 mi (16 km)
to completely relearn the idle trim and
fuel trim strategy.
Note: If you do not allow the engine to
relearn the idle and fuel trim strategy, the
idle quality of your vehicle may be adversely
affected until the engine computer
eventually relearns the idle trim and fuel
trim strategy.
Note: For flexible fuel vehicles, if you are
operating on E85, you may experience poor
starts or an inability to start the engine and
driveability problems until the fuel trim and
ethanol content have been relearned.
Make sure that you dispose of old batteries
in an environmentally friendly way. Seek
advice from your local authority about
recycling old batteries.
If storing your vehicle for more than 30
days without recharging the battery, we
recommend that you disconnect the
negative battery cable to maintain battery
charge for quick starting.
Battery Management System
(If
Equipped)
The battery management system monitors
battery conditions and takes actions to
extend battery life. If excessive battery
drain is detected, the system temporarily
disables some electrical systems to
protect the battery. Systems included are:
•
Heated rear window.
• Heated seats.
• Climate control.
• Heated steering wheel.
• Audio unit.
• Navigation system.
A message may appear in the information
displays to alert you that battery
protection actions are active. These
messages are only for notification that an
action is taking place, and not intended to
indicate an electrical problem or that the
battery requires replacement.
After battery replacement, or in some
cases after charging the battery with an
external charger, the battery management
system requires eight hours of vehicle sleep
time to relearn the battery state of charge.
During this time your vehicle must remain
fully locked with the ignition switched off.
Note: Prior to relearning the battery state
of charge, the battery management system
may temporarily disable some electrical
systems.
Electrical Accessory Installation
To make sure the battery management
system works correctly, do not connect an
electrical device ground connection
directly to the battery negative post. This
can cause inaccurate measurements of
the battery condition and potential
incorrect system operation.
Note: If you add electrical accessories or
components to the vehicle, it may adversely
affect battery performance and durability.
This may also affect the performance of
other electrical systems in the vehicle.
380
Super Duty (TFE) Canada/United States of America, enUSA, Edition date: 202008, Third-Printing- Maintenance
Page 396 of 666
•
Use a spray with a 40 degree wide
spray angle pattern.
• Keep the nozzle at a 12 in (305 mm)
distance and 90 degree angle to your
vehicle's surface.
Note: Holding the pressure washer nozzle
at an angle to the vehicle's surface may
damage graphics and cause the edges to
peel away from the vehicle's surface.
Underbody
Regularly clean the underside of your
vehicle using water. Keep body and door
drain holes free of debris or foreign
material.
Under Hood
For removing black rubber marks from
under the hood we recommend Motorcraft
Wheel and Tire Cleaner or Motorcraft Bug
and Tar Remover.
WAXING
Regular waxing is necessary to protect your
car's paint from the elements. We
recommend that you wash and wax the
painted surface once or twice a year.
When washing and waxing, park your
vehicle in a shaded area out of direct
sunlight. Always wash your vehicle before
applying wax.
• Use a quality wax that does not contain
abrasives.
• Follow the manufacturer ’s instructions
to apply and remove the wax.
• Apply a small amount of wax in a
back-and-forth motion, not in circles. •
Do not allow wax to come in contact
with any non-body (low-gloss black)
colored trim. The wax will discolor or
stain the parts over time.
•Roof racks.
• Bumpers.
• Grained door handles.
• Side moldings.
• Mirror housings.
• Windshield cowl area.
• Do not apply wax to glass areas.
• After waxing, your car's paint should
feel smooth, and be free of streaks and
smudges.
CLEANING THE ENGINE
Engines are more efficient when they are
clean because grease and dirt buildup keep
the engine warmer than normal.
When washing:
• Take care when using a power washer
to clean the engine. The high-pressure
fluid could penetrate the sealed parts
and cause damage.
• Do not spray a hot engine with cold
water to avoid cracking the engine
block or other engine components.
• Spray Motorcraft Engine Shampoo and
Degreaser on all parts that require
cleaning and pressure rinse clean. In
Canada, use Motorcraft Engine
Shampoo.
Note: If your vehicle has an engine cover
remove the cover before application of
Motorcraft Engine Shampoo and Degreaser.
Immediately rinse away any over spray.
393
Super Duty (TFE) Canada/United States of America, enUSA, Edition date: 202008, Third-Printing- Vehicle Care