Page 440 of 666

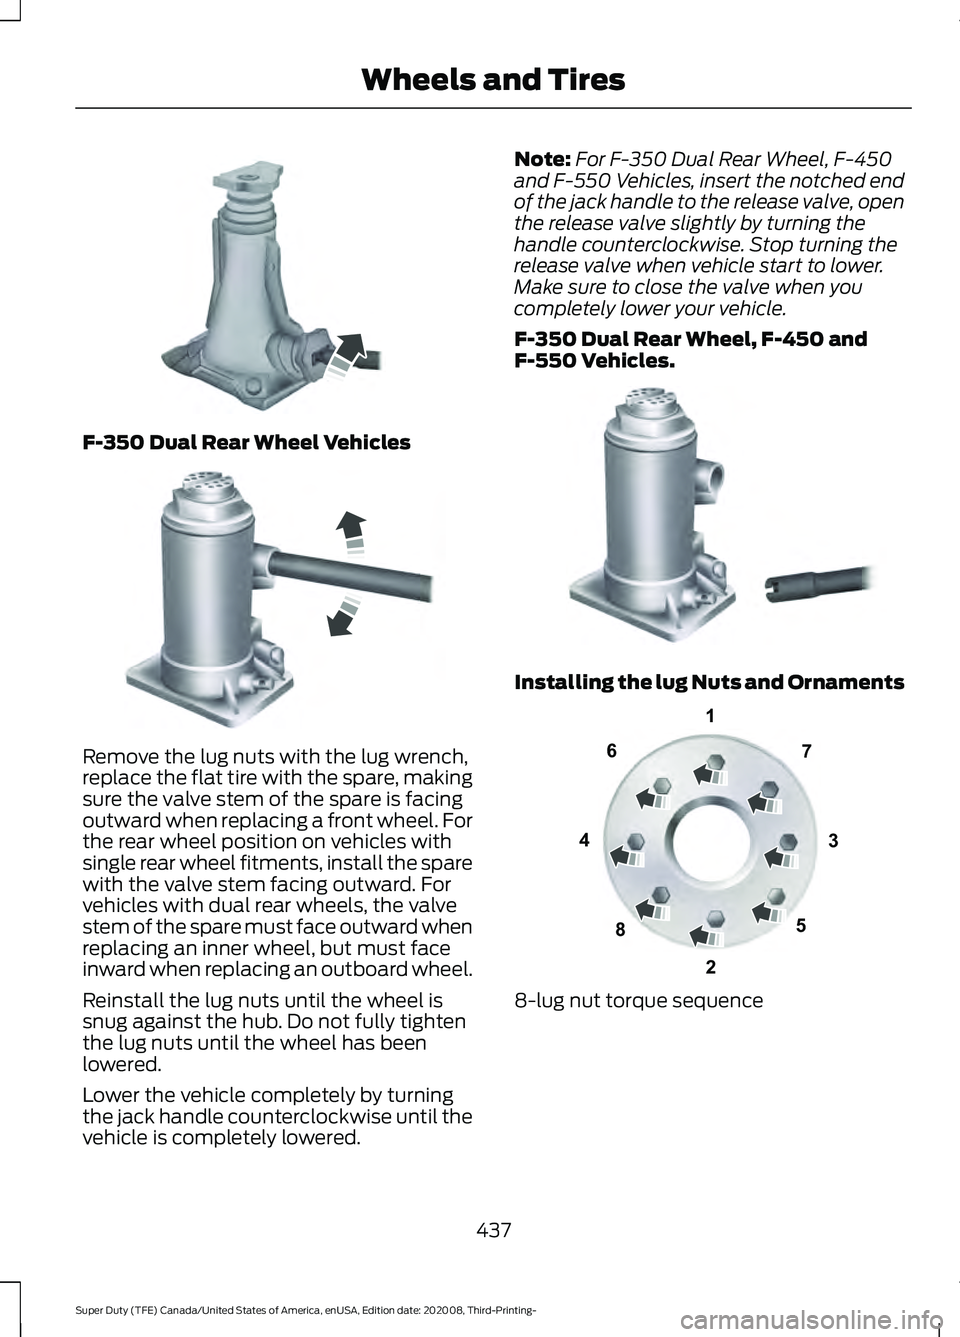
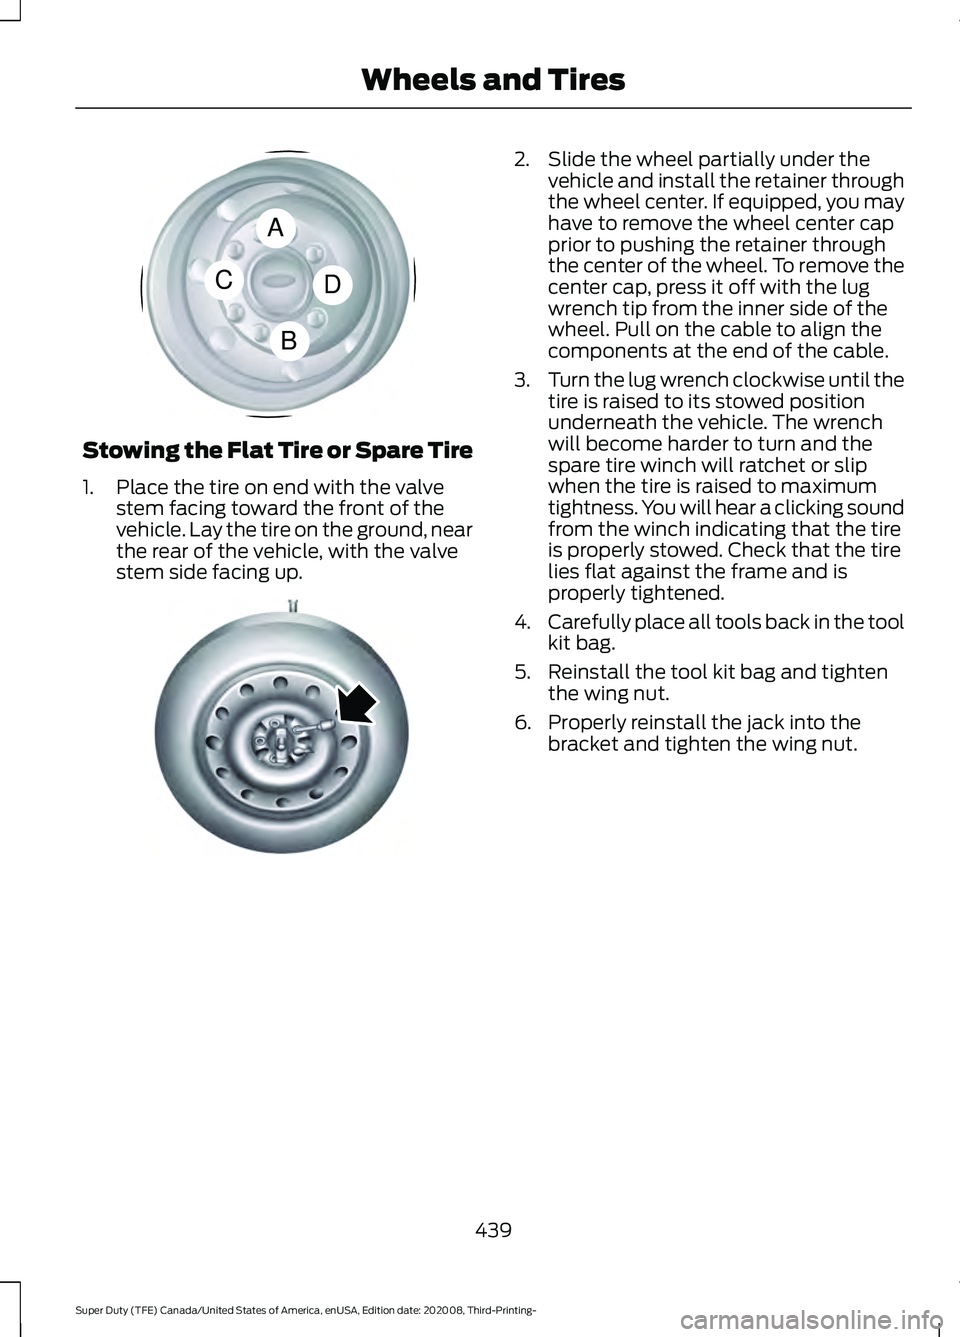
F-350 Dual Rear Wheel Vehicles
Remove the lug nuts with the lug wrench,
replace the flat tire with the spare, making
sure the valve stem of the spare is facing
outward when replacing a front wheel. For
the rear wheel position on vehicles with
single rear wheel fitments, install the spare
with the valve stem facing outward. For
vehicles with dual rear wheels, the valve
stem of the spare must face outward when
replacing an inner wheel, but must face
inward when replacing an outboard wheel.
Reinstall the lug nuts until the wheel is
snug against the hub. Do not fully tighten
the lug nuts until the wheel has been
lowered.
Lower the vehicle completely by turning
the jack handle counterclockwise until the
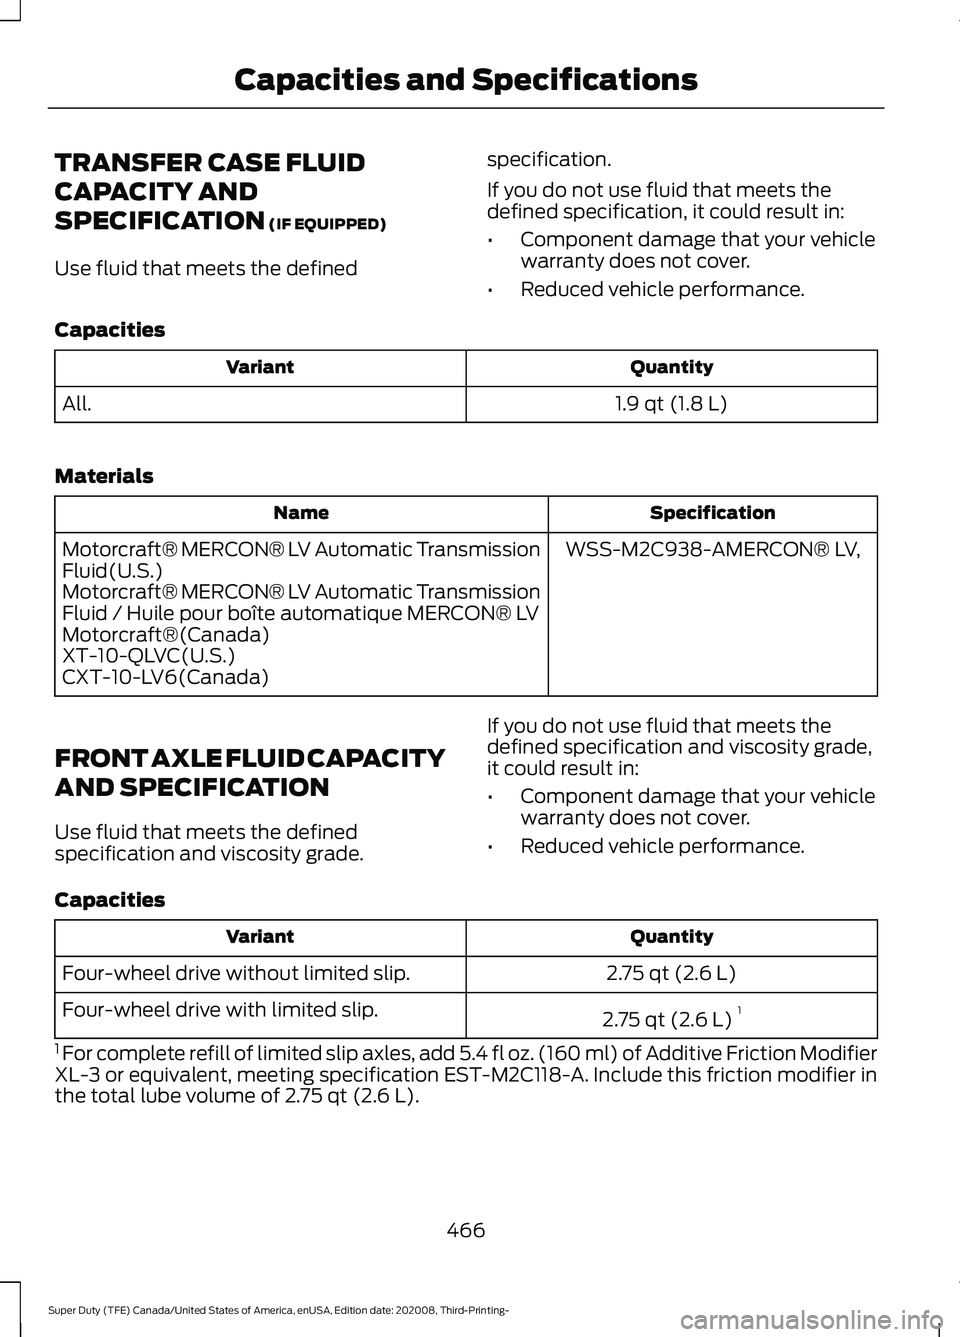
vehicle is completely lowered. Note:
For F-350 Dual Rear Wheel, F-450
and F-550 Vehicles, insert the notched end
of the jack handle to the release valve, open
the release valve slightly by turning the
handle counterclockwise. Stop turning the
release valve when vehicle start to lower.
Make sure to close the valve when you
completely lower your vehicle.
F-350 Dual Rear Wheel, F-450 and
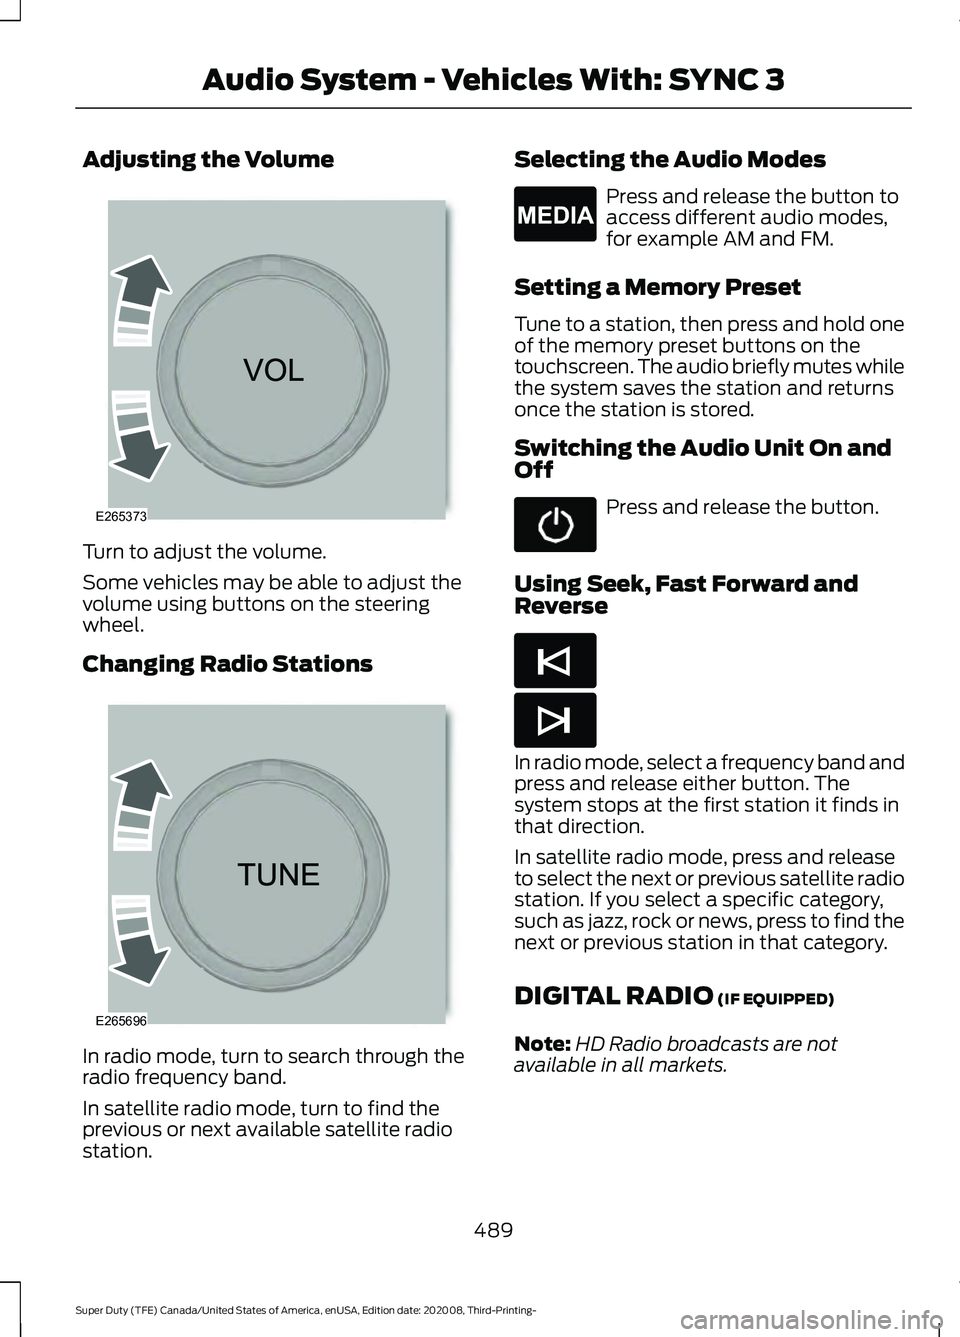
F-550 Vehicles. Installing the lug Nuts and Ornaments
8-lug nut torque sequence
437
Super Duty (TFE) Canada/United States of America, enUSA, Edition date: 202008, Third-Printing- Wheels and TiresE162811 E162819 E162812 13
4
27
6
5
8E161441
Page 441 of 666

10-lug nut torque sequence
Note:
When installing the wheel center
ornaments, make sure that the ornament
retention towers on the back side of the
ornament are aligned with the studs or nuts
and retain to the flange on the lug nuts. Note:
For dual rear wheels, align the
ornament with the lug nuts. (A) is the clip
in the ornament and (B) is the flange of the
lug nut. Make sure that each of the retention
clips are sitting on a lug nut flange. Note:
If the ornament retention clips are
aligned between the studs or lug nuts, the
ornament will be improperly installed. This
improper installation may appear and sound
correct, but will not keep the ornament on
the vehicle. Ornaments improperly installed
in this manner may become loose or fall off
during driving. Use your hand or a rubber mallet to tap the
ornament until the retention clips snap
over the lug nut flanges. Tap in a star
pattern until the ornament seats fully onto
the wheel. There should be an even gap
between the ornament and the wheel
when it is properly installed.
438
Super Duty (TFE) Canada/United States of America, enUSA, Edition date: 202008, Third-Printing- Wheels and Tires1
2
3
4
5
6
7 8
9
10E169375 E162820 ABE162822 E162823
Page 442 of 666

Stowing the Flat Tire or Spare Tire
1. Place the tire on end with the valve
stem facing toward the front of the
vehicle. Lay the tire on the ground, near
the rear of the vehicle, with the valve
stem side facing up. 2. Slide the wheel partially under the
vehicle and install the retainer through
the wheel center. If equipped, you may
have to remove the wheel center cap
prior to pushing the retainer through
the center of the wheel. To remove the
center cap, press it off with the lug
wrench tip from the inner side of the
wheel. Pull on the cable to align the
components at the end of the cable.
3. Turn the lug wrench clockwise until the
tire is raised to its stowed position
underneath the vehicle. The wrench
will become harder to turn and the
spare tire winch will ratchet or slip
when the tire is raised to maximum
tightness. You will hear a clicking sound
from the winch indicating that the tire
is properly stowed. Check that the tire
lies flat against the frame and is
properly tightened.
4. Carefully place all tools back in the tool
kit bag.
5. Reinstall the tool kit bag and tighten the wing nut.
6. Properly reinstall the jack into the bracket and tighten the wing nut.
439
Super Duty (TFE) Canada/United States of America, enUSA, Edition date: 202008, Third-Printing- Wheels and TiresA
C
B
DE162824 E162800
Page 443 of 666

TECHNICAL SPECIFICATIONS
Wheel Lug Nut Torque Specifications
WARNING: When you install a wheel, always remove any corrosion, dirt or foreign
materials present on the mounting surfaces of the wheel or the surface of the wheel
hub, brake drum or brake disc that contacts the wheel. Make sure to secure any fasteners
that attach the rotor to the hub so they do not interfere with the mounting surfaces of
the wheel. Installing wheels without correct metal-to-metal contact at the wheel
mounting surfaces can cause the wheel nuts to loosen and the wheel to come off while
your vehicle is in motion, resulting in loss of vehicle control, personal injury or death. lb.ft (Nm)
1
Bolt size
150 lb.ft (204 Nm)
M14 x 1.5
1 Torque specifications are for nut and bolt threads free of dirt and rust. Use only Ford
recommended replacement fasteners.
On vehicles equipped with single rear wheels, retighten the lug nuts to the specified torque
at 100 mi (160 km) after any wheel disturbance, such as tire rotation, changing a flat tire,
or wheel removal.
On vehicles equipped with dual rear wheels, retighten the wheel lug nuts to the specified
torque at
100 mi (160 km), and again at 500 mi (800 km) of new vehicle operation and
after any wheel disturbance, such as tire rotation, changing a flat tire, or wheel removal.
It is important to follow the proper wheel mounting and lug nut torque procedures. Wheel pilot bore
A
Inspect the wheel pilot hole and
mounting surface prior to installation.
Remove any visible corrosion or loose
particles.
440
Super Duty (TFE) Canada/United States of America, enUSA, Edition date: 202008, Third-Printing- Wheels and TiresE145950
Page 460 of 666
Materials
Specification
Name
WSS-M97B57-A2
Motorcraft® Yellow Prediluted Antifreeze/
Coolant(U.S.)
Motorcraft® Yellow Prediluted Antifreeze/Coolant
/ Antigel/liquide de refroidissement prédilué jaune
Motorcraft®(Canada)
VC-13DL-G(U.S.)
CVC-13DL-G(Canada)
FUEL TANK CAPACITY - DIESEL
Capacities Quantity
Variant
29.0 gal (109.8 L)
Complete vehicle-142 inch and 148 inch
wheelbase, middle location.
34.0 gal (128.7 L)
Complete vehicle-160 inch and 164 inch
wheelbase, middle location.
48.0 gal (181.7 L)
Complete vehicle-176 inch wheelbase,
middle location.
26.5 gal (100.3 L)
Incomplete vehicle, middle location.
40.0 gal (151.4 L)
Incomplete vehicle, aft- axle -location.
66.5 gal (251.7 L)
Incomplete vehicle, middle and aft- axle -
locations.
457
Super Duty (TFE) Canada/United States of America, enUSA, Edition date: 202008, Third-Printing- Capacities and Specifications
Page 461 of 666
FUEL TANK CAPACITY - GASOLINE
Capacities
Quantity
Variant
34.0 gal (128.7 L)
Complete vehicle-all except 176 inch
wheelbase and incomplete vehicles.
48.0 gal (181.7 L)
Complete vehicle-176 inch wheelbase.
40.0 gal (151.4 L)
Incomplete vehicle, aft- axle -location.
26.5 gal (100.3 L)
Incomplete vehicle, middle location.
458
Super Duty (TFE) Canada/United States of America, enUSA, Edition date: 202008, Third-Printing- Capacities and Specifications
Page 469 of 666

TRANSFER CASE FLUID
CAPACITY AND
SPECIFICATION (IF EQUIPPED)
Use fluid that meets the defined specification.
If you do not use fluid that meets the
defined specification, it could result in:
•
Component damage that your vehicle
warranty does not cover.
• Reduced vehicle performance.
Capacities Quantity
Variant
1.9 qt (1.8 L)
All.
Materials Specification
Name
WSS-M2C938-AMERCON® LV,
Motorcraft® MERCON® LV Automatic Transmission
Fluid(U.S.)
Motorcraft® MERCON® LV Automatic Transmission
Fluid / Huile pour boîte automatique MERCON® LV
Motorcraft®(Canada)
XT-10-QLVC(U.S.)
CXT-10-LV6(Canada)
FRONT AXLE FLUID CAPACITY
AND SPECIFICATION
Use fluid that meets the defined
specification and viscosity grade. If you do not use fluid that meets the
defined specification and viscosity grade,
it could result in:
•
Component damage that your vehicle
warranty does not cover.
• Reduced vehicle performance.
Capacities Quantity
Variant
2.75 qt (2.6 L)
Four-wheel drive without limited slip.
2.75 qt (2.6 L)1
Four-wheel drive with limited slip.
1 For complete refill of limited slip axles, add 5.4 fl oz. (160 ml) of Additive Friction Modifier
XL-3 or equivalent, meeting specification EST-M2C118-A. Include this friction modifier in
the total lube volume of 2.75 qt (2.6 L).
466
Super Duty (TFE) Canada/United States of America, enUSA, Edition date: 202008, Third-Printing- Capacities and Specifications
Page 492 of 666

Adjusting the Volume
Turn to adjust the volume.
Some vehicles may be able to adjust the
volume using buttons on the steering
wheel.
Changing Radio Stations
In radio mode, turn to search through the
radio frequency band.
In satellite radio mode, turn to find the
previous or next available satellite radio
station. Selecting the Audio Modes Press and release the button to
access different audio modes,
for example AM and FM.
Setting a Memory Preset
Tune to a station, then press and hold one
of the memory preset buttons on the
touchscreen. The audio briefly mutes while
the system saves the station and returns
once the station is stored.
Switching the Audio Unit On and
Off Press and release the button.
Using Seek, Fast Forward and
Reverse In radio mode, select a frequency band and
press and release either button. The
system stops at the first station it finds in
that direction.
In satellite radio mode, press and release
to select the next or previous satellite radio
station. If you select a specific category,
such as jazz, rock or news, press to find the
next or previous station in that category.
DIGITAL RADIO (IF EQUIPPED)
Note: HD Radio broadcasts are not
available in all markets.
489
Super Duty (TFE) Canada/United States of America, enUSA, Edition date: 202008, Third-Printing- Audio System - Vehicles With: SYNC 3E265373 E265696 E265035 E265045 E265044