2021 FORD F-250 light
[x] Cancel search: lightPage 431 of 666

12.
Turn the ignition off. If two short horn
beeps are heard, the reset procedure
was unsuccessful and you must
repeat it. If after repeating the
procedure and two short beeps are
heard when the ignition is turned to
off, seek assistance from your
authorized dealer.
13. Set all six tires to the recommended air pressure as indicated on the
Safety Compliance Certification
Label, affixed to either the door hinge
pillar, door-latch post, or the door
edge that meets the door-latch post,
next to the driver seating position or
Tire Label located on the B-Pillar or
the edge of the driver door.
Trailer Tire Pressure Monitoring
System (If Equipped)
Note: Additional equipment may be
required for your vehicle to support trailer
tire pressure monitoring. See your authorized
dealer for more information.
Note: The trailer tire pressure monitoring
system is not a substitute for proper tire
maintenance. It is your responsibility to
maintain correct tire pressures at all times.
Note: If a trailer tire is repaired, replaced or
broken down for service, the screw and valve
on the trailer tire pressure sensor should be
replaced. See your authorized dealer for
details. The trailer tire pressure monitoring system
is an added safety feature that allows you
to view your trailer tire pressures through
the information display.
See General
Information (page 110). Tire pressure
sensors are mounted into each tire on your
trailer. The sensors send a message to your
vehicle indicating the current trailer tire
pressure.
If the trailer tire pressure monitoring
system detects that a tire is low, a warning
message appears in the information
display. The trailer tire pressure status
screen in the information display highlights
the tire with a low pressure.
The main function of the trailer tire
pressure monitoring system is to warn you
when your trailer tires need air. It can also
warn you in the event the system is no
longer capable of functioning as intended.
See
Information Messages (page 121).
When a Temporary Spare or New Tire
is Installed
If you have replaced a trailer tire with a new
or spare tire, a warning message appears
and pressure readings are no longer
displayed for that tire.
To restore the full function of the trailer
tire pressure monitoring system:
• Have the damaged wheel and tire
assembly repaired and remounted to
your trailer.
• Install the trailer tire pressure
monitoring sensor into the new wheel
and tire assembly.
• Perform the trailer tire pressure
monitoring system reset procedure.
Trailer Tire Pressure Monitoring
System Reset Procedure
Note: You need to perform the tire pressure
monitoring system reset procedure after
each tire rotation, or when a new trailer tire
pressure sensor is installed into a trailer tire.
428
Super Duty (TFE) Canada/United States of America, enUSA, Edition date: 202008, Third-Printing- Wheels and TiresE235807
Page 432 of 666

The trailer tire pressure monitoring system
can be reset through the menu in the
information display. See General
Information (page 110). Performing the
trailer setup process also resets the trailer
tire pressure monitoring system.
CHANGING A ROAD WHEEL WARNING:
If the tire pressure
monitor sensor becomes damaged it
may not function.
Note: If your vehicle is equipped with the
tire pressure monitoring system, the
indicator light illuminates when the spare
tire is in use. To restore the full function of
the monitoring system, all road wheels
equipped with tire pressure monitoring
sensors must be mounted on the vehicle.
Note: You should only use tire sealants in
roadside emergencies as they may cause
damage to the tire pressure monitoring
system sensor.
If you get a flat tire when driving, do not
apply the brake heavily. Instead, gradually
decrease your speed. Hold the steering
wheel firmly and slowly move to a safe
place on the side of the road.
If your vehicle is equipped with the tire
pressure monitoring system, have a flat
serviced by an authorized dealer in order
to prevent damage to the system sensors.
See
Tire Pressure Monitoring System
(page 421). Replace the spare tire with a
road tire as soon as possible. During
repairing or replacing of the flat tire, have
the authorized dealer inspect the system
sensor for damage. Dissimilar Spare Wheel and Tire
Assembly Information WARNING:
Failure to follow these
guidelines could result in an increased
risk of loss of vehicle control, injury or
death.
If you have a dissimilar spare wheel and
tire, then it is intended for temporary use
only. This means that if you need to use it,
you should replace it as soon as possible
with a road wheel and tire assembly that
is the same size and type as the road tires
and wheels that were originally provided
by Ford. If the dissimilar spare tire or wheel
is damaged, it should be replaced rather
than repaired.
A dissimilar spare wheel and tire assembly
is defined as a spare wheel and tire
assembly that is different in brand, size or
appearance from the road tires and
wheels.
Full-size dissimilar spare
When driving with the full-size dissimilar
spare wheel and tire assembly, do not:
• Exceed
70 mph (113 km/h).
• Use more than one dissimilar spare
wheel and tire assembly at a time.
• Use snow chains on the end of the
vehicle with the dissimilar spare wheel
and tire assembly.
When driving with the full-size dissimilar
spare wheel and tire assembly, 4WD
functionality may be limited. You may
experience the following:
• Additional noise from the transfer case
or other drive components.
• Difficulty shifting out of a mechanically
locked 4WD mode.
429
Super Duty (TFE) Canada/United States of America, enUSA, Edition date: 202008, Third-Printing- Wheels and Tires
Page 440 of 666
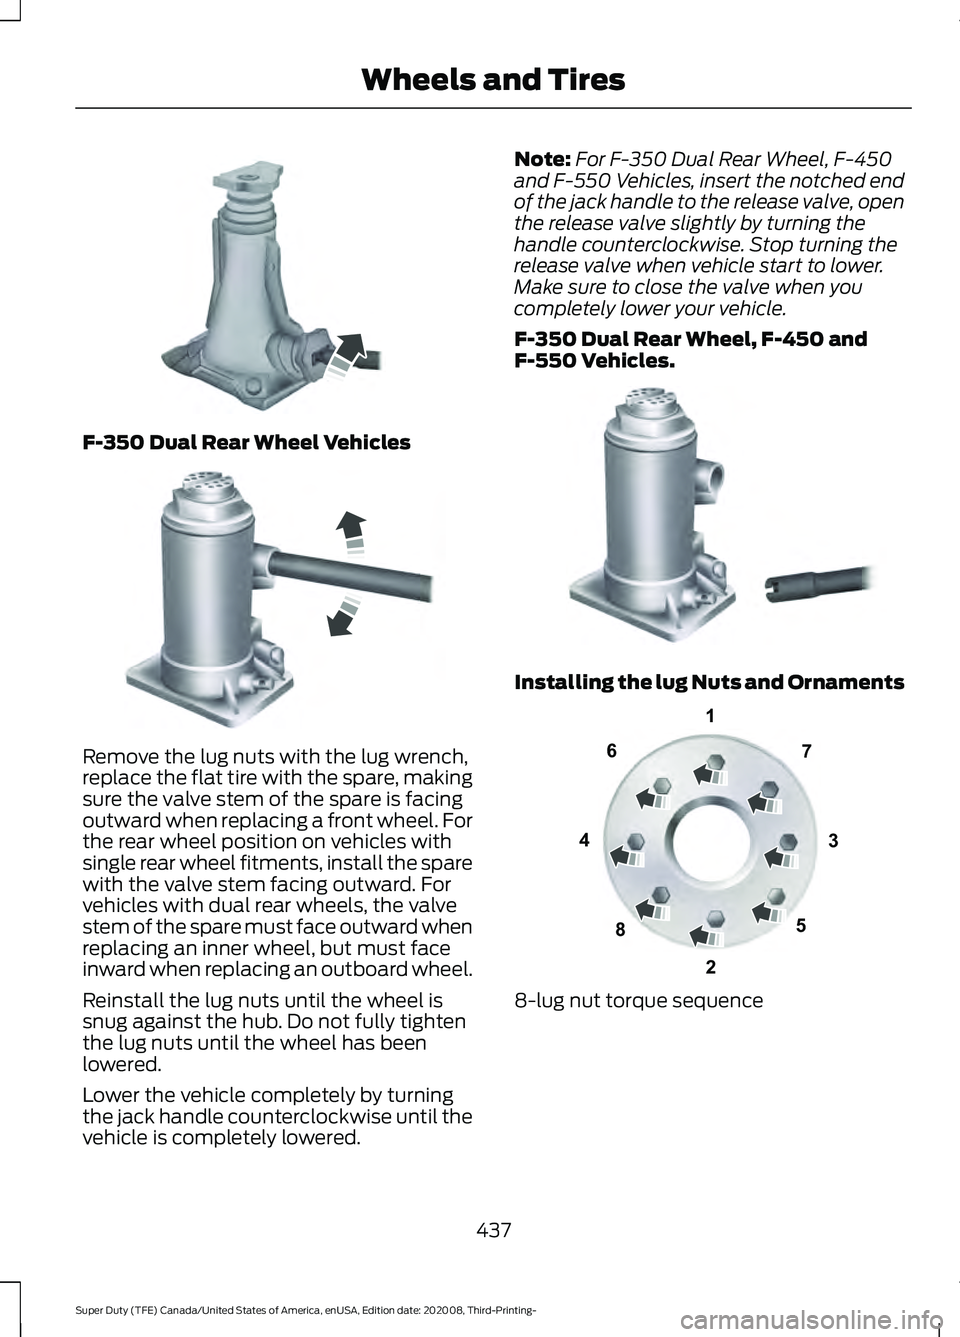
F-350 Dual Rear Wheel Vehicles
Remove the lug nuts with the lug wrench,
replace the flat tire with the spare, making
sure the valve stem of the spare is facing
outward when replacing a front wheel. For
the rear wheel position on vehicles with
single rear wheel fitments, install the spare
with the valve stem facing outward. For
vehicles with dual rear wheels, the valve
stem of the spare must face outward when
replacing an inner wheel, but must face
inward when replacing an outboard wheel.
Reinstall the lug nuts until the wheel is
snug against the hub. Do not fully tighten
the lug nuts until the wheel has been
lowered.
Lower the vehicle completely by turning
the jack handle counterclockwise until the
vehicle is completely lowered. Note:
For F-350 Dual Rear Wheel, F-450
and F-550 Vehicles, insert the notched end
of the jack handle to the release valve, open
the release valve slightly by turning the
handle counterclockwise. Stop turning the
release valve when vehicle start to lower.
Make sure to close the valve when you
completely lower your vehicle.
F-350 Dual Rear Wheel, F-450 and
F-550 Vehicles. Installing the lug Nuts and Ornaments
8-lug nut torque sequence
437
Super Duty (TFE) Canada/United States of America, enUSA, Edition date: 202008, Third-Printing- Wheels and TiresE162811 E162819 E162812 13
4
27
6
5
8E161441
Page 450 of 666

BULB SPECIFICATION CHART
Replacement bulbs are specified in the
chart below. Headlamp bulbs must be
marked with an authorized D.O.T. marking
for North America to make sure they have
the proper lamp performance, light
brightness, light pattern and safe visibility.
The correct bulbs will not damage the
lamp assembly or void the lamp assembly
warranty and will provide quality bulb
illumination time.
Exterior Lamps Power (Watt)
Specification
Lamp
60/55
H13/9008
Headlamp.
LED
LED
Headlamp.
5
W5W
Front side marker lamp.
40
9140
Front fog lamp.
LED
LED
Front fog lamp. 3
28/8
T20/7444NA
Front direction indicator and parking
lamp.
27/7
3157K
Rear lamp, brake lamp, and rear side
marker lamp. Low/Mid series. 1
21
WTY21W
Rear direction indicator lamp. Low/Mid
series. 1
LED
LED
Rear lamp, brake lamp, rear direction
indicator, rear side marker lamp and
reverse lamp. High series. 1
27/7
3157K
Rear lamp, brake lamp, rear direction
indicator and rear side marker lamp. 2
21
WT21W
Reversing lamp. Low/Mid series.
5
168
License plate lamp. Low series.
LED
LED
License plate lamp. High series.
12.8
912
Central high mounted cargo lamp.
LED
LED
Central high mounted cargo lamp.
LED
LED
Side direction indicator and mirror
clearance lamp.
447
Super Duty (TFE) Canada/United States of America, enUSA, Edition date: 202008, Third-Printing- Capacities and Specifications
Page 485 of 666
HD Radio technology is the digital
evolution of analog AM/FM radio. Your
system has a special receiver that allows
it to receive digital broadcasts, where
available, in addition to the analog
broadcasts, it already receives. Digital
broadcasts provide a better sound quality
than analog broadcasts with free,
crystal-clear audio and no static or
distortion. For more information, and a
guide to available stations and
programming, please visit
www.hdradio.com.
When HD Radio is on and you tune to a
station broadcasting HD Radio technology,
you may notice the HD Radio logo on your
screen. When this logo is available, you
may also see Title and Artist fields
on-screen.
The multicast indicator appears in FM
mode, only, if the current station is
broadcasting multiple digital broadcasts.
The highlighted numbers signify available
digital channels where new or different
content is available. HD1 signifies the main
programming status and is available in
analog and digital broadcasts. Other
multicast stations, HD2 through HD7, are
only available digitally.
When HD Radio broadcasts are active, you
can access the following functions:
•
Memory presets allow you to save an
active channel as a memory preset.
Touch and hold a memory preset slot
until the sound returns. There is a brief
mute while the radio saves the station.
Sound returns when finished. When
switching to an HD2 or HD3 memory
preset, the sound mutes before the
digital audio plays, because the system
has to reacquire the digital signal.
Note: As with any saved radio station, you
cannot access the saved station if your
vehicle is outside the station ’s reception
area.
482
Super Duty (TFE) Canada/United States of America, enUSA, Edition date: 202008, Third-Printing- Audio System - Vehicles With: SYNC
Page 486 of 666
HD Radio Reception and Station Troubleshooting
Potential reception issues
If you are listening to a multicast station and you are on
the fringe of the reception area, the station may mute due
to weak signal strength.
Reception area
If you are listening to HD1, the system switches back to
the analog broadcast until the digital broadcast is available
again. However, if you are listening to any of the possible
HD2-HD7 multicast channels, the station mutes and stays
muted unless it is able to connect to the digital signal
again.
When the system first receives a station, aside from HD2-
HD7 multicast stations, it first plays the station in the
analog version. Once the receiver verifies the station is an
HD Radio station, it shifts to the digital version. Depending
on the station quality, you may hear a slight sound change
when the station changes from analog to digital. Blending
is the shift from analog to digital sound or digital back to
analog sound.
Station blending
In order to provide the best possible
experience, use the contact form to report
any station issues found while listening to
a station broadcasting with HD Radio
technology. Independent entities own and
operate each station. These stations are
responsible for the accuracy of all audio
streams and data fields.
483
Super Duty (TFE) Canada/United States of America, enUSA, Edition date: 202008, Third-Printing- Audio System - Vehicles With: SYNC
Page 493 of 666
HD Radio technology is the digital
evolution of analog AM/FM radio. Your
system has a special receiver that allows
it to receive digital broadcasts, where
available, in addition to the analog
broadcasts, it already receives. Digital
broadcasts provide a better sound quality
than analog broadcasts with free,
crystal-clear audio and no static or
distortion. For more information, and a
guide to available stations and
programming, please visit
www.hdradio.com.
When HD Radio is on and you tune to a
station broadcasting HD Radio technology,
you may notice the HD Radio logo on your
screen. When this logo is available, you
may also see Title and Artist fields
on-screen.
The multicast indicator appears in FM
mode, only, if the current station is
broadcasting multiple digital broadcasts.
The highlighted numbers signify available
digital channels where new or different
content is available. HD1 signifies the main
programming status and is available in
analog and digital broadcasts. Other
multicast stations, HD2 through HD7, are
only available digitally.
When HD Radio broadcasts are active, you
can access the following functions:
•
Memory presets allow you to save an
active channel as a memory preset.
Touch and hold a memory preset slot
until the sound returns. There is a brief
mute while the radio saves the station.
Sound returns when finished. When
switching to an HD2 or HD3 memory
preset, the sound mutes before the
digital audio plays, because the system
has to reacquire the digital signal.
Note: As with any saved radio station, you
cannot access the saved station if your
vehicle is outside the station ’s reception
area.
490
Super Duty (TFE) Canada/United States of America, enUSA, Edition date: 202008, Third-Printing- Audio System - Vehicles With: SYNC 3
Page 494 of 666
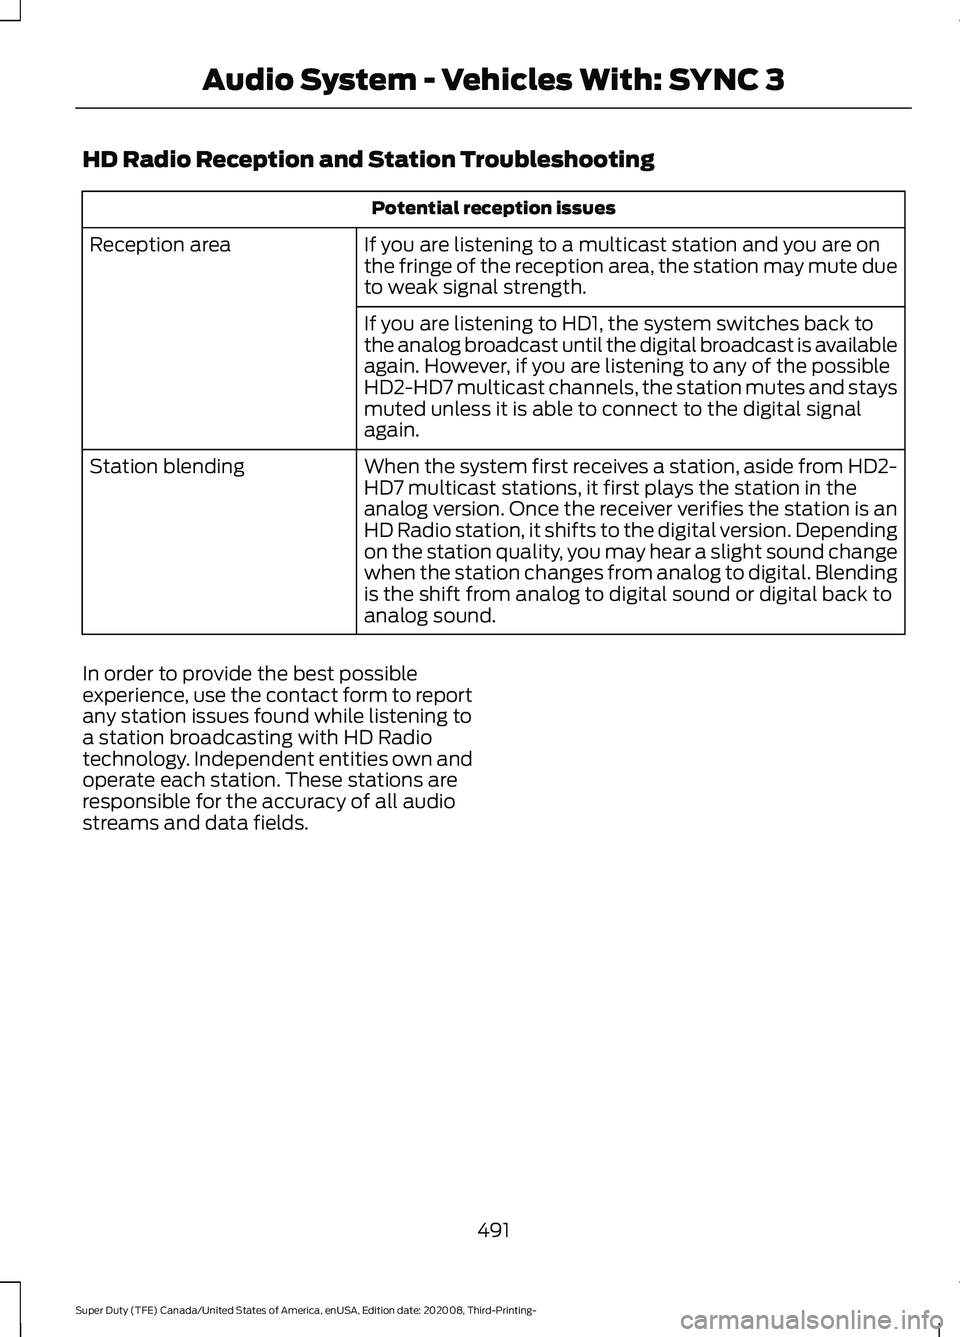
HD Radio Reception and Station Troubleshooting
Potential reception issues
If you are listening to a multicast station and you are on
the fringe of the reception area, the station may mute due
to weak signal strength.
Reception area
If you are listening to HD1, the system switches back to
the analog broadcast until the digital broadcast is available
again. However, if you are listening to any of the possible
HD2-HD7 multicast channels, the station mutes and stays
muted unless it is able to connect to the digital signal
again.
When the system first receives a station, aside from HD2-
HD7 multicast stations, it first plays the station in the
analog version. Once the receiver verifies the station is an
HD Radio station, it shifts to the digital version. Depending
on the station quality, you may hear a slight sound change
when the station changes from analog to digital. Blending
is the shift from analog to digital sound or digital back to
analog sound.
Station blending
In order to provide the best possible
experience, use the contact form to report
any station issues found while listening to
a station broadcasting with HD Radio
technology. Independent entities own and
operate each station. These stations are
responsible for the accuracy of all audio
streams and data fields.
491
Super Duty (TFE) Canada/United States of America, enUSA, Edition date: 202008, Third-Printing- Audio System - Vehicles With: SYNC 3