Page 203 of 796
WARNING: The head restraint is a
safety device. Whenever possible it
should be installed and properly
adjusted when the seat is occupied.
Failure to adjust the head restraint
properly could reduce its effectiveness
during certain impacts. WARNING:
Adjust the head
restraints for all passengers before you
drive your vehicle. This will help minimize
the risk of neck injury in the event of a
crash. Do not adjust the head restraints
when your vehicle is moving.
To raise the head restraint, pull the head
restraint up.
To lower the head restraint:
1. Press and hold the adjust and release button.
2. Push the head restraint down.
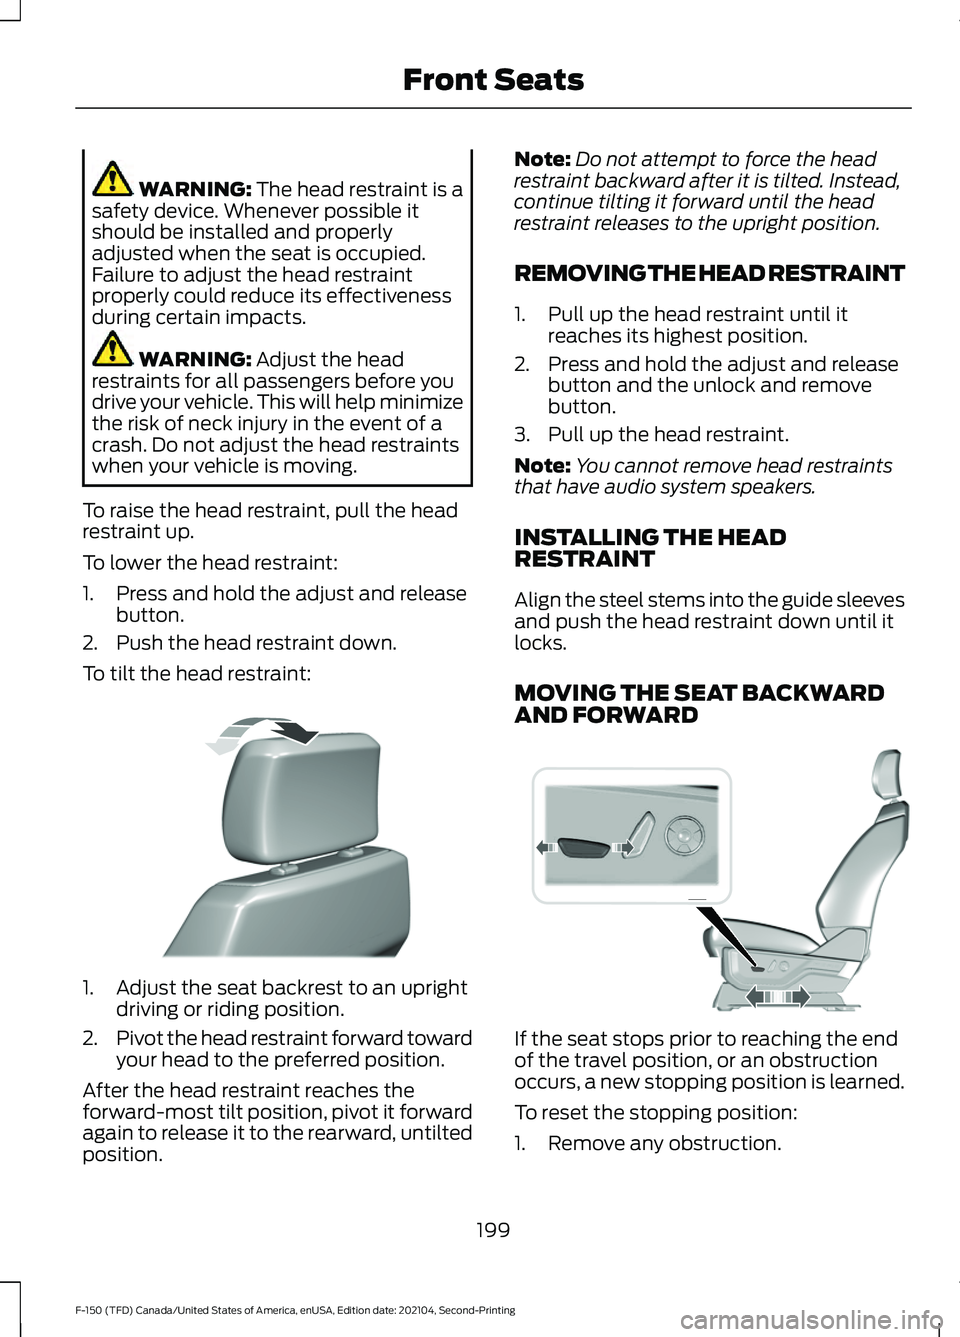
To tilt the head restraint: 1. Adjust the seat backrest to an upright
driving or riding position.
2. Pivot the head restraint forward toward
your head to the preferred position.
After the head restraint reaches the
forward-most tilt position, pivot it forward
again to release it to the rearward, untilted
position. Note:
Do not attempt to force the head
restraint backward after it is tilted. Instead,
continue tilting it forward until the head
restraint releases to the upright position.
REMOVING THE HEAD RESTRAINT
1. Pull up the head restraint until it reaches its highest position.
2. Press and hold the adjust and release button and the unlock and remove
button.
3. Pull up the head restraint.
Note: You cannot remove head restraints
that have audio system speakers.
INSTALLING THE HEAD
RESTRAINT
Align the steel stems into the guide sleeves
and push the head restraint down until it
locks.
MOVING THE SEAT BACKWARD
AND FORWARD If the seat stops prior to reaching the end
of the travel position, or an obstruction
occurs, a new stopping position is learned.
To reset the stopping position:
1. Remove any obstruction.
199
F-150 (TFD) Canada/United States of America, enUSA, Edition date: 202104, Second-Printing Front SeatsE327919 E308339
Page 204 of 796
2. Press and hold the control until the
seat stops moving.
3. Press and hold the control again until the seat stops.
4. Continue holding the control for a few seconds. The new position is learned.
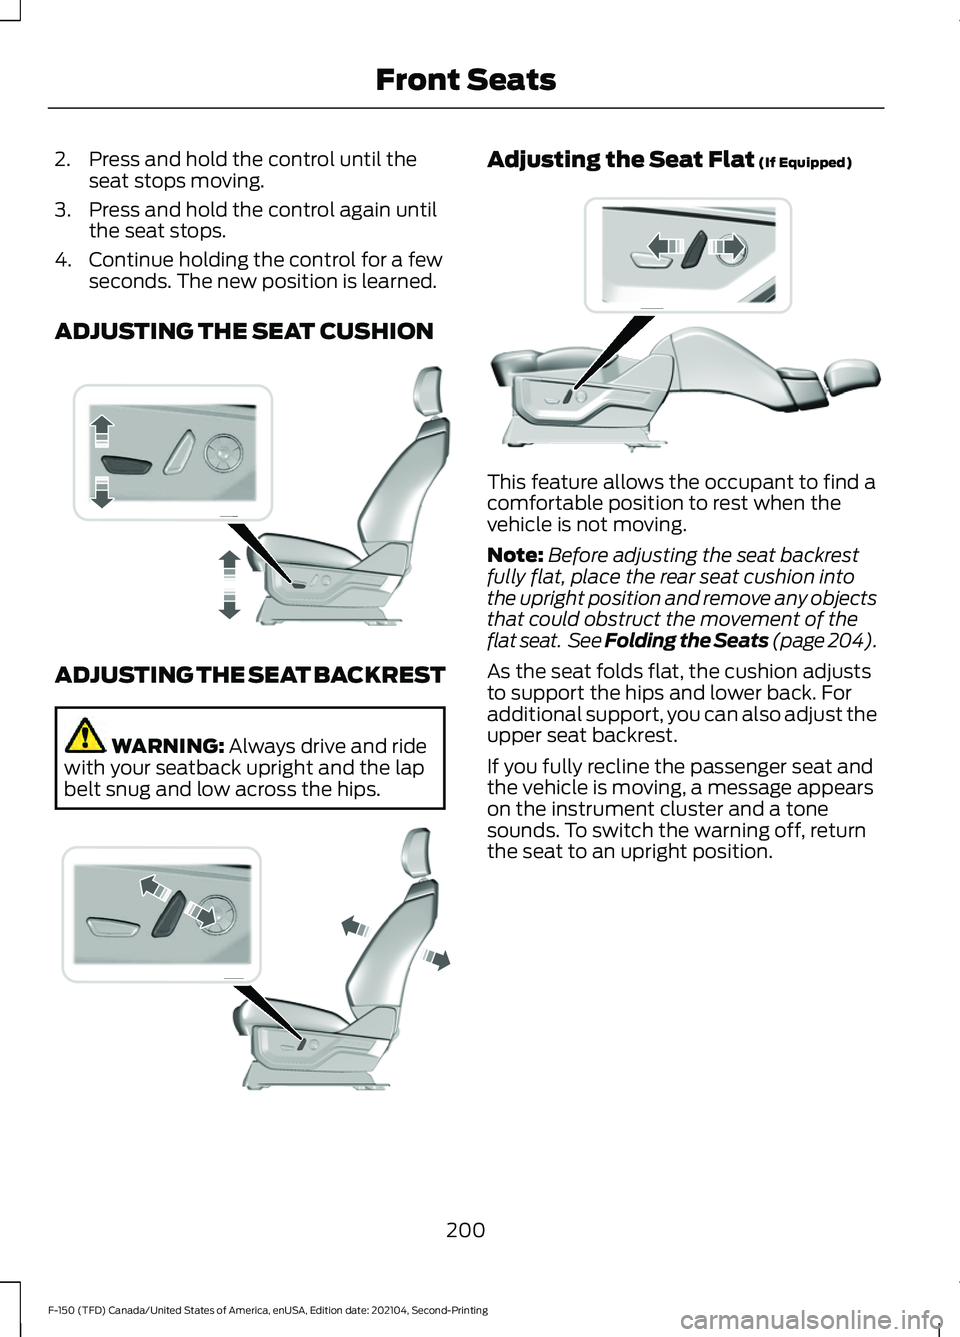
ADJUSTING THE SEAT CUSHION ADJUSTING THE SEAT BACKREST
WARNING: Always drive and ride
with your seatback upright and the lap
belt snug and low across the hips. Adjusting the Seat Flat
(If Equipped)
This feature allows the occupant to find a
comfortable position to rest when the
vehicle is not moving.
Note:
Before adjusting the seat backrest
fully flat, place the rear seat cushion into
the upright position and remove any objects
that could obstruct the movement of the
flat seat. See Folding the Seats (page 204
).
As the seat folds flat, the cushion adjusts
to support the hips and lower back. For
additional support, you can also adjust the
upper seat backrest.
If you fully recline the passenger seat and
the vehicle is moving, a message appears
on the instrument cluster and a tone
sounds. To switch the warning off, return
the seat to an upright position.
200
F-150 (TFD) Canada/United States of America, enUSA, Edition date: 202104, Second-Printing Front SeatsE308336 E308338 E306956
Page 208 of 796
MANUAL SEATS
HEAD RESTRAINT COMPONENTS
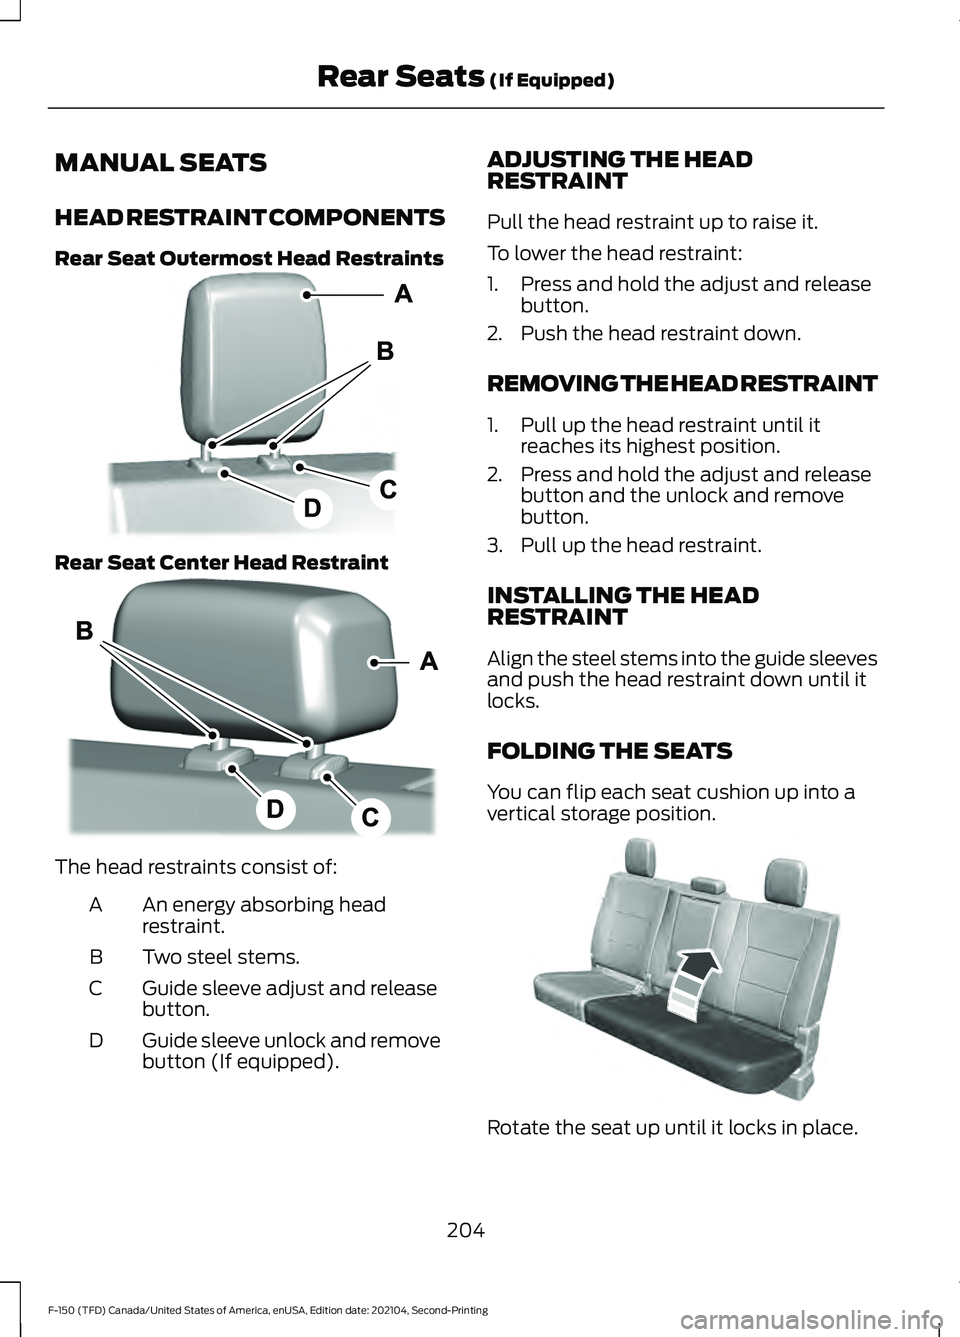
Rear Seat Outermost Head Restraints
Rear Seat Center Head Restraint
The head restraints consist of:
An energy absorbing head
restraint.
A
Two steel stems.
B
Guide sleeve adjust and release
button.
C
Guide sleeve unlock and remove
button (If equipped).
D ADJUSTING THE HEAD
RESTRAINT
Pull the head restraint up to raise it.
To lower the head restraint:
1. Press and hold the adjust and release
button.
2. Push the head restraint down.
REMOVING THE HEAD RESTRAINT
1. Pull up the head restraint until it reaches its highest position.
2. Press and hold the adjust and release button and the unlock and remove
button.
3. Pull up the head restraint.
INSTALLING THE HEAD
RESTRAINT
Align the steel stems into the guide sleeves
and push the head restraint down until it
locks.
FOLDING THE SEATS
You can flip each seat cushion up into a
vertical storage position. Rotate the seat up until it locks in place.
204
F-150 (TFD) Canada/United States of America, enUSA, Edition date: 202104, Second-Printing Rear Seats (If Equipped)E308301 E308306 E181250
Page 212 of 796
REAR OCCUPANT ALERT
SYSTEM INDICATORS
Message
Check rear seats for occupants.
Displays when you switch your vehicle off
after the alert conditions are met.
The message displays for a short period of
time. Press Close to acknowledge and
remove the message.
Note: Depending on your SYNC version, the
graphic may look different from what you
see here.
REAR OCCUPANT ALERT
SYSTEM AUDIBLE WARNINGS
Sounds when you switch your vehicle off
after the alert conditions are met.
The warning sounds for a short period of
time.
208
F-150 (TFD) Canada/United States of America, enUSA, Edition date: 202104, Second-Printing Rear Occupant Alert System
(If Equipped)E350472
Page 280 of 796
Note:
The diesel exhaust fluid tank has a
blue filler cap.
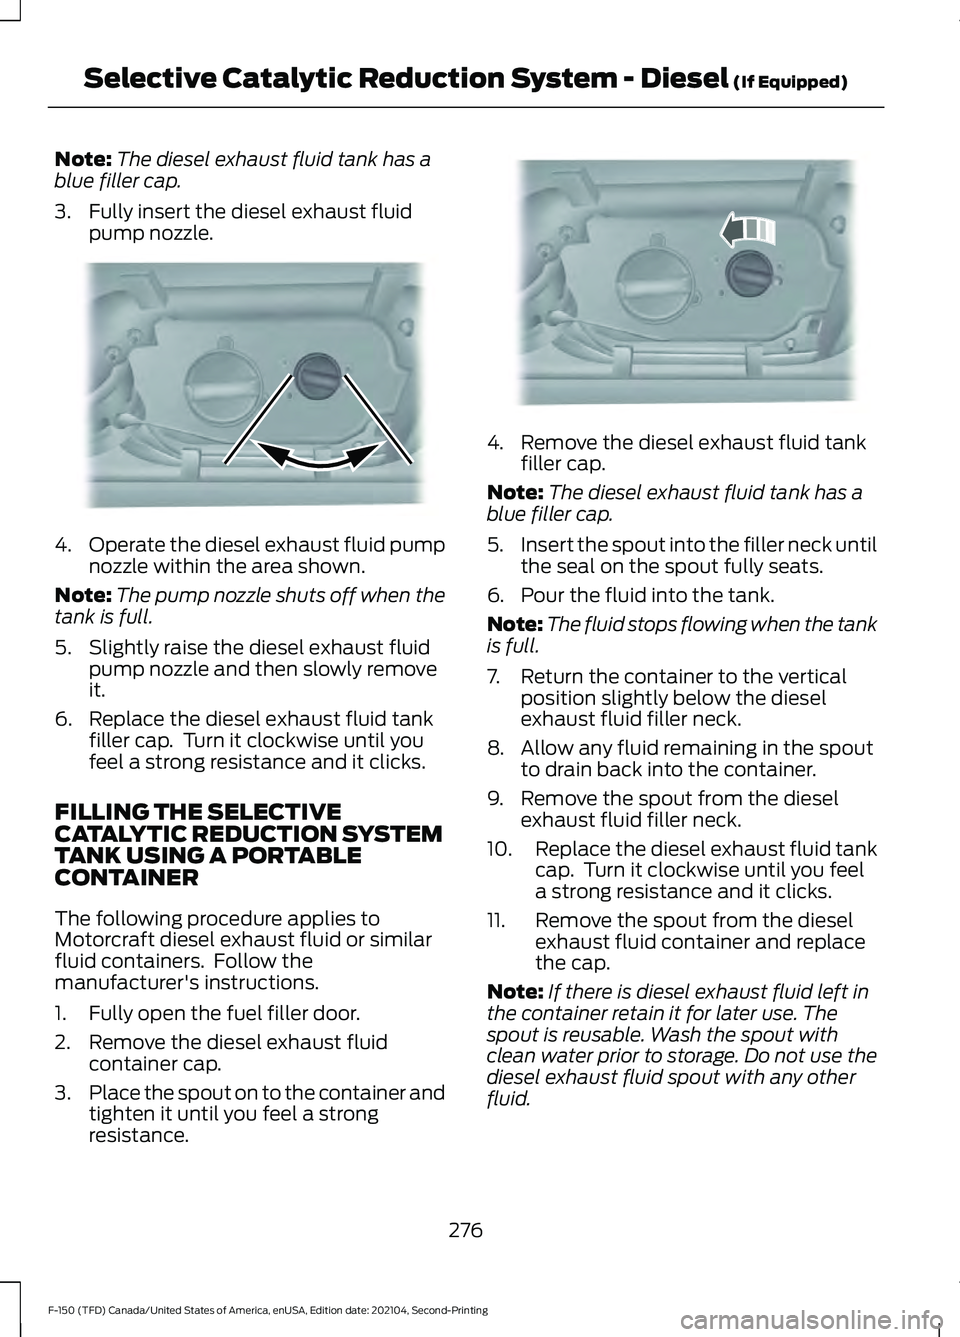
3. Fully insert the diesel exhaust fluid pump nozzle. 4.
Operate the diesel exhaust fluid pump
nozzle within the area shown.
Note: The pump nozzle shuts off when the
tank is full.
5. Slightly raise the diesel exhaust fluid pump nozzle and then slowly remove
it.
6. Replace the diesel exhaust fluid tank filler cap. Turn it clockwise until you
feel a strong resistance and it clicks.
FILLING THE SELECTIVE
CATALYTIC REDUCTION SYSTEM
TANK USING A PORTABLE
CONTAINER
The following procedure applies to
Motorcraft diesel exhaust fluid or similar
fluid containers. Follow the
manufacturer's instructions.
1. Fully open the fuel filler door.
2. Remove the diesel exhaust fluid container cap.
3. Place the spout on to the container and
tighten it until you feel a strong
resistance. 4. Remove the diesel exhaust fluid tank
filler cap.
Note: The diesel exhaust fluid tank has a
blue filler cap.
5. Insert the spout into the filler neck until
the seal on the spout fully seats.
6. Pour the fluid into the tank.
Note: The fluid stops flowing when the tank
is full.
7. Return the container to the vertical position slightly below the diesel
exhaust fluid filler neck.
8. Allow any fluid remaining in the spout to drain back into the container.
9. Remove the spout from the diesel exhaust fluid filler neck.
10. Replace the diesel exhaust fluid tank
cap. Turn it clockwise until you feel
a strong resistance and it clicks.
11. Remove the spout from the diesel exhaust fluid container and replace
the cap.
Note: If there is diesel exhaust fluid left in
the container retain it for later use. The
spout is reusable. Wash the spout with
clean water prior to storage. Do not use the
diesel exhaust fluid spout with any other
fluid.
276
F-150 (TFD) Canada/United States of America, enUSA, Edition date: 202104, Second-Printing Selective Catalytic Reduction System - Diesel (If Equipped)E328783 E328788
Page 541 of 796
CLEANING THE INTERIOR
CLEANING THE INSTRUMENT
PANEL
WARNING: Do not use chemical
solvents or strong detergents when
cleaning the steering wheel or
instrument panel to avoid contamination
of the airbag system.
We recommend that you only clean the
instrument panel and cluster lens with a
damp soft cloth. Dry the area with a clean,
soft cloth.
For additional information and assistance,
we recommend that you contact an
authorized dealer.
Note: Avoid cleaners or polishes that
increase the gloss of the upper portion of
the instrument panel. The dull finish in this
area helps protect you from undesirable
windshield reflection.
CLEANING PLASTIC
We recommend that you only use a mild
soap and water solution on a soft cloth.
Dry the area with a clean, soft cloth.
CLEANING DISPLAYS AND
SCREENS
We recommend that you only use a
microfiber cloth in a circular motion to
clean off the fingerprint or dust.
If dirt or fingerprints are still on the screen,
apply a small amount of alcohol to the
cloth and try to clean it again.
Note: Do not pour or spray alcohol onto the
touchscreen.
Note: Do not use detergent or any type of
solvent to clean the touchscreen. CLEANING SEATS AND THE
HEADLINER WARNING:
On vehicles equipped
with seat-mounted airbags, do not use
chemical solvents or strong detergents.
Such products could contaminate the
side airbag system and affect
performance of the side airbag in a crash.
Cleaning Fabric Seats and the
Headliner
We recommend that you only clean the
fabric seats and headliners in the following
way:
1. Remove dust and loose dirt with a vacuum cleaner.
2. Wipe the surface with a soft, damp cloth and a mild soap and water
solution. Dry the area with a clean, soft
cloth.
3. For additional information and assistance, we recommend that you
contact an authorized dealer.
For heavy stains, spot clean the area. If a
ring forms on the fabric, immediately clean
the entire area, but do not oversaturate or
the ring could set.
Cleaning Vinyl and Leather
We recommend that you only clean the
leather and vinyl surfaces in the following
way:
1. Remove dust and loose dirt with a vacuum cleaner.
2. Wipe the surface with a soft, damp cloth and a mild soap and water
solution. Dry the area with a clean, soft
cloth.
3. For additional information and assistance, we recommend that you
contact an authorized dealer.
537
F-150 (TFD) Canada/United States of America, enUSA, Edition date: 202104, Second-Printing Vehicle Care