2021 FORD EXPLORER warning
[x] Cancel search: warningPage 303 of 577
4. You can attempt to start the vehicle
by pressing the brake pedal and
START/STOP, or press START/STOP
without pressing the brake pedal.
5. If the vehicle does not start, repeat steps 1 through 4.
JUMP STARTING THE VEHICLE WARNING:
Batteries normally
produce explosive gases which can
cause personal injury. Therefore, do not
allow flames, sparks or lighted
substances to come near the battery.
When working near the battery, always
shield your face and protect your eyes.
Always provide correct ventilation. WARNING:
Keep batteries out of
reach of children. Batteries contain
sulfuric acid. Avoid contact with skin,
eyes or clothing. Shield your eyes when
working near the battery to protect
against possible splashing of acid
solution. In case of acid contact with skin
or eyes, flush immediately with water for
a minimum of 15 minutes and get prompt
medical attention. If acid is swallowed,
call a physician immediately. WARNING:
Use only adequately
sized cables with insulated clamps.
Preparing Your Vehicle
Do not attempt to push-start your
automatic transmission vehicle.
Note: Attempting to push-start a vehicle
with an automatic transmission may cause
transmission damage.
Note: Use only a 12-volt supply to start your
vehicle. Note:
Do not disconnect the battery of the
disabled vehicle as this could damage the
vehicle electrical system.
Park the booster vehicle close to the hood
of the disabled vehicle, making sure the
two vehicles do not touch.
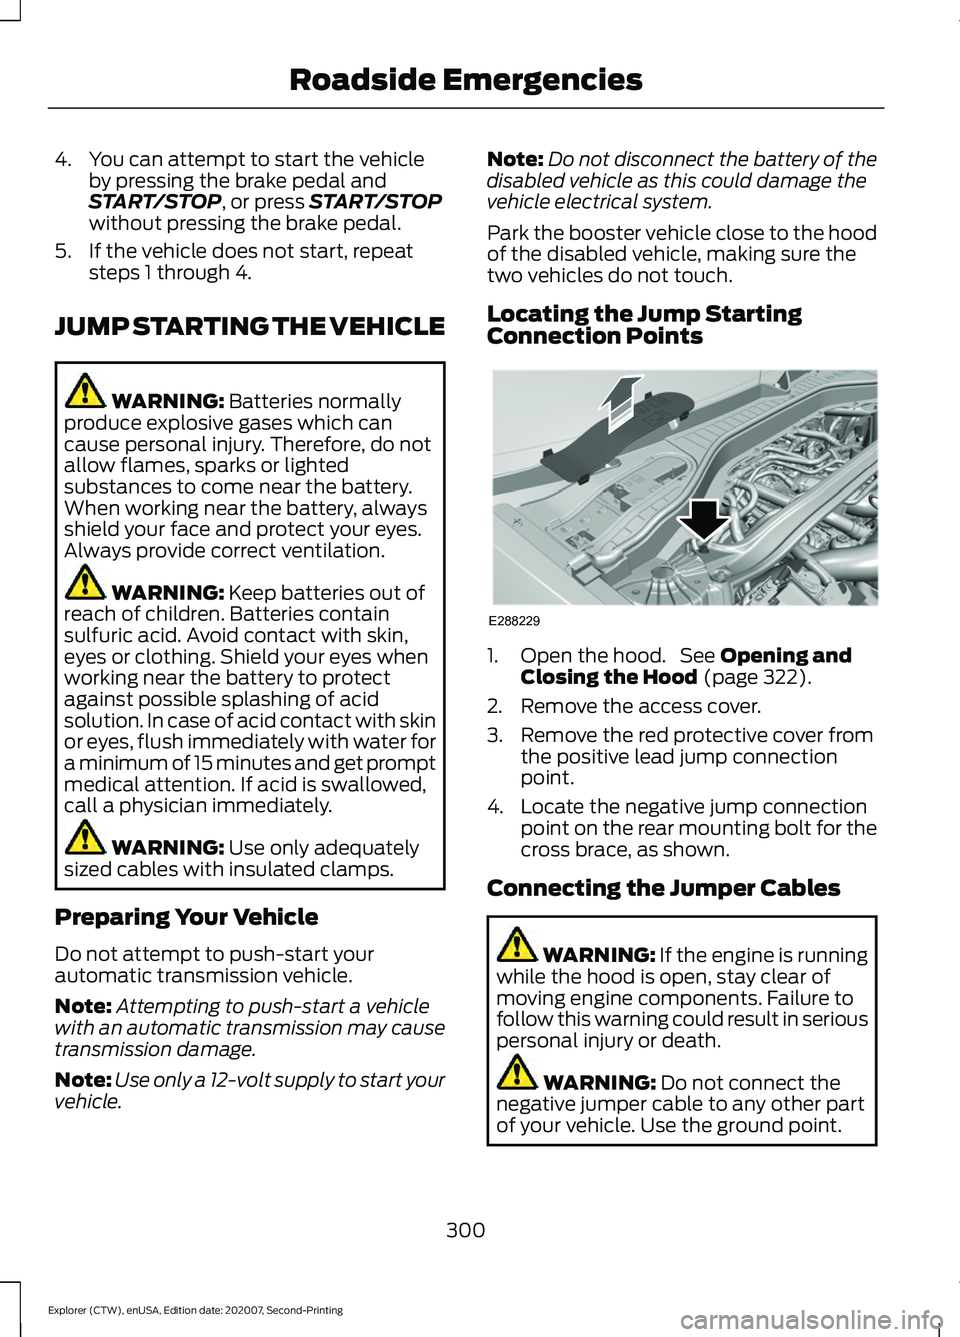
Locating the Jump Starting
Connection Points 1. Open the hood. See
Opening and
Closing the Hood (page 322).
2. Remove the access cover.
3. Remove the red protective cover from the positive lead jump connection
point.
4. Locate the negative jump connection point on the rear mounting bolt for the
cross brace, as shown.
Connecting the Jumper Cables WARNING: If the engine is running
while the hood is open, stay clear of
moving engine components. Failure to
follow this warning could result in serious
personal injury or death. WARNING:
Do not connect the
negative jumper cable to any other part
of your vehicle. Use the ground point.
300
Explorer (CTW), enUSA, Edition date: 202007, Second-Printing Roadside EmergenciesE288229
Page 305 of 577
COLLISION, DAMAGE OR FIRE
EVENT
Guidance for Ford Motor Company
Electric and Hybrid-Electric
Vehicles Equipped With High
Voltage Batteries
(Vehicle Owner/Operator/General
Public)
Electric and Hybrid-Electric Vehicle
Considerations
In the event of damage or fire involving an
electric vehicle or hybrid-electric vehicle:
•
Always assume the high-voltage
battery and associated components
are energized and fully charged.
• Exposed electrical components, wires,
and high-voltage batteries present
potential high-voltage shock hazards.
• Venting high-voltage battery vapors
are potentially toxic and flammable.
• Physical damage to the vehicle or
high-voltage battery may result in
immediate or delayed release of toxic,
flammable gases and fire.
Vehicle information and general safety
practices:
• Know the make and model of your
vehicle.
• Review the owner ’s manual and
become familiar with your vehicle ’s
safety information and recommended
safety practices.
• Do not attempt to repair damaged
electric and hybrid-electric vehicles
yourself.
Contact an authorized dealer. Crashes
A crash or impact significant enough to
require an emergency response for
conventional vehicles would also require
the same response for an electric or
hybrid-electric vehicle.
If possible:
•
Move your vehicle to a safe, nearby
location and remain on the scene.
• Roll down the windows before
switching your vehicle off.
• Place your vehicle in park (P), set the
parking brake, switch off the vehicle,
activate the hazard warning flashers
and move your key(s) at least 15 ft
(5 m) away from the vehicle.
Always:
• Call emergency assistance if needed
and advise that an electric or
hybrid-electric vehicle is involved.
• Exposed electrical components, wires,
and high-voltage batteries present
potential high-voltage shock hazards.
• Avoid contact with leaking fluids and
gases, and remain out of the way of
oncoming traffic until emergency
responders arrive.
• When emergency responders arrive,
tell them that the vehicle involved is an
electric vehicle or hybrid-electric
vehicle.
Fires
As with any vehicle, call emergency
assistance immediately if you see sparks,
smoke or flames coming from the vehicle.
Remain a safe distance from the vehicle
and try to stay clear of the smoke.
• Exit the vehicle immediately.
• Advise emergency assistance that an
electric or hybrid-electric vehicle is
involved.
302
Explorer (CTW), enUSA, Edition date: 202007, Second-Printing Roadside Emergencies
Page 315 of 577
FUSE SPECIFICATION CHART
Engine Compartment Fuse Box
WARNING: Always disconnect the
battery before servicing high current
fuses. WARNING:
To reduce risk of
electrical shock, always replace the
cover to the power distribution box
before reconnecting the battery or
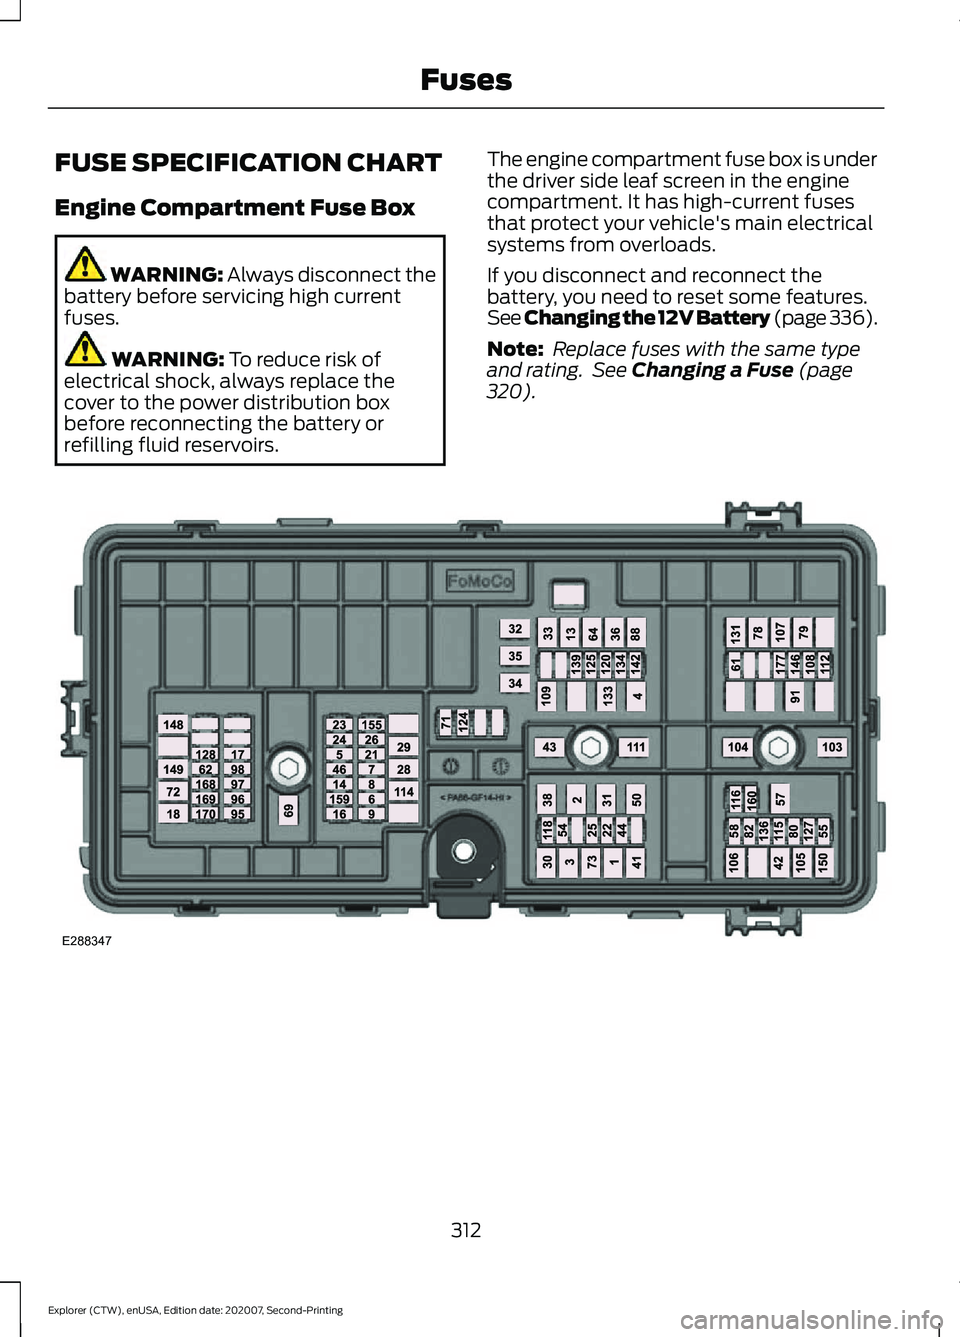
refilling fluid reservoirs. The engine compartment fuse box is under
the driver side leaf screen in the engine
compartment. It has high-current fuses
that protect your vehicle's main electrical
systems from overloads.
If you disconnect and reconnect the
battery, you need to reset some features.
See Changing the 12V Battery (page 336).
Note:
Replace fuses with the same type
and rating. See Changing a Fuse (page
320). 312
Explorer (CTW), enUSA, Edition date: 202007, Second-Printing FusesE288347
Page 323 of 577
Protected Component
Fuse Rating
Fuse or Relay
Number
Terrain management switch.
10A
31
Selectable drive mode switch.
Transceiver module.
Audio control module.
20A
32
Not used.
—
33
Run/start relay.
30A
34
Not used (spare).
5A
35
Park assist module.
15A
36
Image processing module A.
Not used (spare).
20A
37
Left-hand rear power window.
30A
38
Right-hand rear power window.
Note: Spare fuse amperage may vary.
CHANGING A FUSE
Fuses WARNING: Always replace a fuse
with one that has the specified
amperage rating. Using a fuse with a
higher amperage rating can cause severe
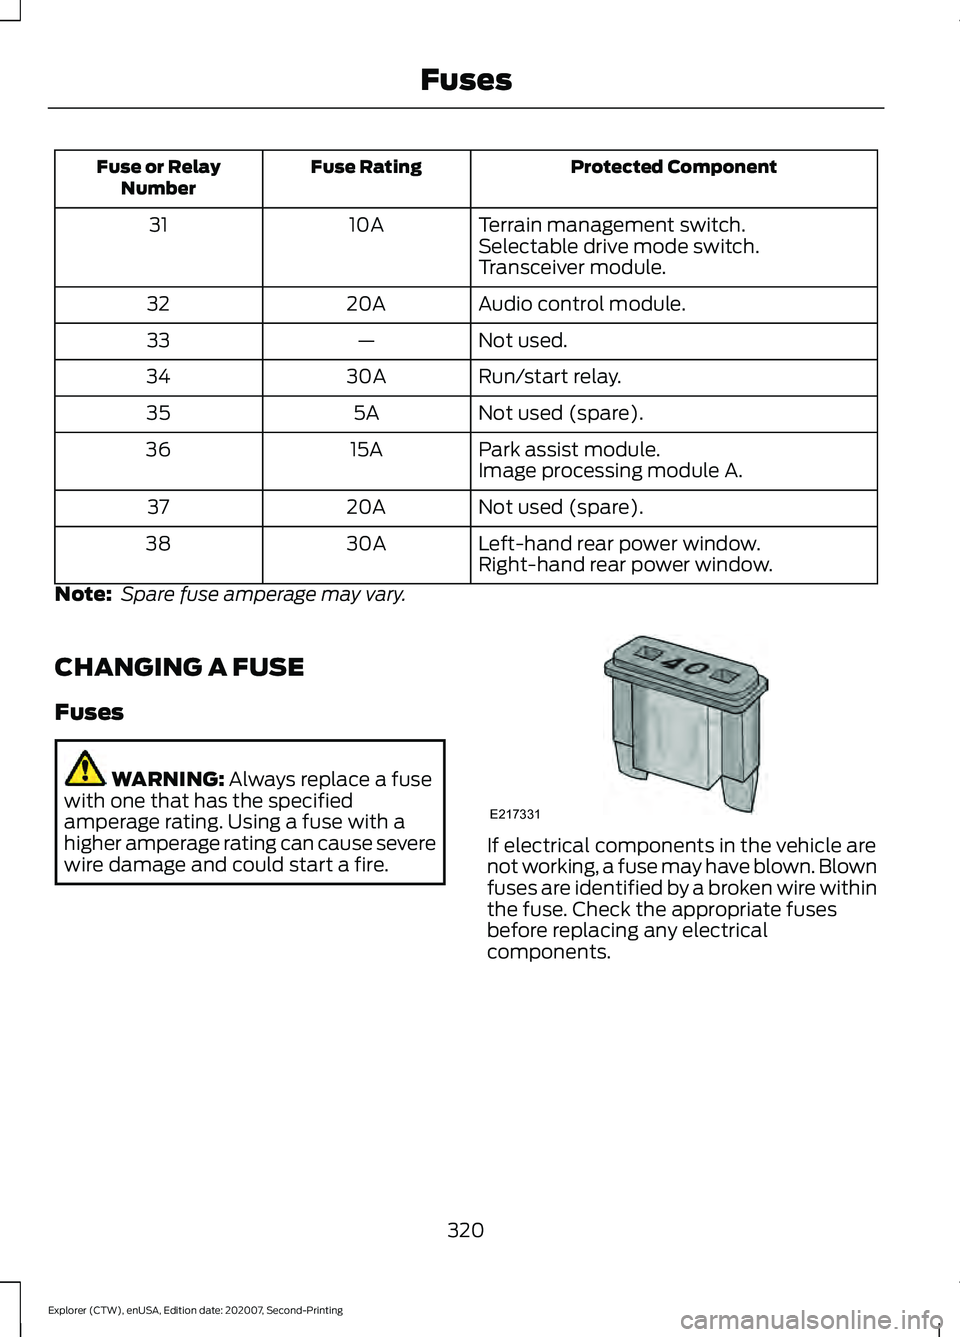
wire damage and could start a fire. If electrical components in the vehicle are
not working, a fuse may have blown. Blown
fuses are identified by a broken wire within
the fuse. Check the appropriate fuses
before replacing any electrical
components.
320
Explorer (CTW), enUSA, Edition date: 202007, Second-Printing FusesE217331
Page 325 of 577
GENERAL INFORMATION
Have your vehicle serviced regularly to help
maintain its roadworthiness and resale
value. There is a large network of
authorized dealers that are there to help
you with their professional servicing
expertise. We believe that their specially
trained technicians are best qualified to
service your vehicle properly and expertly.
They are supported by a wide range of
highly specialized tools developed
specifically for servicing your vehicle.
If your vehicle requires professional service,
an authorized dealer can provide the
necessary parts and service. Check your
warranty information to find out which
parts and services are covered.
Use only recommended fuels, lubricants,
fluids and service parts conforming to
specifications. Motorcraft® parts are
designed and built to provide the best
performance in your vehicle.
Precautions
•
Do not work on a hot engine.
• Make sure that nothing gets caught in
moving parts.
• Do not work on a vehicle with the
engine running in an enclosed space,
unless you are sure you have enough
ventilation.
• Keep all open flames and other burning
material (such as cigarettes) away
from the battery and all fuel related
parts.
Working with the Engine Off
1. Set the parking brake and shift the transmission to park (P).
2. Switch off the engine.
3. Block the wheels. Working with the Engine On WARNING: To reduce the risk of
vehicle damage and personal burn
injuries, do not start your engine with the
air cleaner removed and do not remove
it while the engine is running.
1. Set the parking brake and shift the transmission to park (P).
2. Block the wheels.
OPENING AND CLOSING THE
HOOD
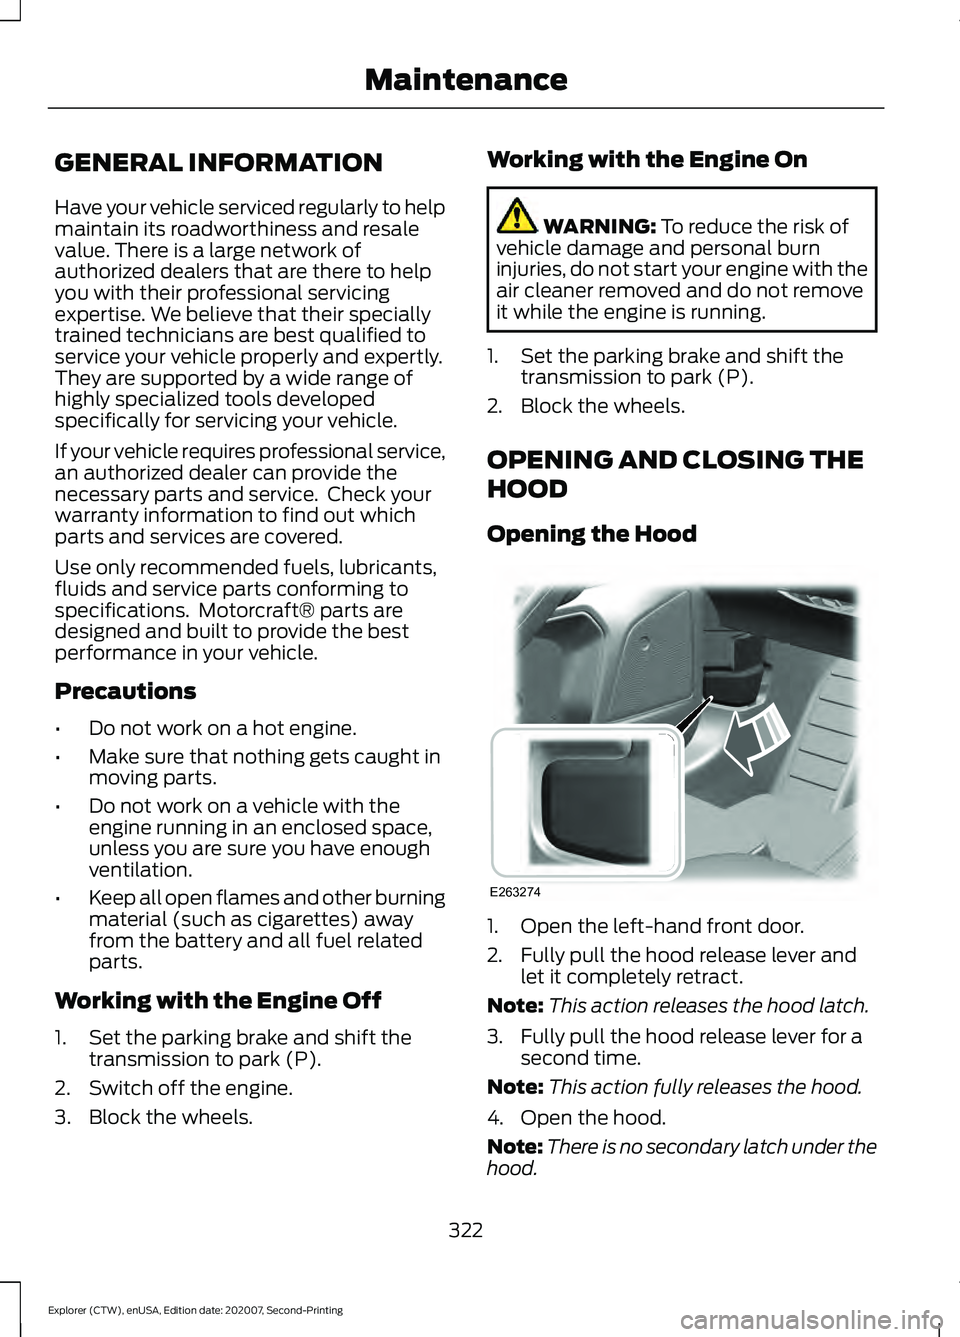
Opening the Hood 1. Open the left-hand front door.
2. Fully pull the hood release lever and
let it completely retract.
Note: This action releases the hood latch.
3. Fully pull the hood release lever for a second time.
Note: This action fully releases the hood.
4. Open the hood.
Note: There is no secondary latch under the
hood.
322
Explorer (CTW), enUSA, Edition date: 202007, Second-Printing MaintenanceE263274
Page 326 of 577
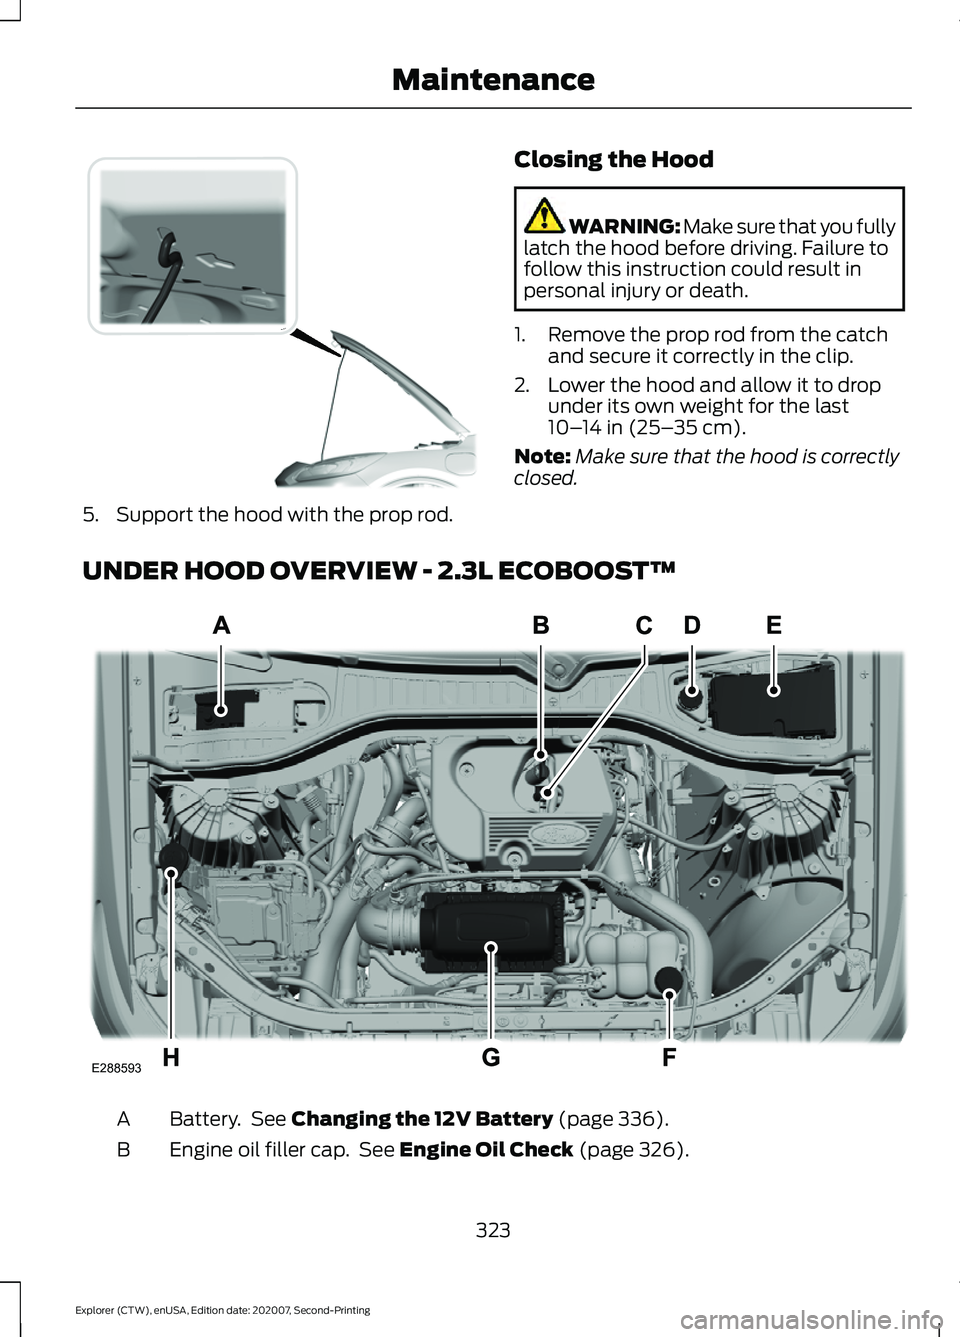
5. Support the hood with the prop rod.
Closing the Hood WARNING: Make sure that you fully
latch the hood before driving. Failure to
follow this instruction could result in
personal injury or death.
1. Remove the prop rod from the catch and secure it correctly in the clip.
2. Lower the hood and allow it to drop under its own weight for the last
10– 14 in (25– 35 cm)
.
Note: Make sure that the hood is correctly
closed.
UNDER HOOD OVERVIEW - 2.3L ECOBOOST™ Battery. See
Changing the 12V Battery (page 336).
A
Engine oil filler cap. See
Engine Oil Check (page 326).
B
323
Explorer (CTW), enUSA, Edition date: 202007, Second-Printing MaintenanceE318379 E288593
Page 330 of 577
8.
Make sure that the oil level is between
the maximum and minimum marks. If
the oil level is at the minimum mark,
add oil immediately. See Capacities
and Specifications (page 391).
9. If the oil level is correct, replace the dipstick and make sure it is fully seated.
Note: Do not remove the dipstick when the
engine is running.
Note: If the oil level is between the
maximum and minimum marks, the oil level
is acceptable. Do not add oil.
Note: The oil consumption of new engines
reaches its normal level after approximately
3,000 mi (5,000 km)
.
Adding Engine Oil WARNING: Do not remove the filler
cap when the engine is running.
Do not use supplemental engine oil
additives because they are unnecessary
and could lead to engine damage that may
not be covered by the vehicle Warranty. Only use oils certified for gasoline engines
by the American Petroleum Institute (API).
An oil with this trademark symbol
conforms to the current engine and
emission system protection standards and
fuel economy requirements of the
International Lubricants Specification
Advisory Committee (ILSAC).
To top up the engine oil level do the
following:
1. Clean the area surrounding the engine
oil filler cap before you remove it.
2. Remove the engine oil filler cap. See Under Hood Overview
(page 323).
Turn it counterclockwise and remove
it.
3. Add engine oil that meets our specifications. See
Capacities and
Specifications (page 391). You may
have to use a funnel to pour the engine
oil into the opening.
4. Recheck the oil level.
5. If the oil level is correct, replace the dipstick and make sure it is fully seated.
6. Replace the engine oil filler cap. Turn it clockwise until you feel a strong
resistance.
Note: Do not add oil further than the
maximum mark. Oil levels above the
maximum mark may cause engine damage.
Note: Make sure you install the oil filler cap
correctly.
Note: Soak up any spillage with an
absorbent cloth immediately.
OIL CHANGE INDICATOR
RESET
Use the information display controls on
the steering wheel to reset the oil change
indicator.
327
Explorer (CTW), enUSA, Edition date: 202007, Second-Printing MaintenanceE142732
Page 331 of 577
From the main menu scroll to:
Action and description
Message
Press the right arrow button,
then from this menu scroll
to the following message.
Settings
Press the right arrow button,
then from this menu scroll
to the following message.
Vehicle
Press and hold the OK
button until the instrument
cluster displays the
following message.
Hold OK to
Reset
Reset Successful
When the oil change indic-
ator resets the instrument
cluster displays 100%.
Remaining Life
{00}%
If the instrument cluster
displays one of the following
messages, repeat the
process.
Not Reset
Reset Cancelled
CHANGING THE ENGINE AIR
FILTER - 2.3L ECOBOOST™ WARNING:
To reduce the risk of
vehicle damage and personal burn
injuries, do not start your engine with the
air cleaner removed and do not remove
it while the engine is running. When changing the engine air filter, do not
allow debris or foreign material to enter
the air induction system. Engine
components are susceptible to damage
not covered by the vehicle Warranty.
Change the air filter element at the correct
interval. See
Scheduled Maintenance
(page 482).
Incorrect component use can cause
damage not covered by the vehicle
Warranty. See
Motorcraft Parts (page
388).
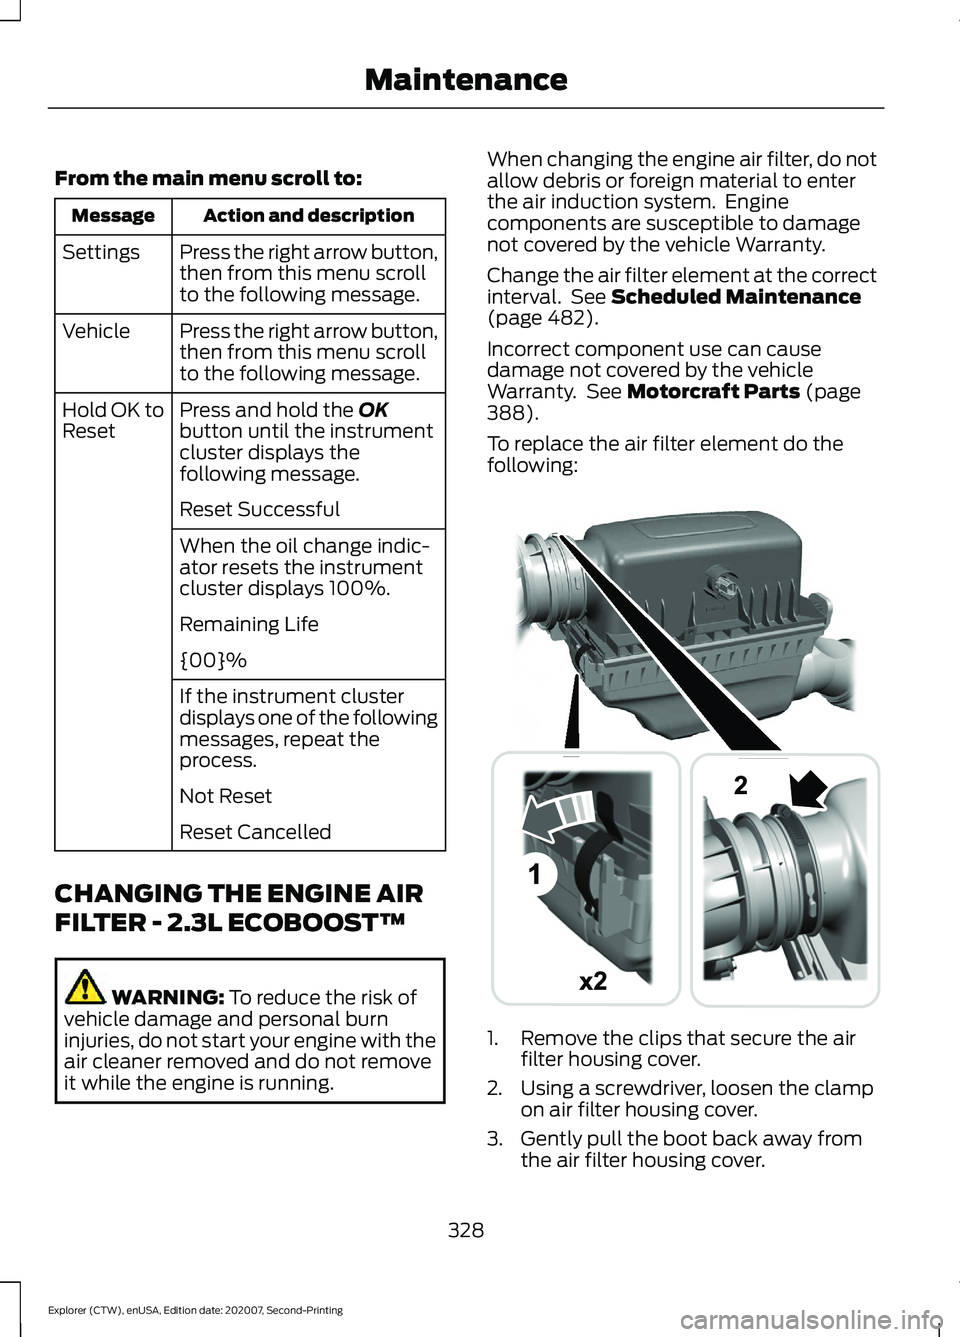
To replace the air filter element do the
following: 1. Remove the clips that secure the air
filter housing cover.
2. Using a screwdriver, loosen the clamp on air filter housing cover.
3. Gently pull the boot back away from the air filter housing cover.
328
Explorer (CTW), enUSA, Edition date: 202007, Second-Printing MaintenanceE294782