2021 FORD EXPLORER fuel cap
[x] Cancel search: fuel capPage 185 of 577
HYBRID VEHICLE OPERATION
This hybrid vehicle combines electric and
gasoline propulsion to provide
breakthrough performance and improved
efficiency. Familiarizing yourself with these
unique characteristics provides an optimal
driving experience from your vehicle.
Starting
When you start your vehicle, a
green READY indicator light
appears in the instrument cluster
letting you know that your vehicle is ready
for driving.
The engine may not start because your
vehicle has a silent key start feature. This
fuel saving feature allows your vehicle to
be ready to drive without requiring the gas
engine to be running. The indicator remains
on when your vehicle is on, whether the
engine is running or not, to indicate your
vehicle is capable of movement using the
electric motor, gas engine or both.
Typically, the engine does not start unless
the vehicle is cold, a climate control
change is requested or you press the
accelerator pedal.
Driving
The gas engine automatically starts and
stops to provide power when needed and
to save fuel when not needed. When
coasting at low speeds, coming to a stop,
or standing, the gas engine normally shuts
down and your vehicle operates in
electric-only mode.
Conditions that may cause the engine to
start up or remain running include:
• Considerable vehicle acceleration.
• Climbing a hill.
• Charge level of high voltage battery is
low. •
High or low outside temperatures in
order to provide system heating or
cooling.
• Engine not warm enough to provide
passenger requested cabin
temperature.
• Towing a trailer.
• Selectable drive modes: Certain
selectable drive modes may cause the
engine to run. See What Is Drive Mode
Control (page 278).
• Live in Drive: Use of the paddle shifters
while in drive (D) may cause the engine
to run. See Automatic Transmission
(page
201).
Stopping
The gas engine may shut off to conserve
fuel as you come to a stop. Restarting your
vehicle is not required. Simply step on the
accelerator when you are ready to drive.
Transmission Operation
The engine and electric motor together
propel the vehicle through the automatic
transmission. This is normal hybrid
operating and helps deliver fuel efficiency
and performance.
Battery
Your hybrid is equipped with a high voltage
battery. A cool battery maintains battery
life and provides the best possible
performance. The high voltage battery is
cooled by the vehicle's air conditioning
system. When the air conditioning system
is on, you may notice a slight increase in
air temperature coming from the climate
control vents while the battery is cooling.
You may also notice cool air flowing from
the vents when the air conditioning or
blower is off.
182
Explorer (CTW), enUSA, Edition date: 202007, Second-Printing Unique Driving CharacteristicsE293827
Page 186 of 577
Braking
Your hybrid is equipped with standard
hydraulic braking and regenerative braking.
Regenerative braking is performed by your
transmission and it captures brake energy
and stores it in the high voltage battery.
You may also notice during extending
downhill driving that your engine continues
to run instead of shutting off. During this
engine braking, the engine stays on, but it
is not using any fuel. You may also hear a
slight whine or whistle when operating your
vehicle. This is the normal operation of the
electric motor in the hybrid system.
Driving to Optimize Fuel Economy
Note:
Having your engine running is not
always an indication of inefficiency. In some
cases, it is actually more efficient than
driving in electric mode.
Your fuel economy should improve
throughout your hybrid's break-in period.
As with any vehicle, your driving habits and
accessory usage can significantly impact
your fuel economy. For best results, keep
these tips in mind: •
Keep the tires properly inflated and
only use the recommended size.
• Aggressive driving increases the
amount of energy required to move
your vehicle. In general, you can
achieve better fuel economy with mild
to moderate acceleration and
deceleration. Moderate braking is
particularly important since it allows
you to maximize the energy captured
by the regenerative braking system.
Additional Tips:
• Do not carry extra loads.
• Be mindful of adding external
accessories that may increase
aerodynamic drag.
• Observe posted speed limits.
• Perform all scheduled maintenance.
• There is no need to wait for your engine
to warm up. The vehicle is ready to
drive immediately after starting.
183
Explorer (CTW), enUSA, Edition date: 202007, Second-Printing Unique Driving Characteristics
Page 188 of 577
SAFETY PRECAUTIONS
WARNING: Do not overfill the fuel
tank. The pressure in an overfilled tank
may cause leakage and lead to fuel spray
and fire. WARNING:
The fuel system may
be under pressure. If you hear a hissing
sound near the fuel filler inlet, do not
refuel until the sound stops. Otherwise,
fuel may spray out, which could cause
serious personal injury. WARNING: Fuels can cause serious
injury or death if misused or mishandled. WARNING:
Fuel may contain
benzene, which is a cancer-causing
agent. WARNING: When refueling always
shut the engine off and never allow
sparks or open flames near the fuel tank
filler valve. Never smoke or use a cell
phone while refueling. Fuel vapor is
extremely hazardous under certain
conditions. Avoid inhaling excess fumes.
Follow these guidelines when refueling:
• Extinguish all smoking materials and
any open flames before refueling your
vehicle.
• Always switch the engine off before
refueling.
• Automotive fuels can be harmful or
fatal if swallowed. Fuel is highly toxic
and if swallowed can cause death or
permanent injury. If fuel is swallowed
immediately call a physician, even if no
symptoms are immediately apparent.
The toxic effects of fuel may not be
apparent for hours. •
Avoid inhaling fuel vapors. Inhaling fuel
vapor can lead to eye and respiratory
tract irritation. In severe cases,
excessive or prolonged breathing of
fuel vapor can cause serious illness and
permanent injury.
• Avoid getting fuel in your eyes. If you
splash fuel in your eyes, immediately
remove contact lenses (if worn), flush
with water for 15 minutes and seek
medical attention. Failure to seek
proper medical attention could lead to
permanent injury.
• Fuels can be harmful if absorbed
through the skin. If you splash fuel on
your skin, clothing or both, promptly
remove contaminated clothing and
thoroughly wash your skin with soap
and water. Repeated or prolonged skin
contact causes skin irritation.
• Be particularly careful if you are taking
Antabuse or other forms of Disulfiram
for the treatment of alcoholism.
Breathing fuel vapors could cause an
adverse reaction, serious personal
injury or sickness. Immediately call a
physician if you experience any adverse
reactions.
FUEL QUALITY - E85
Choosing the Right Fuel - Flex Fuel
Vehicles
Flex fuel vehicles have one of the following
identifiers:
• Yellow fuel filler cap.
• Yellow bezel around the fuel filler inlet.
• Yellow fuel filler housing.
• Yellow E85 label on the fuel tank filler
door.
185
Explorer (CTW), enUSA, Edition date: 202007, Second-Printing Fuel and Refueling
Page 191 of 577
If your vehicle runs out of fuel:
•
Add a minimum of 1.3 gal (5 L) of fuel
to restart the engine.
• You may need to switch the ignition
from off to on several times after
refueling to allow the fuel system to
pump the fuel from the tank to the
engine. When restarting, cranking time
takes a few seconds longer than
normal.
Note: If your vehicle is on a steep slope,
more fuel may be required.
Filling a Portable Fuel Container WARNING:
Flow of fuel through a
fuel pump nozzle can produce static
electricity. This can cause a fire if you are
filling an ungrounded fuel container.
Use the following guidelines to avoid
electrostatic charge build-up, which can
produce a spark, when filling an
ungrounded fuel container:
• Only use an approved fuel container to
transfer fuel to your vehicle. Place the
container on the ground when filling it.
• Do not fill a fuel container when it is
inside your vehicle (including the cargo
area).
• Keep the fuel pump nozzle in contact
with the fuel container when filling it.
• Do not use a device that holds the fuel
pump nozzle lever in the fill position. Adding Fuel From a Portable Fuel
Container WARNING: Do not insert the nozzle
of a fuel container or an aftermarket
funnel into the fuel filler neck. This may
damage the fuel system filler neck or its
seal and cause fuel to run onto the
ground. WARNING:
Do not try to pry open
or push open the capless fuel system
with foreign objects. This could damage
the fuel system and its seal and cause
injury to you or others. WARNING:
Do not dispose of fuel
in the household refuse or the public
sewage system. Use an authorized waste
disposal facility.
When refueling the vehicle fuel tank from
a fuel container, use the fuel filler funnel
included with your vehicle. See Fuel Filler
Funnel Location
(page 187).
Note: Do not use aftermarket funnels as
they may not work with the capless fuel
system and can damage it.
When refueling the vehicle fuel tank from
a fuel container, do the following:
1. Fully open the fuel filler door.
2. Fully insert the fuel filler funnel into the
fuel filler inlet.
188
Explorer (CTW), enUSA, Edition date: 202007, Second-Printing Fuel and Refueling
Page 192 of 577
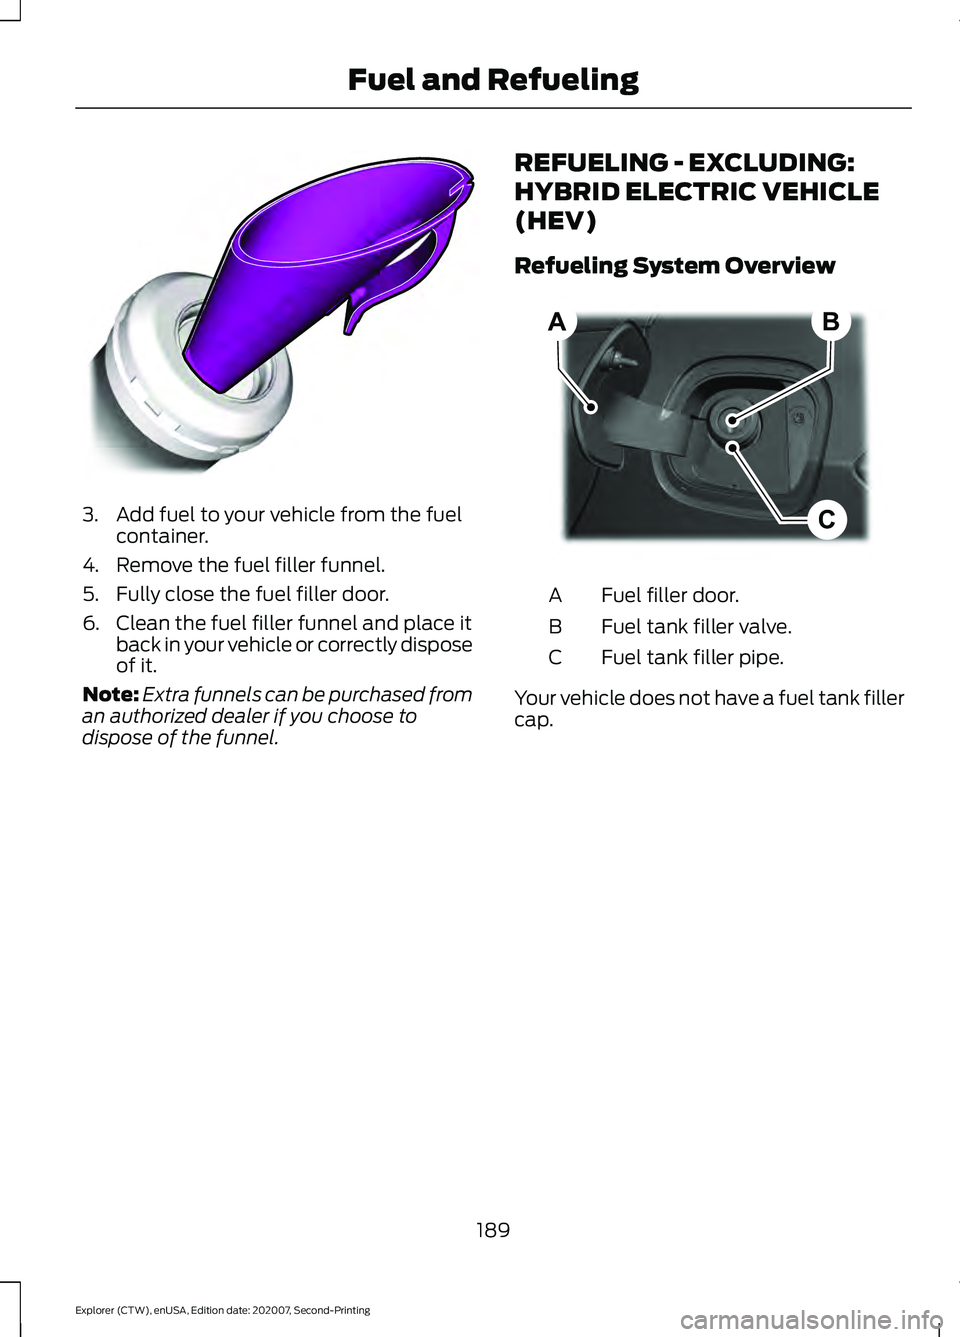
3. Add fuel to your vehicle from the fuel
container.
4. Remove the fuel filler funnel.
5. Fully close the fuel filler door.
6. Clean the fuel filler funnel and place it back in your vehicle or correctly dispose
of it.
Note: Extra funnels can be purchased from
an authorized dealer if you choose to
dispose of the funnel. REFUELING - EXCLUDING:
HYBRID ELECTRIC VEHICLE
(HEV)
Refueling System Overview Fuel filler door.
A
Fuel tank filler valve.
B
Fuel tank filler pipe.
C
Your vehicle does not have a fuel tank filler
cap.
189
Explorer (CTW), enUSA, Edition date: 202007, Second-Printing Fuel and RefuelingE157452 B
C
A E267248
Page 197 of 577
Description and Action
Message
A warning message appears
in the information display
when the fuel system fails
to depressurize or the fuel
filler door fails to open. You
may have to use the fuel
filler door manual override
lever.
Refuel
Error See
Manual
If the information message appears, do the
following:
1. Check the fuel filler door for anything that may be obstructing its movement,
for example ice or snow.
2. Remove any obstruction from the fuel filler door.
3. Press the button on the driver door to open the fuel filler door.
4. If the fuel filler door fails to open and the information message remains in
the information display, use the fuel
filler door manual override lever.
Fuel Filler Door Manual Override
Lever WARNING: The fuel system may
be under pressure. If you hear a hissing
sound near the fuel filler inlet, do not
refuel until the sound stops. Otherwise,
fuel may spray out, which could cause
serious personal injury.
Note: The transmission must be in park (P)
or neutral (N).
When using the manual override lever do
the following:
1. Switch the ignition on. Note:
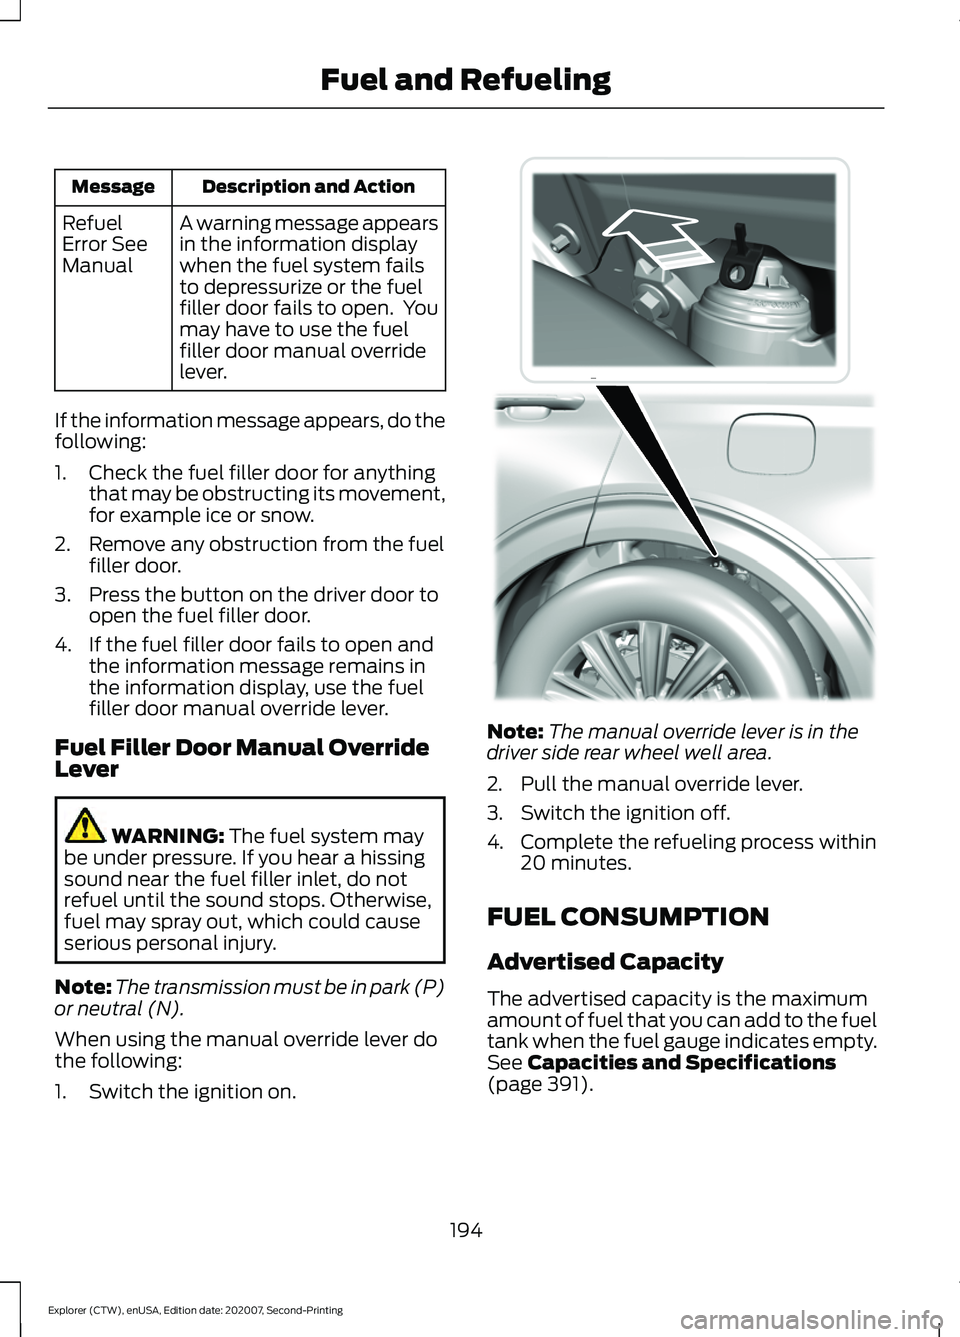
The manual override lever is in the
driver side rear wheel well area.
2. Pull the manual override lever.
3. Switch the ignition off.
4. Complete the refueling process within 20 minutes.
FUEL CONSUMPTION
Advertised Capacity
The advertised capacity is the maximum
amount of fuel that you can add to the fuel
tank when the fuel gauge indicates empty.
See
Capacities and Specifications
(page 391).
194
Explorer (CTW), enUSA, Edition date: 202007, Second-Printing Fuel and RefuelingE297793
Page 285 of 577
Make sure that you securely fasten the
load. Check the tightness of the load
before driving and at each fuel stop.
Note:
Never place loads directly on the roof
panel. The roof panel is not designed to
directly carry a load. Maximum Recommended Load
Amounts
Note:
The maximum recommended load
is based on the load being evenly distributed
on the crossbars. Maximum Recommended Load
Description
75 lb (35 kg)
Vehicles with Moonroof
165 lb (75 kg)
Vehicles without Moonroof
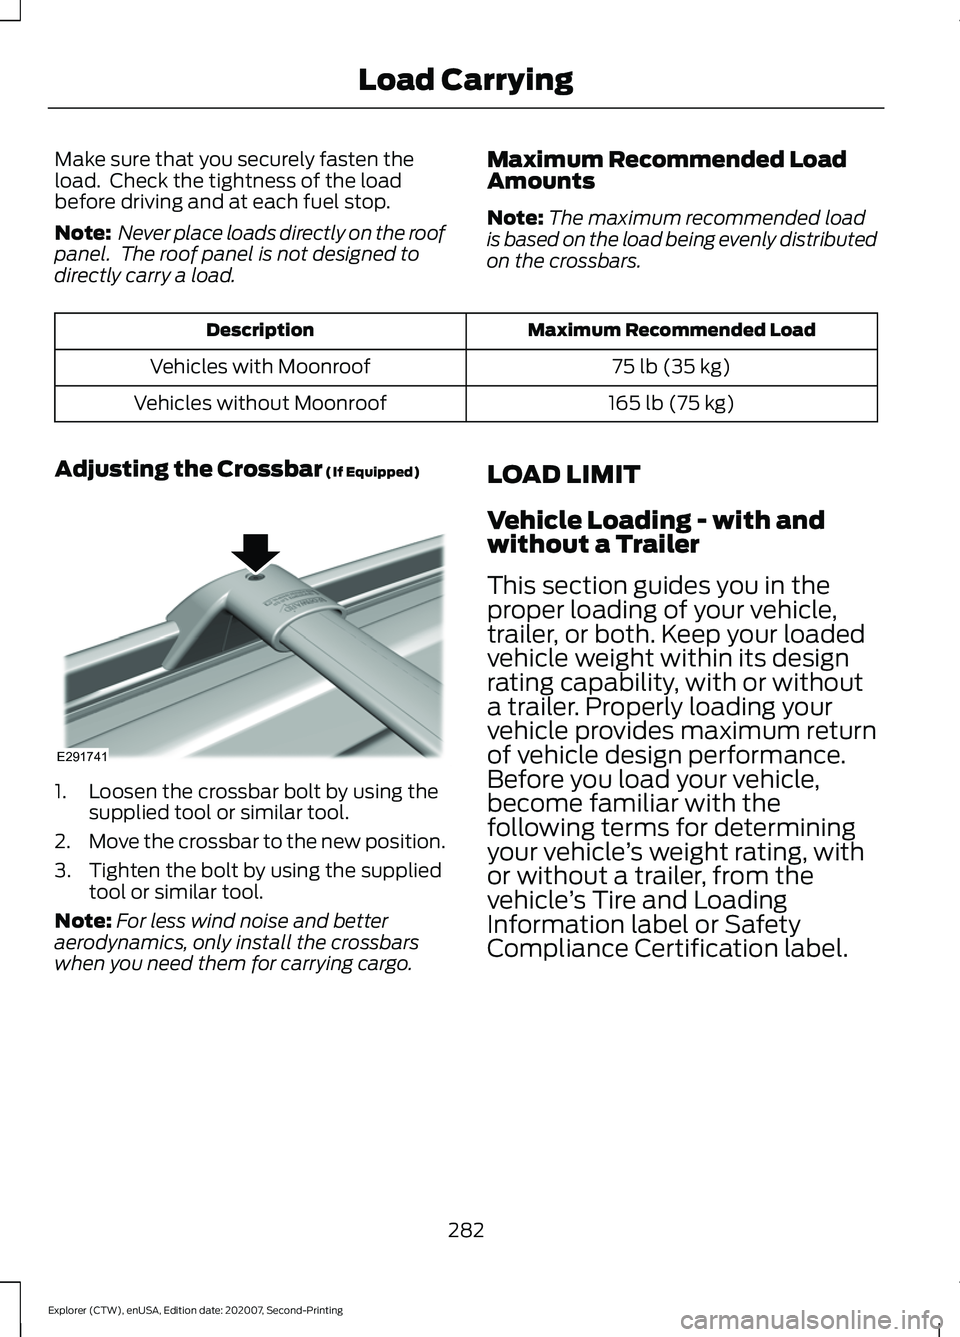
Adjusting the Crossbar (If Equipped) 1. Loosen the crossbar bolt by using the
supplied tool or similar tool.
2. Move the crossbar to the new position.
3. Tighten the bolt by using the supplied tool or similar tool.
Note: For less wind noise and better
aerodynamics, only install the crossbars
when you need them for carrying cargo. LOAD LIMIT
Vehicle Loading - with and
without a Trailer
This section guides you in the
proper loading of your vehicle,
trailer, or both. Keep your loaded
vehicle weight within its design
rating capability, with or without
a trailer. Properly loading your
vehicle provides maximum return
of vehicle design performance.
Before you load your vehicle,
become familiar with the
following terms for determining
your vehicle
’s weight rating, with
or without a trailer, from the
vehicle ’s Tire and Loading
Information label or Safety
Compliance Certification label.
282
Explorer (CTW), enUSA, Edition date: 202007, Second-Printing Load CarryingE291741
Page 330 of 577
8.
Make sure that the oil level is between
the maximum and minimum marks. If
the oil level is at the minimum mark,
add oil immediately. See Capacities
and Specifications (page 391).
9. If the oil level is correct, replace the dipstick and make sure it is fully seated.
Note: Do not remove the dipstick when the
engine is running.
Note: If the oil level is between the
maximum and minimum marks, the oil level
is acceptable. Do not add oil.
Note: The oil consumption of new engines
reaches its normal level after approximately
3,000 mi (5,000 km)
.
Adding Engine Oil WARNING: Do not remove the filler
cap when the engine is running.
Do not use supplemental engine oil
additives because they are unnecessary
and could lead to engine damage that may
not be covered by the vehicle Warranty. Only use oils certified for gasoline engines
by the American Petroleum Institute (API).
An oil with this trademark symbol
conforms to the current engine and
emission system protection standards and
fuel economy requirements of the
International Lubricants Specification
Advisory Committee (ILSAC).
To top up the engine oil level do the
following:
1. Clean the area surrounding the engine
oil filler cap before you remove it.
2. Remove the engine oil filler cap. See Under Hood Overview
(page 323).
Turn it counterclockwise and remove
it.
3. Add engine oil that meets our specifications. See
Capacities and
Specifications (page 391). You may
have to use a funnel to pour the engine
oil into the opening.
4. Recheck the oil level.
5. If the oil level is correct, replace the dipstick and make sure it is fully seated.
6. Replace the engine oil filler cap. Turn it clockwise until you feel a strong
resistance.
Note: Do not add oil further than the
maximum mark. Oil levels above the
maximum mark may cause engine damage.
Note: Make sure you install the oil filler cap
correctly.
Note: Soak up any spillage with an
absorbent cloth immediately.
OIL CHANGE INDICATOR
RESET
Use the information display controls on
the steering wheel to reset the oil change
indicator.
327
Explorer (CTW), enUSA, Edition date: 202007, Second-Printing MaintenanceE142732