2021 FORD EXPLORER display
[x] Cancel search: displayPage 275 of 577
Note:
If your vehicle has a suspension kit
not approved by us, the system may not
correctly function.
Note: Always replace headlamp bulbs with
those specifically designed for your vehicle.
Other bulbs could reduce system
performance.
The system turns on when you switch the
ignition on and you cannot switch the
system off.
Using Speed Sign Recognition
Setting the System Speed Warning
You can set the system speed warning to
alert you when the vehicle speed exceeds
the speed limit recognized by the system
by a certain speed tolerance.
Note: The system remembers the last
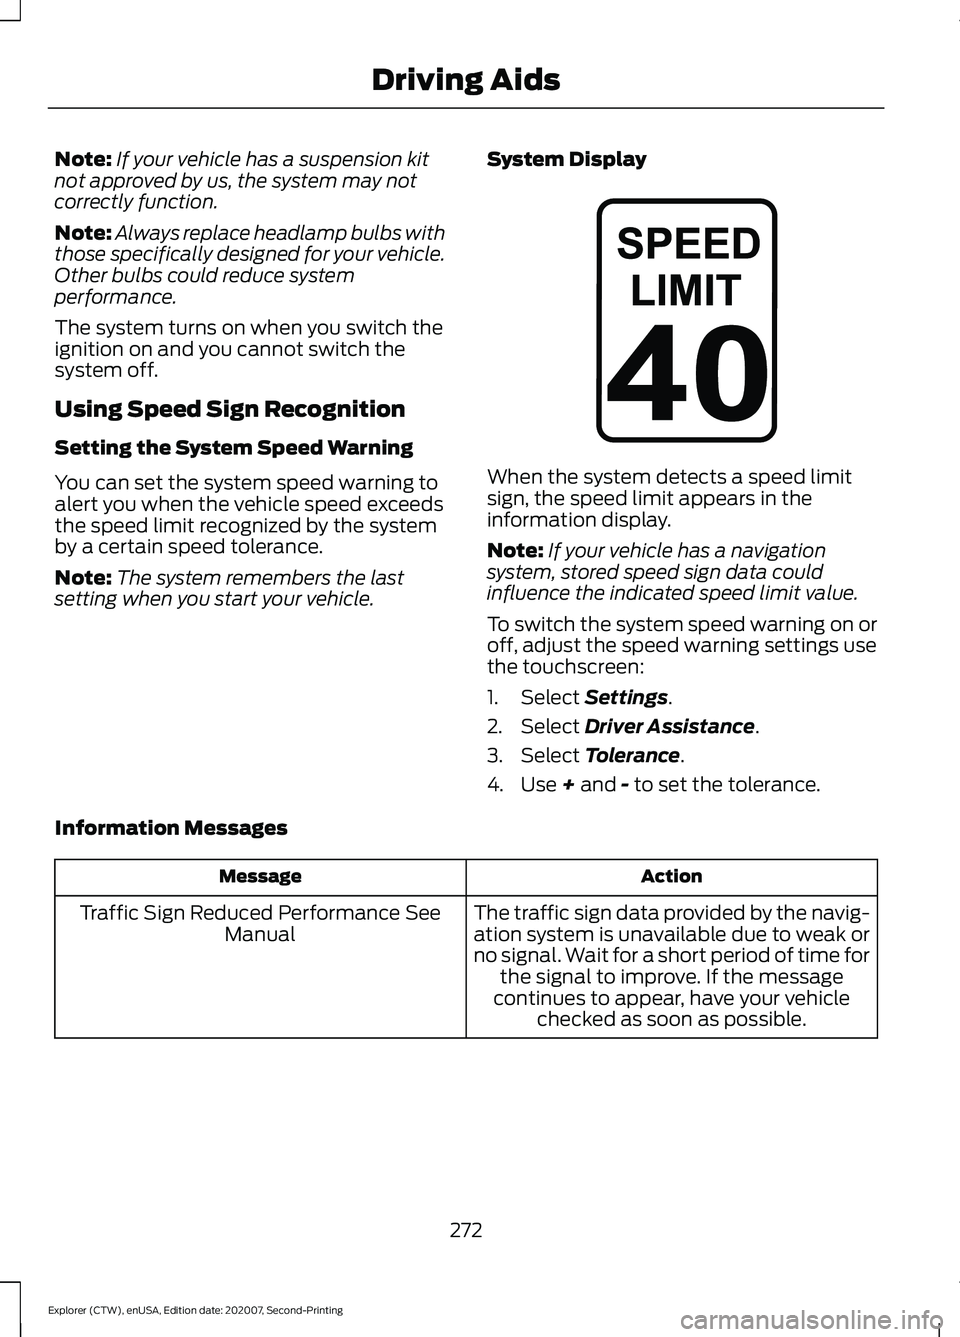
setting when you start your vehicle. System Display When the system detects a speed limit
sign, the speed limit appears in the
information display.
Note:
If your vehicle has a navigation
system, stored speed sign data could
influence the indicated speed limit value.
To switch the system speed warning on or
off, adjust the speed warning settings use
the touchscreen:
1. Select Settings.
2. Select
Driver Assistance.
3. Select
Tolerance.
4. Use
+ and - to set the tolerance.
Information Messages Action
Message
The traffic sign data provided by the navig-ation system is unavailable due to weak or
no signal. Wait for a short period of time for the signal to improve. If the message
continues to appear, have your vehicle checked as soon as possible.
Traffic Sign Reduced Performance See
Manual
272
Explorer (CTW), enUSA, Edition date: 202007, Second-Printing Driving AidsE317824
Page 276 of 577
STEERING
Electric Power Steering
WARNING: The electric power
steering system has diagnostic checks
that continuously monitor the system. If
a fault is detected, a message displays
in the information display. Stop your
vehicle as soon as it is safe to do so.
Switch the ignition off. After at least 10
seconds, switch the ignition on and
watch the information display for a
steering system warning message. If a
steering system warning message
returns, have the system checked as
soon as possible. WARNING:
If the system detects
an error, you may not feel a difference in
the steering, however a serious condition
may exist. Have your vehicle checked as
soon as possible. Failure to do so may
result in loss of steering control.
Your vehicle has an electric power steering
system, there is no fluid reservoir, no
maintenance is required.
If your vehicle loses electrical power while
you are driving, electric power steering
assistance is lost. The steering system still
operates and you can steer your vehicle
manually. Manually steering your vehicle
requires more effort.
Extreme continuous steering may increase
the effort required for you to steer your
vehicle, this increased effort prevents
overheating and permanent damage to
the steering system. You do not lose the
ability to steer your vehicle manually.
Typical steering and driving maneuvers
allow the system to cool and return to
normal operation. Steering Tips
If the steering wanders or pulls, check for:
•
Correct tire pressures.
• Uneven tire wear.
• Loose or worn suspension
components.
• Loose or worn steering components.
• Improper vehicle alignment.
Note: A high crown in the road or high
crosswinds may also make the steering
seem to wander or pull.
Adaptive Learning
(If Equipped)
The electronic power steering system
adaptive learning helps correct road
irregularities and improves overall handling
and steering feel. It communicates with
the brake system to help operate
advanced stability control and accident
avoidance systems. Additionally, whenever
the battery is disconnected or a new
battery installed, you must drive your
vehicle a short distance before the system
relearns the strategy and reactivates all
systems.
PRE-COLLISION ASSIST WARNING: You are responsible for
controlling your vehicle at all times. The
system is designed to be an aid and does
not relieve you of your responsibility to
drive with due care and attention. Failure
to follow this instruction could result in
the loss of control of your vehicle,
personal injury or death.
273
Explorer (CTW), enUSA, Edition date: 202007, Second-Printing Driving Aids
Page 278 of 577
Note:
Brake Support and Active Braking are
active at speeds up to 75 mph (120 km/h).
If your vehicle has a radar sensor included
with Adaptive Cruise Control, then Brake
Support and Active Braking are active up to
the maximum speed of the vehicle.
Note: If you perceive Pre-Collision Assist
alerts as being too frequent or disturbing,
then you can reduce the alert sensitivity,
though the manufacturer recommends
using the highest sensitivity setting where
possible. Setting lower sensitivity would
lead to fewer and later system warnings.
Note: Pre-Collision Assist turns off when
you manually disable AdvanceTrac or when
you select deep snow/sand mode.
Distance Indication and Alert
(If
Equipped)
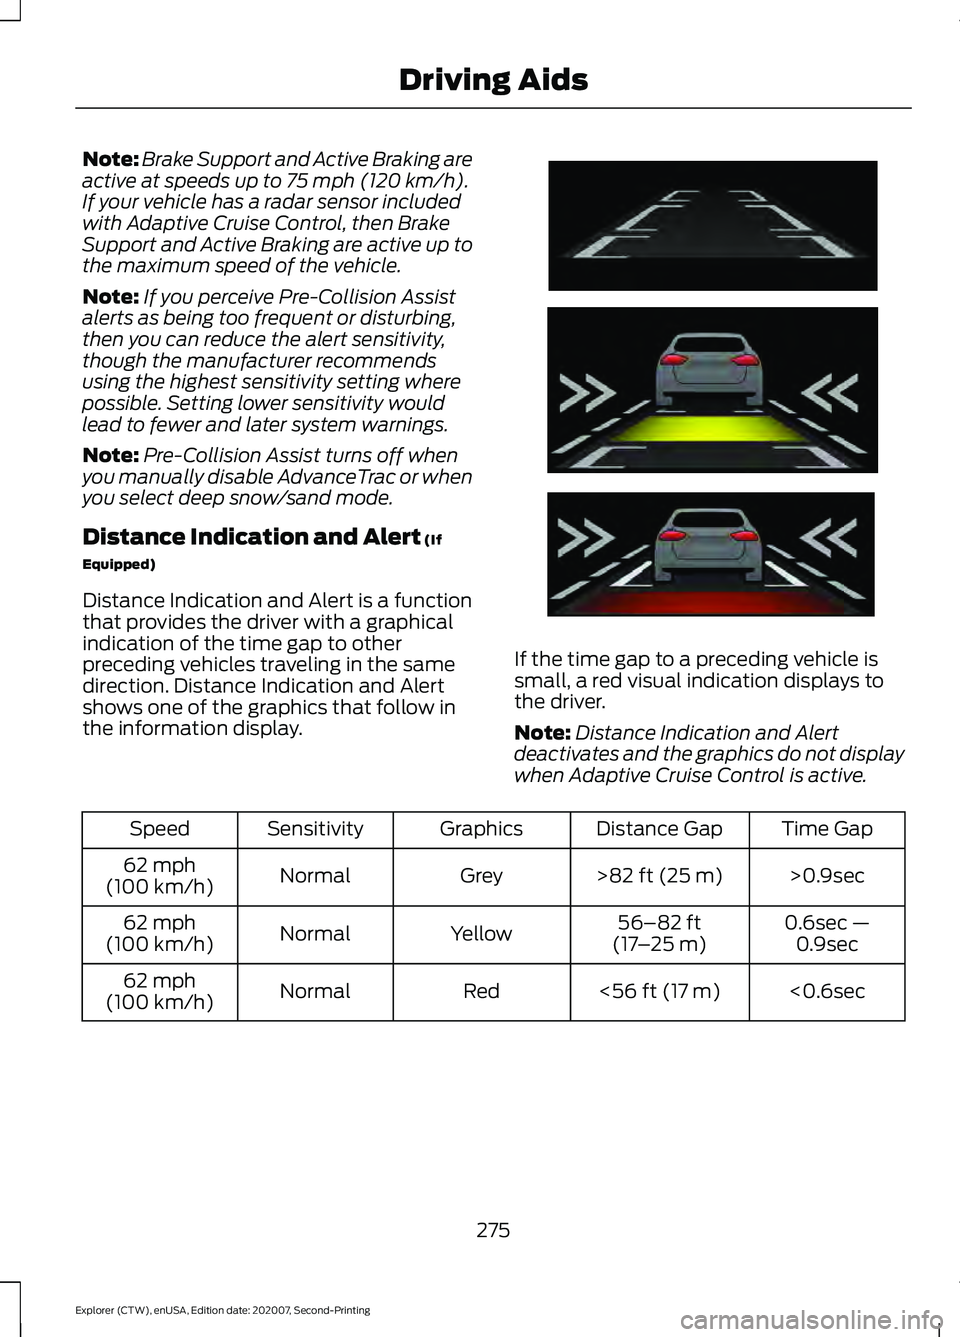
Distance Indication and Alert is a function
that provides the driver with a graphical
indication of the time gap to other
preceding vehicles traveling in the same
direction. Distance Indication and Alert
shows one of the graphics that follow in
the information display. If the time gap to a preceding vehicle is
small, a red visual indication displays to
the driver.
Note:
Distance Indication and Alert
deactivates and the graphics do not display
when Adaptive Cruise Control is active. Time Gap
Distance Gap
Graphics
Sensitivity
Speed
>0.9sec
>
82 ft (25 m)
Grey
Normal
62 mph
(100 km/h)
0.6sec —0.9sec
56–82 ft
(17 –25 m)
Yellow
Normal
62 mph
(100 km/h)
<0.6sec
<
56 ft (17 m)
Red
Normal
62 mph
(100 km/h)
275
Explorer (CTW), enUSA, Edition date: 202007, Second-Printing Driving AidsE254791
Page 279 of 577
Evasive Steering Assist (If Equipped)
If your vehicle is rapidly approaching a
stationary vehicle or a vehicle traveling in
the same direction as your vehicle, the
system is designed to help you steer
around the vehicle.
The system only activates when all of the
following occur:
• The Pre-Collision Assist system detects
a vehicle ahead and starts to apply
Active Braking.
• You turn the steering wheel in an
attempt to steer around the vehicle.
After you turn the steering wheel, the
system applies additional steering torque
to help you steer around the vehicle. After
you pass the vehicle, the system applies
steering torque in the opposite direction to
encourage you to steer back into the lane.
The system deactivates after you fully pass
the vehicle.
Note: The system does not automatically
steer around a vehicle. If you do not turn the
steering wheel, the system does not
activate.
Note: The system does not activate if the
distance to the vehicle ahead is too small
and the system cannot avoid a crash.
Adjusting the Pre-Collision Assist
Settings
You can adjust the following settings by
using the touchscreen. See Settings (page
464
).
• You can change Alert and Distance
Alert sensitivity to one of three possible
settings.
• You can switch Distance Indication and
Alert on or off. •
If required, you can switch Active
Braking on or off.
• If required, you can switch Evasive
Steering Assist on or off.
Note: Active Braking and Evasive Steering
Assist automatically turn on every time you
switch the ignition on.
Note: If you switch Active Braking off,
Evasive Steering Assist turns off.
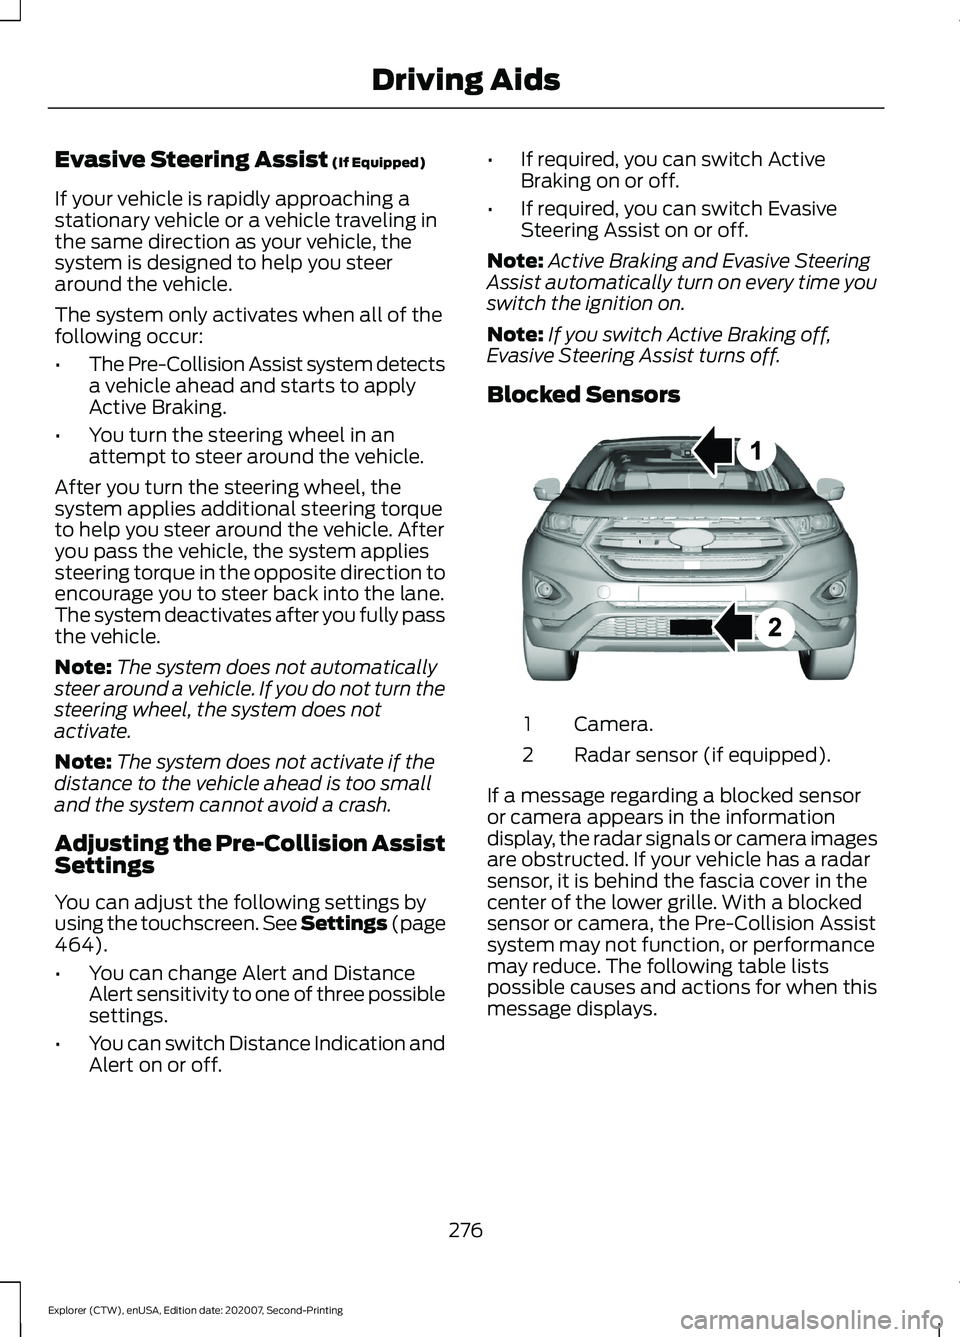
Blocked Sensors Camera.
1
Radar sensor (if equipped).
2
If a message regarding a blocked sensor
or camera appears in the information
display, the radar signals or camera images
are obstructed. If your vehicle has a radar
sensor, it is behind the fascia cover in the
center of the lower grille. With a blocked
sensor or camera, the Pre-Collision Assist
system may not function, or performance
may reduce. The following table lists
possible causes and actions for when this
message displays.
276
Explorer (CTW), enUSA, Edition date: 202007, Second-Printing Driving AidsE273245
Page 280 of 577
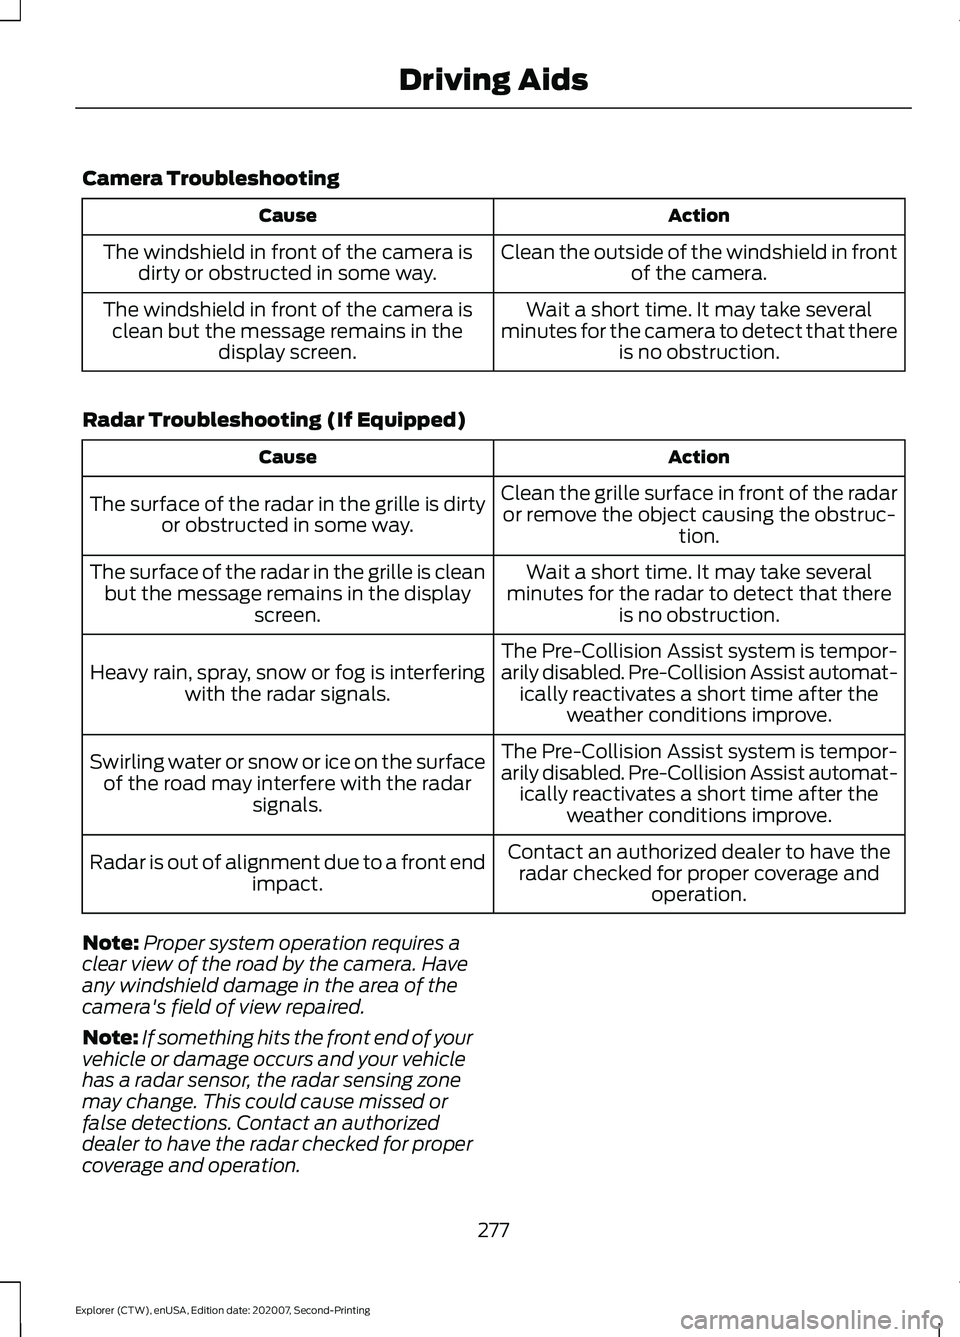
Camera Troubleshooting
Action
Cause
Clean the outside of the windshield in frontof the camera.
The windshield in front of the camera is
dirty or obstructed in some way.
Wait a short time. It may take several
minutes for the camera to detect that there is no obstruction.
The windshield in front of the camera is
clean but the message remains in the display screen.
Radar Troubleshooting (If Equipped) Action
Cause
Clean the grille surface in front of the radaror remove the object causing the obstruc- tion.
The surface of the radar in the grille is dirty
or obstructed in some way.
Wait a short time. It may take several
minutes for the radar to detect that there is no obstruction.
The surface of the radar in the grille is clean
but the message remains in the display screen.
The Pre-Collision Assist system is tempor-
arily disabled. Pre-Collision Assist automat-ically reactivates a short time after the weather conditions improve.
Heavy rain, spray, snow or fog is interfering
with the radar signals.
The Pre-Collision Assist system is tempor-
arily disabled. Pre-Collision Assist automat-ically reactivates a short time after the weather conditions improve.
Swirling water or snow or ice on the surface
of the road may interfere with the radar signals.
Contact an authorized dealer to have theradar checked for proper coverage and operation.
Radar is out of alignment due to a front end
impact.
Note: Proper system operation requires a
clear view of the road by the camera. Have
any windshield damage in the area of the
camera's field of view repaired.
Note: If something hits the front end of your
vehicle or damage occurs and your vehicle
has a radar sensor, the radar sensing zone
may change. This could cause missed or
false detections. Contact an authorized
dealer to have the radar checked for proper
coverage and operation.
277
Explorer (CTW), enUSA, Edition date: 202007, Second-Printing Driving Aids
Page 292 of 577
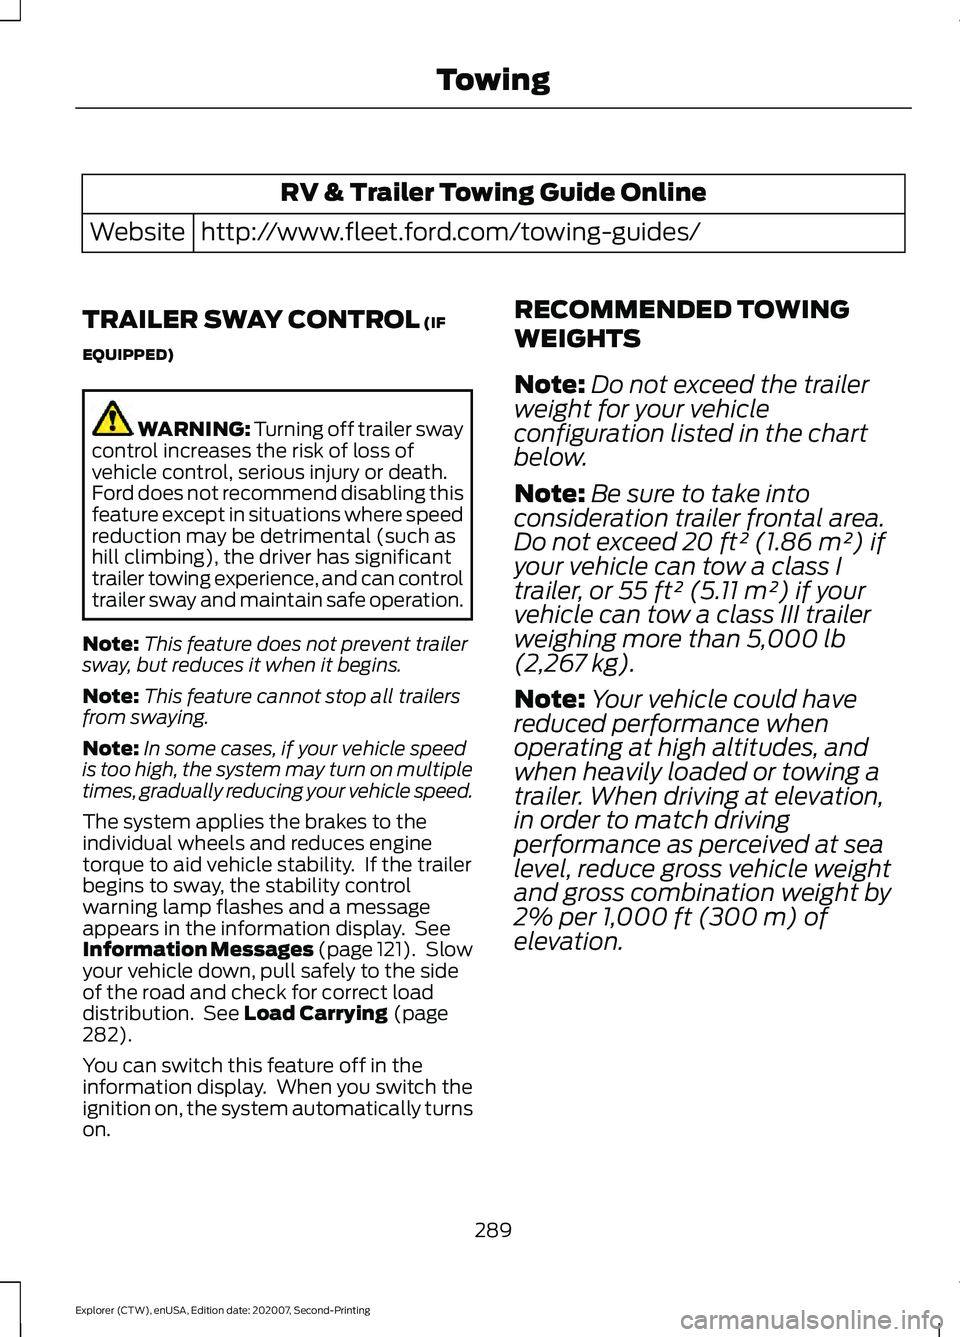
RV & Trailer Towing Guide Online
http://www.fleet.ford.com/towing-guides/
Website
TRAILER SWAY CONTROL (IF
EQUIPPED) WARNING: Turning off trailer sway
control increases the risk of loss of
vehicle control, serious injury or death.
Ford does not recommend disabling this
feature except in situations where speed
reduction may be detrimental (such as
hill climbing), the driver has significant
trailer towing experience, and can control
trailer sway and maintain safe operation.
Note: This feature does not prevent trailer
sway, but reduces it when it begins.
Note: This feature cannot stop all trailers
from swaying.
Note: In some cases, if your vehicle speed
is too high, the system may turn on multiple
times, gradually reducing your vehicle speed.
The system applies the brakes to the
individual wheels and reduces engine
torque to aid vehicle stability. If the trailer
begins to sway, the stability control
warning lamp flashes and a message
appears in the information display. See
Information Messages
(page 121). Slow
your vehicle down, pull safely to the side
of the road and check for correct load
distribution. See
Load Carrying (page
282).
You can switch this feature off in the
information display. When you switch the
ignition on, the system automatically turns
on. RECOMMENDED TOWING
WEIGHTS
Note:
Do not exceed the trailer
weight for your vehicle
configuration listed in the chart
below.
Note: Be sure to take into
consideration trailer frontal area.
Do not exceed 20 ft² (1.86 m²) if
your vehicle can tow a class I
trailer, or 55 ft² (5.11 m²) if your
vehicle can tow a class III trailer
weighing more than
5,000 lb
(2,267 kg).
Note: Your vehicle could have
reduced performance when
operating at high altitudes, and
when heavily loaded or towing a
trailer. When driving at elevation,
in order to match driving
performance as perceived at sea
level, reduce gross vehicle weight
and gross combination weight by
2% per
1,000 ft (300 m) of
elevation.
289
Explorer (CTW), enUSA, Edition date: 202007, Second-Printing Towing
Page 330 of 577
8.
Make sure that the oil level is between
the maximum and minimum marks. If
the oil level is at the minimum mark,
add oil immediately. See Capacities
and Specifications (page 391).
9. If the oil level is correct, replace the dipstick and make sure it is fully seated.
Note: Do not remove the dipstick when the
engine is running.
Note: If the oil level is between the
maximum and minimum marks, the oil level
is acceptable. Do not add oil.
Note: The oil consumption of new engines
reaches its normal level after approximately
3,000 mi (5,000 km)
.
Adding Engine Oil WARNING: Do not remove the filler
cap when the engine is running.
Do not use supplemental engine oil
additives because they are unnecessary
and could lead to engine damage that may
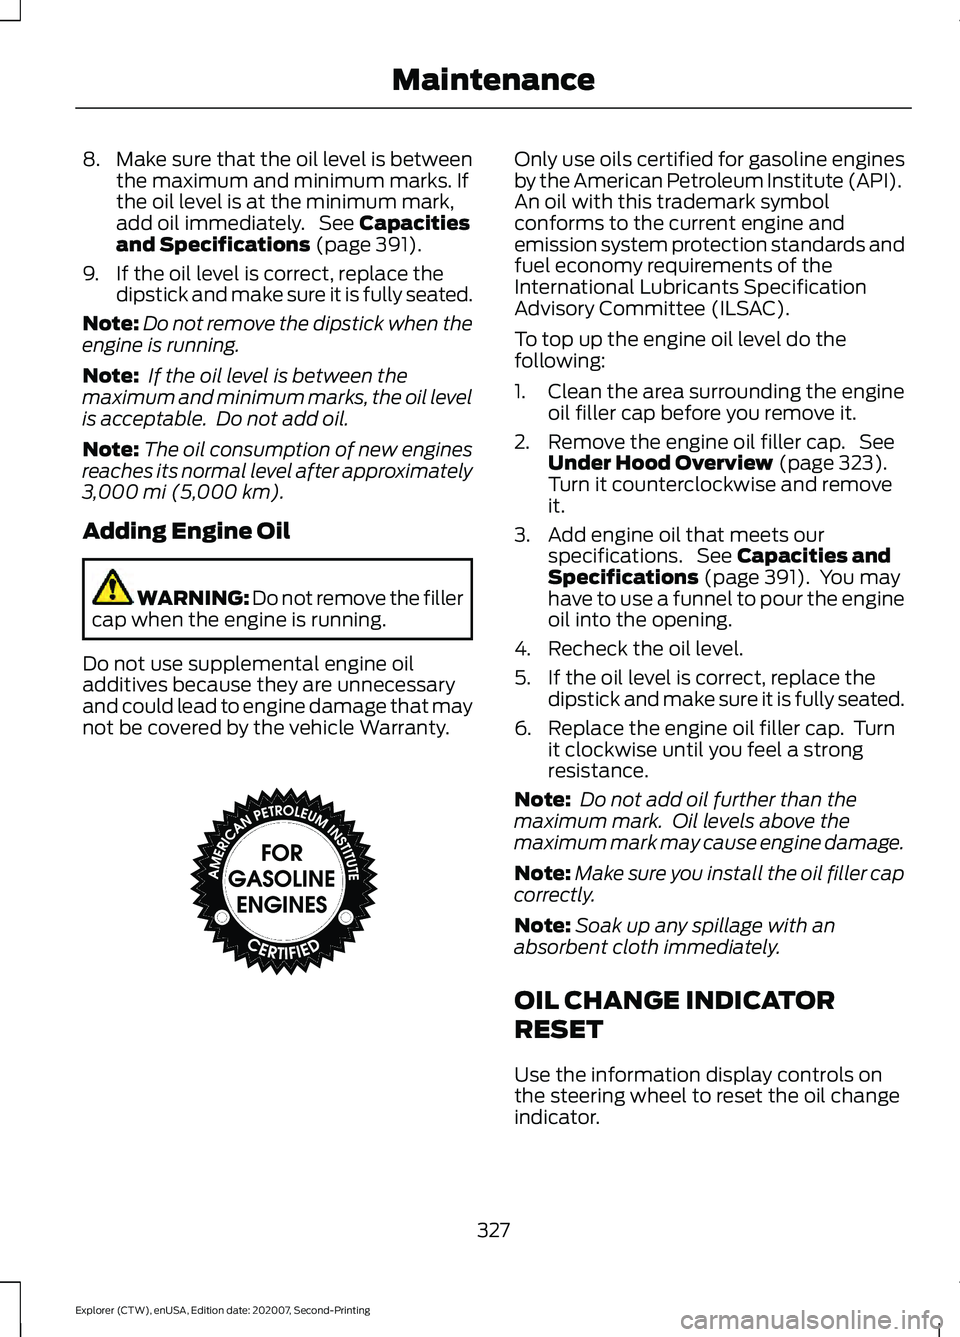
not be covered by the vehicle Warranty. Only use oils certified for gasoline engines
by the American Petroleum Institute (API).
An oil with this trademark symbol
conforms to the current engine and
emission system protection standards and
fuel economy requirements of the
International Lubricants Specification
Advisory Committee (ILSAC).
To top up the engine oil level do the
following:
1. Clean the area surrounding the engine
oil filler cap before you remove it.
2. Remove the engine oil filler cap. See Under Hood Overview
(page 323).
Turn it counterclockwise and remove
it.
3. Add engine oil that meets our specifications. See
Capacities and
Specifications (page 391). You may
have to use a funnel to pour the engine
oil into the opening.
4. Recheck the oil level.
5. If the oil level is correct, replace the dipstick and make sure it is fully seated.
6. Replace the engine oil filler cap. Turn it clockwise until you feel a strong
resistance.
Note: Do not add oil further than the
maximum mark. Oil levels above the
maximum mark may cause engine damage.
Note: Make sure you install the oil filler cap
correctly.
Note: Soak up any spillage with an
absorbent cloth immediately.
OIL CHANGE INDICATOR
RESET
Use the information display controls on
the steering wheel to reset the oil change
indicator.
327
Explorer (CTW), enUSA, Edition date: 202007, Second-Printing MaintenanceE142732
Page 331 of 577
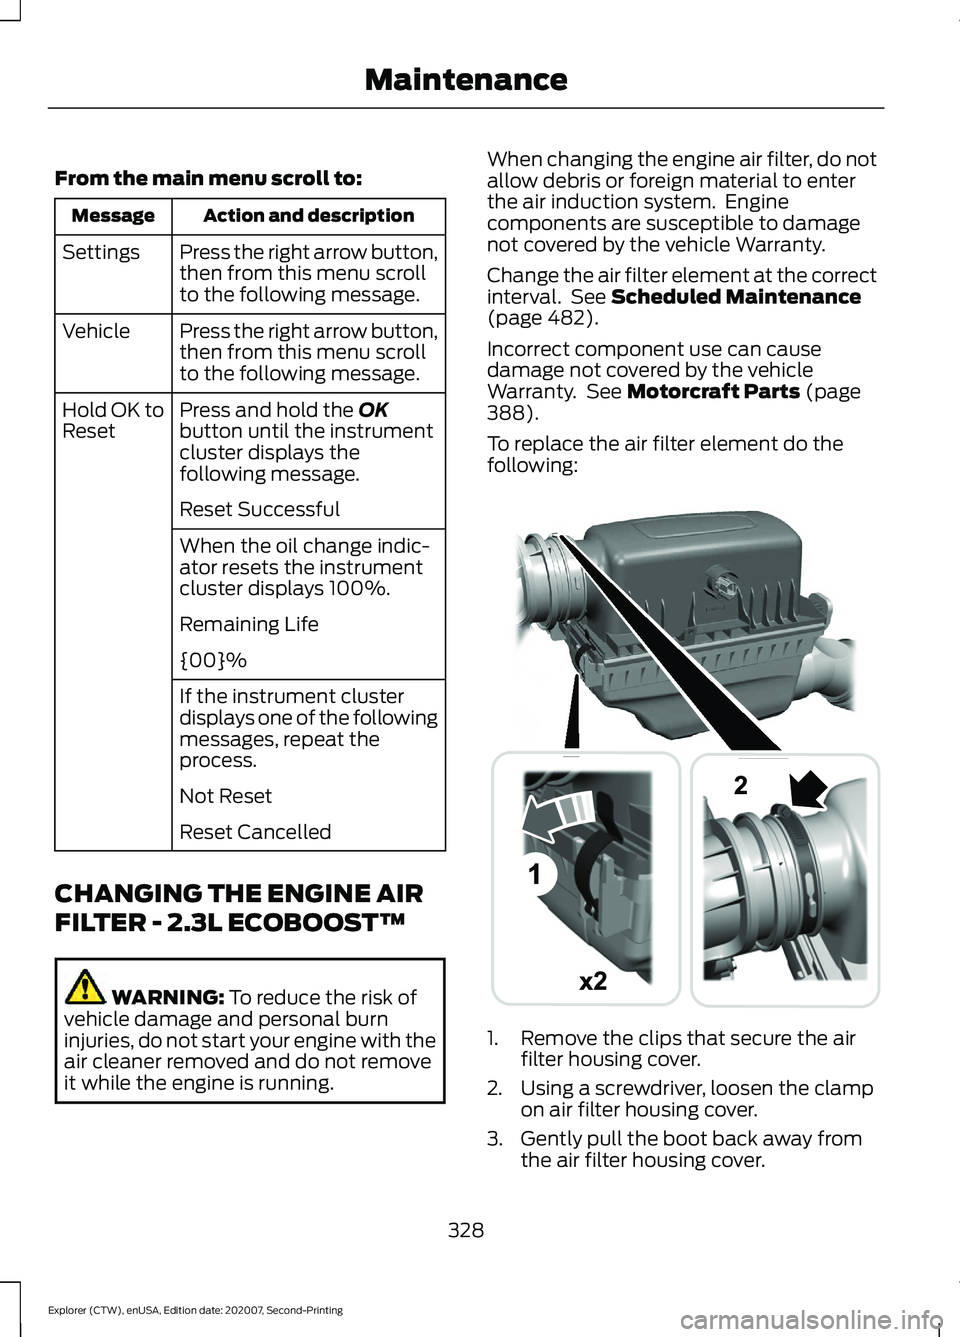
From the main menu scroll to:
Action and description
Message
Press the right arrow button,
then from this menu scroll
to the following message.
Settings
Press the right arrow button,
then from this menu scroll
to the following message.
Vehicle
Press and hold the OK
button until the instrument
cluster displays the
following message.
Hold OK to
Reset
Reset Successful
When the oil change indic-
ator resets the instrument
cluster displays 100%.
Remaining Life
{00}%
If the instrument cluster
displays one of the following
messages, repeat the
process.
Not Reset
Reset Cancelled
CHANGING THE ENGINE AIR
FILTER - 2.3L ECOBOOST™ WARNING:
To reduce the risk of
vehicle damage and personal burn
injuries, do not start your engine with the
air cleaner removed and do not remove
it while the engine is running. When changing the engine air filter, do not
allow debris or foreign material to enter
the air induction system. Engine
components are susceptible to damage
not covered by the vehicle Warranty.
Change the air filter element at the correct
interval. See
Scheduled Maintenance
(page 482).
Incorrect component use can cause
damage not covered by the vehicle
Warranty. See
Motorcraft Parts (page
388).
To replace the air filter element do the
following: 1. Remove the clips that secure the air
filter housing cover.
2. Using a screwdriver, loosen the clamp on air filter housing cover.
3. Gently pull the boot back away from the air filter housing cover.
328
Explorer (CTW), enUSA, Edition date: 202007, Second-Printing MaintenanceE294782