2021 FORD BRONCO SPORT traction control
[x] Cancel search: traction controlPage 246 of 471
Driving In Sand
When driving over sand, try to keep all four
wheels on the most solid area of the trail.
Drive through the terrain without varying
vehicle speed. Apply the accelerator and
avoid excessive wheel slip.
When driving at slow speeds in deep sand
under high ambient temperatures, use low
(L) mode, or shift to a lower gear when
possible. Select Low (L) mode or select a
lower gear to maximize the engine and
transmission cooling capability. See
Transmission (page 166).
Use the vehicle's momentum to maintain
forward motion in sand. Avoid coming to
a stop on steep sand slopes as the vehicle
may not be able to continue forward after
it has stopped.
Driving In Mud
Be cautious of sudden changes in vehicle
speed or direction when you are driving in
mud.
Even four-wheel drive vehicles can lose
traction in slick mud. If your vehicle does
slide, steer in the direction of the slide until
you regain control of your vehicle.
After driving through mud, clean off residue
stuck to rotating driveshafts and tires.
Excess mud stuck on tires and rotating
driveshafts can cause an imbalance that
could damage drive components.
Note: The vehicle brakes are less effective
when wet or muddy.
Driving Over Rocks and Gravel
Gravel is a constantly changing, low-grip
surface. Driving at slow speeds on gravel
reduces the risk of losing traction when you
stop, accelerate or turn a corner.
When approaching large rocks, position
the vehicle so that the tires pass over the
largest obstacle. Note:
Never attempt to straddle a rock that
is large enough to strike your axles or
undercarriage.
Note: Never attempt to drive over a rock
which is large enough to contact the door
sills.
If you lose traction on your wheels facing
uphill, stop and choose a more suitable
route.
Leave a generous gap between your
vehicle and other vehicles to minimize the
risk of damage from flying gravel. Avoid
dust clouds as they reduce visibility.
Before navigating on uneven ground,
secure anything inside the vehicle. If
possible, remove any roof-rack items. Use
the lowest gear possible and approach the
obstacle at a slow speed.
If your vehicle begins to slide down a slope,
steer downhill and gently apply the
throttle. If you lose traction on your uphill
wheels, stop immediately and choose a
more suitable route.
Approach logs, rocky steps or ditches
diagonally. Keep at least three wheels on
the ground at all times.
Climbing A Hill WARNING:
Extreme care should
be used when steering the vehicle in
reverse down a slope so as not to cause
the vehicle to swerve out of control.
Although natural obstacles can make it
necessary to travel diagonally up or down
a hill or steep incline, try to drive straight
up or straight down.
Note: Avoid turning on steep slopes or hills.
A danger lies in losing traction, slipping
sideways and possible vehicle roll over.
Whenever driving on a hill, first determine
the route you can use.
243
Bronco Sport (CHD) Canada/United States of America, enUSA, Edition date: 202007, Second-Printing Driving Hints
Page 247 of 471
When climbing a steep slope or hill, start
in a lower gear rather than downshifting to
a lower gear from a higher gear. This
reduces strain on the engine and the
possibility of stalling.
If your vehicle stalls, do not try to turn
around because this could cause your
vehicle to roll over. It is better to reverse
back to a safe location.
Do not drive over the crest of a hill without
seeing what conditions are on the other
side. Do not drive in reverse over a hill
without the aid of an observer.
If the vehicle is unable to make it up the
hill, do not attempt to turn back down the
slope.
Apply the accelerator just enough for the
wheels to climb the hill.
Note:
Too much acceleration can cause
the tires to slip, spin or lose traction,
resulting in loss of vehicle control.
Descending A Hill:
• Use the same gear you would use to
climb the hill.
• Do not descend in neutral.
• Disengage overdrive.
• Avoid sudden and excessive braking.
Note: The front wheels have to be turning
in order to steer your vehicle.
When descending a steep hill in a manual
transmission vehicle do not leave the
vehicle in gear with the clutch depressed.
This could cause damage to your driveline.
Driving Through Water WARNING: Do not attempt to
cross a deep, fast flowing body of water.
Failure to follow this instruction could
result in the loss of control of your
vehicle, personal injury or death. As the water depth increases, you must
reduce your vehicle speed to avoid
potential vehicle damage.
The key to a safe crossing is the water
depth, current and bottom of the water's
condition. On soft bottoms, the vehicle
sinks in, effectively increasing the water
level on the vehicle. Make sure to consider
this when determining the depth of water.
Determine the depth and speed of the
current before attempting a water crossing.
Be aware that obstacles and debris may
be beneath the water
’s surface.
Note: Cross flowing water at an angle
heading slightly upstream.
Note: You should tread lightly and avoid
damage to the environment.
Drive slow when crossing water. Proceed
with a constant slow speed lightly pressing
on the accelerator.
Drive through the water very slowly when
entering, then build up momentum. Keep
your vehicle moving at a steady pace.
Note: Do not try to accelerate through the
water crossing.
When driving too fast in water or through
deep water, the engine, transmission,
transfer case, axles, electrical components
or vehicle interior could ingest water. Water
can cause permanent damage that may
not be covered by your vehicle warranty.
See
Driving Through Water Limitations
(page 246).
Note: Failure to follow the recommended
speeds can result in vehicle damage.
Never stop or shut a vehicle off when
crossing deep water unless your vehicle
ingested water into the engine air intake.
If the engine stalls, do not attempt to
restart it.
244
Bronco Sport (CHD) Canada/United States of America, enUSA, Edition date: 202007, Second-Printing Driving Hints
Page 249 of 471
Crossing A Ravine, Gully, Ditch,
Washout Or Rut
Review the path ahead before attempting
to cross any obstacle. Review the obstacle
from outside the vehicle for an
understanding of the terrain condition in
front of and behind the obstacle. Approach
obstacles slowly and inch the vehicle over.
Ditches and washouts should be crossed
at a 45 degree angle when possible.
Driving Over Logs
Review the path ahead before attempting
to cross any obstacle. Review the obstacle
from outside the vehicle for an
understanding of the terrain condition in
front of and behind the obstacle.
Approach obstacles slowly and inch the
vehicle over, approaching at a 15 degree
angle.
Note:
It is best to have a front tire on top of
the log when the other begins to climb over.
If a large obstacle near the log such as a
rock cannot be avoided, choose a path that
places the rock directly under the tire
rather than the undercarriage of the
vehicle. This helps prevent damage to the
vehicle.
Driving Through Water Limitations Maximum Wading
Depth
Model
17.7 in (450 mm)
Base
23.6 in (600 mm)
Badlands
When you are driving though water do not
exceed 4 mph (7 km/h). Off-Road Driving Aids
Selecting an Off-Road Drive Mode
Using the appropriate drive mode increases
your vehicle's control.
See What Is Drive
Mode Control (page 223).
Using the Cameras Off-Road
Use the 180 degree camera to enhance
your off-road experience. See 180 Degree
Camera
(page 191).
Using Four-Wheel Drive Lock
Increases four wheel drive performance by
preventing the front and rear axles from
disconnecting. You can activate and
deactivate the four wheel drive lock on the
fly. See
Using Four-Wheel Drive (page
172).
Using Rear Differential Lock
The rear differential lock provides
additional traction to your vehicle when
stuck.
You can activate and deactivate the rear
differential lock on the fly within the
operating speed range.
The rear differential locker disengages
when the vehicle speed exceeds a set
value and it re-engages when the vehicle
speed goes below a set value. See
Using
Four-Wheel Drive (page 172).
Using Trail Control
The system works in a similar manner to
cruise control in off-road conditions. Trail
Control provides you the ability to
maneuver the vehicle without using the
throttle and brake pedals.
246
Bronco Sport (CHD) Canada/United States of America, enUSA, Edition date: 202007, Second-Printing Driving Hints
Page 250 of 471
Trail Control allows you to set a speed
between 1 mph (1.6 km/h) to 14 mph
(23 km/h) in a forward motion and 1 mph
(1.6 km/h) to 5 mph (8 km/h) in reverse.
The system controls acceleration and
braking in difficult off-road environments,
which allows you to focus on steering. See
What Is Trail Control
(page 184).
Trail Control Performance:
• Manages wheel slip to maximize
traction.
• Removes the need for you to use both
feet when driving in off-road situations.
• Provides braking to maximize traction
in descents.
• Gives you confidence in difficult
environments.
After Driving Your Vehicle Off-
Road WARNING:
After off-road use,
before returning to the road, check the
wheels and tires for damage. Off-road
use may cause damage to your wheels
and tires that can lead to tire failure, loss
of vehicle control, serious injury or death.
Driving off-road places more stress on your
vehicle than most on-road driving. After
driving off-road, check for damage to the
wheels, chassis and underbody.
Inspect the underbody of your vehicle by
checking tires, body structure, steering,
suspension, and exhaust system for
damage.
Inspect the tires for any cuts in the tread
or sidewall area. Also inspect the sidewall
for any bulge indicating damage to the tire.
Make sure that tires are inflated to proper
tire pressure as indicated on the tire
placard. Check the radiator for mud and debris and
clean as needed.
Check that the air filter is clean and dry.
Remove accumulations of plants or brush.
These things could be a fire hazard or hide
damage to the fuel lines, brake hoses, and
propeller shafts.
Make sure that the grille and radiator are
clear of any obstructions that may affect
cooling.
After extended operation in mud, sand,
water, or similar dirty conditions, inspect
the wipers and washers to make sure they
are working.
Note:
Mud caked windows are hard to see
through and can damage wiper blades or
motor.
Check wipers for debris or anything that
may scratch the windshield.
If you experience unusual vibration after
driving in mud, slush or similar conditions,
check the wheels for impacted material.
Impacted material can cause vibrations
when driving and wheel imbalance.
Remove the material to reduce the
vibration.
Note: If you have removed the impacted
material from the wheels and your vehicle
still has a vibration check your vehicle for
damage or see an authorized dealer.
Inspect the exhaust system for damage or
looseness.
Make sure that the brakes are in proper
working order and free of any mud, stones
and debris, which can become trapped
around the brake rotor, backing plate and
caliper.
Inspect the wheels for dents, cracks, or
other damage.
247
Bronco Sport (CHD) Canada/United States of America, enUSA, Edition date: 202007, Second-Printing Driving Hints
Page 300 of 471
GENERAL INFORMATION
Use only approved wheel and tire sizes.
Using other sizes could damage your
vehicle. If you change the diameter of the
tires from what is fitted at the factory, the
speedometer may not display the correct
speed. If you intend to change the size of
the wheels from what was fitted by the
manufacturer, you can check the suitability
with your dealer.
Additional information related to the
functionality and maintenance of your tires
can be found later in this chapter. See Tire
Care (page 299).
You can find the recommended tire
inflation pressures on the Tire Label, which
is on the B-pillar or the edge of the driver
door. You can also find this information on
the Safety Compliance Certification Label,
affixed to either the door hinge pillar,
door-latch post, or the door edge that
meets the door latch post, next to the
driver seating position.
We strongly recommend maintaining these
tire pressures at all times. Failure to follow
the tire pressure recommendations can
cause uneven treadwear patterns, reduced
fuel economy, and adversely affect the
way your vehicle handles.
Note: Check and set the tire pressure at the
ambient temperature in which you are
intending to drive your vehicle and when the
tires are cold.
Note: Check your tire pressures at least
once per month.
If your vehicle has a spare tire, set the
pressure to the highest value given for your
vehicle and tire size combination. Notice to Utility Vehicle and Truck
Owners WARNING:
Utility vehicles have a
significantly higher rollover rate than
other types of vehicles. WARNING:
Vehicles with a higher
center of gravity (utility and four-wheel
drive vehicles) handle differently than
vehicles with a lower center of gravity
(passenger cars). Avoid sharp turns,
excessive speed and abrupt steering in
these vehicles. Failure to drive cautiously
increases the risk of losing control of your
vehicle, vehicle rollover, personal injury
and death. WARNING:
In a rollover crash, an
unbelted person is significantly more
likely to die than a person wearing a
seatbelt. WARNING:
Do not become
overconfident in the ability of four-wheel
drive vehicles. Although a four-wheel
drive vehicle may accelerate better than
a two-wheel drive vehicle in low traction
situations, it won't stop any faster than
two-wheel drive vehicles. Always drive
at a safe speed.
Utility vehicles and trucks handle
differently than passenger cars in the
various driving conditions that are
encountered on streets, highways and
off-road. Utility vehicles and trucks are not
designed for cornering at speeds as high
as passenger cars any more than low-slung
sports cars are designed to perform
satisfactorily under off-road conditions.
297
Bronco Sport (CHD) Canada/United States of America, enUSA, Edition date: 202007, Second-Printing Wheels and Tires
Page 302 of 471
TIRE CARE
Information About Uniform
Tire Quality Grading
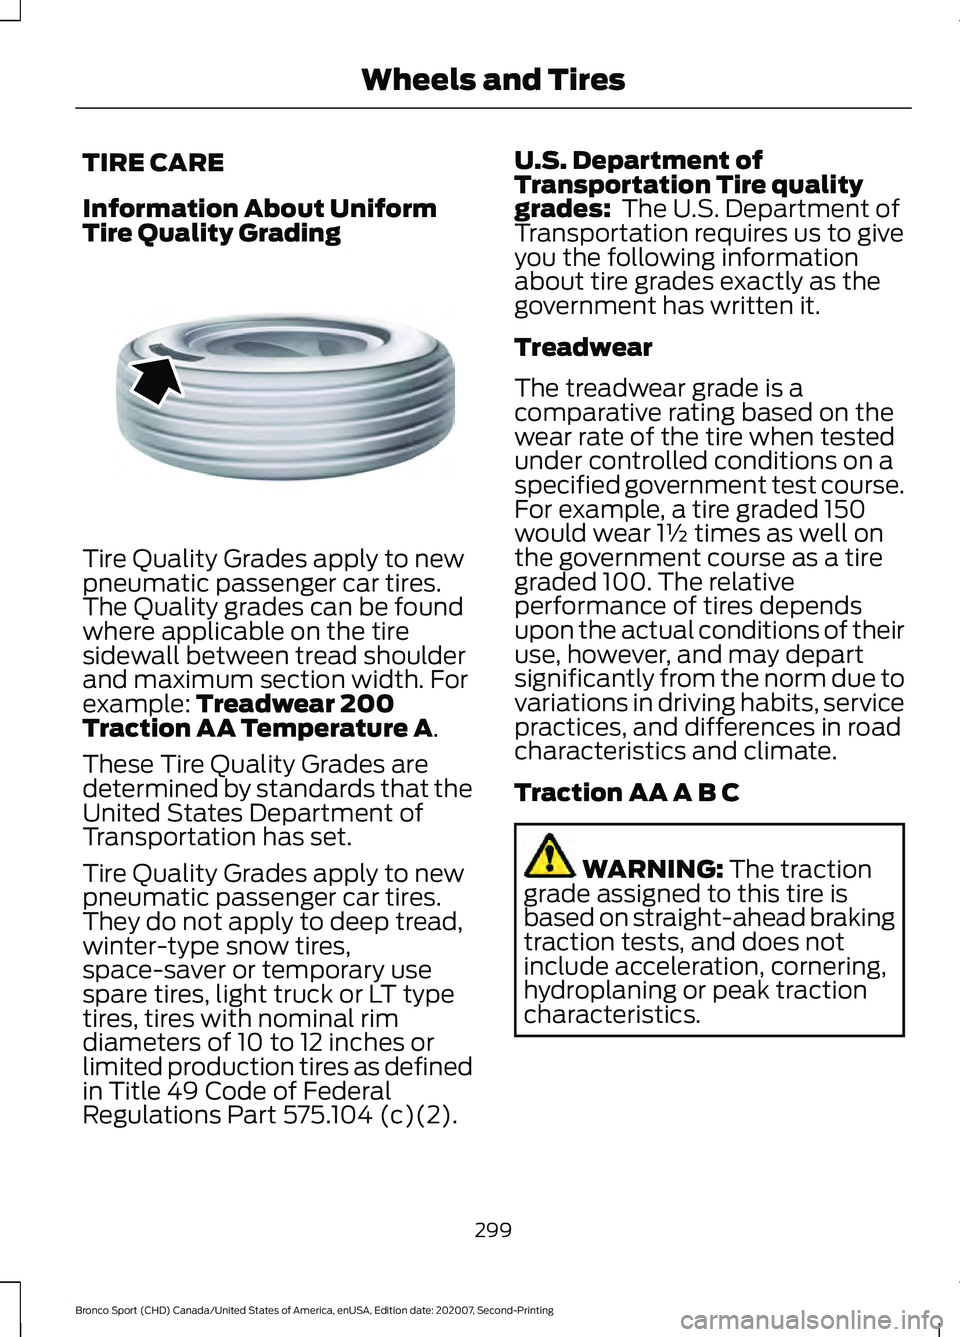
Tire Quality Grades apply to new
pneumatic passenger car tires.
The Quality grades can be found
where applicable on the tire
sidewall between tread shoulder
and maximum section width. For
example: Treadwear 200
Traction AA Temperature A.
These Tire Quality Grades are
determined by standards that the
United States Department of
Transportation has set.
Tire Quality Grades apply to new
pneumatic passenger car tires.
They do not apply to deep tread,
winter-type snow tires,
space-saver or temporary use
spare tires, light truck or LT type
tires, tires with nominal rim
diameters of 10 to 12 inches or
limited production tires as defined
in Title 49 Code of Federal
Regulations Part 575.104 (c)(2). U.S. Department of
Transportation Tire quality
grades:
The U.S. Department of
Transportation requires us to give
you the following information
about tire grades exactly as the
government has written it.
Treadwear
The treadwear grade is a
comparative rating based on the
wear rate of the tire when tested
under controlled conditions on a
specified government test course.
For example, a tire graded 150
would wear 1½ times as well on
the government course as a tire
graded 100. The relative
performance of tires depends
upon the actual conditions of their
use, however, and may depart
significantly from the norm due to
variations in driving habits, service
practices, and differences in road
characteristics and climate.
Traction AA A B C WARNING:
The traction
grade assigned to this tire is
based on straight-ahead braking
traction tests, and does not
include acceleration, cornering,
hydroplaning or peak traction
characteristics.
299
Bronco Sport (CHD) Canada/United States of America, enUSA, Edition date: 202007, Second-Printing Wheels and TiresE142542
Page 303 of 471
The traction grades, from highest
to lowest are AA, A, B, and C. The
grades represent the tire
’s ability
to stop on wet pavement as
measured under controlled
conditions on specified
government test surfaces of
asphalt and concrete. A tire
marked C may have poor traction
performance.
Temperature A B C WARNING: The
temperature grade for this tire is
established for a tire that is
properly inflated and not
overloaded. Excessive speed,
underinflation, or excessive
loading, either separately or in
combination, can cause heat
buildup and possible tire failure.
The temperature grades are A
(the highest), B and C,
representing the tire ’s resistance
to the generation of heat and its
ability to dissipate heat when
tested under controlled conditions
on a specified indoor laboratory
test wheel. Sustained high
temperature can cause the
material of the tire to degenerate
and reduce tire life, and excessive
temperature can lead to sudden
tire failure. The grade C
corresponds to a level of
performance which all passenger
car tires must meet under the Federal Motor Vehicle Safety
Standard No. 139. Grades B and A
represent higher levels of
performance on the laboratory
test wheel than the minimum
required by law.
Glossary of Tire Terminology
*
Tire label: A label showing the
original equipment tire sizes,
recommended inflation pressure
and the maximum weight the
vehicle can carry.
*
Tire Identification Number
(TIN): A number on the sidewall
of each tire providing information
about the tire brand and
manufacturing plant, tire size and
date of manufacture. Also referred
to as DOT code.
*
Inflation pressure: A measure
of the amount of air in a tire.
*
Standard load: A class of
P-metric or Metric tires designed
to carry a maximum load at set
pressure. For example: For
P-metric tires
35 psi (2.4 bar) and
for Metric tires 36 psi (2.5 bar).
Increasing the inflation pressure
beyond this pressure will not
increase the tire ’s load carrying
capability.
*
Extra load: A class of P-metric
or Metric tires designed to carry a
heavier maximum load at
42 psi
(2.9 bar). Increasing the inflation
pressure beyond this pressure will
not increase the tire ’s load
carrying capability.
300
Bronco Sport (CHD) Canada/United States of America, enUSA, Edition date: 202007, Second-Printing Wheels and Tires
Page 306 of 471
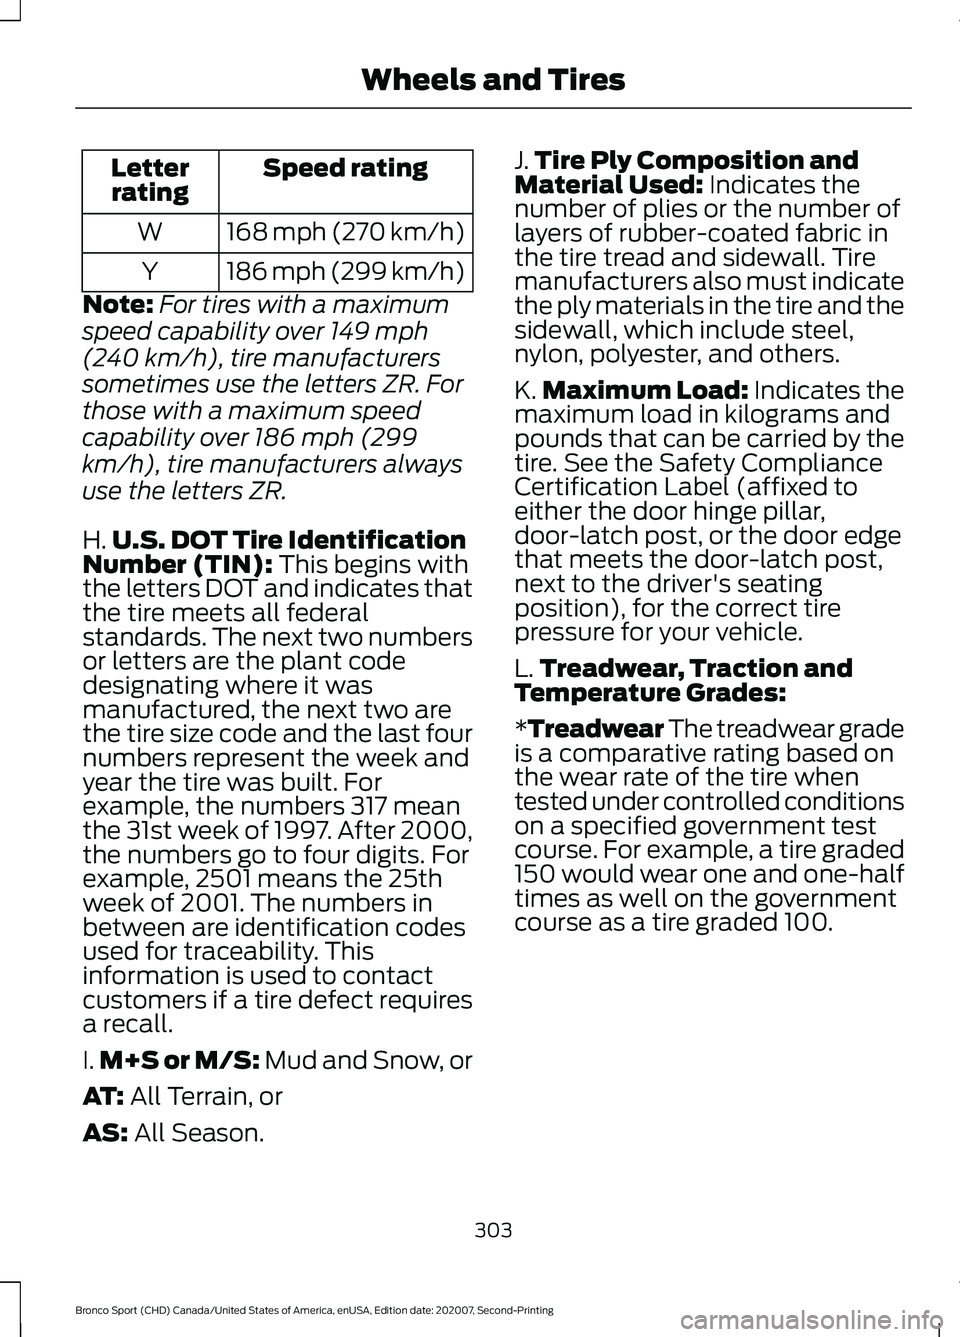
Speed rating
Letter
rating
168 mph (270 km/h)
W
186 mph (299 km/h)
Y
Note: For tires with a maximum
speed capability over 149 mph
(240 km/h), tire manufacturers
sometimes use the letters ZR. For
those with a maximum speed
capability over 186 mph (299
km/h), tire manufacturers always
use the letters ZR.
H. U.S. DOT Tire Identification
Number (TIN): This begins with
the letters DOT and indicates that
the tire meets all federal
standards. The next two numbers
or letters are the plant code
designating where it was
manufactured, the next two are
the tire size code and the last four
numbers represent the week and
year the tire was built. For
example, the numbers 317 mean
the 31st week of 1997. After 2000,
the numbers go to four digits. For
example, 2501 means the 25th
week of 2001. The numbers in
between are identification codes
used for traceability. This
information is used to contact
customers if a tire defect requires
a recall.
I. M+S or M/S:
Mud and Snow, or
AT:
All Terrain, or
AS:
All Season. J.
Tire Ply Composition and
Material Used:
Indicates the
number of plies or the number of
layers of rubber-coated fabric in
the tire tread and sidewall. Tire
manufacturers also must indicate
the ply materials in the tire and the
sidewall, which include steel,
nylon, polyester, and others.
K. Maximum Load: Indicates the
maximum load in kilograms and
pounds that can be carried by the
tire. See the Safety Compliance
Certification Label (affixed to
either the door hinge pillar,
door-latch post, or the door edge
that meets the door-latch post,
next to the driver's seating
position), for the correct tire
pressure for your vehicle.
L. Treadwear, Traction and
Temperature Grades:
*Treadwear The treadwear grade
is a comparative rating based on
the wear rate of the tire when
tested under controlled conditions
on a specified government test
course. For example, a tire graded
150 would wear one and one-half
times as well on the government
course as a tire graded 100.
303
Bronco Sport (CHD) Canada/United States of America, enUSA, Edition date: 202007, Second-Printing Wheels and Tires