2021 FORD BRONCO SPORT manual transmission
[x] Cancel search: manual transmissionPage 180 of 471

ELECTRIC PARKING BRAKE
WARNING: Always fully apply the
parking brake and make sure you shift
into park (P). Failure to follow this
instruction could result in personal injury
or death. WARNING:
If you drive extended
distances with the parking brake applied,
you could cause damage to the brake
system. WARNING:
The electric parking
brake does not operate if the vehicle
battery is running out of charge.
Your vehicle has an electric parking brake.
You operate it with a switch instead of a
lever. The switch is on the center console
or to the left-hand side of the steering
wheel, on the lower part of the instrument
panel.
Note: The electric parking brake makes
noises during operation. This is normal.
Applying the Electric Parking
Brake Pull the switch upward.
The red warning lamp flashes
during operation and illuminates
when the parking brake is
applied. Note:
It remains illuminated for a short
period of time after you switch the ignition
off. If it continues to flash or does not
illuminate, the system has malfunctioned.
Have your vehicle checked as soon as
possible.
Note:
You can apply the electric parking
brake when the ignition is off.
Note: The electric parking brake could
automatically apply when you shift into park
(P). See
Transmission (page 166).
Applying the Electric Parking Brake in
an Emergency
Note: Do not apply the electric parking
brake when your vehicle is moving, except
in an emergency. If you repeatedly use the
electric parking brake to slow or stop your
vehicle, you could cause damage to the
brake system.
You can use the electric parking brake to
slow or stop your vehicle in an emergency. Pull the switch upward and hold
it.
The red warning lamp
illuminates, a tone sounds and
the stoplamps turn on.
The electric parking brake continues to
slow your vehicle down unless you release
the switch.
Manually Releasing the Electric
Parking Brake
Switch the ignition on.
Press and hold the brake pedal.
Push the switch downward.
The red warning lamp turns off.
177
Bronco Sport (CHD) Canada/United States of America, enUSA, Edition date: 202007, Second-Printing BrakesE267156 E270480 E267156 E270480 E267156 E270480
Page 187 of 471
WHAT IS TRAIL CONTROL
WARNING: The system does not
control speed in low traction conditions
or extremely steep slopes. The system
is designed to be an aid and does not
relieve you of your responsibility to drive
with due care and attention. Failure to
follow this instruction could result in
personal injury. WARNING:
The system does not
replace the parking brake. When you
leave your vehicle, always apply the
parking brake and shift the transmission
into park (P) for automatic transmission
or first gear for manual transmission.
Trail control lets you focus on steering
during low-speed and off-road use by
controlling your vehicle's acceleration and
braking.
You can use trail control under the
following speeds:
• 20 mph (32 km/h)
in four-wheel drive
or four-wheel drive lock.
• 5 mph (8 km/h)
in reverse (R).
You may hear a noise from the anti-lock
brake system pump motor when you use
the system. This is normal.
SWITCHING TRAIL CONTROL
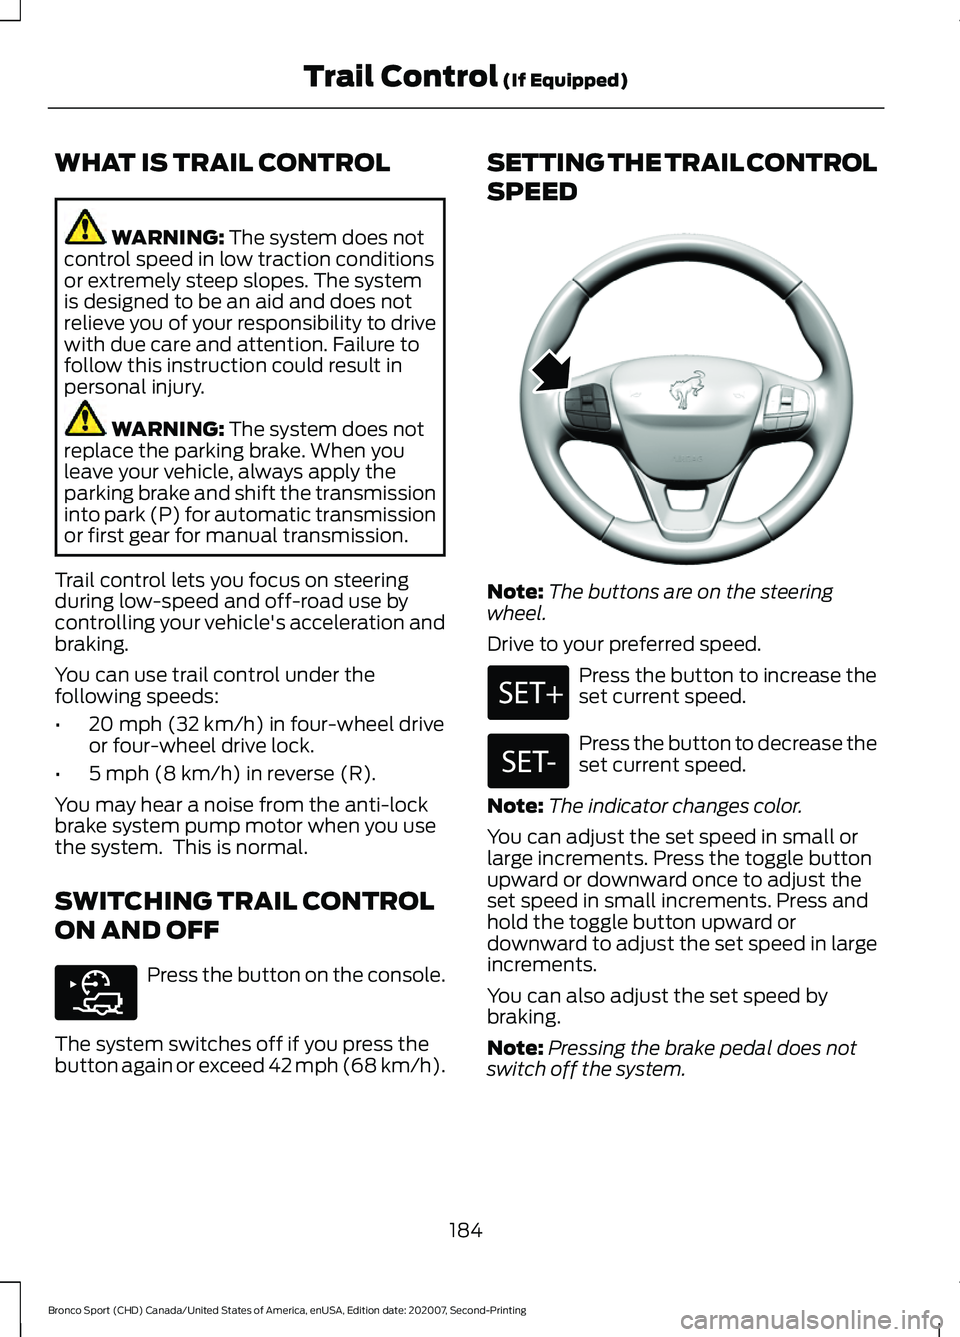
ON AND OFF Press the button on the console.
The system switches off if you press the
button again or exceed 42 mph (68 km/h). SETTING THE TRAIL CONTROL
SPEED
Note:
The buttons are on the steering
wheel.
Drive to your preferred speed. Press the button to increase the
set current speed.
Press the button to decrease the
set current speed.
Note: The indicator changes color.
You can adjust the set speed in small or
large increments. Press the toggle button
upward or downward once to adjust the
set speed in small increments. Press and
hold the toggle button upward or
downward to adjust the set speed in large
increments.
You can also adjust the set speed by
braking.
Note: Pressing the brake pedal does not
switch off the system.
184
Bronco Sport (CHD) Canada/United States of America, enUSA, Edition date: 202007, Second-Printing Trail Control
(If Equipped)E318506 E318924
Page 193 of 471
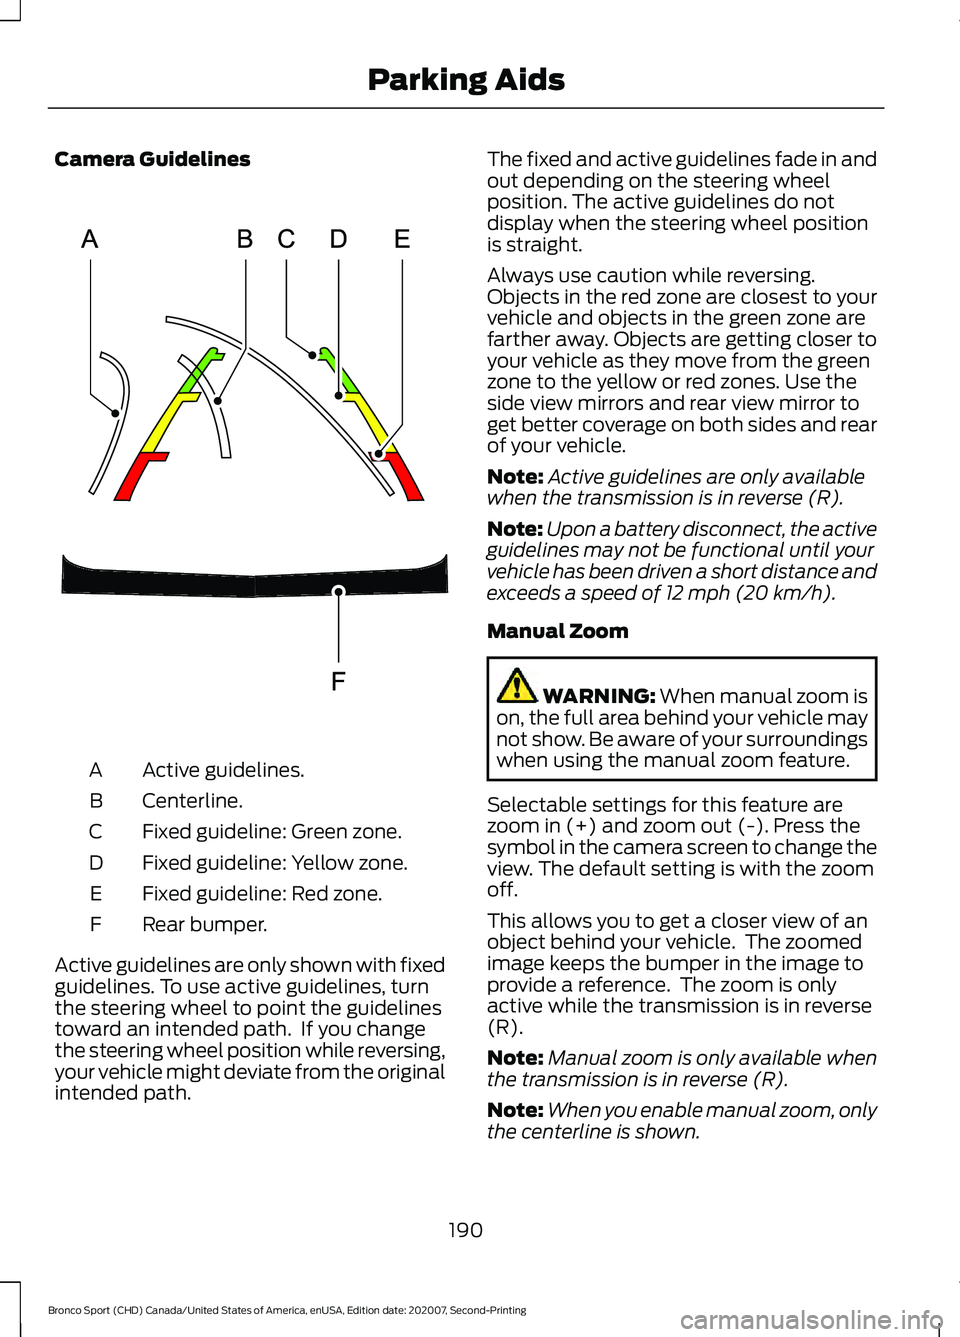
Camera Guidelines
Active guidelines.
A
Centerline.
B
Fixed guideline: Green zone.
C
Fixed guideline: Yellow zone.
D
Fixed guideline: Red zone.
E
Rear bumper.
F
Active guidelines are only shown with fixed
guidelines. To use active guidelines, turn
the steering wheel to point the guidelines
toward an intended path. If you change
the steering wheel position while reversing,
your vehicle might deviate from the original
intended path. The fixed and active guidelines fade in and
out depending on the steering wheel
position. The active guidelines do not
display when the steering wheel position
is straight.
Always use caution while reversing.
Objects in the red zone are closest to your
vehicle and objects in the green zone are
farther away. Objects are getting closer to
your vehicle as they move from the green
zone to the yellow or red zones. Use the
side view mirrors and rear view mirror to
get better coverage on both sides and rear
of your vehicle.
Note:
Active guidelines are only available
when the transmission is in reverse (R).
Note: Upon a battery disconnect, the active
guidelines may not be functional until your
vehicle has been driven a short distance and
exceeds a speed of 12 mph (20 km/h).
Manual Zoom WARNING:
When manual zoom is
on, the full area behind your vehicle may
not show. Be aware of your surroundings
when using the manual zoom feature.
Selectable settings for this feature are
zoom in (+) and zoom out (-). Press the
symbol in the camera screen to change the
view. The default setting is with the zoom
off.
This allows you to get a closer view of an
object behind your vehicle. The zoomed
image keeps the bumper in the image to
provide a reference. The zoom is only
active while the transmission is in reverse
(R).
Note: Manual zoom is only available when
the transmission is in reverse (R).
Note: When you enable manual zoom, only
the centerline is shown.
190
Bronco Sport (CHD) Canada/United States of America, enUSA, Edition date: 202007, Second-Printing Parking AidsE306774
Page 194 of 471
Camera System Settings
The rear view camera system settings can
be accessed through the display screen.
See General Information (page 99).
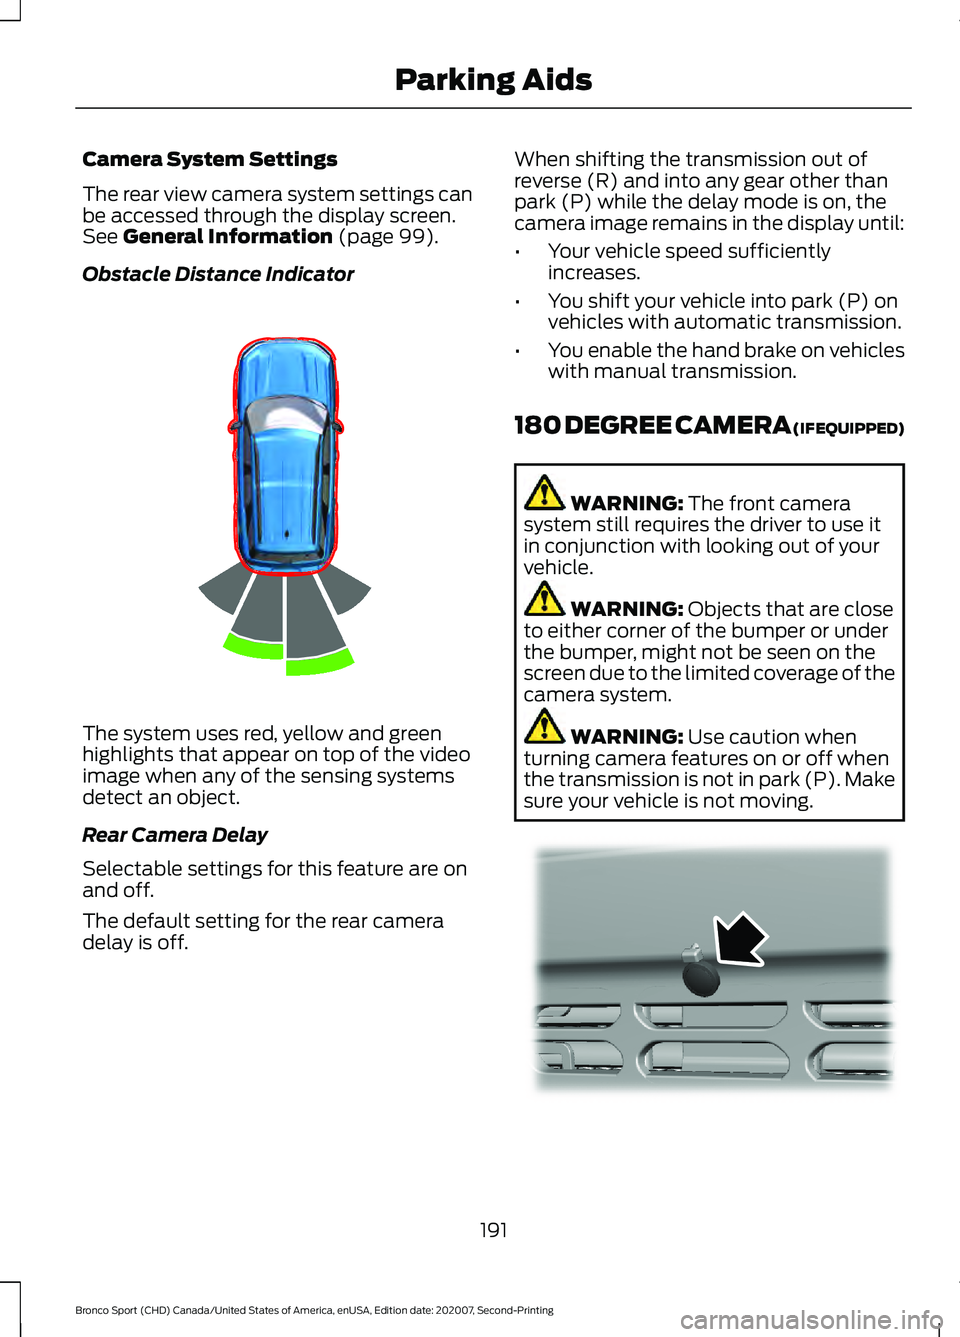
Obstacle Distance Indicator The system uses red, yellow and green
highlights that appear on top of the video
image when any of the sensing systems
detect an object.
Rear Camera Delay
Selectable settings for this feature are on
and off.
The default setting for the rear camera
delay is off. When shifting the transmission out of
reverse (R) and into any gear other than
park (P) while the delay mode is on, the
camera image remains in the display until:
•
Your vehicle speed sufficiently
increases.
• You shift your vehicle into park (P) on
vehicles with automatic transmission.
• You enable the hand brake on vehicles
with manual transmission.
180 DEGREE CAMERA (IF EQUIPPED) WARNING:
The front camera
system still requires the driver to use it
in conjunction with looking out of your
vehicle. WARNING:
Objects that are close
to either corner of the bumper or under
the bumper, might not be seen on the
screen due to the limited coverage of the
camera system. WARNING:
Use caution when
turning camera features on or off when
the transmission is not in park (P). Make
sure your vehicle is not moving. 191
Bronco Sport (CHD) Canada/United States of America, enUSA, Edition date: 202007, Second-Printing Parking AidsE322352 E321541
Page 238 of 471
TOWING A TRAILER
WARNING: Towing trailers
beyond the maximum
recommended gross trailer
weight exceeds the limit of your
vehicle and could result in engine
damage, transmission damage,
structural damage, loss of
vehicle control, vehicle rollover
and personal injury. WARNING:
Do not exceed
the GVWR or the GAWR
specified on the certification
label.
Note: See
Recommended
Towing Weights (page 236).
Your vehicle may have electrical
items, such as fuses or relays,
related to towing. See
Fuses
(page 262).
Your vehicle's load capacity
designation is by weight, not by
volume, so you cannot necessarily
use all available space when
loading a vehicle or trailer.
Towing a trailer places an extra
load on your vehicle's engine,
transmission, axle, brakes, tires
and suspension. Inspect these
components periodically during,
and after, any towing operation. Load Placement
To help minimize how trailer
movement affects your vehicle
when driving:
•
Load the heaviest items closest
to the trailer floor.
• Load the heaviest items
centered between the left and
right side trailer tires.
• Load the heaviest items above
the trailer axles or just slightly
forward toward the trailer
tongue. Do not allow the final
trailer tongue weight to go
above or below 10-15% of the
loaded trailer weight.
• Select a ball mount with the
correct rise or drop and load
capacity. When both the
loaded vehicle and trailer are
connected, the trailer frame
should be level, or slightly
angled down toward your
vehicle, when viewed from the
side.
When driving with a trailer or
payload, a slight takeoff vibration
or shudder may be present due to
the increased payload weight.
Additional information regarding
proper trailer loading and setting
your vehicle up for towing is
located in another chapter of this
manual. See
Load Limit (page
227).
You can also find information in
the
RV & Trailer Towing Guide
available at your authorized
dealer, or online.
235
Bronco Sport (CHD) Canada/United States of America, enUSA, Edition date: 202007, Second-Printing Towing
Page 243 of 471
Exceeding these limits may allow water to
enter vehicle components:
•
Causing internal damage to the
components.
• Affecting driveability, emissions, and
reliability.
Replace the rear axle lubricant anytime
the rear axle has been submerged in water.
Water may have contaminated the rear
axle lubricant, which is not normally
checked or changed unless a leak is
suspected or other axle repair is required.
TOWING THE VEHICLE ON
FOUR WHEELS
Emergency Towing WARNING: If your vehicle has a
steering wheel lock make sure the
ignition is in the accessory or on position
when being towed.
If your vehicle becomes inoperable without
access to wheel dollies or a vehicle
transport trailer, it can be flat-towed with
all wheels on the ground, regardless of the
powertrain and transmission configuration,
under the following conditions:
• Your vehicle is facing forward for
towing in a forward direction.
• Refer to the Manual Park Release
procedure. See
Automatic
Transmission (page 166). Failing to
do so could result in damage to the
transmission.
• Maximum speed is 35 mph (56 km/h).
• Maximum distance is
50 mi (80 km).
Note: If you are unsure of the vehicle ’s
configuration, contact an authorized dealer. Recreational Towing - Front-Wheel
Drive Vehicles
(If Equipped)
You cannot recreational tow your vehicle
with all wheels on the ground because
vehicle or transmission damage could
occur. Place the front wheels on a
two-wheel tow dolly. If you are using a tow
dolly, follow the instructions specified by
the equipment provider.
Recreational Towing - Rear-Wheel
Drive Vehicles
(If Equipped)
You cannot recreational tow your vehicle
with all wheels on the ground because
vehicle or transmission damage could
occur. We recommend towing your vehicle
with all four wheels off the ground, such
as when using a car-hauling trailer.
Otherwise, you cannot recreational tow
your vehicle.
Recreational Towing - All-Wheel
and Four-Wheel Drive Vehicles
(If
Equipped)
You cannot recreational tow your vehicle
with all wheels on the ground because
vehicle or transmission damage could
occur. We recommend towing your vehicle
with all four wheels off the ground, such
as when using a car-hauling trailer.
Otherwise, you cannot recreational tow
your vehicle.
240
Bronco Sport (CHD) Canada/United States of America, enUSA, Edition date: 202007, Second-Printing Towing
Page 247 of 471
When climbing a steep slope or hill, start
in a lower gear rather than downshifting to
a lower gear from a higher gear. This
reduces strain on the engine and the
possibility of stalling.
If your vehicle stalls, do not try to turn
around because this could cause your
vehicle to roll over. It is better to reverse
back to a safe location.
Do not drive over the crest of a hill without
seeing what conditions are on the other
side. Do not drive in reverse over a hill
without the aid of an observer.
If the vehicle is unable to make it up the
hill, do not attempt to turn back down the
slope.
Apply the accelerator just enough for the
wheels to climb the hill.
Note:
Too much acceleration can cause
the tires to slip, spin or lose traction,
resulting in loss of vehicle control.
Descending A Hill:
• Use the same gear you would use to
climb the hill.
• Do not descend in neutral.
• Disengage overdrive.
• Avoid sudden and excessive braking.
Note: The front wheels have to be turning
in order to steer your vehicle.
When descending a steep hill in a manual
transmission vehicle do not leave the
vehicle in gear with the clutch depressed.
This could cause damage to your driveline.
Driving Through Water WARNING: Do not attempt to
cross a deep, fast flowing body of water.
Failure to follow this instruction could
result in the loss of control of your
vehicle, personal injury or death. As the water depth increases, you must
reduce your vehicle speed to avoid
potential vehicle damage.
The key to a safe crossing is the water
depth, current and bottom of the water's
condition. On soft bottoms, the vehicle
sinks in, effectively increasing the water
level on the vehicle. Make sure to consider
this when determining the depth of water.
Determine the depth and speed of the
current before attempting a water crossing.
Be aware that obstacles and debris may
be beneath the water
’s surface.
Note: Cross flowing water at an angle
heading slightly upstream.
Note: You should tread lightly and avoid
damage to the environment.
Drive slow when crossing water. Proceed
with a constant slow speed lightly pressing
on the accelerator.
Drive through the water very slowly when
entering, then build up momentum. Keep
your vehicle moving at a steady pace.
Note: Do not try to accelerate through the
water crossing.
When driving too fast in water or through
deep water, the engine, transmission,
transfer case, axles, electrical components
or vehicle interior could ingest water. Water
can cause permanent damage that may
not be covered by your vehicle warranty.
See
Driving Through Water Limitations
(page 246).
Note: Failure to follow the recommended
speeds can result in vehicle damage.
Never stop or shut a vehicle off when
crossing deep water unless your vehicle
ingested water into the engine air intake.
If the engine stalls, do not attempt to
restart it.
244
Bronco Sport (CHD) Canada/United States of America, enUSA, Edition date: 202007, Second-Printing Driving Hints
Page 257 of 471
If you need to have your vehicle towed,
contact a professional towing service or,
if you are a member of a roadside
assistance program, your roadside
assistance service provider.
We recommend the use of a wheel lift and
dollies or flatbed equipment to tow your
vehicle. Do not tow with a slingbelt. We do
not approve a slingbelt towing procedure.
Vehicle damage could occur if towed
incorrectly, or by any other means.
We produce a towing manual for all
authorized tow truck operators. Have your
tow truck operator refer to this manual for
proper hook-up and towing procedures for
your vehicle.
Towing an all-wheel or four-wheel drive
vehicle requires that all wheels be off the
ground, such as using a wheel lift and
dollies or flatbed equipment. This prevents
damage to the transmission, all-wheel or
four-wheel drive system and vehicle.
TOWING POINTS (IF EQUIPPED)
Your vehicle comes equipped with fixed
front recovery hooks. These hooks should
never have a load applied to them greater
than the gross vehicle weight rating of your
vehicle.
Note: When recovering your vehicle, we
recommend using both front hooks when
possible to minimize damage to the vehicle.
Before using recovery hooks:
• Make sure all attaching points are
secure and capable of withstanding
the applied load.
• Never use chains, cables or tow straps
with metal hook ends.
• Only use recovery straps that have a
minimum breaking strength two to
three times the gross vehicle weight of
the stuck vehicle. •
Make sure the recovery strap is in good
condition and free of visible cuts, tears
or damage.
• Use a damper device such as a tarp,
heavy blanket or piece of carpet
draped over the recovery strap to help
absorb the energy in the event the
strap breaks.
• Make sure the stuck vehicle is not
loaded heavier than its gross vehicle
weight rating specified on the
certification label.
• Always align the tow vehicle and stuck
vehicle in a straight line within 10
degrees.
• Keep bystanders to the
sides of the
vehicle, at a distance of at least twice
the length of the recovery strap. This
helps avoid injury from the hazard of a
recovery hook or strap breaking, or a
vehicle lurching into their path.
254
Bronco Sport (CHD) Canada/United States of America, enUSA, Edition date: 202007, Second-Printing Roadside Emergencies