2021 FORD BRONCO SPORT height
[x] Cancel search: heightPage 40 of 471
2. Grasp the shoulder portion and pull
downward until you pull the entire belt
out. Allow the belt to retract. As the
belt retracts, you will hear a clicking
sound. This indicates the seatbelt is
now in the automatic locking mode.
How to Disengage the Automatic
Locking Mode
Unbuckle the combination lap and
shoulder belt and allow it to retract
completely to disengage the automatic
locking mode and turn on the vehicle
sensitive (emergency) locking mode.
How to Extract Seatbelts in the
Rear Outermost Positions
Seatbelts in the rear outermost positions
can lock if you firmly return the seat
backrest to its upright position. You can
unlock the seatbelts using the following
procedures.
For vehicles where the rear seats recline:
1. Recline the seat to its full rear recline position.
2. The seatbelt should then unlock.
3. Return the seat backrest to its desired upright position.
For vehicles with rear seats that do not
recline or are locked with the seat in its full
rear recline position:
1. Grasp the seatbelt webbing at the top of the seat backrest.
2. Pull the seatbelt webbing forward, firmly.
3. After pulling the seatbelt forward, allow the seatbelt to feed back into the
seatbelt retractor as much as possible.
If necessary, press the seat backrest
down to allow the seatbelt webbing to
retract further.
4. The seatbelt should then unlock. 5. If the seatbelt does not unlock, repeat
steps 1-3.
SEATBELT HEIGHT
ADJUSTMENT WARNING: Position the seatbelt
height adjusters so that the belt rests
across the middle of your shoulder.
Failure to adjust the seatbelt correctly
could reduce the effectiveness of the
seatbelt and increase the risk of injury in
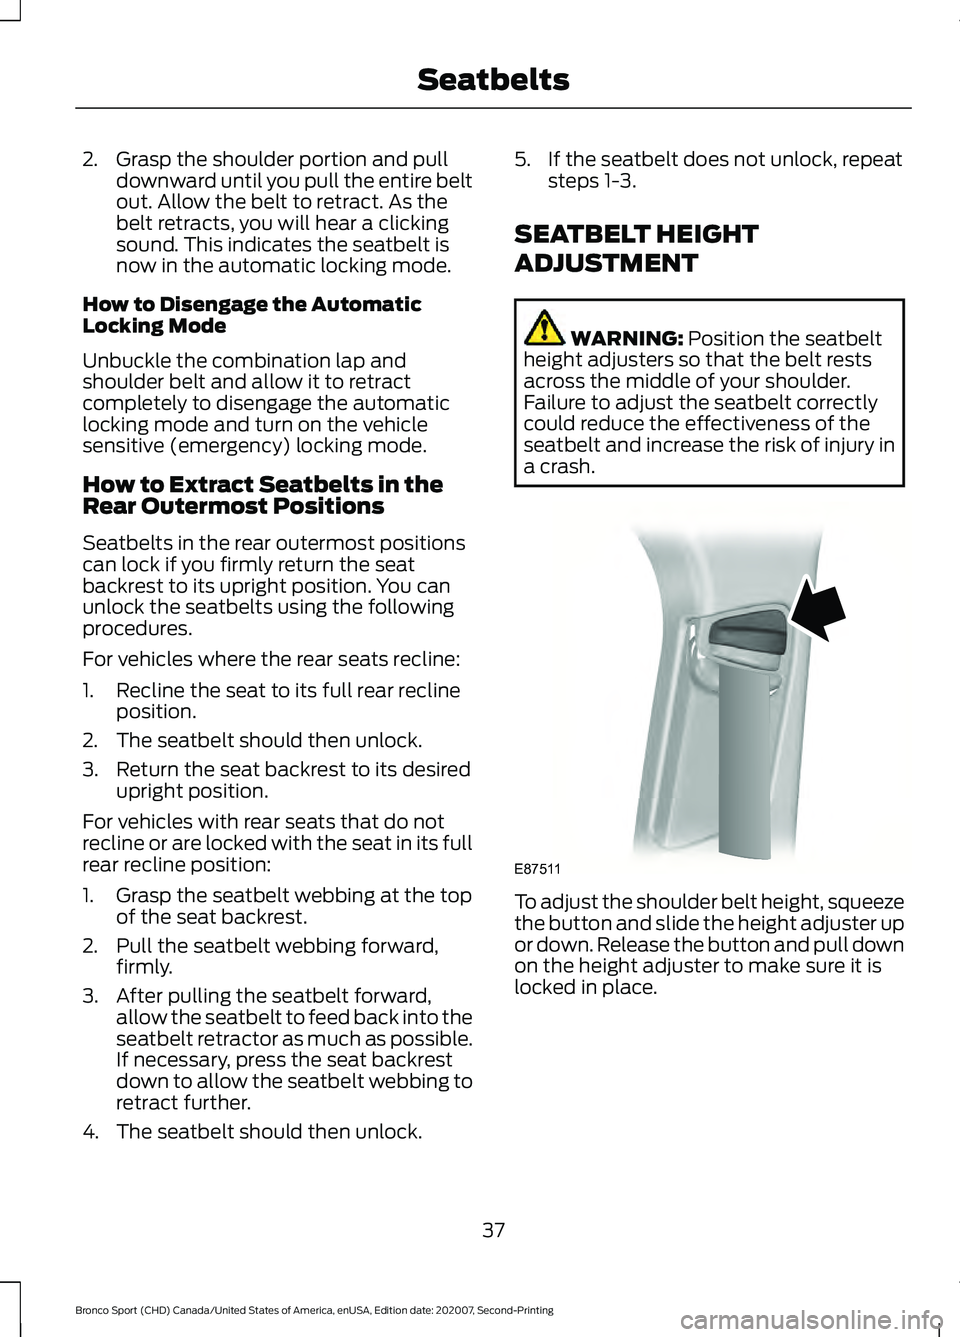
a crash. To adjust the shoulder belt height, squeeze
the button and slide the height adjuster up
or down. Release the button and pull down
on the height adjuster to make sure it is
locked in place.
37
Bronco Sport (CHD) Canada/United States of America, enUSA, Edition date: 202007, Second-Printing SeatbeltsE87511
Page 43 of 471
•
This switches the feature off if it is
currently on.
• This switches the feature on if it is
currently off.
CHILD RESTRAINT AND
SEATBELT MAINTENANCE
Inspect the vehicle seatbelts and child
safety seat systems periodically to make
sure they work properly and are not
damaged. Inspect the vehicle and child
restraint seatbelts to make sure there are
no nicks, tears or cuts. Replace if
necessary. All vehicle seatbelt assemblies,
including retractors, buckles, front seatbelt
buckle assemblies, buckle support
assemblies (slide bar-if equipped),
shoulder belt height adjusters (if
equipped), shoulder belt guide on seat
backrest (if equipped), child safety seat
LATCH and tether anchors, and attaching
hardware, should be inspected after a
crash. Read the child restraint
manufacturer's instructions for additional
inspection and maintenance information
specific to the child restraint.
We recommend that all seatbelt
assemblies in use in vehicles involved in a
crash be replaced. However, if the crash
was minor and an authorized dealer finds
that the belts do not show damage and
continue to operate properly, they do not
need to be replaced. Seatbelt assemblies
not in use during a crash should also be
inspected and replaced if either damage
or improper operation is noted.
Properly care for seatbelts. See Vehicle
Care (page 289). SEATBELT EXTENSIONS WARNING:
Persons who fit into
the vehicle's seatbelt should not use an
extension. Unnecessary use could result
in serious personal injury in the event of
a crash. WARNING:
Only use extensions
provided free of charge by our dealers.
The dealer will provide an extension
designed specifically for this vehicle,
model year and seating position. The use
of an extension intended for another
vehicle, model year or seating position
may not offer you the full protection of
your vehicle's seatbelt restraint system. WARNING:
Never use seatbelt
extensions to install child restraints. WARNING:
Do not use a seatbelt
extension with an inflatable seatbelt. WARNING:
Do not use extensions
to change the way the seatbelt fits
across the torso, over the lap or to make
the seatbelt buckle easier to reach.
If, because of body size or driving position,
it is not possible to properly fasten the
seatbelt over your lap and shoulder, an
extension that is compatible with the
seatbelts is available free of charge from
our dealers. Only use our seatbelt
extensions made by the original equipment
seatbelt manufacturer with our seatbelts.
Ask your authorized dealer if your extension
is compatible with your vehicle restraint
system.
40
Bronco Sport (CHD) Canada/United States of America, enUSA, Edition date: 202007, Second-Printing Seatbelts
Page 89 of 471
WHAT IS AUTOMATIC HIGH
BEAM CONTROL
The system turns on high beams if it is dark
enough and no other traffic is present. If it
detects an approaching vehicle
’s
headlamps or tail lamps, or street lighting
ahead, the system turns the high beams
off. Low beams remain on.
A camera sensor, centrally mounted
behind the windshield of your vehicle,
continuously monitors conditions to turn
the high beams on and off.
SWITCHING AUTOMATIC HIGH
BEAM CONTROL ON AND OFF WARNING: Do not use the system
in poor visibility, for example fog, heavy
rain, spray or snow.
1. Press
Settings on the touchscreen.
2. Press
Vehicle.
3. Press
Lighting.
Activating the Automatic High
Beam Control Switch the lighting control to the
autolamps position. See
Autolamps
(page 81).
Note: The lighting control defaults to
autolamps each time you switch your
vehicle on.
When active, the high beams turn on if:
• The ambient light level is low enough.
• There is no traffic in front of your
vehicle.
• The vehicle speed is greater than
approximately
32 mph (51 km/h). When active, the high beams turn off if:
•
The ambient light level is high enough
that high beams are not required.
• The system detects an approaching
vehicle's headlamps or tail lamps.
• The system detects severe rain, snow
or fog.
• The camera is blocked.
• The vehicle speed falls below
approximately
27 mph (44 km/h).
Note: The deactivation speed is lower on
curves.
Note: High beam reactivation may be
delayed in certain curvy road situations.
Note: The system may not operate properly
if the sensor is blocked. Keep the windshield
free from obstruction or damage.
Note: The system may not operate properly
in cold or inclement conditions. You can
switch on the high beams by overriding the
system.
Note: If the system detects a blockage, for
example bird droppings, bug splatter, snow
or ice, the system goes into low beam mode
until you clear the blockage. A message may
appear in the information display if the
camera is blocked.
Note: Using much larger tires or equipping
vehicle accessories such as snowplows can
modify your vehicle's ride height and
degrade automatic high beam control
performance.
AUTOMATIC HIGH BEAM
CONTROL INDICATORS The indicator illuminates to
confirm when the system is
ready to assist.
86
Bronco Sport (CHD) Canada/United States of America, enUSA, Edition date: 202007, Second-Printing Automatic High Beam ControlE281240
Page 139 of 471
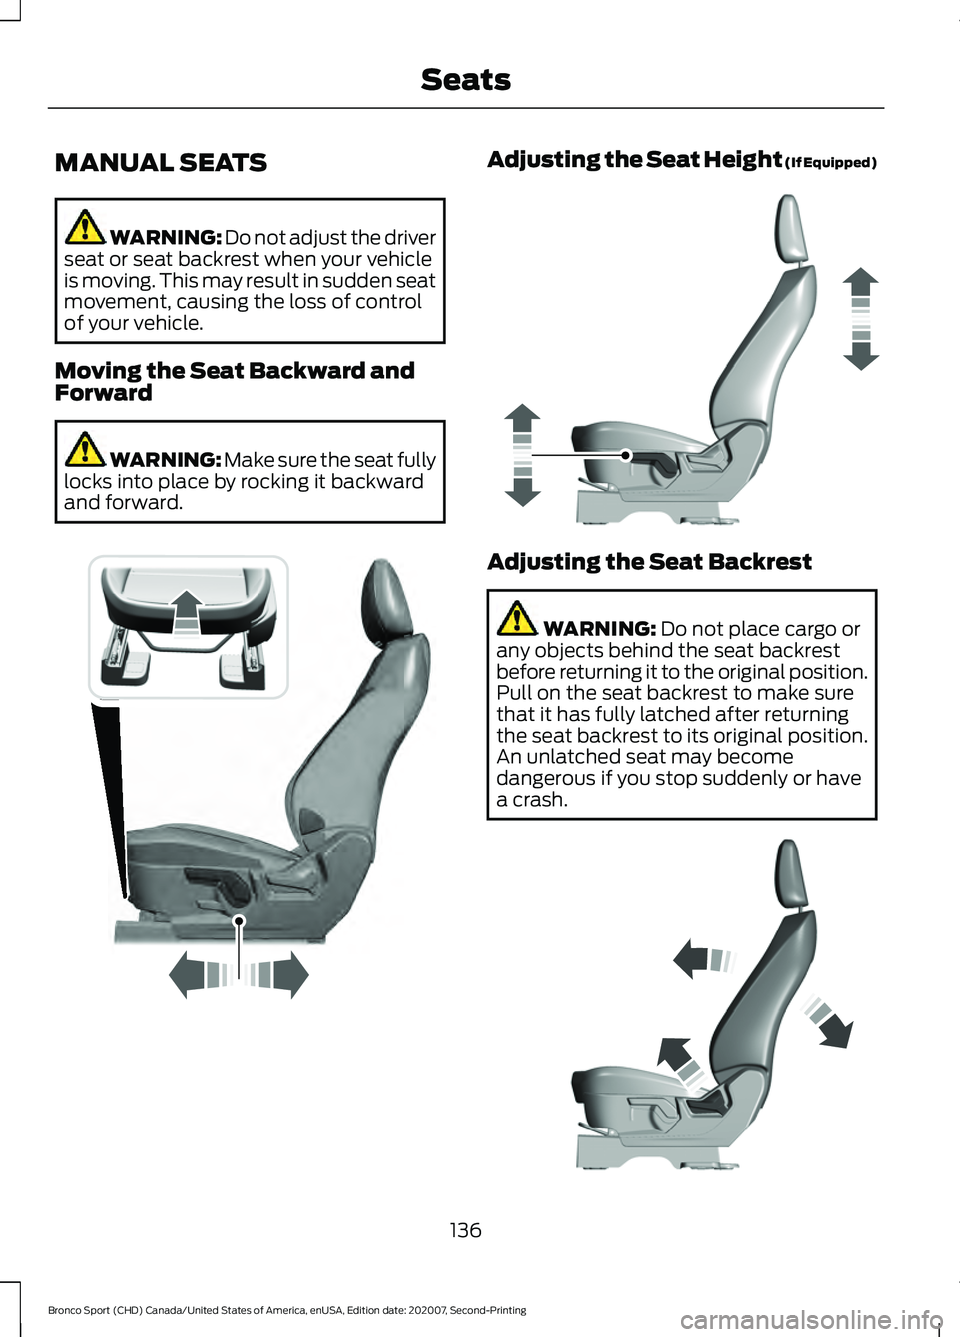
MANUAL SEATS
WARNING: Do not adjust the driver
seat or seat backrest when your vehicle
is moving. This may result in sudden seat
movement, causing the loss of control
of your vehicle.
Moving the Seat Backward and
Forward WARNING: Make sure the seat fully
locks into place by rocking it backward
and forward. Adjusting the Seat Height (If Equipped)
Adjusting the Seat Backrest
WARNING: Do not place cargo or
any objects behind the seat backrest
before returning it to the original position.
Pull on the seat backrest to make sure
that it has fully latched after returning
the seat backrest to its original position.
An unlatched seat may become
dangerous if you stop suddenly or have
a crash. 136
Bronco Sport (CHD) Canada/United States of America, enUSA, Edition date: 202007, Second-Printing Seats E318290 E293554 E293558
Page 140 of 471
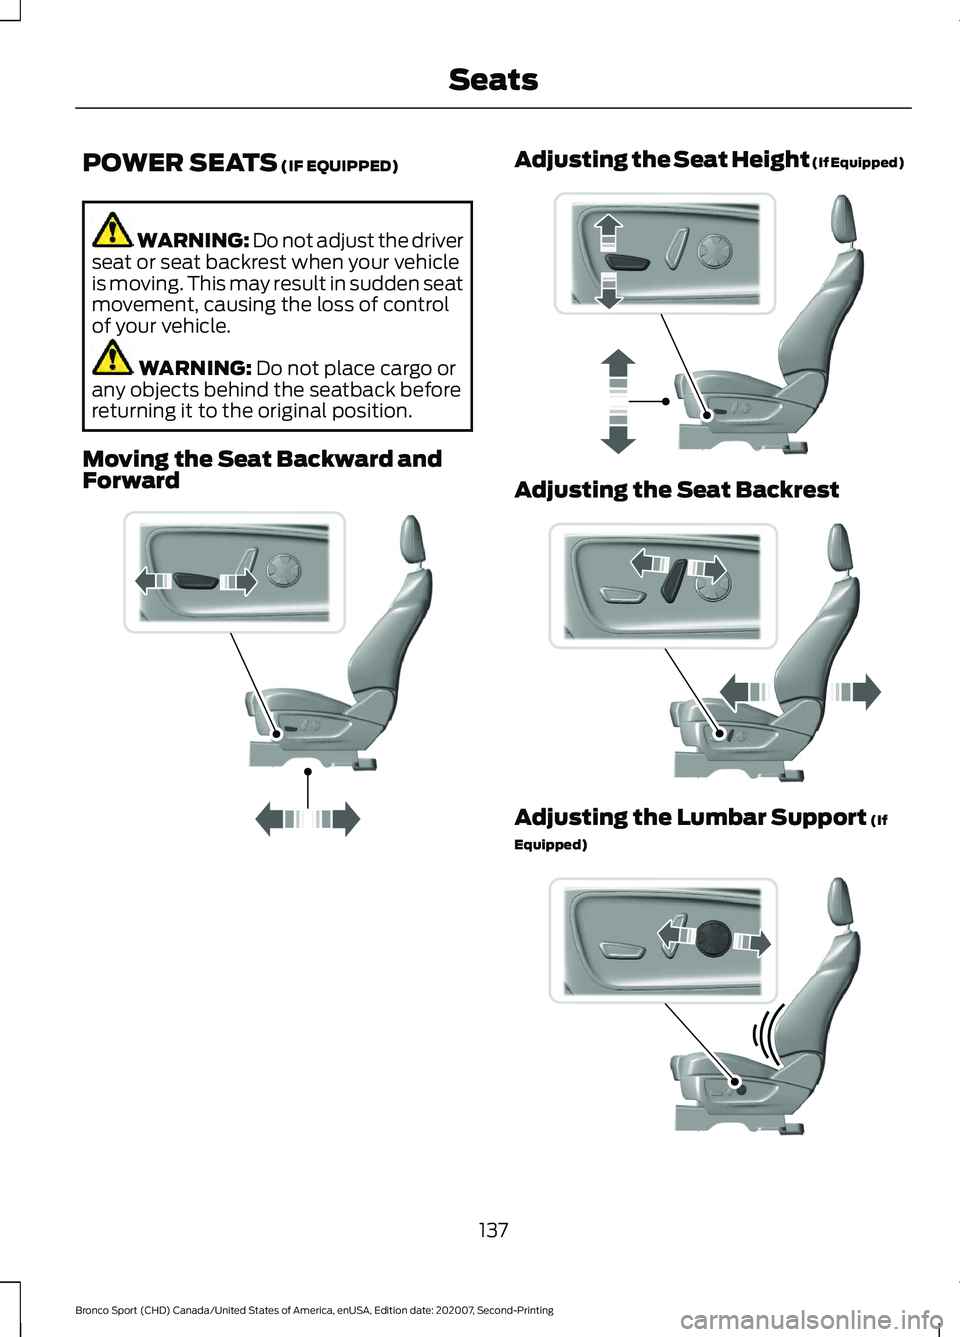
POWER SEATS (IF EQUIPPED)
WARNING: Do not adjust the driver
seat or seat backrest when your vehicle
is moving. This may result in sudden seat
movement, causing the loss of control
of your vehicle. WARNING:
Do not place cargo or
any objects behind the seatback before
returning it to the original position.
Moving the Seat Backward and
Forward Adjusting the Seat Height (If Equipped)
Adjusting the Seat Backrest
Adjusting the Lumbar Support
(If
Equipped) 137
Bronco Sport (CHD) Canada/United States of America, enUSA, Edition date: 202007, Second-Printing SeatsE298944 E298771 E298773 E298774
Page 244 of 471
OFF-ROAD DRIVING
What Is Off-Road Driving
Off-road driving is driving your vehicle on
unsurfaced roads or trails, made from dirt,
rocks, sand and mud.
Your vehicle has been designed and
equipped to explore those places where
the road cannot take you, whether you
choose a forest trail or the open desert.
Off-Road Driving Precautions
WARNING: If you continue to drive
your vehicle when the engine is
overheating, the engine could stop
without warning. Failure to follow this
instruction could result in the loss of
control of your vehicle.
Before going off-road, consult with your
local governmental agencies to determine
designated off-road trails and recreation
areas. Also, be sure to understand any
off-road vehicle registration requirements
for the area in which you plan on driving.
Tread Lightly is an educational program
designed to increase public awareness of
land-use regulations and responsibilities
in our nation ’s wilderness areas. The U.S.
Forest Service and Bureau of Land
Management is encouraging you to help
preserve our national forest and other
public and private lands by treading lightly.
Before taking your vehicle off-road, do a
basic vehicle inspection to make sure that
the vehicle is in top working condition. Before you venture off road, have a clear
mental picture of the underside of your
vehicle. Learn the location of any low
hanging items and any skid plates that may
be on the vehicle. You can avoid snagging
them on rocks and other obstacles if you
know where they are.
Memorizing some basic dimensions helps
you confidently deal with off-road
obstacles. Get to know your vehicle
’s
height and width, its lowest point, its
wading depth and angles. Familiarize
yourself with your vehicle ’s on-board
technology features.
We recommend driving at least two
vehicles when driving off-road. The buddy
system helps make sure that help is close
at hand should a vehicle become stuck or
damaged.
We recommend taking supplies such as a
first aid kit, supply of water, tow strap and
cell or satellite phone with you any time
you plan an off-road excursion.
Basic Off-Road Driving Techniques
Grip the steering wheel with your thumbs
on the outside of the rim. This reduces the
risk of injury due to abrupt steering wheel
motions that occur when negotiating rough
terrain.
Control your throttle, brake and steering
inputs in a smooth manner. Sudden inputs
to the controls can cause a loss of traction
for the vehicle, especially when on sloped
terrain or crossing obstacles such as rocks
or logs.
241
Bronco Sport (CHD) Canada/United States of America, enUSA, Edition date: 202007, Second-Printing Driving Hints
Page 287 of 471
If you disconnect or replace the vehicle
battery, you must reset the following
features:
•
Window bounce-back.
• Clock Settings.
• Pre-set radio stations.
• Steering Angle Sensor.
Note: To calibrate the steering angle
sensor, drive the vehicle above 30 mph
(50 km/h) for a minimum of 1.2 mi (2 km).
Make sure to drive straight ahead for a
minimum of 30 seconds. Several vehicle
functions are disabled and a warning light
could appear until the sensor is calibrated.
Note: For flexible fuel vehicles, if you are
operating on E85, you could experience poor
starts or an inability to start the engine, and
driveability problems until the fuel trim and
ethanol content have been relearned. Drive
the vehicle at least
10 mi (16 km) to
completely relearn the idle trim and fuel
trim strategy.
Battery Disposal Make sure that you dispose of
old batteries in an
environmentally friendly way.
Seek advice from your local authority
about recycling old batteries.
ADJUSTING THE HEADLAMPS
Vertical Aim Adjustment
The headlamps on your vehicle are
properly aimed at the assembly plant. If
your vehicle has been in an accident, have
the alignment of your headlamps checked
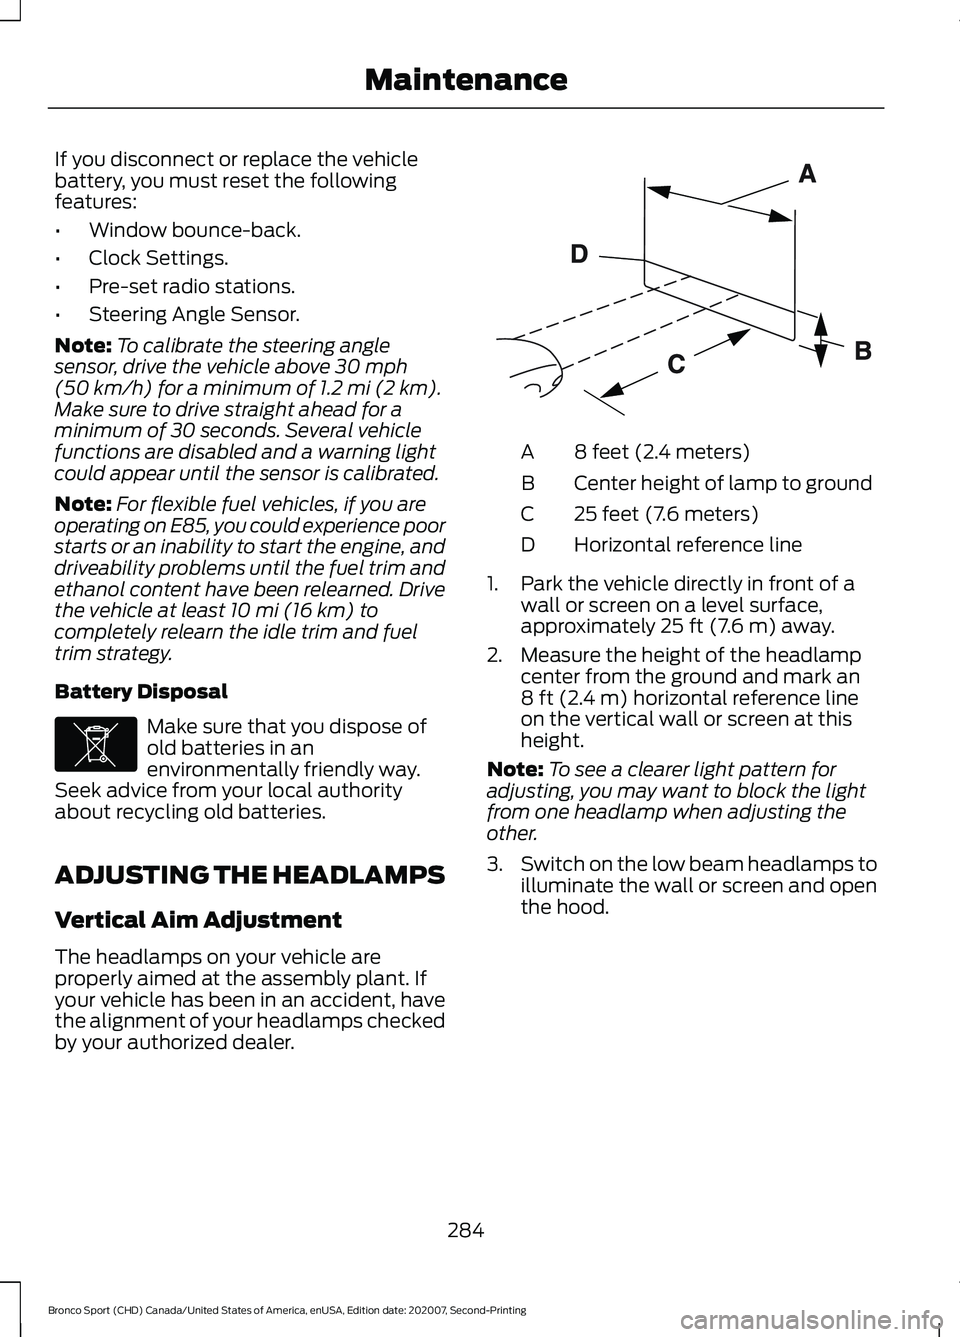
by your authorized dealer. 8 feet (2.4 meters)
A
Center height of lamp to ground
B
25 feet (7.6 meters)
C
Horizontal reference line
D
1. Park the vehicle directly in front of a wall or screen on a level surface,
approximately 25 ft (7.6 m) away.
2. Measure the height of the headlamp center from the ground and mark an
8 ft (2.4 m)
horizontal reference line
on the vertical wall or screen at this
height.
Note: To see a clearer light pattern for
adjusting, you may want to block the light
from one headlamp when adjusting the
other.
3. Switch on the low beam headlamps to
illuminate the wall or screen and open
the hood.
284
Bronco Sport (CHD) Canada/United States of America, enUSA, Edition date: 202007, Second-Printing MaintenanceE107998 E142592
Page 305 of 471
A.
P: Indicates a tire, designated
by the Tire and Rim Association,
that may be used for service on
cars, sport utility vehicles,
minivans and light trucks. Note:
If
your tire size does not begin with
a letter this may mean it is
designated by either the European
Tire and Rim Technical
Organization or the Japan Tire
Manufacturing Association.
B. 215:
Indicates the nominal
width of the tire in millimeters
from sidewall edge to sidewall
edge. In general, the larger the
number, the wider the tire.
C. 65:
Indicates the aspect ratio
which gives the tire's ratio of
height to width.
D. R:
Indicates a radial type tire.
E. 15:
Indicates the wheel or rim
diameter in inches. If you change
your wheel size, you will have to
purchase new tires to match the
new wheel diameter.
F. 95:
Indicates the tire's load
index. It is an index that relates to
how much weight a tire can carry.
You may find this information in
your owner ’s manual. If not,
contact a local tire dealer.
Note: You may not find this
information on all tires because it
is not required by federal law. G.
H:
Indicates the tire's speed
rating. The speed rating denotes
the speed at which a tire is
designed to be driven for extended
periods of time under a standard
condition of load and inflation
pressure. The tires on your vehicle
may operate at different
conditions for load and inflation
pressure. These speed ratings may
need to be adjusted for the
difference in conditions. The
ratings range from
81 mph
(130 km/h) to 186 mph
(299 km/h). These ratings are
listed in the following chart.
Note: You may not find this
information on all tires because it
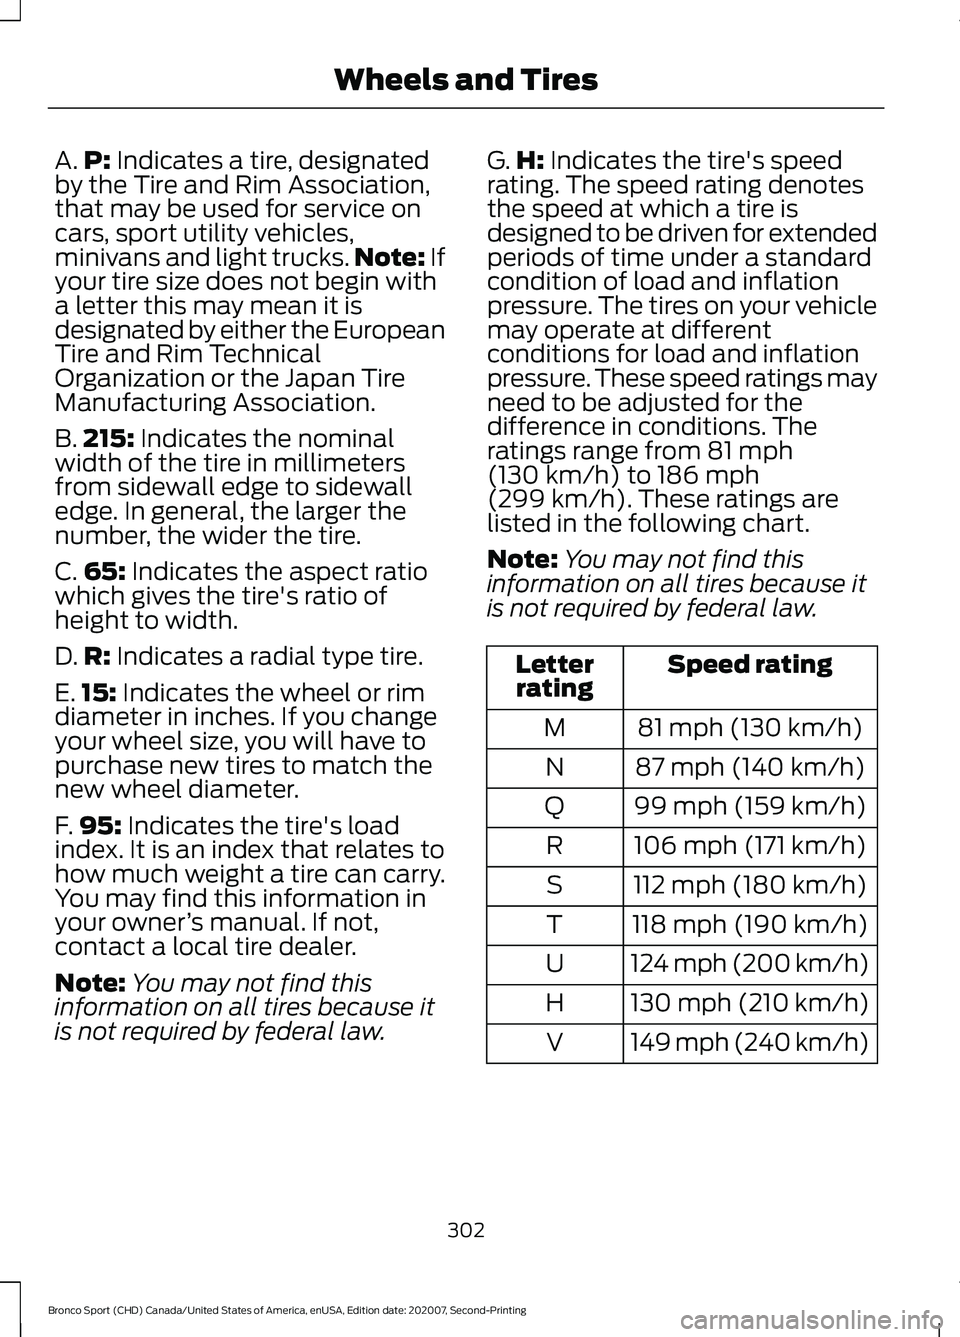
is not required by federal law. Speed rating
Letter
rating
81 mph (130 km/h)
M
87 mph (140 km/h)
N
99 mph (159 km/h)
Q
106 mph (171 km/h)
R
112 mph (180 km/h)
S
118 mph (190 km/h)
T
124 mph (200 km/h)
U
130 mph (210 km/h)
H
149 mph (240 km/h)
V
302
Bronco Sport (CHD) Canada/United States of America, enUSA, Edition date: 202007, Second-Printing Wheels and Tires