2021 FORD BRONCO SPORT display
[x] Cancel search: displayPage 63 of 471
Note:
Not every feature applies to every
vehicle in every market. When they are
available for your vehicle, then they appear
in your information display, providing
choices to switch them on or off, or to select
a more specific setting.
• Various vehicle speed limits so the
MyKey driver cannot exceed certain
speeds. The information display shows
warnings followed by an audible tone
when the MyKey driver reaches the set
speed. You cannot override the set
speed by fully depressing the
accelerator pedal. WARNING: Do not set MyKey
maximum speed limit to a limit that will
prevent the driver from maintaining a
safe speed considering posted speed
limits and prevailing road conditions. The
driver is always responsible to drive in
accordance with local laws and
prevailing conditions. Failure to do so
could result in accident or injury. •
Various vehicle speed reminders so
MyKey drivers know when their vehicle
speed approaches the limits. Warnings
appear in your information display and
a tone sounds when the MyKey drivers
exceed the set vehicle speed.
• The audio system's maximum volume
limits to 45% so MyKey drivers can
concentrate on the road. A message
appears in the information display
when MyKey drivers attempt to exceed
the limited volume. MyKey also
disables the automatic volume control.
Note:
If your vehicle includes an
AM/FM radio or a very basic audio
system, then the radio may not limit.
• Always on setting. This setting forces
certain features to remain on and
active for MyKey drivers. For example,
E911 or emergency assistance and the
do not disturb features stay on even if
a MyKey driver uses the feature's
control to switch it off. When selected,
you will not be able to turn off Advance
Trac or traction control (if your vehicle
has this feature).
CREATING A MYKEY
Use the touchscreen to create a MyKey:
1. Insert the key you want to program into
the ignition. If your vehicle has a
push-button start, place the remote
control into the backup slot. See
Starting a Gasoline Engine
(page
149).
2. Switch the ignition on.
3. Access the main menu in the touchscreen and then scroll through
the menus to change the settings of
your MyKey. From the MyKey menu,
select the option Create MyKey. See
Settings
(page 378).
60
Bronco Sport (CHD) Canada/United States of America, enUSA, Edition date: 202007, Second-Printing MyKey
™
Page 64 of 471
4. Press Yes if you want to create the key
as a MyKey. A confirmation message
appears on the screen.
5. Switch the ignition off.
You have successfully created a MyKey.
Make sure you label it so you can
distinguish it from the admin keys.
You can also program configurable
settings for the key.
Programming and Changing
Configurable Settings
Use the touchscreen to access your
configurable MyKey settings.
1. Switch the ignition on using an admin key or the remote control you want to
program.
2. Access the main menu in the information display and then scroll
through the menus to change the
settings of your MyKey. See Settings
(page 378).
3. Follow the instructions in the touchscreen.
The programmed restrictions apply when
you switch the vehicle off, open and close
the driver door and restart your vehicle with
the programmed key or remote control.
Note: You can clear or change your MyKey
settings at any time during the same key
cycle as you created the MyKey. Once you
have switched the vehicle off, however, you
need an admin key to change or clear your
MyKey settings. When you make any
changes to your MyKey settings, you change
the settings for every MyKey. You cannot
make individual changes to apply to specific
MyKeys. CLEARING ALL MYKEYS
When you clear your MyKeys, you remove
all restrictions and return all MyKeys to
their original admin key status at once. To
clear all MyKeys of all MyKey settings, use
the touchscreen.
1. Switch the ignition on using an admin
key.
2. Access the main menu in the touchscreen and then scroll through
the menus to begin clearing your
MyKey programming. See
Settings
(page 378).
3. Follow the instructions in the display.
4. A confirmation message appears in the
display after you finish clearing your
MyKeys.
Note: When you clear your MyKeys, you
remove all restrictions and return all MyKeys
to their original admin key status. You
cannot remove the MyKey restrictions
individually.
CHECKING MYKEY SYSTEM
STATUS
You can find information about your
programmed MyKeys by using the
touchscreen. See
Settings (page 378).
MyKey Distance
Tracks the distance when drivers use a
MyKey. The only way to delete the
accumulated distance is by using an admin
key to clear all MyKeys. If the distance does
not accumulate as expected, then the
intended user is not using the MyKey, or an
admin key user recently cleared and then
recreated a MyKey.
61
Bronco Sport (CHD) Canada/United States of America, enUSA, Edition date: 202007, Second-Printing MyKey
™
Page 70 of 471
The lamps turn off if all the doors remain
closed and:
•
Twenty-five seconds have elapsed.
• You lock your vehicle from the outside.
Battery Saver
If you leave the courtesy lamps, interior
lamps or headlamps on, the battery saver
shuts them off 10 minutes after you switch
the ignition off.
Accessory Mode Battery Saver for
Passive Keys (If Equipped)
If you leave the ignition on after leaving
your vehicle, it turns off 15 minutes after
you close all of the doors.
KEYLESS ENTRY (IF EQUIPPED)
SECURICODE™ KEYLESS ENTRY
KEYPAD
The keypad is located near the driver
window. It is invisible until touched and
then it lights up so you can see and touch
the appropriate buttons.
Note: If you enter your entry code too fast
on the keypad, the unlock function may not
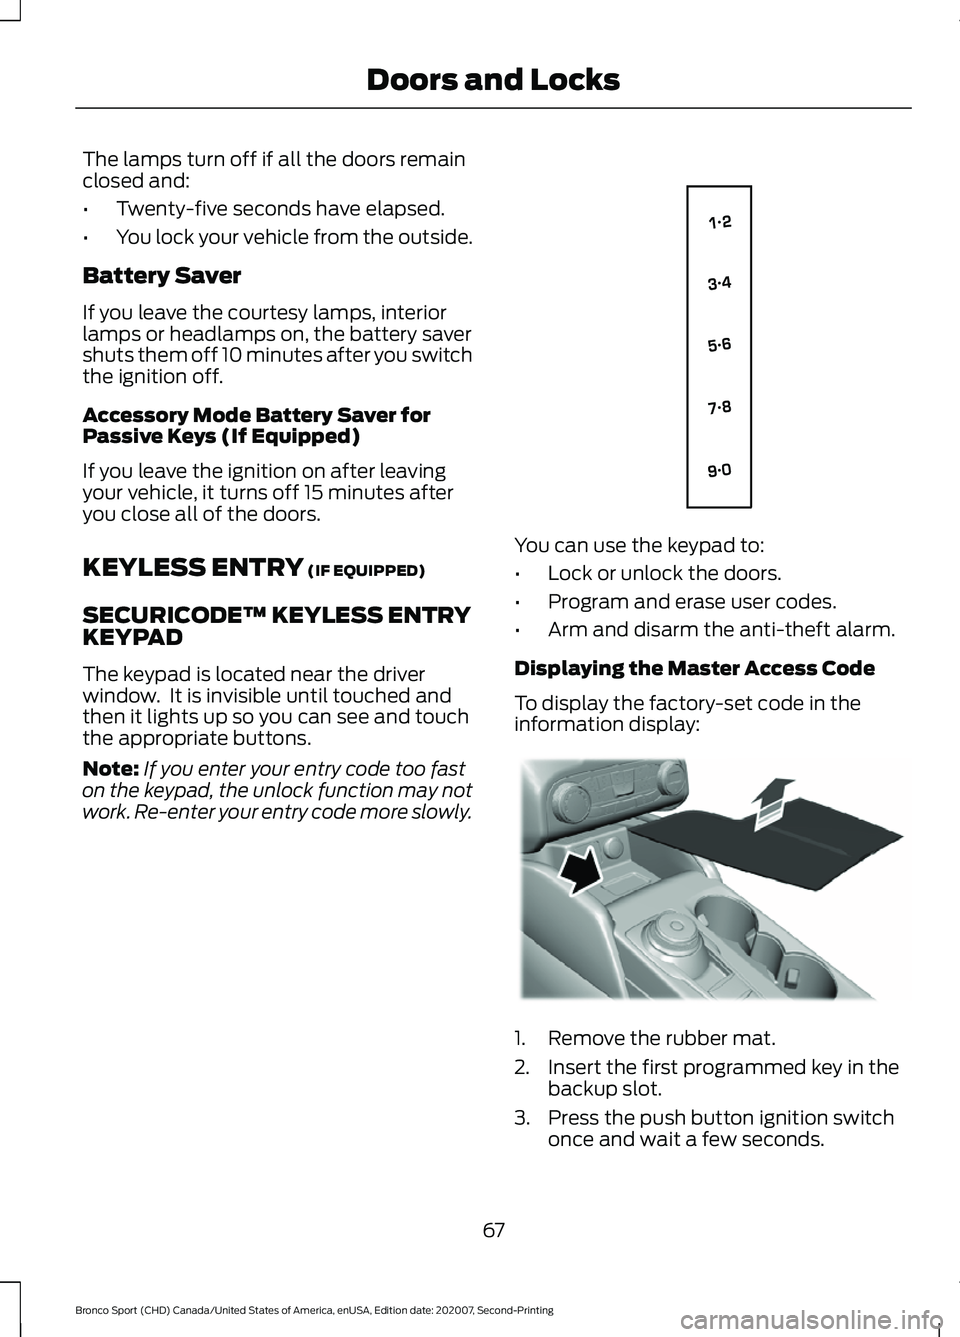
work. Re-enter your entry code more slowly. You can use the keypad to:
•
Lock or unlock the doors.
• Program and erase user codes.
• Arm and disarm the anti-theft alarm.
Displaying the Master Access Code
To display the factory-set code in the
information display: 1. Remove the rubber mat.
2. Insert the first programmed key in the
backup slot.
3. Press the push button ignition switch once and wait a few seconds.
67
Bronco Sport (CHD) Canada/United States of America, enUSA, Edition date: 202007, Second-Printing Doors and LocksE138637 E306769
Page 71 of 471
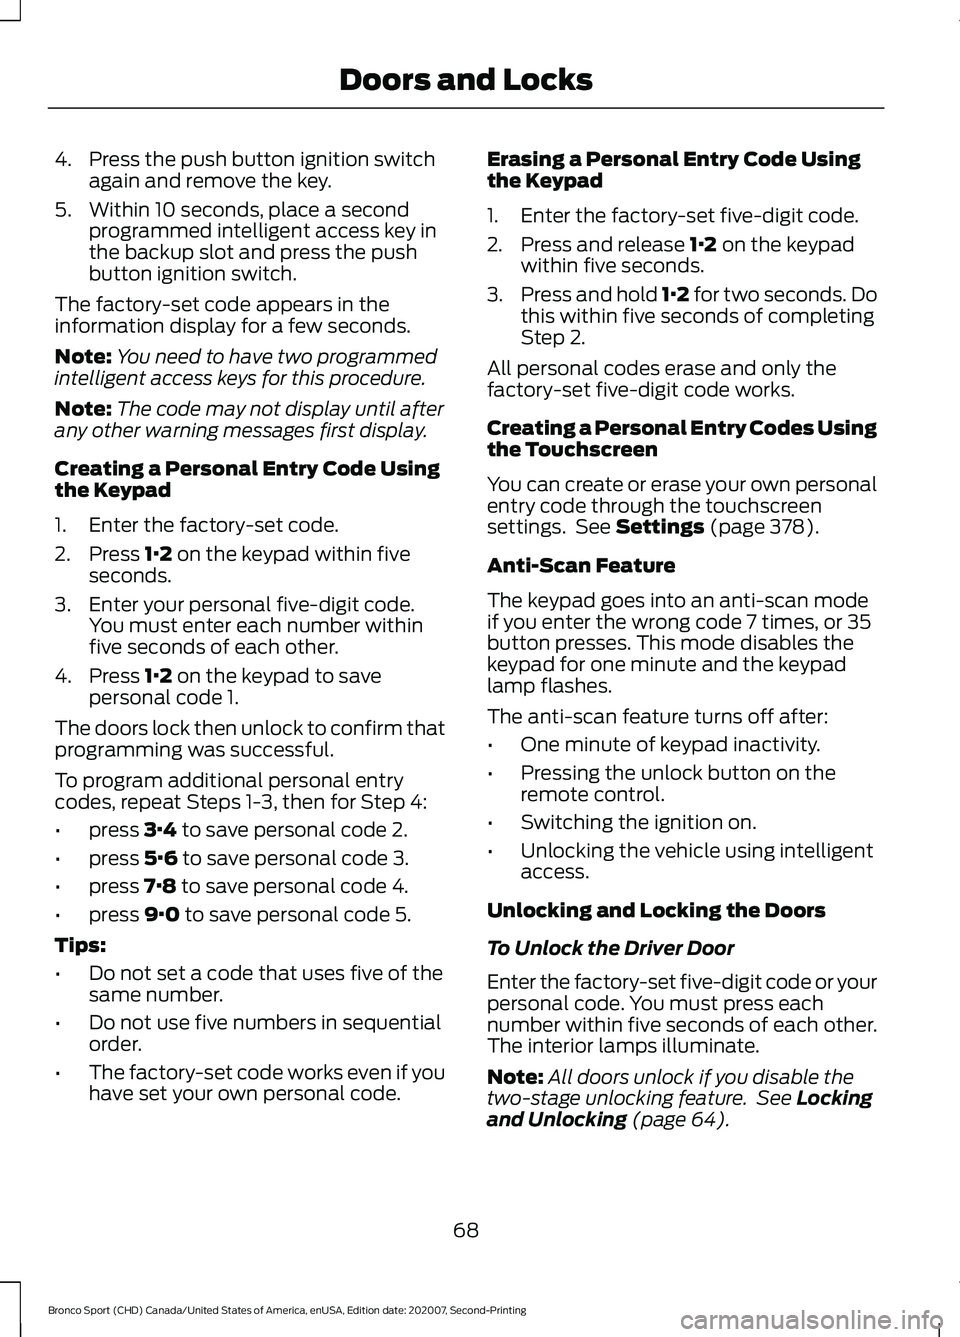
4. Press the push button ignition switch
again and remove the key.
5. Within 10 seconds, place a second programmed intelligent access key in
the backup slot and press the push
button ignition switch.
The factory-set code appears in the
information display for a few seconds.
Note: You need to have two programmed
intelligent access keys for this procedure.
Note: The code may not display until after
any other warning messages first display.
Creating a Personal Entry Code Using
the Keypad
1. Enter the factory-set code.
2. Press 1·2 on the keypad within five
seconds.
3. Enter your personal five-digit code. You must enter each number within
five seconds of each other.
4. Press
1·2 on the keypad to save
personal code 1.
The doors lock then unlock to confirm that
programming was successful.
To program additional personal entry
codes, repeat Steps 1-3, then for Step 4:
• press
3·4 to save personal code 2.
• press
5·6 to save personal code 3.
• press
7·8 to save personal code 4.
• press
9·0 to save personal code 5.
Tips:
• Do not set a code that uses five of the
same number.
• Do not use five numbers in sequential
order.
• The factory-set code works even if you
have set your own personal code. Erasing a Personal Entry Code Using
the Keypad
1. Enter the factory-set five-digit code.
2. Press and release
1·2 on the keypad
within five seconds.
3. Press and hold 1·2 for two seconds. Do
this within five seconds of completing
Step 2.
All personal codes erase and only the
factory-set five-digit code works.
Creating a Personal Entry Codes Using
the Touchscreen
You can create or erase your own personal
entry code through the touchscreen
settings. See
Settings (page 378).
Anti-Scan Feature
The keypad goes into an anti-scan mode
if you enter the wrong code 7 times, or 35
button presses. This mode disables the
keypad for one minute and the keypad
lamp flashes.
The anti-scan feature turns off after:
• One minute of keypad inactivity.
• Pressing the unlock button on the
remote control.
• Switching the ignition on.
• Unlocking the vehicle using intelligent
access.
Unlocking and Locking the Doors
To Unlock the Driver Door
Enter the factory-set five-digit code or your
personal code. You must press each
number within five seconds of each other.
The interior lamps illuminate.
Note: All doors unlock if you disable the
two-stage unlocking feature. See
Locking
and Unlocking (page 64).
68
Bronco Sport (CHD) Canada/United States of America, enUSA, Edition date: 202007, Second-Printing Doors and Locks
Page 75 of 471
PASSIVE ANTI-THEFT
SYSTEM
Note:
The system is not compatible with
non-Ford aftermarket remote start systems.
Use of these systems could result in vehicle
starting problems and a loss of security
protection.
Note: Metallic objects, electronic devices
or a second coded key on the same key
chain could cause vehicle starting problems
if they are too close to the key when starting
the engine. Prevent these objects from
touching the coded key while starting the
engine. Switch the ignition off, move all
objects on the key chain away from the
coded key and restart the engine if a
problem occurs.
Note: Do not leave a duplicate coded key
in the vehicle. Always take your keys and
lock all doors when leaving the vehicle.
SecuriLock®
The system is an engine immobilization
system. It helps to prevent anyone from
starting the engine without using a coded
key programmed to your vehicle. Using the
wrong key could prevent the engine from
starting. A message may appear in the
information display.
If you are unable to start the engine with a
correctly coded key, there is a problem with
the system and a message could appear
in the information display.
Automatic Arming
The vehicle arms immediately after you
switch the ignition off.
Automatic Disarming
Switching the ignition on with a coded key
disarms the vehicle. Replacement Keys
Note:
Your vehicle comes with two
integrated keyhead transmitters or two
intelligent access keys.
The integrated keyhead transmitter
functions as a programmed ignition key
that operates all the locks and starts the
vehicle, as well as a remote control.
The intelligent access key functions as a
programmed key that operates the driver
door lock and activates the intelligent
access with push button start system, as
well as a remote control.
If your programmed transmitters or
standard SecuriLock coded keys
(integrated keyhead transmitters only) are
lost or stolen and you do not have an extra
coded key, you will need to have your
vehicle towed to an authorized dealer. You
need to erase the key codes from your
vehicle and program new coded keys.
Store an extra programmed key away from
the vehicle in a safe place to help prevent
any inconveniences. See your authorized
dealer to purchase additional spare or
replacement keys.
Programming a Spare Intelligent
Access Key (If Equipped)
See your authorized dealer to have
additional keys programmed to your
vehicle.
ANTI-THEFT ALARM
The system will warn you of an
unauthorized entry to your vehicle. It will
be triggered if any door, the luggage
compartment or the hood is opened
without using the key, remote control or
keyless entry keypad.
The direction indicators will flash and the
horn will sound if unauthorized entry is
attempted while the alarm is armed.
72
Bronco Sport (CHD) Canada/United States of America, enUSA, Edition date: 202007, Second-Printing Security
Page 78 of 471
Press to access the previous
media selection.
Press to access the next media
selection.
VOICE CONTROL
The controls are on the steering wheel. Press and release to activate
voice recognition.
CRUISE CONTROL - VEHICLES
WITH: LANE CENTERING See Switching Adaptive Cruise Control
On and Off (page 198). See Setting the
Adaptive Cruise Control Speed
(page
199). See Setting the Adaptive Cruise
Control Gap (page 200). CRUISE CONTROL See
What Is Cruise Control (page 193).
INFORMATION DISPLAY
CONTROL See
General Information (page 99).
HORN Press on the center of the
steering wheel near the horn icon
to activate the horn.
75
Bronco Sport (CHD) Canada/United States of America, enUSA, Edition date: 202007, Second-Printing Steering WheelE265045 E265044 E142599 E349487 E349489 E280795 E270945
Page 81 of 471
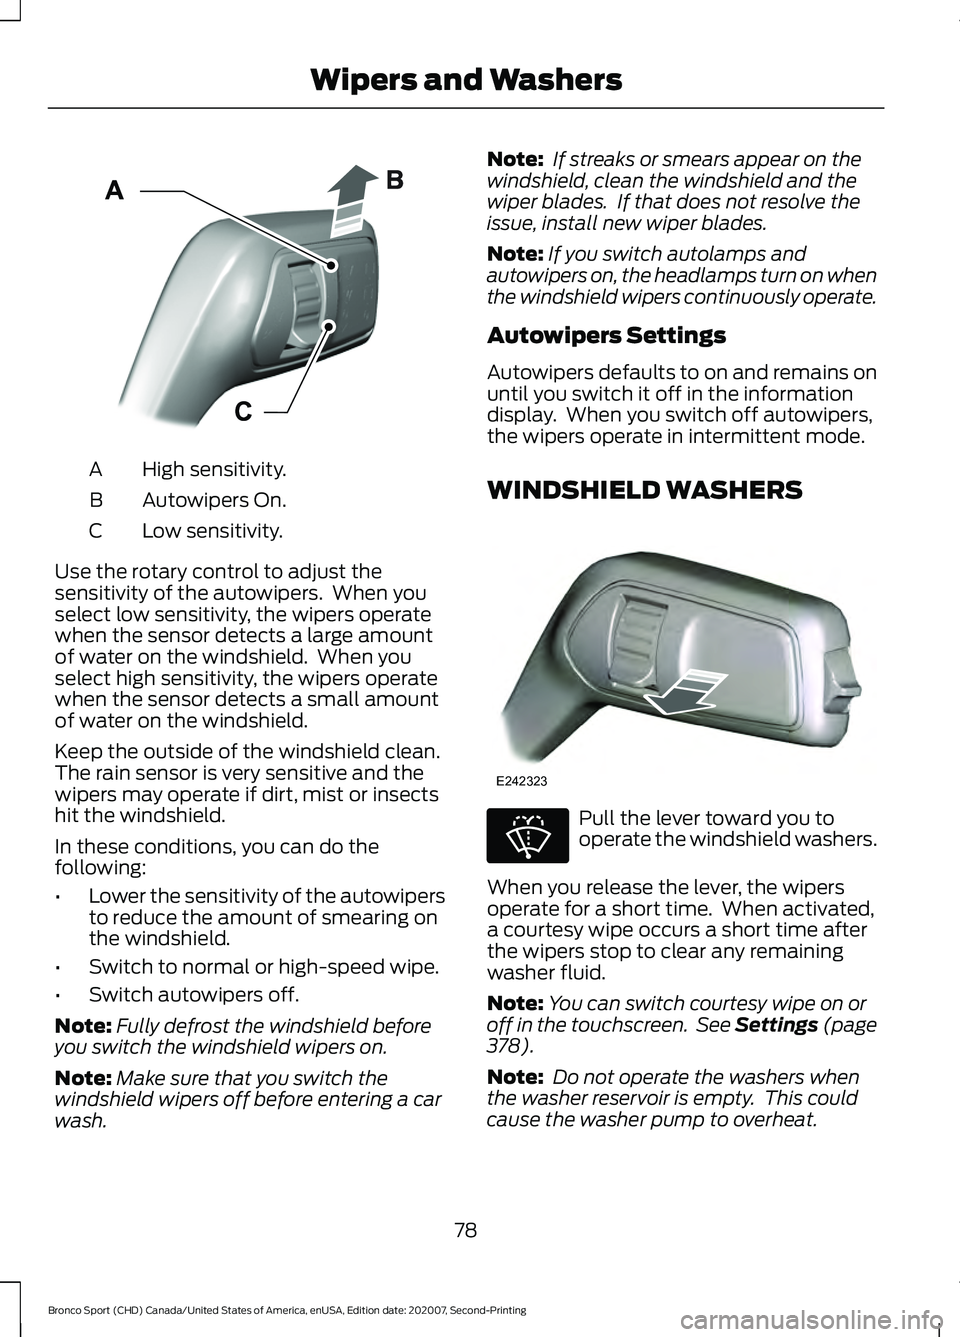
High sensitivity.
A
Autowipers On.
B
Low sensitivity.
C
Use the rotary control to adjust the
sensitivity of the autowipers. When you
select low sensitivity, the wipers operate
when the sensor detects a large amount
of water on the windshield. When you
select high sensitivity, the wipers operate
when the sensor detects a small amount
of water on the windshield.
Keep the outside of the windshield clean.
The rain sensor is very sensitive and the
wipers may operate if dirt, mist or insects
hit the windshield.
In these conditions, you can do the
following:
• Lower the sensitivity of the autowipers
to reduce the amount of smearing on
the windshield.
• Switch to normal or high-speed wipe.
• Switch autowipers off.
Note: Fully defrost the windshield before
you switch the windshield wipers on.
Note: Make sure that you switch the
windshield wipers off before entering a car
wash. Note:
If streaks or smears appear on the
windshield, clean the windshield and the
wiper blades. If that does not resolve the
issue, install new wiper blades.
Note: If you switch autolamps and
autowipers on, the headlamps turn on when
the windshield wipers continuously operate.
Autowipers Settings
Autowipers defaults to on and remains on
until you switch it off in the information
display. When you switch off autowipers,
the wipers operate in intermittent mode.
WINDSHIELD WASHERS Pull the lever toward you to
operate the windshield washers.
When you release the lever, the wipers
operate for a short time. When activated,
a courtesy wipe occurs a short time after
the wipers stop to clear any remaining
washer fluid.
Note: You can switch courtesy wipe on or
off in the touchscreen. See Settings (page
378).
Note: Do not operate the washers when
the washer reservoir is empty. This could
cause the washer pump to overheat.
78
Bronco Sport (CHD) Canada/United States of America, enUSA, Edition date: 202007, Second-Printing Wipers and WashersE295997 E242323 E270967
Page 85 of 471
DAYTIME RUNNING LAMPS -
VEHICLES WITH:
CONFIGURABLE DAYTIME
RUNNING LAMPS
WARNING: The daytime running
lamps system does not activate the rear
lamps and may not provide adequate
lighting during low visibility driving
conditions. Make sure you switch the
headlamps on, as appropriate, during all
low visibility conditions. Failure to do so
may result in a crash.
Switch the daytime running lamps on or
off using the touchscreen:
1. Select
Settings. See Settings (page
378).
2. Select
Vehicle.
3. Select
Lighting.
The daytime running lamps turn on when:
1. The lamps are on in the information display.
2. You switch the ignition on.
3. The transmission is not in park (P) for vehicles with automatic transmissions
or you release the parking brake for
vehicles with manual transmissions.
4. The lighting control is in the autolamps
position.
5. The headlamps are off.
The other lighting control switch positions
do not turn on the daytime running lamps.
If the daytime running lamps are off in the
information display, the lamps stay off in
all switch positions. DAYTIME RUNNING LAMPS -
VEHICLES WITH: DAYTIME
RUNNING LAMPS (DRL) WARNING:
The daytime running
lamps system does not activate the rear
lamps and may not provide adequate
lighting during low visibility driving
conditions. Make sure you switch the
headlamps on, as appropriate, during all
low visibility conditions. Failure to do so
may result in a crash.
The system turns the lamps on in daylight
conditions.
To switch the system on, switch the
lighting control to any position except
headlamps.
FRONT FOG LAMPS
(IF EQUIPPED)
Switching the Front Fog Lamps On
or Off
Only switch the front fog lamps on during
reduced visibility.
You can switch the front fog lamps on if
any of the following occur:
• You set the lighting control to the
parking lamps position.
• You set the lighting control to the
headlamps position.
• You set the lighting control to the
autolamps position and the headlamps
are on.
The front fog lamp button is on the lighting
control. Press the button to switch the
front fog lamps on or off.
82
Bronco Sport (CHD) Canada/United States of America, enUSA, Edition date: 202007, Second-Printing Lighting