2021 DODGE CHALLENGER transmission
[x] Cancel search: transmissionPage 168 of 328

166MULTIMEDIA
The Performance Pages include the following:
Home
Timers
Gauges
G-Force
Engine
Dyno
If a USB drive is installed in the media hub, press
the Camera icon on the top right of the
touchscreen when using Performance Pages. A
screen shot of the page will be taken and saved
onto the USB.
Screenshot Camera Button
The following describes each feature and its
operation:
HOME
Performance Pages — Home
When Home is selected, a series of widgets
(gauges) can be customized by the user. Follow
these steps to change a widget. Either press
directly on the widget you want to change, or:
1. Press the Settings button (gear icon) on the
touchscreen to access the main menu for the
widgets.
2. Select one the following options from the menu:
Set Widget: Top Left
Set Widget: Top Right
Set Widget: Bottom Left
Set Widget: Bottom Right
3. After selecting a widget location, select the gauge to display:
Gauge: Oil Temp
Gauge: Oil Pressure
Gauge: Coolant Temp
Gauge: Battery Voltage
Gauge: Trans Temp — If Equipped with an
Automatic Transmission
Gauge: Boost Pressure — If Equipped
Gauge: Air/Fuel Ratio — If Equipped
Gauge: I/C Coolant Temp — If Equipped
21_LA_OM_EN_USC_t.book Page 166
Page 172 of 328

170MULTIMEDIA
330 ft (100 m) ET
Displays the time it takes the vehicle to go 330
feet (100 m).
⅛ Mile (200 m) ET
Displays the time it takes for the vehicle to go ⅛
mile (200 m).
⅛ Mile (200 m) mph
Displays the vehicle speed at the time ⅛ mile
(200 m) was reached.
1000 ft (300 m) ET
Displays the time it takes the vehicle to go
1000 ft (300 m).
¼ Mile (400 m) ET
Displays the time it takes for the vehicle to go ¼
mile (400 m).
¼ Mile (400 m) mph
Displays the speed the vehicle was at when ¼
mile (400 m) was reached.
Brake Distance ft (meters)
Displays the distance it takes the vehicle to
make a complete stop.
NOTE:The distance measurement will be aborted if the
brake pedal is released or the parking brake is
engaged, before the vehicle comes to a complete
stop.
Brake from mph (km/h)
Displays the speed the vehicle is traveling when
the brake pedal is pressed.
NOTE:Brake Distance and Speed timers only display
"ready" when vehicle is traveling at greater than
30 mph (48 km/h).
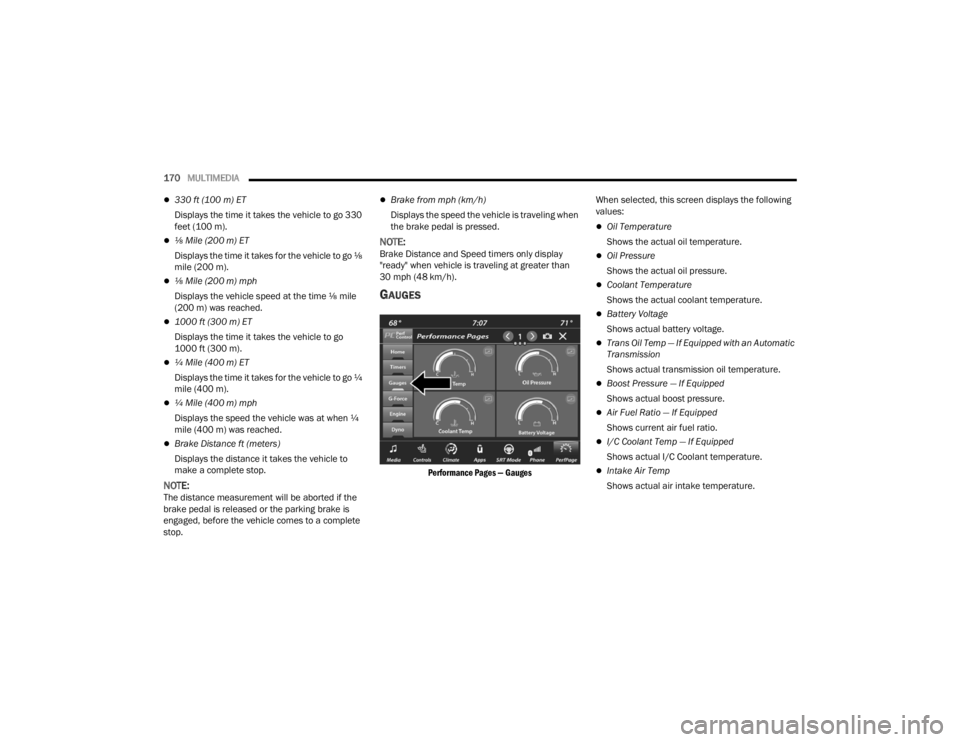
GAUGES
Performance Pages — Gauges
When selected, this screen displays the following
values:
Oil Temperature
Shows the actual oil temperature.
Oil Pressure
Shows the actual oil pressure.
Coolant Temperature
Shows the actual coolant temperature.
Battery Voltage
Shows actual battery voltage.
Trans Oil Temp — If Equipped with an Automatic
Transmission
Shows actual transmission oil temperature.
Boost Pressure — If Equipped
Shows actual boost pressure.
Air Fuel Ratio — If Equipped
Shows current air fuel ratio.
I/C Coolant Temp — If Equipped
Shows actual I/C Coolant temperature.
Intake Air Temp
Shows actual air intake temperature.
21_LA_OM_EN_USC_t.book Page 170
Page 174 of 328

172MULTIMEDIA
ENGINE
Performance Pages — Engine
When selected, this screen displays the following
values:
Vehicle Speed
Shows the actual vehicle speed.
Engine Power
Shows the instantaneous power.
Engine Torque
Shows the instantaneous torque.
Oil Pressure (6.4L Only) — If Equipped
Shows the actual engine oil pressure.
Boost Pressure (6.2L Only) — If Equipped
Shows the actual boost pressure.
Gear (Automatic Transmission Only)
Shows the current (or pending) operating gear
of the vehicle.
DYNAMOMETER (DYNO)
Performance Pages — Dyno
The system will start drawing graphs for Power and
Torque (top chart) and Engine Speed (bottom
chart). The graph will fill to the right side of the
page (based on History time selected). Once the
right side of the page is reached, the graph will
scroll with the right side always being the most
recent recorded sample.
The following options can be selected:
Pressing the STOP button will freeze the graph.
Selecting Play will clear the graph and restart
the process over.
Press the + or – button to change the history of
the graph. The selectable options are “30”,
“60”, “90”, or “120” seconds. The graph will
expand or constrict depending on the setting
selected.
Select the “Gear” display setting to turn the
graph gear markers on and off for automatic
transmission vehicles only.
NOTE:The Gear on/off feature will only display if your
vehicle is equipped with an Automatic Trans
-
mission.
21_LA_OM_EN_USC_t.book Page 172
Page 176 of 328

174MULTIMEDIA
Available Mode Configurations
Refer to the Sport and Default Modes for their
detailed operation.
NOTE:These settings will remain in effect when using the
Launch Control feature.
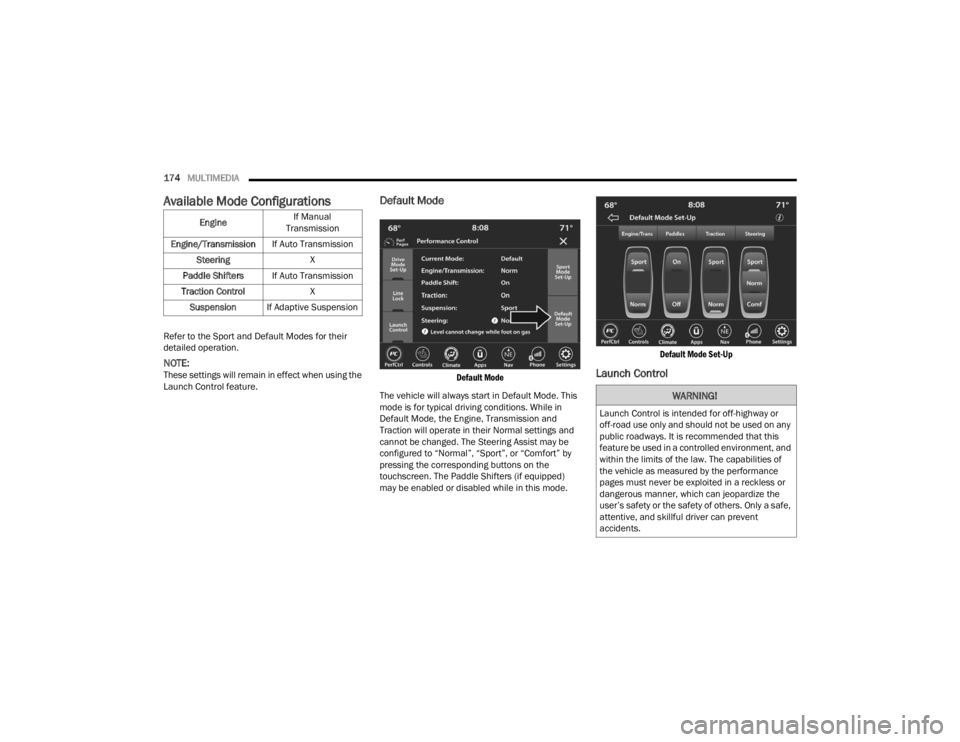
Default Mode
Default Mode
The vehicle will always start in Default Mode. This
mode is for typical driving conditions. While in
Default Mode, the Engine, Transmission and
Traction will operate in their Normal settings and
cannot be changed. The Steering Assist may be
configured to “Normal”, “Sport”, or “Comfort” by
pressing the corresponding buttons on the
touchscreen. The Paddle Shifters (if equipped)
may be enabled or disabled while in this mode.
Default Mode Set-Up
Launch Control
Engine
If Manual
Transmission
Engine/Transmission If Auto Transmission
Steering X
Paddle Shifters If Auto Transmission
Traction Control X
Suspension If Adaptive Suspension
WARNING!
Launch Control is intended for off-highway or
off-road use only and should not be used on any
public roadways. It is recommended that this
feature be used in a controlled environment, and
within the limits of the law. The capabilities of
the vehicle as measured by the performance
pages must never be exploited in a reckless or
dangerous manner, which can jeopardize the
user’s safety or the safety of others. Only a safe,
attentive, and skillful driver can prevent
accidents.
21_LA_OM_EN_USC_t.book Page 174
Page 177 of 328

MULTIMEDIA175
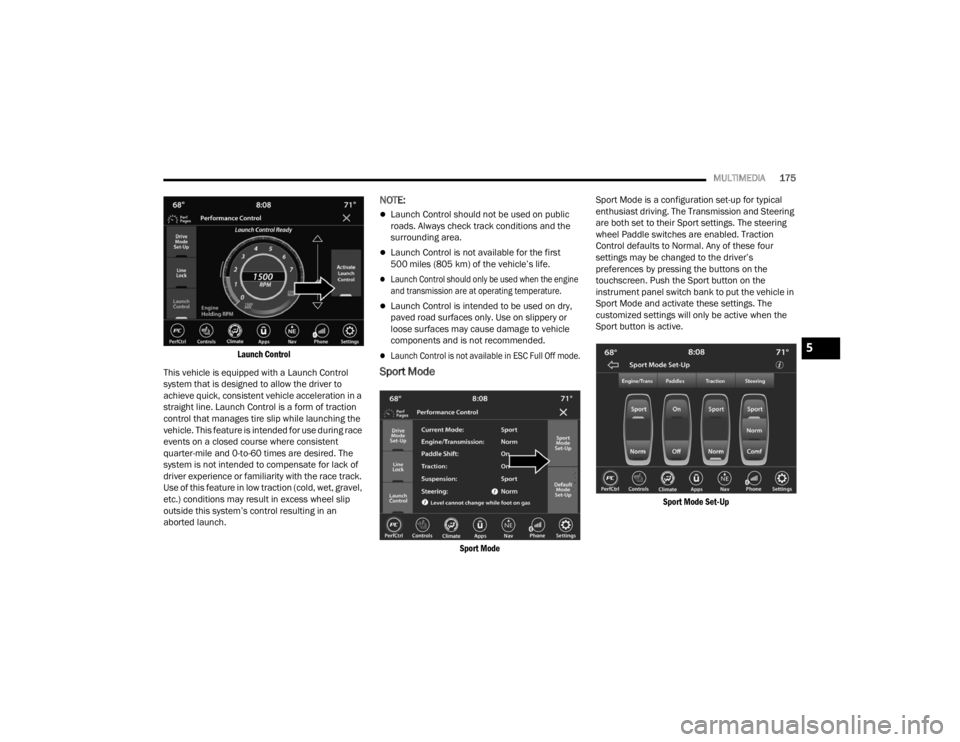
Launch Control
This vehicle is equipped with a Launch Control
system that is designed to allow the driver to
achieve quick, consistent vehicle acceleration in a
straight line. Launch Control is a form of traction
control that manages tire slip while launching the
vehicle. This feature is intended for use during race
events on a closed course where consistent
quarter-mile and 0-to-60 times are desired. The
system is not intended to compensate for lack of
driver experience or familiarity with the race track.
Use of this feature in low traction (cold, wet, gravel,
etc.) conditions may result in excess wheel slip
outside this system’s control resulting in an
aborted launch.
NOTE:
Launch Control should not be used on public
roads. Always check track conditions and the
surrounding area.
Launch Control is not available for the first
500 miles (805 km) of the vehicle’s life.
Launch Control should only be used when the engine
and transmission are at operating temperature.
Launch Control is intended to be used on dry,
paved road surfaces only. Use on slippery or
loose surfaces may cause damage to vehicle
components and is not recommended.
Launch Control is not available in ESC Full Off mode.
Sport Mode
Sport Mode
Sport Mode is a configuration set-up for typical
enthusiast driving. The Transmission and Steering
are both set to their Sport settings. The steering
wheel Paddle switches are enabled. Traction
Control defaults to Normal. Any of these four
settings may be changed to the driver’s
preferences by pressing the buttons on the
touchscreen. Push the Sport button on the
instrument panel switch bank to put the vehicle in
Sport Mode and activate these settings. The
customized settings will only be active when the
Sport button is active.
Sport Mode Set-Up
5
21_LA_OM_EN_USC_t.book Page 175
Page 178 of 328

176MULTIMEDIA
Possible Performance Control configurations are
listed below with accompanying descriptions. The
information contained in the list below can also be
accessed from within the mode Set-Up menus. To
access the information, press the Info button on
the touchscreen from the mode Set-Up menu, and
use the Left/Right arrows to toggle through
available descriptions. The title for each system in
the Set-Up menu can be pressed, which provides
the descriptions for each function of that system.
ENGINE/TRANS (IF EQUIPPED WITH AUTO -
MATIC TRANSMISSION)
Engine/Trans
SPORT
Press the Sport button on the touchscreen for
improved throttle response and modified
shifting for an enhanced driving experience.
NORMAL
Press the Normal button on the touchscreen for
a balance of throttle response, shift comfort and
economy for normal driving.
PADDLE SHIFTERS — IF EQUIPPED WITH AUTO -
MATIC TRANSMISSION
Paddle – Automatic Transmission
ON
Press the On button on the touchscreen to
enable steering wheel Paddle Shifters.
OFF
Press the Off button on the touchscreen to
disable steering wheel Paddle Shifters.
TRACTION
Traction Control
21_LA_OM_EN_USC_t.book Page 176
Page 184 of 328

182SAFETY
ESC Activation/Malfunction Indicator Light
And ESC OFF Indicator Light
The ESC Activation/Malfunction
Indicator Light in the instrument cluster
will come on when the ignition is placed
in the ON mode. It should go out with the
engine running. If the ESC Activation/Malfunction
Indicator Light comes on continuously with the
engine running, a malfunction has been detected
in the ESC system. If this light remains on after
several ignition cycles, and the vehicle has been
driven several miles (kilometers) at speeds greater
than 30 mph (48 km/h), see an authorized dealer
as soon as possible to have the problem
diagnosed and corrected. The ESC Activation/Malfunction Indicator Light
starts to flash as soon as the tires lose traction and
the ESC system becomes active. The ESC
Activation/Malfunction Indicator Light also flashes
when TCS is active. If the ESC Activation/
Malfunction Indicator Light begins to flash during
acceleration, ease up on the accelerator and apply
as little throttle as possible. Be sure to adapt your
speed and driving to the prevailing road conditions.
The ESC OFF Indicator Light indicates
that the Electronic Stability Control
(ESC) is in a reduced mode.
NOTE:
The ESC Activation/Malfunction Indicator Light
and the ESC OFF Indicator Light come on
momentarily each time the ignition is placed in
the ON position.
Each time the ignition is placed in the ON posi -
tion, the ESC system will be on even if it was
turned off previously.
The ESC system will make buzzing or clicking
sounds when it is active. This is normal; the
sounds will stop when ESC becomes inactive
following the maneuver that caused the ESC
activation.
Hill Start Assist (HSA)
HSA is designed to mitigate roll back from a
complete stop while on an incline. If the driver
releases the brake while stopped on an incline,
HSA will continue to hold the brake pressure for a
short period. If the driver does not apply the
throttle before this time expires, the system will
release brake pressure and the vehicle will roll
down the hill as normal.
The following conditions must be met in order for
HSA to activate:
The feature must be enabled.
The vehicle must be stopped.
The parking brake must be off.
The driver door must be closed.
The vehicle must be on a sufficient grade.
The gear selection must match vehicle uphill
direction (i.e., vehicle facing uphill is in forward
gear; vehicle backing uphill is in REVERSE gear).
HSA will work in REVERSE gear and all forward
gears. The system will not activate if the trans -
mission is in PARK or NEUTRAL. For vehicles
equipped with a manual transmission, if the
clutch is pressed, HSA will remain active.
The Electronic Stability Control (ESC) cannot
prevent the natural laws of physics from
acting on the vehicle, nor can it increase the
traction afforded by prevailing road condi -
tions. ESC cannot prevent all accidents,
including those resulting from excessive
speed in turns, driving on very slippery
surfaces, or hydroplaning. ESC also cannot
prevent collisions.
WARNING!
21_LA_OM_EN_USC_t.book Page 182
Page 185 of 328

SAFETY183
Disabling And Enabling HSA
This feature can be turned on or turned off. To
change the current setting, proceed as follows:
If disabling HSA using Uconnect Settings, see
Úpage 120.
Towing With HSA
HSA will also provide assistance to mitigate roll
back while towing a trailer.
Rain Brake Support (RBS)
RBS may improve braking performance in wet
conditions. It will periodically apply a small amount
of brake pressure to remove any water buildup on
the front brake rotors. It functions when the
windshield wipers are in LO or HI speed. When RBS
is active, there is no notification to the driver and
no driver interaction is required.
Ready Alert Braking (RAB)
RAB may reduce the time required to reach full
braking during emergency braking situations. It
anticipates when an emergency braking situation
may occur by monitoring how fast the throttle is
released by the driver. The Electronic Brake
Controller (EBC) will prepare the brake system for
a panic stop.
Traction Control System (TCS)
The TCS monitors the amount of wheel spin of
each of the driven wheels. If wheel spin is
detected, the TCS may apply brake pressure to the
spinning wheel(s) and/or reduce engine power to
provide enhanced acceleration and stability. A
feature of the TCS, Brake Limited Differential (BLD)
functions similarly to a limited slip differential and
controls the wheel spin across a driven axle. If one
wheel on a driven axle is spinning faster than the
other, the system will apply the brake of the
spinning wheel. This will allow more engine power
to be applied to the wheel that is not spinning. BLD
may remain enabled even if TCS and ESC are in
reduced modes.
WARNING!
There may be situations where the Hill Start
Assist (HSA) will not activate and slight rolling
may occur, such as on minor hills or with a
loaded vehicle, or while pulling a trailer. HSA is
not a substitute for active driving involvement. It
is always the driver’s responsibility to be
attentive to distance to other vehicles, people,
and objects, and most importantly brake
operation to ensure safe operation of the vehicle
under all road conditions. Your complete
attention is always required while driving to
maintain safe control of your vehicle. Failure to
follow these warnings can result in a collision or
serious personal injury.
WARNING!
If you use a trailer brake controller with your
trailer, the trailer brakes may be activated and
deactivated with the brake switch. If so, there
may not be enough brake pressure to hold
both the vehicle and the trailer on a hill when
the brake pedal is released. In order to avoid
rolling down an incline while resuming accel -
eration, manually activate the trailer brake or
apply more vehicle brake pressure prior to
releasing the brake pedal.
HSA is not a parking brake. Always apply the
parking brake fully when exiting your vehicle.
Also, be certain to place the transmission in
PARK.
Failure to follow these warnings can result in a
collision or serious personal injury.
6
21_LA_OM_EN_USC_t.book Page 183