2021 DODGE CHALLENGER brake
[x] Cancel search: brakePage 117 of 328

STARTING AND OPERATING115
Perform the maintenance listed in the “Scheduled
Servicing” Ú page 246. When towing a trailer,
never exceed the GAWR or GCWR ratings.
Towing Requirements — Tires
Do not attempt to tow a trailer while using a
compact spare tire.
Do not drive more than 50 mph (80 km/h) when
towing while using a full size spare tire.
Proper tire inflation pressures are essential to
the safe and satisfactory operation of your
vehicle. For proper tire inflation procedures.
Check the trailer tires for proper tire inflation
pressures before trailer usage.
Check for signs of tire wear or visible tire
damage before towing a trailer.
Replacing tires with a higher load carrying
capacity will not increase the vehicle's GVWR
and GAWR limits.
For further information Ú page 279.
Towing Requirements — Trailer Brakes
Do not interconnect the hydraulic brake system
or vacuum system of your vehicle with that of
the trailer. This could cause inadequate braking
and possible personal injury.
An electronically actuated trailer brake
controller is required when towing a trailer with
electronically actuated brakes. When towing a
trailer equipped with a hydraulic surge actuated
brake system, an electronic brake controller is
not required.
Trailer brakes are recommended for trailers
over 1,000 lb (453 kg) and required for trailers
in excess of 2,000 lb (907 kg).
Total weight must be distributed between the
tow vehicle and the trailer such that the
following four ratings are not exceeded :
Max loading as defined on the “Tire and
Loading Information” placard.
GTW
GAWR
Tongue weight rating for the trailer hitch
utilized.
CAUTION!
Do not tow a trailer at all during the first
500 miles (805 km) the new vehicle is driven.
The engine, axle or other parts could be
damaged.
Then, during the first 500 miles (805 km) that
a trailer is towed, do not drive over 50 mph
(80 km/h) and do not make starts at full
throttle. This helps the engine and other parts
of the vehicle wear in at the heavier loads.
WARNING!
WARNING!
Do not connect trailer brakes to your vehicle's
hydraulic brake lines. It can overload your
brake system and cause it to fail. You might
not have brakes when you need them and
could have an accident.
Towing any trailer will increase your stopping
distance. When towing, you should allow for
additional space between your vehicle and the
vehicle in front of you. Failure to do so could
result in an accident.
CAUTION!
If the trailer weighs more than 1,000 lb (453 kg)
loaded, it should have its own brakes and they
should be of adequate capacity. Failure to do
this could lead to accelerated brake lining wear,
higher brake pedal effort, and longer stopping
distances.
4
21_LA_OM_EN_USC_t.book Page 115
Page 118 of 328

116STARTING AND OPERATING
Towing Requirements — Trailer Lights And
Wiring
Whenever you pull a trailer, regardless of the trailer
size, stoplights and turn signals on the trailer are
required for motoring safety.
The Trailer Tow Package may include a four- and
seven-pin wiring harness. Use a factory approved
trailer harness and connector.
NOTE:Do not cut or splice wiring into the vehicle’s wiring
harness.
The electrical connections are all complete to the
vehicle but you must mate the harness to a trailer
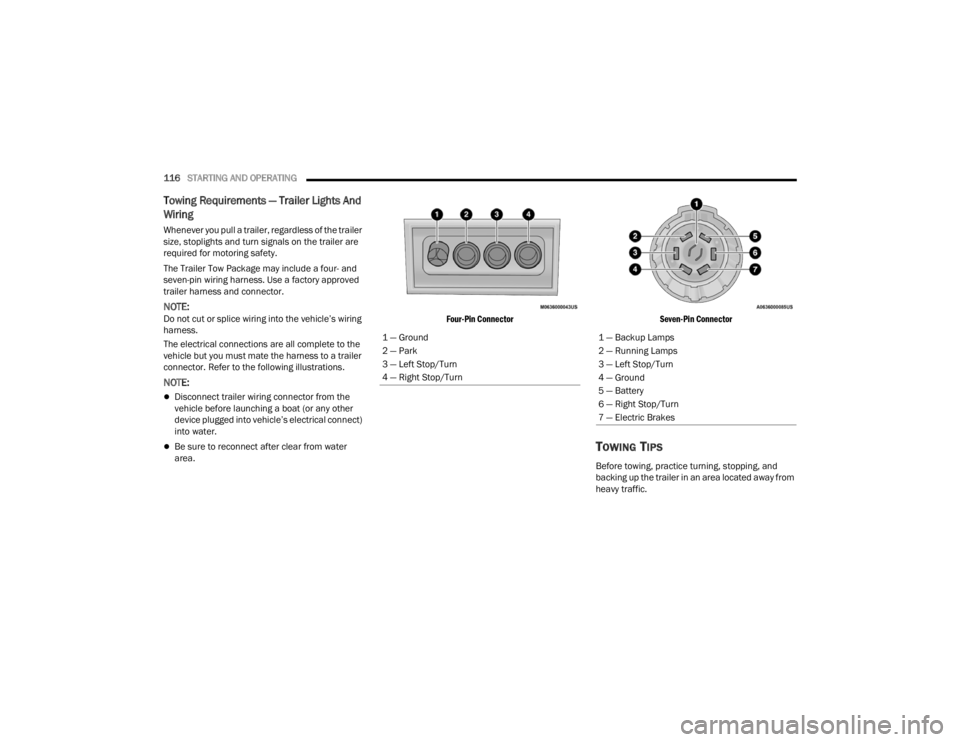
connector. Refer to the following illustrations.
NOTE:
Disconnect trailer wiring connector from the
vehicle before launching a boat (or any other
device plugged into vehicle’s electrical connect)
into water.
Be sure to reconnect after clear from water
area.
Four-Pin Connector
Seven-Pin Connector
TOWING TIPS
Before towing, practice turning, stopping, and
backing up the trailer in an area located away from
heavy traffic.
1 — Ground
2 — Park
3 — Left Stop/Turn
4 — Right Stop/Turn
1 — Backup Lamps
2 — Running Lamps
3 — Left Stop/Turn
4 — Ground
5 — Battery
6 — Right Stop/Turn
7 — Electric Brakes
21_LA_OM_EN_USC_t.book Page 116
Page 120 of 328

118STARTING AND OPERATING
(Continued)
Replace tires when tread wear indicators first
become visible.
Keep tires properly inflated.
Maintain sufficient distance between your
vehicle and the vehicle in front of you to avoid a
collision in a sudden stop.
Your vehicle may be equipped with a Limited Slip
Differential (LSD) that reduces, but does not
eliminate, the amount of wheel slip across a given
axle for improved handling.
DRIVING THROUGH WATER
Driving through water more than a few inches/
centimeters deep will require extra caution to
ensure safety and prevent damage to your vehicle.
Flowing/Rising Water Shallow Standing Water
Although your vehicle is capable of driving through
shallow standing water, consider the following
Warnings and Cautions before doing so.
WARNING!
Do not drive on or across a road or path where
water is flowing and/or rising (as in storm
run-off). Flowing water can wear away the road
or path's surface and cause your vehicle to sink
into deeper water. Furthermore, flowing and/or
rising water can carry your vehicle away swiftly.
Failure to follow this warning may result in
injuries that are serious or fatal to you, your
passengers, and others around you.
WARNING!
Driving through standing water limits your
vehicle’s traction capabilities. Do not exceed
5 mph (8 km/h) when driving through
standing water.
Driving through standing water limits your
vehicle’s braking capabilities, which increases
stopping distances. Therefore, after driving
through standing water, drive slowly and
lightly press on the brake pedal several times
to dry the brakes.
Failure to follow these warnings may result in
injuries that are serious or fatal to you, your
passengers, and others around you.
CAUTION!
Always check the depth of the standing water
before driving through it. Never drive through
standing water that is deeper than the bottom
of the tire rims mounted on the vehicle.
Determine the condition of the road or the
path that is under water and if there are any
obstacles in the way before driving through
the standing water.
Do not exceed 5 mph (8 km/h) when driving
through standing water. This will minimize
wave effects.
Driving through standing water may cause
damage to your vehicle’s drivetrain compo -
nents. Always inspect your vehicle’s fluids
(i.e., engine oil, transmission, axle, etc.) for
signs of contamination (i.e., fluid that is milky
or foamy in appearance) after driving through
standing water. Do not continue to operate
the vehicle if any fluid appears contaminated,
as this may result in further damage. Such
damage is not covered by the New Vehicle
Limited Warranty.
Getting water inside your vehicle’s engine can
cause it to lock up and stall out, and cause
serious internal damage to the engine. Such
damage is not covered by the New Vehicle
Limited Warranty.
CAUTION!
21_LA_OM_EN_USC_t.book Page 118
Page 127 of 328

MULTIMEDIA125
Safety/Assistance
When the Safety/Assistance button is selected on the touchscreen, the system displays the options related to the vehicle’s safety settings. These options will
differ depending on the features equipped on the vehicle. The settings may display in list form or within subfolders on the screen. To access a subfolder, select
the desired folder; the available options related to that feature will then display on the screen.
NOTE:Depending on the vehicle’s options, feature settings may vary.
Setting Name Description
Forward Collision Warning SensitivityThis setting will change the distance at which the Forward Collision Warning
(FCW) alert sounds. The “Medium” setting will have the FCW system signal when an object is in view, and the possibility of a collision is detected. The
“Near” setting will have the FCW system signal when the object is closer to the
vehicle. The “Far” setting will have the FCW system signal when an object is at a far distance from the vehicle.
Forward Collision Warning
This setting will turn the Forward Collision Warning system on or off. The “Off” setting
will deactivate the FCW system. The “Warning Only” setting will provide only an
audible chime when a collision is detected. The “Warning + Active Braking” setting
will provide an audible chime and apply brake pressure when a collision is detected.
ParkSense This setting will change the type of ParkSense alert when a close object is
detected and provide both an audible chime and a visual display.
Rear ParkSense Volume This setting adjusts the volume of the Rear ParkSense system. The available
settings are “Low”, “Medium”, and “High”.
Blind Spot Alert This setting will change the type of alert provided when an object is detected
in a vehicle’s blind spot. The “Off” setting will turn off Blind Spot Alert. The
“Lights” setting will activate the Blind Spot Alert lights on the outside mirrors. The “Lights & Chime” setting will activate both the lights on the outside mirrors and an audible chime.5
21_LA_OM_EN_USC_t.book Page 125
Page 140 of 328

138MULTIMEDIA
DRAG & DROP MENU BAR
The Uconnect features and services in the main
menu bar are easily customized for your
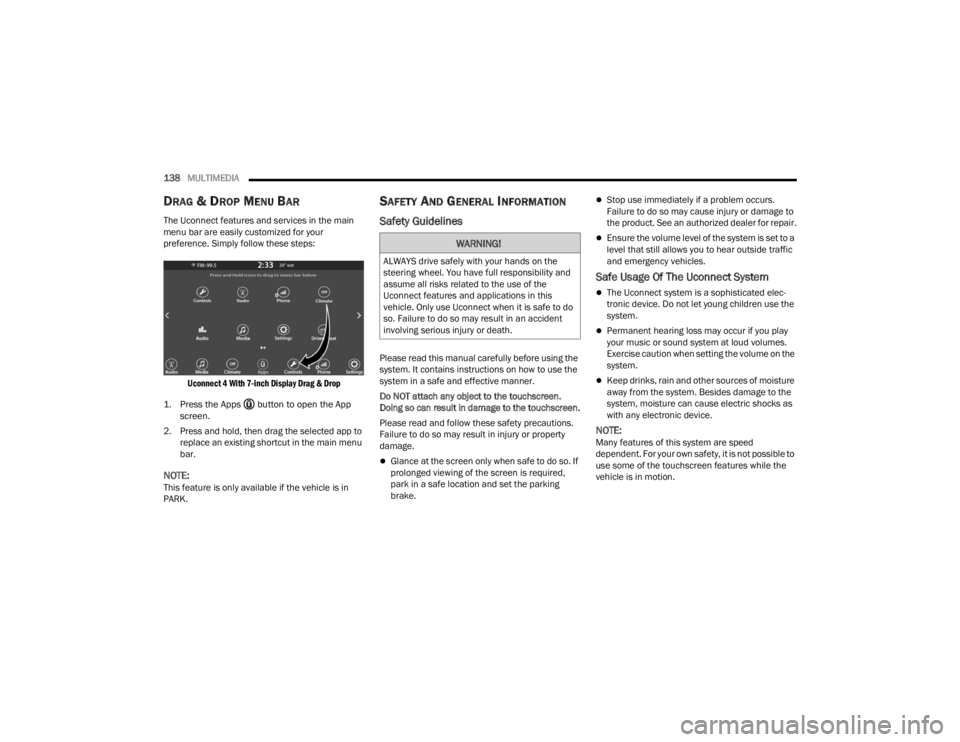
preference. Simply follow these steps:
Uconnect 4 With 7-inch Display Drag & Drop
1. Press the Apps button to open the App screen.
2. Press and hold, then drag the selected app to replace an existing shortcut in the main menu
bar.
NOTE:This feature is only available if the vehicle is in
PARK.
SAFETY AND GENERAL INFORMATION
Safety Guidelines
Please read this manual carefully before using the
system. It contains instructions on how to use the
system in a safe and effective manner.
Do NOT attach any object to the touchscreen.
Doing so can result in damage to the touchscreen.
Please read and follow these safety precautions.
Failure to do so may result in injury or property
damage.
Glance at the screen only when safe to do so. If
prolonged viewing of the screen is required,
park in a safe location and set the parking
brake.
Stop use immediately if a problem occurs.
Failure to do so may cause injury or damage to
the product. See an authorized dealer for repair.
Ensure the volume level of the system is set to a
level that still allows you to hear outside traffic
and emergency vehicles.
Safe Usage Of The Uconnect System
The Uconnect system is a sophisticated elec -
tronic device. Do not let young children use the
system.
Permanent hearing loss may occur if you play
your music or sound system at loud volumes.
Exercise caution when setting the volume on the
system.
Keep drinks, rain and other sources of moisture
away from the system. Besides damage to the
system, moisture can cause electric shocks as
with any electronic device.
NOTE:Many features of this system are speed
dependent. For your own safety, it is not possible to
use some of the touchscreen features while the
vehicle is in motion.
WARNING!
ALWAYS drive safely with your hands on the
steering wheel. You have full responsibility and
assume all risks related to the use of the
Uconnect features and applications in this
vehicle. Only use Uconnect when it is safe to do
so. Failure to do so may result in an accident
involving serious injury or death.
21_LA_OM_EN_USC_t.book Page 138
Page 171 of 328

MULTIMEDIA169
When the Timers Page is selected, you will be able
to select the Drag or Accel & Braking tabs. The
following will be displayed:
Recent
The most recent successful run of performance
timers. If a run does not complete within the
timers limit, or is aborted, the values shown will
revert to the most recent valid run.
Last
The last recorded successful run of perfor -
mance timers.
Best
The best recorded run of performance timers,
except for braking data.
Save
Pressing the Save button will let you save the
visible page, Recent/Last/Best. Any saved run
over 10 will overwrite the last saved run for
Uconnect system storage. The operation of the
Save feature is listed below:
NOTE:Pressing the Camera icon in the upper right corner
of the screen at any time will save a screenshot of
the screen currently being viewed to the connected
USB device.
Performance Pages — Save
With a USB jump drive installed, press the USB
button to save to the jump drive.
Press the Uconnect button to save the runs to
the Owner web page.
NOTE:Uconnect option will be grayed out or missing if the
vehicle does not have a valid Uconnect account
associated with it.
Press the Cancel button to return to the Timers
page.The tabs on the Timers page contain the timers
listed below:
Reaction Time
Measures the driver's reaction time for
launching the vehicle against a simulated drag
strip timing light (behavior modeled after 500
Sportsman Tree) displayed in the instrument
cluster display.
NOTE:Drag timers (RT, 60 ft [20 m], 330 ft [100 m],
1/8 mile [200 m], 1000 ft [300 m], and 1/4 mile
[400 m]).
NOTE:Accel & Braking timers (0-60 mph [0-100 km/h],
0-100 mph [0-160 km/h], Brake from mph
[km/h], and Brake Distance ft [meters]).
0-60 mph (0-100 km/h)
Displays the time it takes for the vehicle to go
from 0 to 60 mph (0 to 100 km/h).
0-100 mph (0-160 km/h)
Displays the time it takes for the vehicle to go
from 0 to 100 mph (0 to 160 km/h).
60 ft (20 m) ET
Displays the time it takes the vehicle to go 60
feet (20 m).
5
21_LA_OM_EN_USC_t.book Page 169
Page 172 of 328

170MULTIMEDIA
330 ft (100 m) ET
Displays the time it takes the vehicle to go 330
feet (100 m).
⅛ Mile (200 m) ET
Displays the time it takes for the vehicle to go ⅛
mile (200 m).
⅛ Mile (200 m) mph
Displays the vehicle speed at the time ⅛ mile
(200 m) was reached.
1000 ft (300 m) ET
Displays the time it takes the vehicle to go
1000 ft (300 m).
¼ Mile (400 m) ET
Displays the time it takes for the vehicle to go ¼
mile (400 m).
¼ Mile (400 m) mph
Displays the speed the vehicle was at when ¼
mile (400 m) was reached.
Brake Distance ft (meters)
Displays the distance it takes the vehicle to
make a complete stop.
NOTE:The distance measurement will be aborted if the
brake pedal is released or the parking brake is
engaged, before the vehicle comes to a complete
stop.
Brake from mph (km/h)
Displays the speed the vehicle is traveling when
the brake pedal is pressed.
NOTE:Brake Distance and Speed timers only display
"ready" when vehicle is traveling at greater than
30 mph (48 km/h).
GAUGES
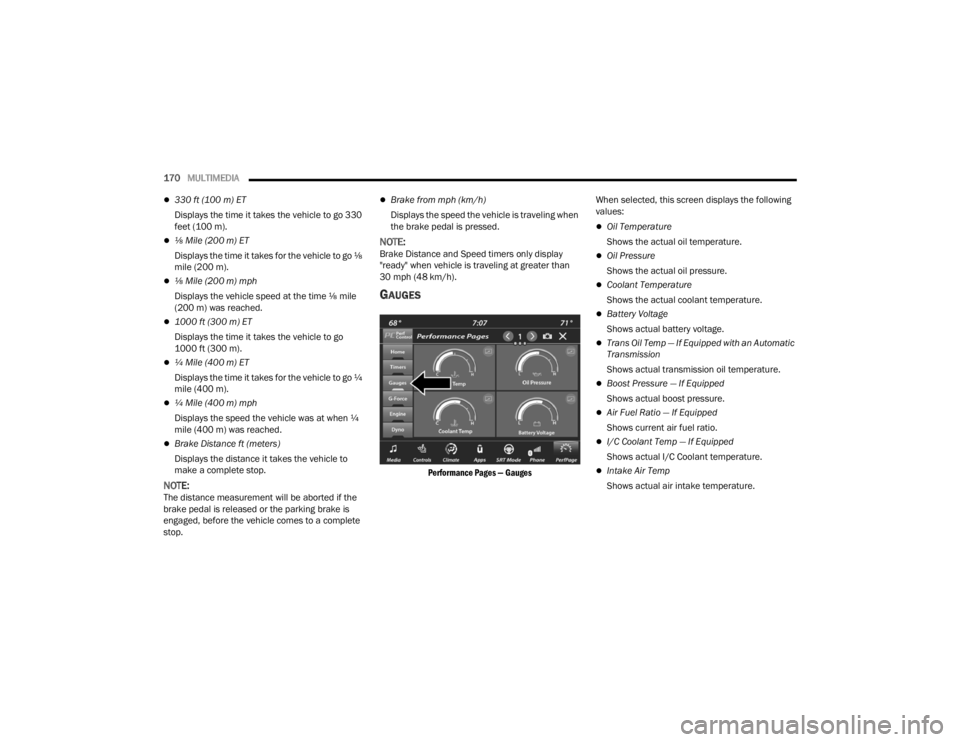
Performance Pages — Gauges
When selected, this screen displays the following
values:
Oil Temperature
Shows the actual oil temperature.
Oil Pressure
Shows the actual oil pressure.
Coolant Temperature
Shows the actual coolant temperature.
Battery Voltage
Shows actual battery voltage.
Trans Oil Temp — If Equipped with an Automatic
Transmission
Shows actual transmission oil temperature.
Boost Pressure — If Equipped
Shows actual boost pressure.
Air Fuel Ratio — If Equipped
Shows current air fuel ratio.
I/C Coolant Temp — If Equipped
Shows actual I/C Coolant temperature.
Intake Air Temp
Shows actual air intake temperature.
21_LA_OM_EN_USC_t.book Page 170
Page 180 of 328

178 (Continued)
SAFETY
SAFETY FEATURES
ANTI-LOCK BRAKE SYSTEM (ABS)
The ABS provides increased vehicle stability and
brake performance under most braking conditions.
The system automatically prevents wheel lock, and
enhances vehicle control during braking.
The ABS performs a self-check cycle to ensure that
the ABS is working properly each time the vehicle
is started and driven. During this self-check, you
may hear a slight clicking sound as well as some
related motor noises.
The ABS is activated during braking when the
system detects one or more wheels are beginning
to lock. Road conditions such as ice, snow, gravel,
bumps, railroad tracks, loose debris, or panic stops
may increase the likelihood of the ABS activating.
You also may experience the following normal
characteristics when the ABS activates:
ABS motor noise or clicking sounds (you may
continue to hear for a short time after the stop)
Brake pedal pulsations
A slight drop of the brake pedal at the end of the
stopThe ABS is designed to function with the Original
Equipment Manufacturer (OEM) tires. Modification
may result in degraded ABS performance.
Anti-Lock Brake System (ABS) Warning
Light
The yellow ABS Warning Light will turn on when the
ignition is placed in the ON/RUN mode and may
stay on for as long as four seconds.
If the ABS Warning Light remains on or comes on
while driving, it indicates that the anti-lock portion
of the brake system is not functioning and that
service is required. However, the conventional
brake system will continue to operate normally if
the ABS Warning Light is on.
WARNING!
The ABS contains sophisticated electronic
equipment that may be susceptible to interfer
-
ence caused by improperly installed or high
output radio transmitting equipment. This
interference can cause possible loss of
anti-lock braking capability. Installation of
such equipment should be performed by qual -
ified professionals.
Pumping of the Anti-Lock Brakes will diminish
their effectiveness and may lead to a collision.
Pumping makes the stopping distance longer.
Just press firmly on your brake pedal when you
need to slow down or stop.
The ABS cannot prevent the natural laws of
physics from acting on the vehicle, nor can it
increase braking or steering efficiency beyond
that afforded by the condition of the vehicle
brakes and tires or the traction afforded.
The ABS cannot prevent collisions, including
those resulting from excessive speed in turns,
following another vehicle too closely, or hydro -
planing.
The capabilities of an ABS equipped vehicle
must never be exploited in a reckless or
dangerous manner that could jeopardize the
user’s safety or the safety of others.
WARNING!
21_LA_OM_EN_USC_t.book Page 178