2021 DODGE CHALLENGER ECO mode
[x] Cancel search: ECO modePage 155 of 328

MULTIMEDIA153
To complete the pairing process, you will need to
reference your mobile phone’s manual. Please
visit
UconnectPhone.com for complete mobile
phone compatibility information.
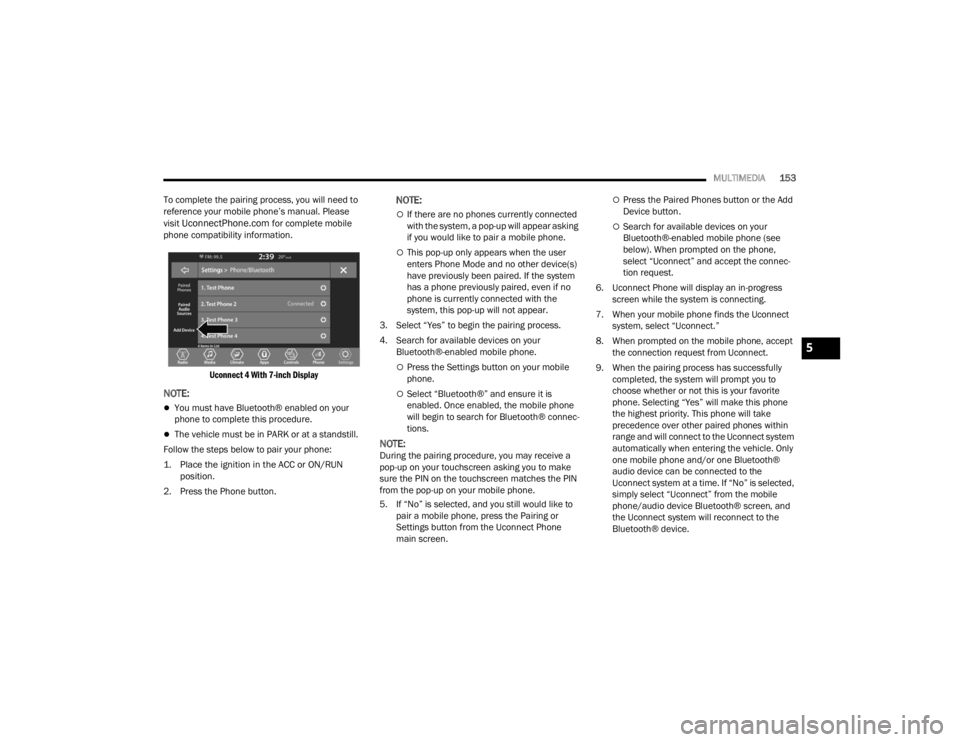
Uconnect 4 With 7-inch Display
NOTE:
You must have Bluetooth® enabled on your
phone to complete this procedure.
The vehicle must be in PARK or at a standstill.
Follow the steps below to pair your phone:
1. Place the ignition in the ACC or ON/RUN position.
2. Press the Phone button.
NOTE:
If there are no phones currently connected
with the system, a pop-up will appear asking
if you would like to pair a mobile phone.
This pop-up only appears when the user
enters Phone Mode and no other device(s)
have previously been paired. If the system
has a phone previously paired, even if no
phone is currently connected with the
system, this pop-up will not appear.
3. Select “Yes” to begin the pairing process.
4. Search for available devices on your Bluetooth®-enabled mobile phone.
Press the Settings button on your mobile
phone.
Select “Bluetooth®” and ensure it is
enabled. Once enabled, the mobile phone
will begin to search for Bluetooth® connec -
tions.
NOTE:During the pairing procedure, you may receive a
pop-up on your touchscreen asking you to make
sure the PIN on the touchscreen matches the PIN
from the pop-up on your mobile phone.
5. If “No” is selected, and you still would like to pair a mobile phone, press the Pairing or
Settings button from the Uconnect Phone
main screen.
Press the Paired Phones button or the Add
Device button.
Search for available devices on your
Bluetooth®-enabled mobile phone (see
below). When prompted on the phone,
select “Uconnect” and accept the connec -
tion request.
6. Uconnect Phone will display an in-progress screen while the system is connecting.
7. When your mobile phone finds the Uconnect system, select “Uconnect.”
8. When prompted on the mobile phone, accept the connection request from Uconnect.
9. When the pairing process has successfully completed, the system will prompt you to
choose whether or not this is your favorite
phone. Selecting “Yes” will make this phone
the highest priority. This phone will take
precedence over other paired phones within
range and will connect to the Uconnect system
automatically when entering the vehicle. Only
one mobile phone and/or one Bluetooth®
audio device can be connected to the
Uconnect system at a time. If “No” is selected,
simply select “Uconnect” from the mobile
phone/audio device Bluetooth® screen, and
the Uconnect system will reconnect to the
Bluetooth® device.
5
21_LA_OM_EN_USC_t.book Page 153
Page 162 of 328

160MULTIMEDIA
Did You Know: When providing a Voice Command,
push the Phone button and say “ Call”, then
pronounce the name exactly as it appears in your
phonebook. When a contact has multiple phone
numbers, you can say “ Call John Smith work”.
Voice Text Reply — If Equipped
Uconnect can announce incoming text messages.
Push the VR button or Phone button and
say:
1. “
Listen
” to have the system read an incoming
text message. (Must have compatible mobile
phone paired to Uconnect system.)
2. “ Reply ” after an incoming text message has
been read.
Listen to the Uconnect prompts. After the
beep, repeat one of the predefined messag -
es and follow the system prompts. NOTE:
Only use the numbering listed in the provided
table. Otherwise, the system will not transpose the
message.
Did You Know:
Your mobile phone must have the
full implementation of the Message Access Profile
(MAP) to take advantage of this feature. For details
about MAP, visit
UconnectPhone.com.
Apple® iPhone® iOS 5 or later supports reading
incoming text messages only. For further
information on how to enable this feature on your
Apple® iPhone®, refer to your iPhone® “User
Manual”. Did You Know:
Voice Text Reply is not compatible
with iPhone®, but if your vehicle is equipped with
Siri® Eyes Free, you can use your voice to send a
text message.
Siri® Eyes Free — If Equipped
When used with your Apple® iPhone® connected
to your vehicle via Bluetooth®, Siri lets you use
your voice to send text messages, select media,
place phone calls and much more. Siri uses your
natural language to understand what you mean
and responds back to confirm your requests. The
system is designed to keep your eyes on the road
and your hands on the wheel by letting Siri help you
perform useful tasks.
To enable Siri, push and hold, then release the
Uconnect Voice Recognition (VR) button on the
steering wheel. After you hear a double beep, you
can ask Siri to play podcasts and music, get
directions, read text messages, and many other
useful requests.
BLUETOOTH® COMMUNICATION LINK
Mobile phones may lose connection to the
Uconnect Phone. When this happens, the
connection can generally be re-established by
restarting the mobile phone. Your mobile phone is
recommended to remain in Bluetooth® ON mode.
PRE-DEFINED VOICE TEXT REPLY
RESPONSES
Yes. Stuck in
traffic. See you later.
No. Start without
me. I’ll be late.
Okay. Where are
you? I will be 5
25, 30, 45,
60> minutes late.
Call me.
Are you there
yet?
I’ll call you later. I need
directions. See you in 5
minutes.
I’m on my way.
Can’t talk right
now.
I’m lost. Thanks.
PRE-DEFINED VOICE TEXT REPLY
RESPONSES
21_LA_OM_EN_USC_t.book Page 160
Page 171 of 328

MULTIMEDIA169
When the Timers Page is selected, you will be able
to select the Drag or Accel & Braking tabs. The
following will be displayed:
Recent
The most recent successful run of performance
timers. If a run does not complete within the
timers limit, or is aborted, the values shown will
revert to the most recent valid run.
Last
The last recorded successful run of perfor -
mance timers.
Best
The best recorded run of performance timers,
except for braking data.
Save
Pressing the Save button will let you save the
visible page, Recent/Last/Best. Any saved run
over 10 will overwrite the last saved run for
Uconnect system storage. The operation of the
Save feature is listed below:
NOTE:Pressing the Camera icon in the upper right corner
of the screen at any time will save a screenshot of
the screen currently being viewed to the connected
USB device.
Performance Pages — Save
With a USB jump drive installed, press the USB
button to save to the jump drive.
Press the Uconnect button to save the runs to
the Owner web page.
NOTE:Uconnect option will be grayed out or missing if the
vehicle does not have a valid Uconnect account
associated with it.
Press the Cancel button to return to the Timers
page.The tabs on the Timers page contain the timers
listed below:
Reaction Time
Measures the driver's reaction time for
launching the vehicle against a simulated drag
strip timing light (behavior modeled after 500
Sportsman Tree) displayed in the instrument
cluster display.
NOTE:Drag timers (RT, 60 ft [20 m], 330 ft [100 m],
1/8 mile [200 m], 1000 ft [300 m], and 1/4 mile
[400 m]).
NOTE:Accel & Braking timers (0-60 mph [0-100 km/h],
0-100 mph [0-160 km/h], Brake from mph
[km/h], and Brake Distance ft [meters]).
0-60 mph (0-100 km/h)
Displays the time it takes for the vehicle to go
from 0 to 60 mph (0 to 100 km/h).
0-100 mph (0-160 km/h)
Displays the time it takes for the vehicle to go
from 0 to 100 mph (0 to 160 km/h).
60 ft (20 m) ET
Displays the time it takes the vehicle to go 60
feet (20 m).
5
21_LA_OM_EN_USC_t.book Page 169
Page 176 of 328

174MULTIMEDIA
Available Mode Configurations
Refer to the Sport and Default Modes for their
detailed operation.
NOTE:These settings will remain in effect when using the
Launch Control feature.
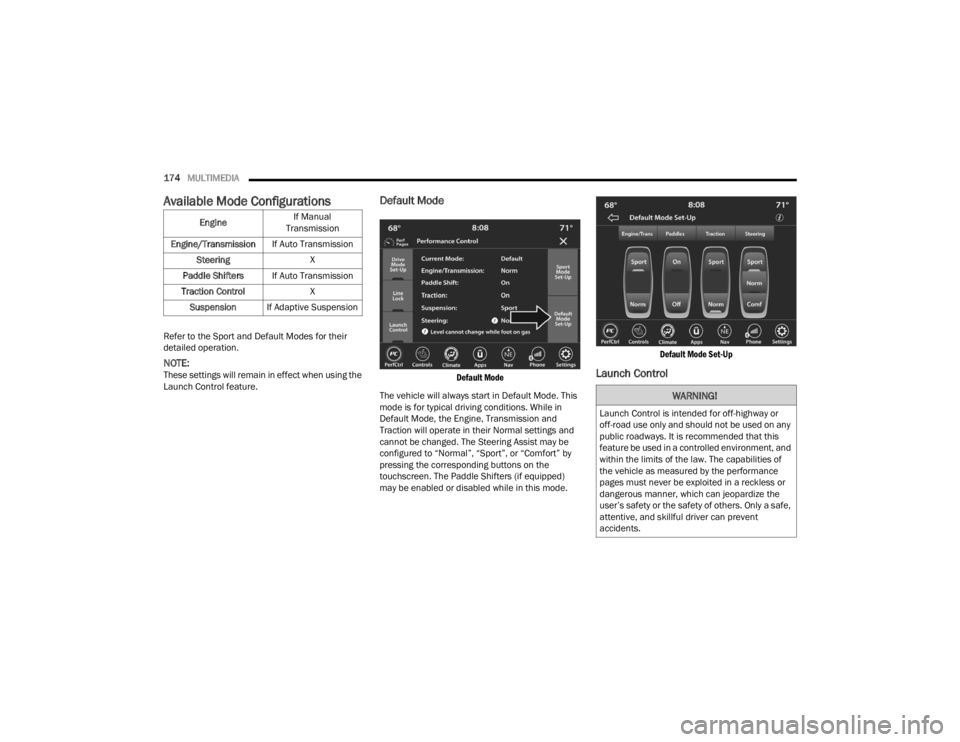
Default Mode
Default Mode
The vehicle will always start in Default Mode. This
mode is for typical driving conditions. While in
Default Mode, the Engine, Transmission and
Traction will operate in their Normal settings and
cannot be changed. The Steering Assist may be
configured to “Normal”, “Sport”, or “Comfort” by
pressing the corresponding buttons on the
touchscreen. The Paddle Shifters (if equipped)
may be enabled or disabled while in this mode.
Default Mode Set-Up
Launch Control
Engine
If Manual
Transmission
Engine/Transmission If Auto Transmission
Steering X
Paddle Shifters If Auto Transmission
Traction Control X
Suspension If Adaptive Suspension
WARNING!
Launch Control is intended for off-highway or
off-road use only and should not be used on any
public roadways. It is recommended that this
feature be used in a controlled environment, and
within the limits of the law. The capabilities of
the vehicle as measured by the performance
pages must never be exploited in a reckless or
dangerous manner, which can jeopardize the
user’s safety or the safety of others. Only a safe,
attentive, and skillful driver can prevent
accidents.
21_LA_OM_EN_USC_t.book Page 174
Page 177 of 328

MULTIMEDIA175
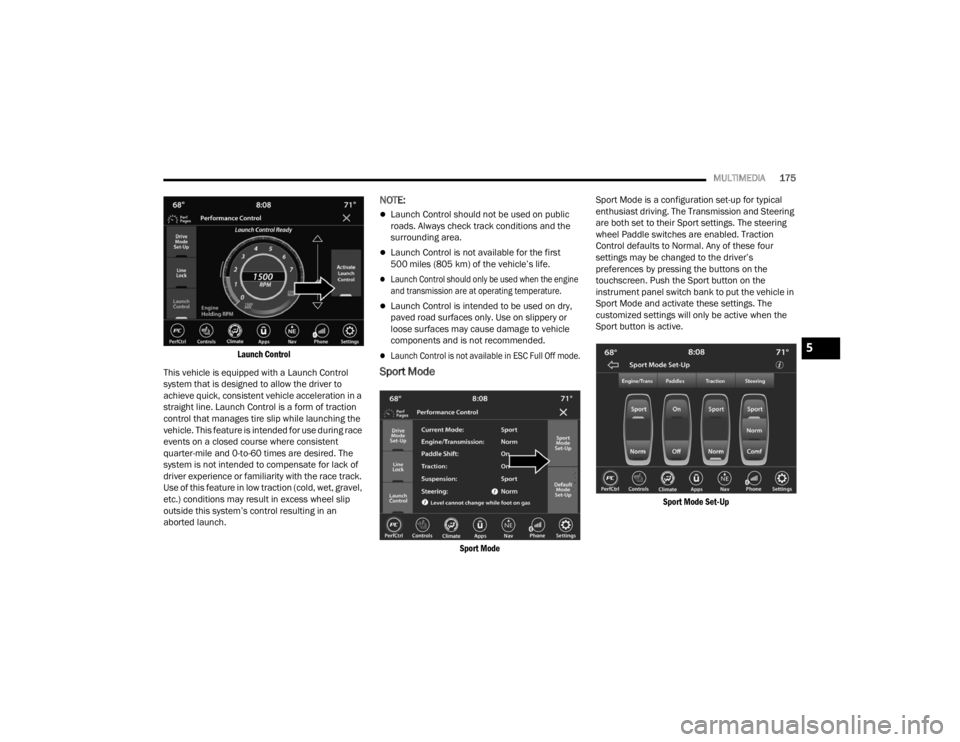
Launch Control
This vehicle is equipped with a Launch Control
system that is designed to allow the driver to
achieve quick, consistent vehicle acceleration in a
straight line. Launch Control is a form of traction
control that manages tire slip while launching the
vehicle. This feature is intended for use during race
events on a closed course where consistent
quarter-mile and 0-to-60 times are desired. The
system is not intended to compensate for lack of
driver experience or familiarity with the race track.
Use of this feature in low traction (cold, wet, gravel,
etc.) conditions may result in excess wheel slip
outside this system’s control resulting in an
aborted launch.
NOTE:
Launch Control should not be used on public
roads. Always check track conditions and the
surrounding area.
Launch Control is not available for the first
500 miles (805 km) of the vehicle’s life.
Launch Control should only be used when the engine
and transmission are at operating temperature.
Launch Control is intended to be used on dry,
paved road surfaces only. Use on slippery or
loose surfaces may cause damage to vehicle
components and is not recommended.
Launch Control is not available in ESC Full Off mode.
Sport Mode
Sport Mode
Sport Mode is a configuration set-up for typical
enthusiast driving. The Transmission and Steering
are both set to their Sport settings. The steering
wheel Paddle switches are enabled. Traction
Control defaults to Normal. Any of these four
settings may be changed to the driver’s
preferences by pressing the buttons on the
touchscreen. Push the Sport button on the
instrument panel switch bank to put the vehicle in
Sport Mode and activate these settings. The
customized settings will only be active when the
Sport button is active.
Sport Mode Set-Up
5
21_LA_OM_EN_USC_t.book Page 175
Page 178 of 328

176MULTIMEDIA
Possible Performance Control configurations are
listed below with accompanying descriptions. The
information contained in the list below can also be
accessed from within the mode Set-Up menus. To
access the information, press the Info button on
the touchscreen from the mode Set-Up menu, and
use the Left/Right arrows to toggle through
available descriptions. The title for each system in
the Set-Up menu can be pressed, which provides
the descriptions for each function of that system.
ENGINE/TRANS (IF EQUIPPED WITH AUTO -
MATIC TRANSMISSION)
Engine/Trans
SPORT
Press the Sport button on the touchscreen for
improved throttle response and modified
shifting for an enhanced driving experience.
NORMAL
Press the Normal button on the touchscreen for
a balance of throttle response, shift comfort and
economy for normal driving.
PADDLE SHIFTERS — IF EQUIPPED WITH AUTO -
MATIC TRANSMISSION
Paddle – Automatic Transmission
ON
Press the On button on the touchscreen to
enable steering wheel Paddle Shifters.
OFF
Press the Off button on the touchscreen to
disable steering wheel Paddle Shifters.
TRACTION
Traction Control
21_LA_OM_EN_USC_t.book Page 176
Page 180 of 328

178 (Continued)
SAFETY
SAFETY FEATURES
ANTI-LOCK BRAKE SYSTEM (ABS)
The ABS provides increased vehicle stability and
brake performance under most braking conditions.
The system automatically prevents wheel lock, and
enhances vehicle control during braking.
The ABS performs a self-check cycle to ensure that
the ABS is working properly each time the vehicle
is started and driven. During this self-check, you
may hear a slight clicking sound as well as some
related motor noises.
The ABS is activated during braking when the
system detects one or more wheels are beginning
to lock. Road conditions such as ice, snow, gravel,
bumps, railroad tracks, loose debris, or panic stops
may increase the likelihood of the ABS activating.
You also may experience the following normal
characteristics when the ABS activates:
ABS motor noise or clicking sounds (you may
continue to hear for a short time after the stop)
Brake pedal pulsations
A slight drop of the brake pedal at the end of the
stopThe ABS is designed to function with the Original
Equipment Manufacturer (OEM) tires. Modification
may result in degraded ABS performance.
Anti-Lock Brake System (ABS) Warning
Light
The yellow ABS Warning Light will turn on when the
ignition is placed in the ON/RUN mode and may
stay on for as long as four seconds.
If the ABS Warning Light remains on or comes on
while driving, it indicates that the anti-lock portion
of the brake system is not functioning and that
service is required. However, the conventional
brake system will continue to operate normally if
the ABS Warning Light is on.
WARNING!
The ABS contains sophisticated electronic
equipment that may be susceptible to interfer
-
ence caused by improperly installed or high
output radio transmitting equipment. This
interference can cause possible loss of
anti-lock braking capability. Installation of
such equipment should be performed by qual -
ified professionals.
Pumping of the Anti-Lock Brakes will diminish
their effectiveness and may lead to a collision.
Pumping makes the stopping distance longer.
Just press firmly on your brake pedal when you
need to slow down or stop.
The ABS cannot prevent the natural laws of
physics from acting on the vehicle, nor can it
increase braking or steering efficiency beyond
that afforded by the condition of the vehicle
brakes and tires or the traction afforded.
The ABS cannot prevent collisions, including
those resulting from excessive speed in turns,
following another vehicle too closely, or hydro -
planing.
The capabilities of an ABS equipped vehicle
must never be exploited in a reckless or
dangerous manner that could jeopardize the
user’s safety or the safety of others.
WARNING!
21_LA_OM_EN_USC_t.book Page 178
Page 181 of 328

SAFETY179
If the ABS Warning Light is on, the brake system
should be serviced as soon as possible to restore
the benefits of Anti-Lock Brakes. If the ABS
Warning Light does not come on when the ignition
is placed in the ON/RUN mode, have the light
repaired as soon as possible.
ELECTRONIC BRAKE CONTROL (EBC)
S
YSTEM
Your vehicle is equipped with an advanced
Electronic Brake Control (EBC) system. This system
includes Anti-Lock Brake System (ABS), Brake
Assist System (BAS), Electronic Brake Force
Distribution (EBD), Electronic Roll Mitigation
(ERM), Electronic Stability Control (ESC), Hill Start
Assist (HSA), and Traction Control System (TCS).
These systems work together to enhance both
vehicle stability and control in various driving
conditions.
Your vehicle may also be equipped with Ready
Alert Braking (RAB) and Rain Brake Support (RBS).
Brake Assist System (BAS)
The BAS is designed to optimize the vehicle’s
braking capability during emergency braking
maneuvers. The system detects an emergency
braking situation by sensing the rate and amount
of brake application and then applies optimum
pressure to the brakes. This can help reduce
braking distances. The BAS complements the Anti-Lock Brake System (ABS). Applying the brakes
very quickly results in the best BAS assistance. To
receive the benefit of the system, you must apply
continuous braking pressure during the stopping
sequence (do not “pump” the brakes). Do not
reduce brake pedal pressure unless braking is no
longer desired. Once the brake pedal is released,
the BAS is deactivated.Brake System Warning Light
The red Brake System Warning Light will turn on
when the ignition is placed in the ON/RUN mode
and may stay on for as long as four seconds.
If the Brake System Warning Light remains on or
comes on while driving, it indicates that the brake
system is not functioning properly and that
immediate service is required. If the Brake System Warning Light does not come on when the ignition
is placed in the ON/RUN mode, have the light
repaired as soon as possible.
Electronic Brake Force Distribution (EBD)
EBD manages the distribution of the braking
torque between the front and rear axles by limiting
braking pressure to the rear axle. This is done to
prevent overslip of the rear wheels to avoid vehicle
instability, and to prevent the rear axle from
entering the Anti-Lock Brake System (ABS) before
the front axle.
Electronic Roll Mitigation (ERM)
ERM anticipates the potential for wheel lift by
monitoring the driver’s steering wheel input and
the speed of the vehicle. When ERM determines
that the rate of change of the steering wheel angle
and vehicle’s speed are sufficient to potentially
cause wheel lift, it then applies the appropriate
brake and may also reduce engine power to lessen
the chance that wheel lift will occur. ERM can only
reduce the chance of wheel lift occurring during
severe or evasive driving maneuvers; it cannot
prevent wheel lift due to other factors, such as
road conditions, leaving the roadway, or striking
objects or other vehicles.
NOTE:ERM is disabled any time the ESC is in “Full Off”
mode (if equipped). For a complete explanation of
the available ESC modes, see Ú
page 180.
WARNING!
The Brake Assist System (BAS) cannot prevent
the natural laws of physics from acting on the
vehicle, nor can it increase the traction afforded
by prevailing road conditions. BAS cannot
prevent collisions, including those resulting from
excessive speed in turns, driving on very slippery
surfaces, or hydroplaning. The capabilities of a
BAS-equipped vehicle must never be exploited in
a reckless or dangerous manner, which could
jeopardize the user's safety or the safety of
others.
6
21_LA_OM_EN_USC_t.book Page 179