2021 DODGE CHALLENGER ESP
[x] Cancel search: ESPPage 98 of 328

96STARTING AND OPERATING
(Continued)
NOTE:
If the ACC sensor detects a vehicle ahead, ACC
will apply limited braking or accelerate (not to
exceed the original set speed) automatically to
maintain a preset following distance, while
matching the speed of the vehicle ahead.
Any chassis/suspension or tire size modifica -
tions to the vehicle will affect the performance
of the Adaptive Cruise Control and Forward Colli -
sion Warning system.
Fixed Speed Cruise Control (ACC not enabled)
will not detect vehicles directly ahead of you.
Always be aware of the feature selected
Ú page 311.
Adaptive Cruise Control (ACC) Operation
The Cruise Control buttons (located on the right
side of the steering wheel) operate the Adaptive
Cruise Control (ACC) system.
Adaptive Cruise Control Buttons
WARNING!
Adaptive Cruise Control (ACC) is a convenience
system. It is not a substitute for active driver
involvement. It is always the driver’s responsi -
bility to be attentive of road, traffic, and weather
conditions, vehicle speed, distance to the
vehicle ahead; and, most importantly, brake
operation to ensure safe operation of the vehicle
under all road conditions. Your complete atten -
tion is always required while driving to maintain
safe control of your vehicle. Failure to follow
these warnings can result in a collision and
death or serious personal injury.
The ACC system:
Does not react to pedestrians, oncoming
vehicles, and stationary objects (e.g., a
stopped vehicle in a traffic jam or a
disabled vehicle).
Cannot take street, traffic, and weather
conditions into account, and may be
limited upon adverse sight distance condi -
tions.
Does not always fully recognize complex
driving conditions, which can result in
wrong or missing distance warnings.
You should switch off the ACC system:
When driving in fog, heavy rain, heavy snow,
sleet, heavy traffic, and complex driving situa -
tions (i.e., in highway construction zones).
When entering a turn lane or highway
off-ramp; when driving on roads that are
winding, icy, snow-covered, slippery, or have
steep uphill or downhill slopes.
When towing a trailer up or down steep slopes.
When circumstances do not allow safe driving
at a constant speed.
WARNING!
1 — CANC/Cancel
2 — Fixed Speed Cruise Control On/Off
3 — Adaptive Cruise Control (ACC) On/Off
4 — Distance Decrease
5 — SET (+)/Accel
6 — RES/Resume
7 — SET (-)/Decel
8 — Distance Increase
21_LA_OM_EN_USC_t.book Page 96
Page 110 of 328

108STARTING AND OPERATING
ParkSense will reduce the volume of the radio
when it is sounding an audio tone.
Clean the ParkSense sensors regularly, taking
care not to scratch or damage them. The
sensors must not be covered with ice, snow,
slush, mud, dirt or debris. Failure to do so can
result in the system not working properly. The
ParkSense system might not detect an obstacle
behind the fascia/bumper, or it could provide a
false indication that an obstacle is behind the
fascia/bumper.
Ensure the ParkSense system is off if objects
such as bicycle carriers, trailer hitches, etc., are
placed within 12 inches (30 cm) from the rear
fascia/bumper. Failure to do so can result in the
system misinterpreting a close object as a
sensor problem, causing the “PARKSENSE
UNAVAILABLE SERVICE REQUIRED” message to
be shown in the instrument cluster display.
PARKVIEW REAR BACK UP CAMERA
The ParkView Rear Back Up Camera allows you to
see an on-screen image of the rear surroundings of
your vehicle whenever the gear selector is put into
REVERSE. The ParkView camera is located on the
rear of the vehicle above the rear license plate. The
image will be displayed in the touchscreen display
along with a caution note to “Check Entire
Surroundings” across the top of the screen. After
five seconds, this note will disappear.
NOTE:The ParkView Rear Back Up Camera has program -
mable modes of operation that may be selected
through the Uconnect system Ú page 120.If your vehicle is equipped with the Camera Delay
feature and it is turned on, the rear camera image
will be displayed for up to 10 seconds when the
vehicle is shifted out of REVERSE. However, this
feature is canceled if the forward vehicle speed
exceeds 8 mph (13 km/h), the transmission is
shifted into PARK, the vehicle's ignition is placed in
the OFF position, or by pressing the image defeat X
button.
When the vehicle is shifted out of REVERSE with
Camera Delay turned off, the rear camera mode is
exited and the last touchscreen appears again.
When enabled, active guidelines are overlaid on
the image to illustrate the width of the vehicle and
its projected backup path based on the steering
wheel position. The active guidelines will show
separate zones that will help indicate the distance
to the rear of the vehicle.
If the vehicle speed remains below 8 mph (13 km/
h), the rear view camera image will continue to be
displayed until the transmission is shifted into
PARK, the vehicle’s ignition is placed in the OFF
position, or the image defeat X button is pressed.
Different colored zones indicate the distance to
the rear of the vehicle.
WARNING!
Drivers must be careful when backing up even
when using the Rear Park Assist system. Always
check carefully behind your vehicle, and be sure
to check for pedestrians, animals, other
vehicles, obstructions, or blind spots before
backing up. You are responsible for the safety of
your surroundings and must continue to pay
attention while backing up. Failure to do so can
result in serious injury or death.
CAUTION!
ParkSense is only a parking aid and it is
unable to recognize every obstacle, including
small obstacles. Parking curbs might be
temporarily detected or not detected at all.
Obstacles located above or below the sensors
will not be detected when they are in close
proximity.
The vehicle must be driven slowly when using
ParkSense in order to be able to stop in time
when an obstacle is detected. It is recom
-
mended that the driver looks over his/her
shoulder when using ParkSense.
21_LA_OM_EN_USC_t.book Page 108
Page 111 of 328

STARTING AND OPERATING109
The following table shows the approximate
distances for each zone:
NOTE:If snow, ice, mud, or any foreign substance builds
up on the camera lens, clean the lens, rinse with
water, and dry with a soft cloth. Do not cover the
lens.
REFUELING THE VEHICLE
The gas cap is located behind the fuel filler door on
the left side of the vehicle. Use a finger to pull open
the door. If the gas cap is lost or damaged, be sure
to use the correct replacement cap for this vehicle.
Fuel Filler Cap
NOTE:When removing the fuel filler cap, lay the cap
tether in the hook, located on the fuel filler door.
Zone
Distance To The Rear Of
The Vehicle
Red 0 - 1 ft (0 - 30 cm)
Yellow 1 ft - 6.5 ft (30 cm - 2 m)
Green 6.5 ft or greater
(2 m or greater)
WARNING!
Drivers must be careful when backing up even
when using the ParkView Rear Back Up Camera.
Always check carefully behind your vehicle, and
be sure to check for pedestrians, animals, other
vehicles, obstructions, or blind spots before
backing up. You are responsible for the safety of
your surroundings and must continue to pay
attention while backing up. Failure to do so can
result in serious injury or death.
CAUTION!
To avoid vehicle damage, ParkView should
only be used as a parking aid. The ParkView
camera is unable to view every obstacle or
object in your drive path.
To avoid vehicle damage, the vehicle must be
driven slowly when using ParkView to be able
to stop in time when an obstacle is seen. It is
recommended that the driver look frequently
over his/her shoulder when using ParkView.
WARNING!
Never have any smoking materials lit in or
near the vehicle when the fuel door is open or
the tank is being filled.
Never add fuel when the engine is running.
This is in violation of most state and federal
fire regulations and may cause the Malfunc -
tion Indicator Light to turn on.
A fire may result if fuel is pumped into a
portable container that is inside of a vehicle.
You could be burned. Always place fuel
containers on the ground while filling.
4
21_LA_OM_EN_USC_t.book Page 109
Page 123 of 328

MULTIMEDIA121
Language
Display
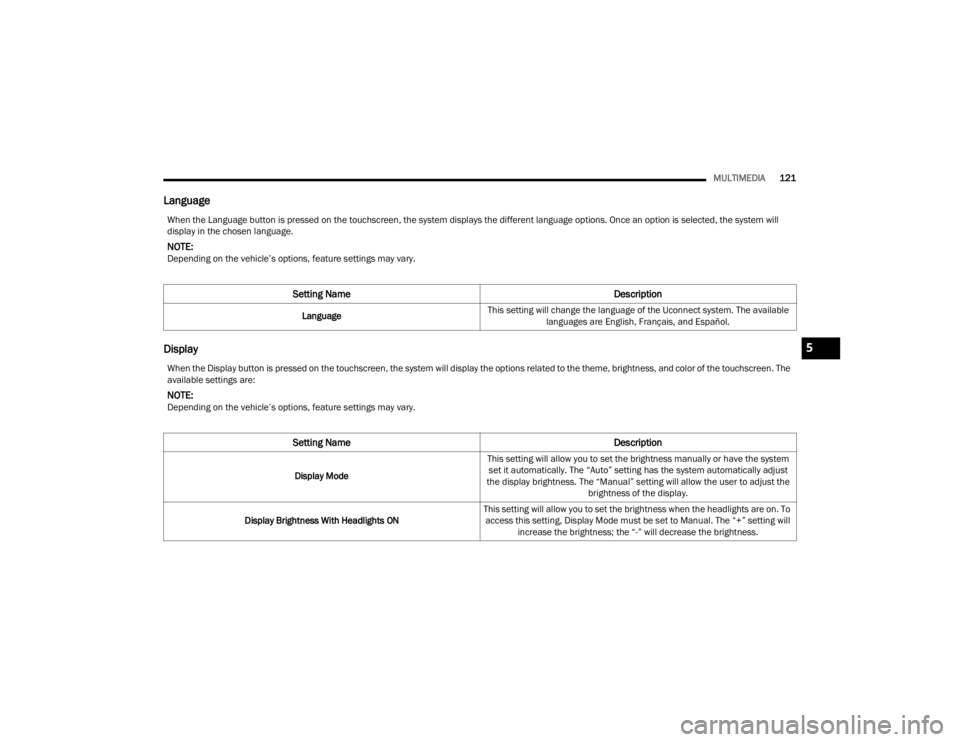
When the Language button is pressed on the touchscreen, the system displays the different language options. Once an option is selected, the system will
display in the chosen language.
NOTE:Depending on the vehicle’s options, feature settings may vary.
Setting Name Description
LanguageThis setting will change the language of the Uconnect system. The available
languages are English, Français, and Español.
When the Display button is pressed on the touchscreen, the system will display the options related to the theme, brightness, and color of the touchscreen. The
available settings are:
NOTE:Depending on the vehicle’s options, feature settings may vary.
Setting Name Description
Display ModeThis setting will allow you to set the brightness manually or have the system
set it automatically. The “Auto” setting has the system automatically adjust
the display brightness. The “Manual” setting will allow the user to adjust the brightness of the display.
Display Brightness With Headlights ON This setting will allow you to set the brightness when the headlights are on. To
access this setting, Display Mode must be set to Manual. The “+” setting will increase the brightness; the “-” will decrease the brightness.
5
21_LA_OM_EN_USC_t.book Page 121
Page 125 of 328

MULTIMEDIA123
Voice
Clock
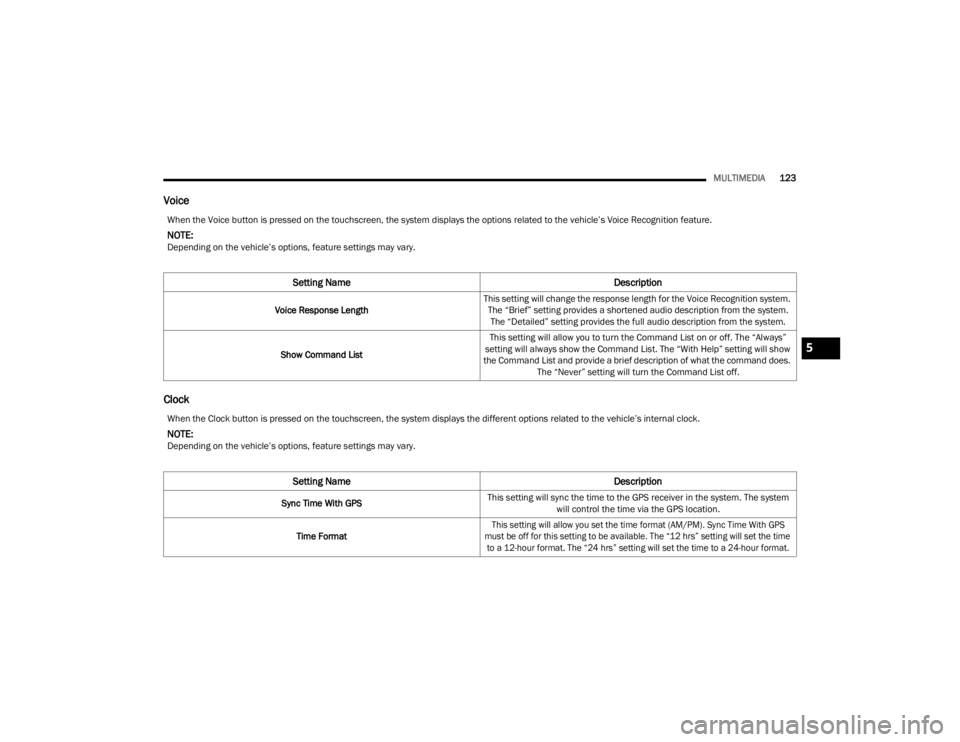
When the Voice button is pressed on the touchscreen, the system displays the options related to the vehicle’s Voice Recognition feature.
NOTE:Depending on the vehicle’s options, feature settings may vary.
Setting Name Description
Voice Response LengthThis setting will change the response length for the Voice Recognition system.
The “Brief” setting provides a shortened audio description from the system. The “Detailed” setting provides the full audio description from the system.
Show Command List This setting will allow you to turn the Command List on or off. The “Always”
setting will always show the Command List. The “With Help” setting will show
the Command List and provide a brief description of what the command does. The “Never” setting will turn the Command List off.
When the Clock button is pressed on the touchscreen, the system displays the different options related to the vehicle’s internal clock.
NOTE:Depending on the vehicle’s options, feature settings may vary.
Setting Name Description
Sync Time With GPSThis setting will sync the time to the GPS receiver in the system. The system
will control the time via the GPS location.
Time Format
This setting will allow you set the time format (AM/PM). Sync Time With GPS
must be off for this setting to be available. The “12 hrs” setting will set the time to a 12-hour format. The “24 hrs” setting will set the time to a 24-hour format.
5
21_LA_OM_EN_USC_t.book Page 123
Page 140 of 328

138MULTIMEDIA
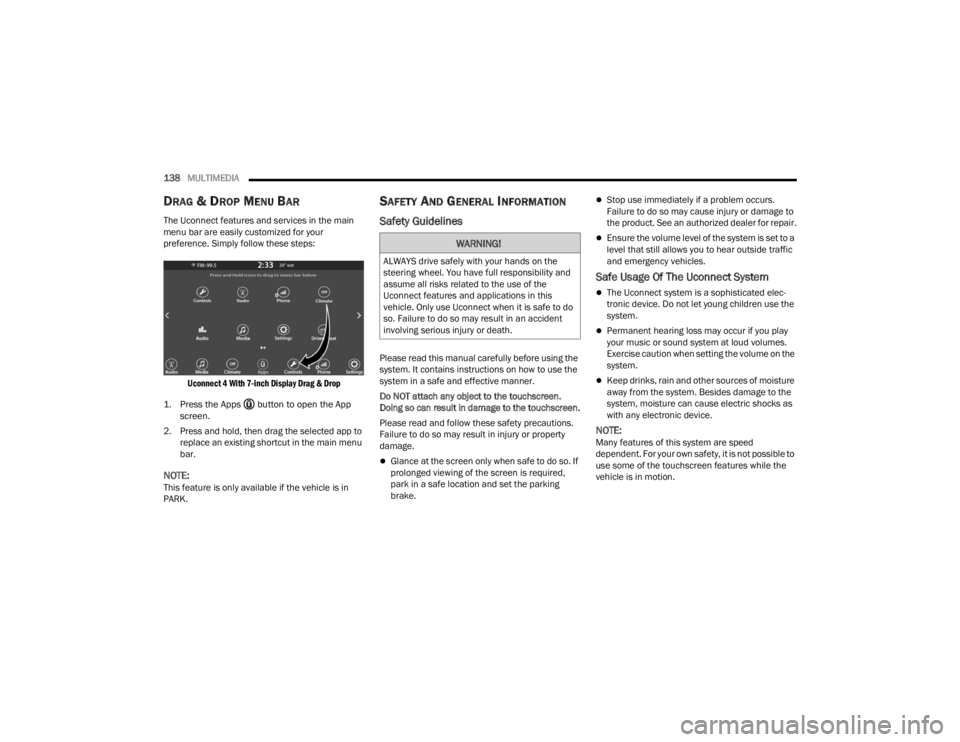
DRAG & DROP MENU BAR
The Uconnect features and services in the main
menu bar are easily customized for your
preference. Simply follow these steps:
Uconnect 4 With 7-inch Display Drag & Drop
1. Press the Apps button to open the App screen.
2. Press and hold, then drag the selected app to replace an existing shortcut in the main menu
bar.
NOTE:This feature is only available if the vehicle is in
PARK.
SAFETY AND GENERAL INFORMATION
Safety Guidelines
Please read this manual carefully before using the
system. It contains instructions on how to use the
system in a safe and effective manner.
Do NOT attach any object to the touchscreen.
Doing so can result in damage to the touchscreen.
Please read and follow these safety precautions.
Failure to do so may result in injury or property
damage.
Glance at the screen only when safe to do so. If
prolonged viewing of the screen is required,
park in a safe location and set the parking
brake.
Stop use immediately if a problem occurs.
Failure to do so may cause injury or damage to
the product. See an authorized dealer for repair.
Ensure the volume level of the system is set to a
level that still allows you to hear outside traffic
and emergency vehicles.
Safe Usage Of The Uconnect System
The Uconnect system is a sophisticated elec -
tronic device. Do not let young children use the
system.
Permanent hearing loss may occur if you play
your music or sound system at loud volumes.
Exercise caution when setting the volume on the
system.
Keep drinks, rain and other sources of moisture
away from the system. Besides damage to the
system, moisture can cause electric shocks as
with any electronic device.
NOTE:Many features of this system are speed
dependent. For your own safety, it is not possible to
use some of the touchscreen features while the
vehicle is in motion.
WARNING!
ALWAYS drive safely with your hands on the
steering wheel. You have full responsibility and
assume all risks related to the use of the
Uconnect features and applications in this
vehicle. Only use Uconnect when it is safe to do
so. Failure to do so may result in an accident
involving serious injury or death.
21_LA_OM_EN_USC_t.book Page 138
Page 142 of 328

140MULTIMEDIA
RADIO MODE
Radio Controls
Uconnect 4 With 7-inch Display
The radio is equipped with the following modes:
AM
FM
SiriusXM® Satellite Radio (if equipped)
Press the Radio button on the touchscreen to enter
the Radio Mode. The different tuner modes, AM,
FM, and SXM, can then be selected by pressing the
corresponding buttons in Radio Mode.
Volume & On/Off Control
Push the Volume & On/Off control knob to turn on
and off the Uconnect system.
The electronic volume control turns continuously
(360 degrees) in either direction, without stopping.
Turning the Volume & On/Off control knob
clockwise increases the volume, and
counterclockwise decreases it.
When the audio system is turned on, the sound will
be set at the same volume level as last played.
Mute Button
Push the Mute button to mute or unmute the
system.
Tune/Scroll Control
Turn the rotary Tune/Scroll control knob clockwise
to increase or counterclockwise to decrease the
radio station frequency. Push the Enter/Browse
button to choose a selection. Seek
The Seek Up and Down functions are activated by
pressing the double arrow buttons on the
touchscreen to the right and left of the radio
station display or by pushing the left steering wheel
audio control button up or down.
Seek Up
and Seek Down
Press and release the Seek Up or Seek Down
button to tune the radio to the next available station
or channel. During a Seek Up/Down function, if the
radio reaches the starting station after passing
through the entire band two times, the radio will stop
at the station where it began.
Fast Seek Up and Fast Seek Down
Press and hold, and then release the Seek Up
or Seek Down button to advance the radio
through the available stations or channels at a
faster rate. The radio stops at the next available
station or channel when the button on the
touchscreen is released.
NOTE:
Pressing and holding either the Seek Up or
Seek Down button will scan the different
frequency bands at a slower rate.
1 — Radio Bands
2 — Preset Radio Stations
3 — View Next Preset Radio Stations
4 — Status Bar
5 — Browse Button
6 — Seek Down
7 — Tune Button
8 — Seek Up
9 — Audio Settings
10 — Bottom Bar
21_LA_OM_EN_USC_t.book Page 140
Page 147 of 328

MULTIMEDIA145
Deleting A Preset
A preset can be deleted in the Presets Browse
screen by pressing the Trash Can icon for the
corresponding preset.
Favorites
Press the Favorites button on the Browse screen.
The Favorites menu provides a means to edit the
Favorites list and to configure the Alert Settings,
along with providing a list of Channels currently
airing any of the items in the Favorites list.
You can scroll the Favorites list by pressing the Up
and Down arrows located at the right side of the
screen. Scrolling can also be done by operating the
Tune/Scroll knob as well.
Remove Favorites
Press the Remove Favorites tab at the top of the
screen. Press the Delete All button on the
touchscreen to delete all of the Favorites or press
the Trash Can icon next to the Favorite to be
deleted.
Alert Settings
Press the Alert Settings tab at the top of the
Favorites screen. The Alert Settings menu allows
you to choose from a visual alert or audible and
visual alert when one of your favorites is airing on
any of the SiriusXM® channels. Game Zone
Press the Game Zone button, located at the left of
the Browse screen. This feature provides you with
the ability to select teams, edit the selection, and
set alerts.
On-Air
Press the On-Air tab at the top of the screen. The
On-Air list provides a list of Channels currently
airing any of the items in the Selections list, and
pressing any of the items in the list tunes the radio
to that channel.
Select Team — If Equipped
Press the Select Team button on the touchscreen
to activate the League Scroll list. Press the chosen
league and a scroll list of all teams within the
league will appear, then you can select a team by
pressing the corresponding box. A check mark
appears for all teams that are chosen.
Remove Selection/Trash Can Icon
Press the Remove Selection tab at the top of the
screen. Press the Delete All button on the
touchscreen to delete all of the selections or press
the Trash Can icon next to the selection to be
deleted.
Alert Settings
Press the Alert Setting tab at the top of the screen.
The Alert Settings menu allows you to choose from
“Alert me to on-air games upon start” or “Alert
upon score update” or both when one or more of
your selections is airing on any of the SiriusXM®
channels.
Tune Start
Tune Start begins playing the current song from
the beginning when you tune to a music channel
using one of the 12 presets. This feature occurs
the first time the preset is selected during that
current song.
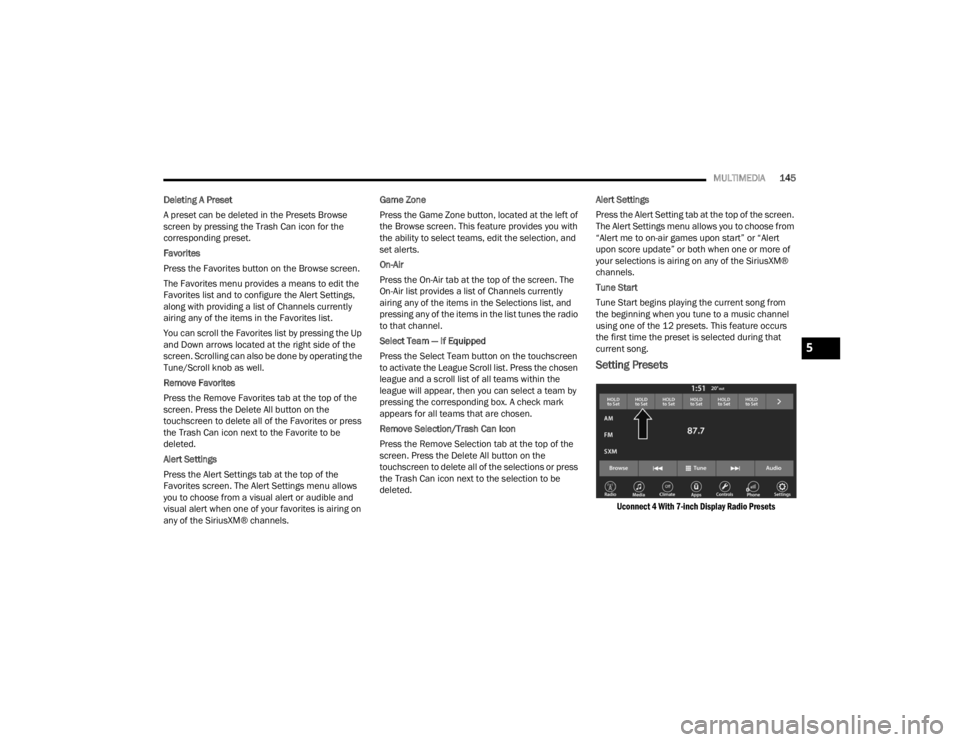
Setting Presets
Uconnect 4 With 7-inch Display Radio Presets
5
21_LA_OM_EN_USC_t.book Page 145