2021 DODGE CHALLENGER instrument panel
[x] Cancel search: instrument panelPage 52 of 328

50GETTING TO KNOW YOUR VEHICLE
Driver And Passenger Up And Down
Buttons
These buttons provide the driver and passenger
with independent temperature control.
Push the red button on the faceplate or
touchscreen or press and slide the
temperature bar towards the red arrow
button on the touchscreen for warmer
temperature settings.
Push the blue button on the faceplate or
touchscreen or press and slide the
temperature bar towards the blue arrow
on the touchscreen for cooler
temperature settings.
SYNC Button
Press the SYNC button on the
touchscreen to toggle the Sync feature
on/off. The SYNC indicator is
illuminated when SYNC is on. SYNC is
used to synchronize the passenger temperature
setting with the driver temperature setting.
Changing the passenger temperature setting while
in SYNC will automatically exit this feature.
NOTE:The SYNC button is only available on the touch-
screen.
Blower Control
Blower Control is used to regulate the
amount of air forced through the
Climate Control system. There are seven
blower speeds available. Adjusting the
blower will cause automatic mode to switch to
manual operation. The speeds can be selected
using either the blower control knob on the
faceplate or the buttons on the touchscreen.
Faceplate
The blower speed increases as you turn the blower
control knob clockwise from the lowest blower
setting. The blower speed decreases as you turn
the blower control knob counterclockwise.
Touchscreen
Use the small blower icon to reduce the blower
setting and the large blower icon to increase the
blower setting. Blower can also be selected by
pressing the blower bar area between the icons.
Mode Control
Select Mode by pressing one of the
Mode buttons on the touchscreen to
change the airflow distribution mode.
The airflow distribution mode can be
adjusted so air comes from the instrument panel
outlets, floor outlets, defrost outlets and demist
outlets.
Panel Mode
Air comes from the outlets in the
instrument panel. Each of these outlets
can be individually adjusted to direct the
flow of air. The air vanes of the center
outlets and outboard outlets can be moved up and
down or side to side to regulate airflow direction.
There is a shut-off wheel located below the air
vanes to shut off or adjust the amount of airflow
from these outlets.
Bi-Level Mode
Air comes from the instrument panel
outlets and floor outlets. A slight amount
of air is directed through the defrost and
side window demister outlets.
NOTE:Bi-Level mode is designed under comfort condi -
tions to provide cooler air out of the panel outlets
and warmer air from the floor outlets.
Floor Mode
Air comes from the floor outlets. A slight
amount of air is directed through the
defrost and side window demister
outlets.
21_LA_OM_EN_USC_t.book Page 50
Page 55 of 328

GETTING TO KNOW YOUR VEHICLE53
INTERIOR STORAGE AND EQUIPMENT
STORAGE
Glove Compartment
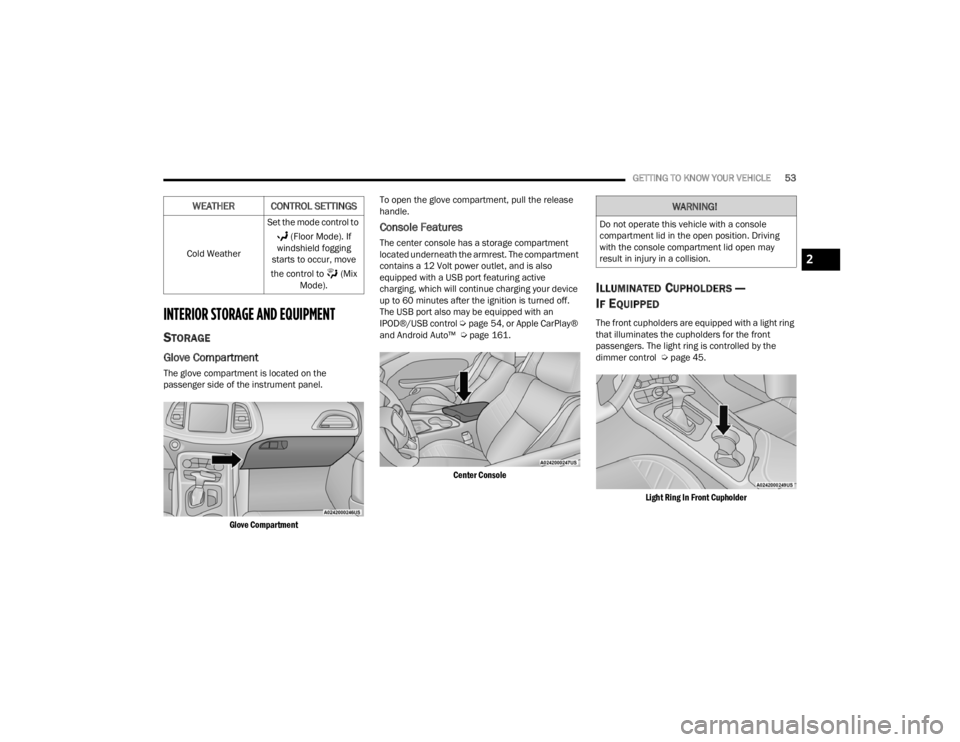
The glove compartment is located on the
passenger side of the instrument panel.
Glove Compartment
To open the glove compartment, pull the release
handle.
Console Features
The center console has a storage compartment
located underneath the armrest. The compartment
contains a 12 Volt power outlet, and is also
equipped with a USB port featuring active
charging, which will continue charging your device
up to 60 minutes after the ignition is turned off.
The USB port also may be equipped with an
IPOD®/USB control
Úpage 54, or Apple CarPlay®
and Android Auto™ Ú page 161.
Center Console
ILLUMINATED CUPHOLDERS —
I
F EQUIPPED
The front cupholders are equipped with a light ring
that illuminates the cupholders for the front
passengers. The light ring is controlled by the
dimmer control Ú page 45.
Light Ring In Front Cupholder
Cold Weather
Set the mode control to
(Floor Mode). If
windshield fogging
starts to occur, move
the control to (Mix Mode).
WEATHER CONTROL SETTINGSWARNING!
Do not operate this vehicle with a console
compartment lid in the open position. Driving
with the console compartment lid open may
result in injury in a collision.
2
21_LA_OM_EN_USC_t.book Page 53
Page 56 of 328

54GETTING TO KNOW YOUR VEHICLE
USB/AUX CONTROL
Located in the front storage area of the center
console, this feature allows an external USB device
to be connected to the audio system.
Plugging in a smartphone device to a USB port may
activate Android Auto™ or Apple CarPlay®
features, if equipped
USB/AUX Ports
POWER OUTLETS
Your vehicle is equipped with 12 Volt (13 Amp)
power outlets that can be used to power cellular
phones, small electronics and other low powered
electrical accessories. The power outlets are
labeled with either a “key” or a “battery” symbol to
indicate how the outlet is powered. Power outlets
labeled with a key symbol can be powered when
the ignition is in the ACC or ON/RUN position, while
the outlets labeled with a battery symbol are
connected directly to the battery and powered at
all times.
These power outlets can also operate a
conventional cigar lighter unit.
The front power outlet is located next to the
storage area on the integrated center stack of the
instrument panel.
Power Outlet — Integrated Center Stack Front
NOTE:The front integrated center stack power outlet can
be changed to battery powered at all times by
moving the integrated center stack fuse #12 in the
Rear Power Distribution Center from fuse location
“IGN” to “B+” Ú page 267.
Power Outlet Fuse Locations
1 — USB 1 Port
2 — AUX Jack
3 — USB 2 Port
1 — #12 Fuse 20A Yellow Power Outlet Integrated
Center Stack
2 — #38 Fuse 20A Yellow Power Outlet Center
Console
21_LA_OM_EN_USC_t.book Page 54
Page 60 of 328

58GETTING TO KNOW YOUR VEHICLE
SUNROOF MAINTENANCE
Use only a non-abrasive cleaner and a soft cloth to
clean the glass panel. Periodically check for and
clear out any debris that may have collected in the
tracks.
IGNITION OFF OPERATION
NOTE:
The power sunroof switch can remain active in
Accessory Delay for up to approximately
10 minutes after the vehicle’s ignition is placed
to the OFF position. Opening either front door
will cancel this feature.
This feature is programmable using the
Uconnect system Úpage 120.
HOOD
OPENING THE HOOD
To open the hood, two latches must be released.
1. Pull the release lever located underneath the
driver’s side of the instrument panel.
Hood Release Lever
2. Reach under the hood, push the safety catch to the left and lift the hood.
Hood Safety Catch Location
CLOSING THE HOOD
WARNING!
Be sure the hood is fully latched before driving
your vehicle. If the hood is not fully latched, it
could open when the vehicle is in motion and
block your vision. Failure to follow this warning
could result in serious injury or death.
CAUTION!
To prevent possible damage, do not slam the
hood to close it. Lower hood to approximately
12 inches (30 cm) and drop the hood to close.
Make sure hood is fully closed for both latches.
Never drive vehicle unless hood is fully closed,
with both latches engaged.
21_LA_OM_EN_USC_t.book Page 58
Page 61 of 328

GETTING TO KNOW YOUR VEHICLE59
TRUNK
OPENING THE TRUNK
The trunk may be opened in several ways:
Power trunk release button on the instrument
panel
Trunk button on the key fob
Trunk Passive Entry button Úpage 22
External release switch located on the under -
side of the decklid overhang
NOTE:The release feature will function only when the
vehicle is unlocked.
With the ignition in the ON/RUN position, the trunk
open symbol will display in the instrument cluster
indicating that the trunk is open. The odometer
display will reappear once the trunk is closed.
With the ignition in the OFF position, the trunk
open symbol will display until the trunk is closed. Power Trunk Release Button
The trunk can be opened from inside the
vehicle using the power trunk release
button located on the instrument panel
to the left of the steering wheel.
NOTE:The automatic transmission must be in PARK
before the button will operate. For manual trans -
missions, the vehicle must be in NEUTRAL.
Key Fob Trunk Release Button
Push the power trunk button on the key
fob twice within five seconds to release
the trunk.
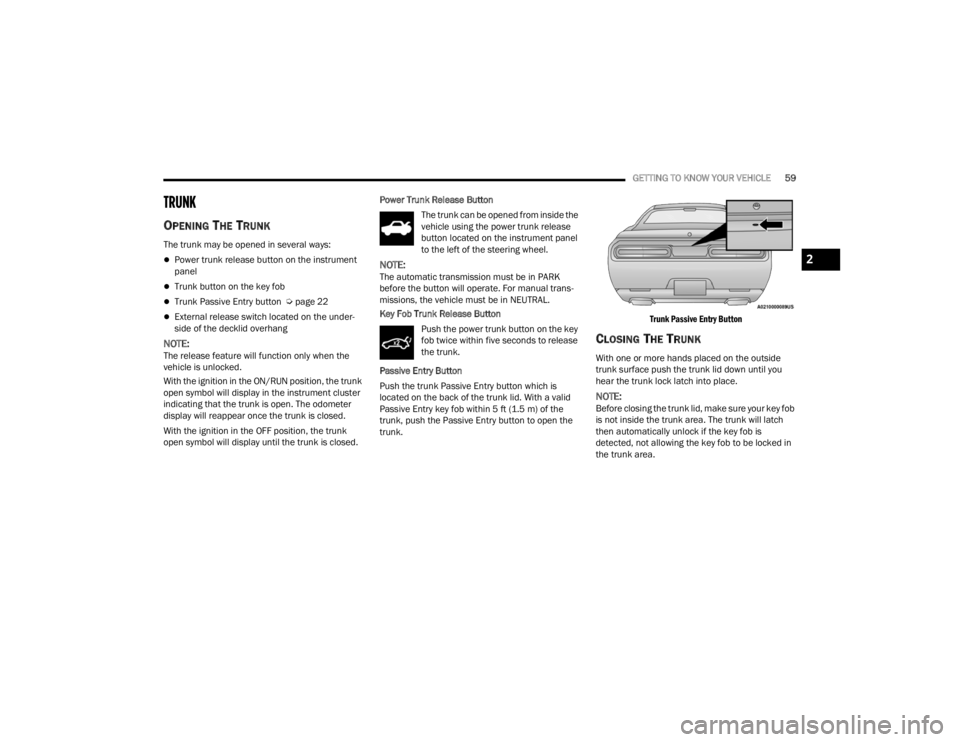
Passive Entry Button
Push the trunk Passive Entry button which is
located on the back of the trunk lid. With a valid
Passive Entry key fob within 5 ft (1.5 m) of the
trunk, push the Passive Entry button to open the
trunk.
Trunk Passive Entry Button
CLOSING THE TRUNK
With one or more hands placed on the outside
trunk surface push the trunk lid down until you
hear the trunk lock latch into place.
NOTE:Before closing the trunk lid, make sure your key fob
is not inside the trunk area. The trunk will latch
then automatically unlock if the key fob is
detected, not allowing the key fob to be locked in
the trunk area.
2
21_LA_OM_EN_USC_t.book Page 59
Page 63 of 328

61
GETTING TO KNOW YOUR INSTRUMENT PANEL
INSTRUMENT CLUSTER
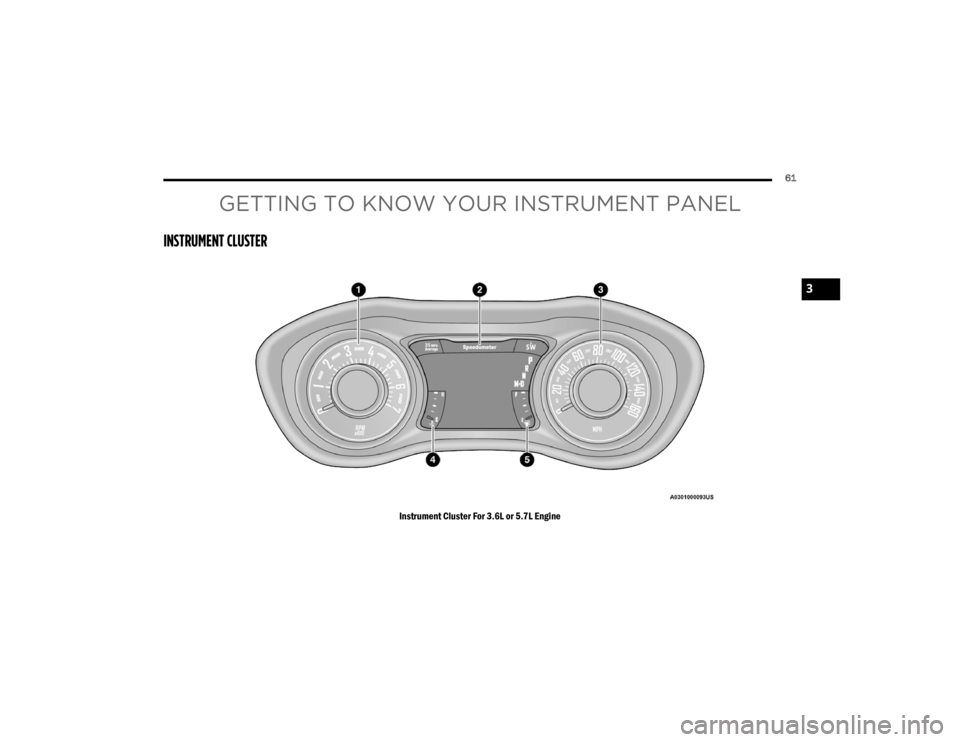
Instrument Cluster For 3.6L or 5.7L Engine
3
21_LA_OM_EN_USC_t.book Page 61
Page 64 of 328

62GETTING TO KNOW YOUR INSTRUMENT PANEL
INSTRUMENT CLUSTER DESCRIPTIONS
1. Tachometer
Indicates the engine speed in revolutions
per minute (RPM x 1000).
2. Instrument Cluster Display
When the appropriate conditions exist, this
display shows the instrument cluster
display messages Ú page 62.
3. Speedometer
Indicates vehicle speed.
4. Temperature Gauge
The temperature gauge shows engine
coolant temperature. Any reading within the
normal range indicates that the engine
cooling system is operating satisfactorily.
The gauge pointer will likely indicate a
higher temperature when driving in hot
weather, up mountain grades, or when
towing a trailer. It should not be allowed to
exceed the upper limits of the normal oper -
ating range. 5. Fuel Gauge
The pointer shows the level of fuel in the
fuel tank when the Keyless Push Button
Ignition is in the ON/RUN position.
The fuel pump symbol points to
the side of the vehicle where the
fuel door is located.
NOTE:The hard telltales will illuminate for a bulb check
when the ignition is first cycled.
INSTRUMENT CLUSTER DISPLAY
Your vehicle is equipped with an instrument cluster
display, which offers useful information to the
driver. With the ignition in the OFF mode, opening/
closing of a door will activate the display for
viewing, and display the total miles, or kilometers,
in the odometer. Your instrument cluster display is
designed to display important information about
your vehicle’s systems and features. Using a driver
interactive display located on the instrument
panel, your instrument cluster display can show
you how systems are working and give you
warnings when they are not. The steering wheel
mounted controls allow you to scroll through the
main menus and submenus. You can access the
specific information you want and make selections
and adjustments.
WARNING!
A hot engine cooling system is dangerous. You or
others could be badly burned by steam or boiling
coolant. It is recommended to call an authorized
dealer for service if your vehicle overheats
Ú page 262.
CAUTION!
Driving with a hot engine cooling system could
damage your vehicle. If the temperature gauge
reads “H,” pull over and stop the vehicle. Idle the
vehicle with the air conditioner turned off until
the pointer drops back into the normal range. If
the pointer remains on the “H,” turn the engine
off immediately and call an authorized dealer for
service.
21_LA_OM_EN_USC_t.book Page 62
Page 65 of 328

GETTING TO KNOW YOUR INSTRUMENT PANEL63
LOCATION AND CONTROLS
The instrument cluster display features an
interactive display which is located in the
instrument cluster.
This system conveniently allows the driver to select
a variety of useful information by pushing the
arrow buttons located on the left side of the
steering wheel. The instrument cluster display
menu items consist of the following:
Speedometer
Vehicle Info
Performance
Driver Assist — If Equipped
Fuel Economy
Trip
Audio
Messages
Screen Setup
The system allows the driver to select information
by pushing the following buttons mounted on the
steering wheel:
Instrument Cluster Display Controls
Up And Down Arrow Buttons:
Using the up or down arrow button allows
you to cycle through the Main Menu Items.
Changes the Main Screen area and Menu Title
area.
Left And Right Arrow Buttons:
Using the left or right arrow button allows
you to cycle through the submenu items of the
Main menu item.
NOTE:
Holding the up or down or left or
right arrow button will loop the user through
the currently selected menu or options
presented on the screen.
Upon returning to a main menu, the last
submenu screen viewed within that main menu
will be displayed.
OK Button:
For Digital Speedometer:
Pushing the OK button changes units (mph or km/h).
For Screen Setup:
OK button allows user to enter menu and
submenus.
Within each submenu layer, the up and
down arrow buttons will allow the user to
select the item of interest.
Pushing the OK button makes the selection and
a confirmation screen will appear (returning the
user to the first page of the submenu).
Pushing the left arrow button will exit each
submenu layer and return to the main menu.
For the Trip and Fuel Economy menus (and
Performance Timers) — If Equipped:
Information is reset by pushing and holding the
OK button.
1 — Left Arrow Button
2 — Up Arrow Button
3 — Right Arrow Button
4 — Down Arrow Button
5 — OK Button
3
21_LA_OM_EN_USC_t.book Page 63