2021 CITROEN C3 AIRCROSS Touch screen
[x] Cancel search: Touch screenPage 121 of 244

11 9
Driving
6Activating the function deactivates the Blind Spot Monitoring System.
You can deactivate the function at any time until the parking space entry or exit
manoeuvre begins, by pressing the arrow
located in the top left-hand corner of the
display page.
Selecting the type of manoeuvre
A manoeuvre selection page is displayed on the
touch screen: by default, the "Entry" page if the
vehicle has been running since the ignition was
switched on, otherwise, the "Exit" page.
► Select the type and side of the manoeuvre to activate the parking space search.
The selected manoeuvre can be changed at
any time, even while searching for an available
space.
Parking space search
► You should drive at a distance of between 0.50 m and 1.50 m from the row of parked vehicles, without ever exceeding 19 mph (30 km/h), until the system finds an available space.
The parking space search is suspended at
higher speeds. The function is automatically
deactivated if the vehicle speed exceeds 31 mph
(50 km/h).
For "parallel" parking, the space must
measure at least the length of your
vehicle plus 0.60 m.
For "bay" parking, the space must be at least
as wide as your vehicle plus 0.70 m.
If the parking sensors function has been
deactivated in the Driving/Vehicle touch
screen menu, it will be automatically
reactivated when the system is activated.
When the system finds an available space, " OK"
is displayed on the parking view, accompanied
by an audible signal.
Preparing for the manoeuvre
► Move very slowly until the request to stop the vehicle is displayed: " Stop the vehicle“,
accompanied by the “ STOP” sign and an audible
signal.
Once the vehicle has stopped, an instructions
page is displayed on the screen.
► To prepare for the manoeuvre, follow the instructions.
The start of the manoeuvre is indicated by the
"Manoeuvre under way" onscreen message
and an accompanying audible signal.
Reversing is indicated by this message:
“Release the steering wheel, reverse ”.
The Top Rear Vision and the parking sensors
are automatically activated to help you monitor
the area immediately surrounding your vehicle
during the manoeuvre.
During the manoeuvre
The system controls the vehicle’s steering. It gives instructions on the manoeuvring direction
when starting "parallel" entry and exit parking
manoeuvres, and for all "bay" entry manoeuvres.
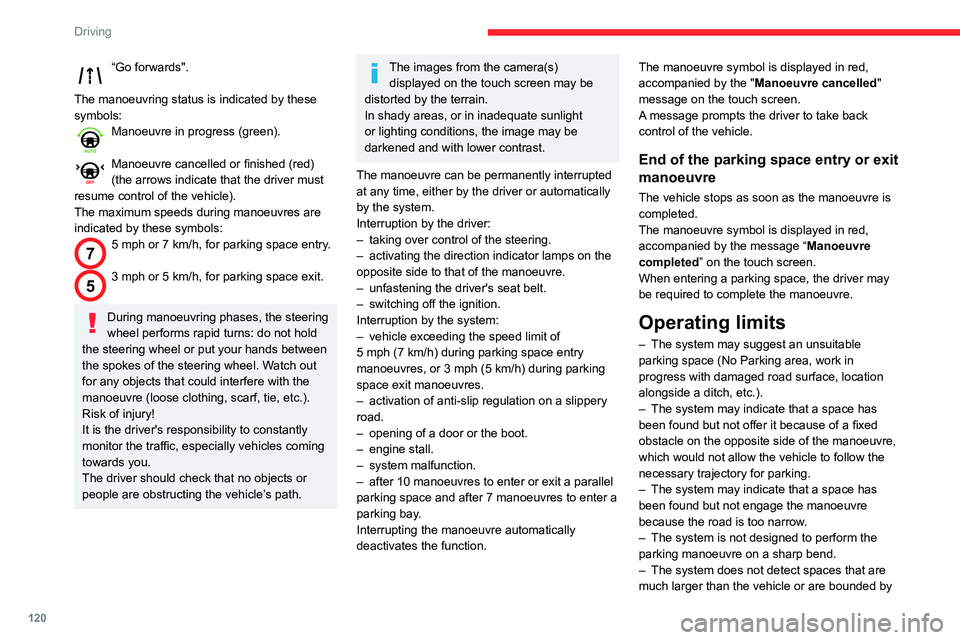
These instructions are displayed as a symbol
accompanied by a message:
"Reverse".
Page 122 of 244
120
Driving
“Go forwards".
The manoeuvring status is indicated by these
symbols:
Manoeuvre in progress (green).
Manoeuvre cancelled or finished (red) (the arrows indicate that the driver must
resume control of the vehicle).
The maximum speeds during manoeuvres are
indicated by these symbols:
75 mph or 7 km/h, for parking space entry.
53 mph or 5 km/h, for parking space exit.
During manoeuvring phases, the steering
wheel performs rapid turns: do not hold
the steering wheel or put your hands between
the spokes of the steering wheel. Watch out
for any objects that could interfere with the
manoeuvre (loose clothing, scarf, tie, etc.).
Risk of injury!
It is the driver's responsibility to constantly
monitor the traffic, especially vehicles coming
towards you.
The driver should check that no objects or
people are obstructing the vehicle’s path.
The images from the camera(s) displayed on the touch screen may be
distorted by the terrain.
In shady areas, or in inadequate sunlight
or lighting conditions, the image may be
darkened and with lower contrast.
The manoeuvre can be permanently interrupted
at any time, either by the driver or automatically
by the system.
Interruption by the driver:
– taking over control of the steering.– activating the direction indicator lamps on the opposite side to that of the manoeuvre.– unfastening the driver's seat belt.– switching off the ignition.Interruption by the system:– vehicle exceeding the speed limit of 5 mph (7 km/h) during parking space entry manoeuvres, or 3 mph (5 km/h) during parking space exit manoeuvres.– activation of anti-slip regulation on a slippery road.
– opening of a door or the boot.– engine stall.– system malfunction.– after 10 manoeuvres to enter or exit a parallel parking space and after 7 manoeuvres to enter a
parking bay.
Interrupting the manoeuvre automatically
deactivates the function. The manoeuvre symbol is displayed in red,
accompanied by the "
Manoeuvre cancelled"
message on the touch screen.
A message prompts the driver to take back
control of the vehicle.
End of the parking space entry or exit
manoeuvre
The vehicle stops as soon as the manoeuvre is
completed.
The manoeuvre symbol is displayed in red,
accompanied by the message “ Manoeuvre
completed” on the touch screen.
When entering a parking space, the driver may
be required to complete the manoeuvre.
Operating limits
– The system may suggest an unsuitable parking space (No Parking area, work in
progress with damaged road surface, location
alongside a ditch, etc.).
– The system may indicate that a space has been found but not offer it because of a fixed
obstacle on the opposite side of the manoeuvre,
which would not allow the vehicle to follow the
necessary trajectory for parking.
– The system may indicate that a space has been found but not engage the manoeuvre
because the road is too narrow.
– The system is not designed to perform the parking manoeuvre on a sharp bend.– The system does not detect spaces that are much larger than the vehicle or are bounded by
obstacles that are very low (pavements, studs, etc.) or very thin (trees, posts, wire fences, etc.).– Certain obstacles located in the sensors’ blind spots may not be detected or may no longer be
detected during the manoeuvre.
– Certain materials (fabrics) absorb sound waves: pedestrians may not be detected.– A front or rear impact to the vehicle can upset the sensors’ settings, which is not always
detected by the system: distance measurements
may be distorted.
– If the boot is heavily loaded, the vehicle may tilt, affecting distance measurements.
The vehicle's sensors and camera(s) may be
impaired by:
– accumulated snow or fallen leaves on the road,– adverse weather conditions (heavy rain, thick fog, falling snow),– noise interference from noisy vehicles and machinery (lorries, pneumatic drills, etc.).
Do not use the function under the
following exterior conditions:
– Alongside a soft shoulder (e.g. ditch) or quay or on the edge of a drop.– When the road surface is slippery (e.g. ice).
If any of the following malfunctions
occurs, do not use the system:
– If a tyre is under-inflated.– If one of the bumpers is damaged.– If one of the cameras is faulty.
Page 153 of 244
151
In the event of a breakdown
8Fuses in the dashboard
Access to the fuses
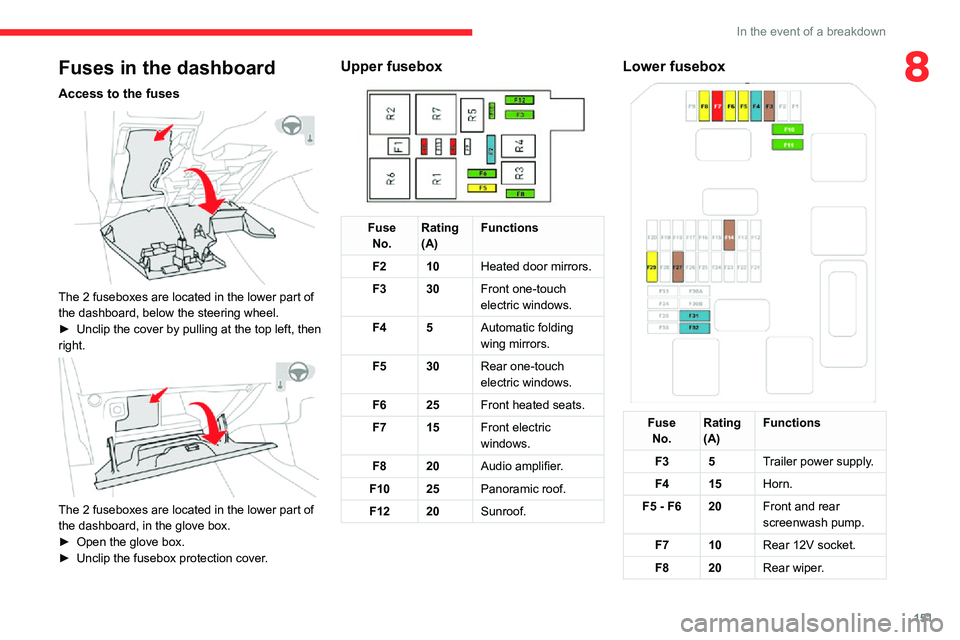
The 2 fuseboxes are located in the lower part of
the dashboard, below the steering wheel.
► Unclip the cover by pulling at the top left, then right.
The 2 fuseboxes are located in the lower part of
the dashboard, in the glove box.
► Open the glove box.► Unclip the fusebox protection cover.
Upper fusebox
Fuse
No. Rating
(A) Functions
F2 10 Heated door mirrors.
F3 30 Front one-touch
electric windows.
F4 5 Automatic folding
wing mirrors.
F5 30 Rear one-touch
electric windows.
F6 25 Front heated seats.
F7 15 Front electric
windows.
F8 20 Audio amplifier.
F10 25Panoramic roof.
F12 20Sunroof.
Lower fusebox
Fuse
No. Rating
(A) Functions
F3 5 Trailer power supply.
F4 15 Horn.
F5 - F6 20Front and rear
screenwash pump.
F7 10 Rear 12V socket.
F8 20 Rear wiper.
Page 178 of 244
176
CITROËN Connect Radio
CITROËN Connect Radio
Multimedia audio system -
Applications - Bluetooth
®
telephone
The functions and settings described
vary according to the vehicle version and
configuration.
For safety reasons and because they
require sustained attention by the driver,
the following operations must be carried out
with the vehicle stationary and the ignition
on:
– Pairing the smartphone with the system in Bluetooth mode.– Using the smartphone.– Connection to the CarPlay®, MirrorLinkTM
or Android Auto applications (certain
applications interrupt their display while the
vehicle is moving).
– Changing the system settings and configuration.
The system is protected in such a way that it will only operate in the vehicle.
The Energy Economy Mode message is
displayed when the system is about to enter
the corresponding mode.
The system’s Open Source Software (OSS) source codes are available at the
following addresses:
https://www.groupe-psa.com/fr/oss/
https://www.groupe-psa.com/en/oss/
First steps
With the engine running, a press mutes the sound.
With the ignition off, a press turns the system on.
Increase or decrease the volume using
the wheel or the "plus" or "minus" buttons
(depending on the equipment).
Use the buttons on either side of or below the
touch screen for access to the menus, then
press the virtual buttons in the touch screen.
Depending on the model, use the "Source" or
"Menu" buttons on the left of the touch screen
for access to the menus, then press the virtual
buttons in the touch screen.
At all times it is possible to display the rolling
menus by pressing the screen briefly with three
fingers.
All of the touch areas of the screen are white.
For pages with multiple tabs at the bottom of the
screen, it is possible to switch between pages
either by tapping the tab for the desired page, or
by using a finger, sliding the pages to the left or
to the right.
Press in the grey zone to go back up a level or
to confirm.
Press the back arrow to go back a level or
confirm.
The touch screen is of the "capacitive" type.
To clean the screen, use a soft, non-abrasive
cloth (e.g. spectacles cloth) with no additional
product.
Do not use sharp objects on the screen.
Do not touch the screen with wet hands.
Certain information is displayed permanently in
the upper bar of the touch screen:
– Air conditioning status information (depending on version), and direct access to the
corresponding menu.
– Radio Media and Telephone menu status information.– Privacy status information.– Access to the touch screen and digital instrument panel settings.
Audio source selection (depending on
equipment):
Page 184 of 244
182
CITROËN Connect Radio
Playlists are updated whenever the ignition
is switched off or a USB memory stick is
connected. The audio system memorises these
lists, which will subsequently load faster if they
have not been changed.
Auxiliary (AUX) jack socket
Depending on equipmentConnect a portable device (MP3 player, etc.) to the auxiliary jack socket using an
audio cable (not supplied).
This source is only available if "Auxiliary input"
has been selected in the audio settings.
First adjust the volume on the portable device
(to a high level). Then adjust the volume of the
audio system.
Controls are managed via the portable device.
Selecting the source
Press Radio Media to display the main
page.
Press the "SOURCES" button.
Select the source.
BluetoothStreaming®
Streaming allows you to listen to the audio feed
from your smartphone.
The Bluetooth profile must be activated.
First adjust the volume on the portable device
(to a high level). Then adjust the volume of the
system.
If play does not start automatically, it may be
necessary to start the audio playback from the
smartphone.
Control is from the portable device or by using
the system's touch buttons.
Once connected in Streaming mode, the
smartphone is considered to be a media
source.
Connecting Apple® players
Connect the Apple® player to the USB socket
using a suitable cable (not supplied).
Play starts automatically.
Control is via the audio system.
The classifications available are those of the portable device connected (artists/
albums/genres/playlists/audio books/
podcasts). It is also possible to use a
classification structured in the form of a
library.
The default classification used is by artist. To
modify the classification used, return to the
first level of the menu then select the desired
classification (playlists for example) and
confirm to go down through the menu to the
desired track.
The version of software in the audio system may
not be compatible with the generation of the
Apple
® player.
Information and advice
The system supports USB mass storage
devices, BlackBerry® devices or Apple® players
via the USB ports. The adapter cable is not
supplied.
Devices are managed using the audio system
controls.
Other devices, not recognised on connection,
must be connected to the auxiliary socket using
a jack cable (not supplied) or via Bluetooth
streaming, if compatible.
To protect the system, do not use a USB hub.
The audio system will only play audio files with
".wav", ".wma", ".aac", ".ogg" and ".mp3" file
extensions, at bit rates between 32 Kbps and
320 Kbps.
It also supports VBR (Variable Bit Rate) mode.
No other file types (".mp4", etc.) can be read.
All ".wma" files must be standard WMA 9 files.
The supported sampling rates are 11, 22, 44 and
48 KHz.
To avoid reading and display problems, we
recommend choosing file names less than 20
characters long that do not contain any special
characters (e.g. “ ? . ; ù).Use only USB memory sticks in FAT32 format
(File Allocation Table).
We recommend using the original USB
cable for the portable device.
Telephone
USB sockets
Depending on equipment, for more information
on the USB sockets compatible with the
CarPlay
®, MirrorLinkTM or Android Auto
applications, refer to the "Ease of use and
comfort" section.
The synchronisation of a smartphone allows users to display applications
adapted to the CarPlay
®, MirrorLinkTM or Android Auto technology of the smartphone on the vehicle screen. For the CarPlay®
technology, the CarPlay® function must be
activated on the smartphone beforehand.
For the communication process between
the smartphone and the system to work, it is
essential in all cases that the smartphone is
unlocked.
As the principles and standards are
constantly changing, it is recommended
that you keep the smartphone's operating
system up-to-date, as well as the date and
time of the smartphone and of the system .
For the list of eligible smartphones, go to the
Brand's national website.
Page 185 of 244
183
CITROËN Connect Radio
11Telephone
USB sockets
Depending on equipment, for more information
on the USB sockets compatible with the
CarPlay
®, MirrorLinkTM or Android Auto
applications, refer to the "Ease of use and
comfort" section.
The synchronisation of a smartphone allows users to display applications
adapted to the CarPlay
®, MirrorLinkTM or Android Auto technology of the smartphone on the vehicle screen. For the CarPlay®
technology, the CarPlay® function must be
activated on the smartphone beforehand.
For the communication process between
the smartphone and the system to work, it is
essential in all cases that the smartphone is
unlocked.
As the principles and standards are
constantly changing, it is recommended
that you keep the smartphone's operating
system up-to-date, as well as the date and
time of the smartphone and of the system .
For the list of eligible smartphones, go to the
Brand's national website.
MirrorLinkTM smartphone
connection
The "MirrorLinkTM" function requires a
compatible smartphone and applications.
Telephone not connected by
Bluetooth®
When connecting a smartphone to the system, we recommend enabling
Bluetooth® on the smartphone.Connect a USB cable. The smartphone charges when connected by a USB cable.From the system, press "Telephone" to
display the main page.
Press "MirrorLinkTM" to start the
application in the system.
Depending on the smartphone, it may be
necessary to activate the "MirrorLink
TM"
function.
During the procedure, several screen pages relating to certain features are
displayed.
Accept to start and complete the connection.
Telephone connected by Bluetooth®
Connect a USB cable. The smartphone charges when connected by a USB cable.From the system, press "Telephone" to
display the main page.
Press the "PHONE" button to display the
secondary page.
Press "MirrorLinkTM" to start the
application in the system.
Once the connection is established, a page is
displayed, showing the applications already
downloaded to the smartphone that are
compatible with MirrorLink
TM technology.
Access to the different audio sources remains
available in the margin of the MirrorLink
TM
display, using the touch buttons located in the
upper bar.
Access to the menus for the system is possible
at any time using the dedicated buttons.
There may be a pause before applications become available,
depending on the quality of the network.
CarPlay® smartphone
connection
Connect a USB cable. The smartphone charges when connected by a USB cable.From the system, press Telephone to
display the CarPlay® interface.
Or
If the smartphone has already connected by Bluetooth®.Connect a USB cable. The smartphone charges when connected by a USB cable.From the system, press "Telephone" to
display the main page.
Press the "PHONE" button to access the
secondary page.
Page 186 of 244
184
CITROËN Connect Radio
Press "CarPlay" to display the CarPlay®
interface.
On connecting the USB cable, the
CarPlay® function deactivates the
system's Bluetooth® mode.
When the USB cable is disconnected
and the ignition is switched off then back
on, the system will not automatically switch to
Radio Media mode; the source must be
changed manually.
The CarPlay® navigation can be accessed
at any time by pressing the system's
Navigation button.
Android Auto smartphone connection
On the smartphone, download the Android Auto application.
The "Android Auto" function requires the
use of a compatible smartphone and
applications.
Telephone not connected by
Bluetooth®
Connect a USB cable. The smartphone charges when connected by a USB cable.From the system, press "Telephone" to
display the main page.
Press "Android Auto" to start the
application in the system.
Depending on the smartphone, it may be
necessary to activate the "Android Auto"
function.
During the procedure, several screen pages relating to certain features are
displayed.
Accept to start and complete the connection.
When connecting a smartphone to the system, we recommend enabling
Bluetooth® on the smartphone.
Telephone connected by Bluetooth®
From the system, press "Telephone" to
display the main page.
Press the "PHONE" button to display the
secondary page.
Press "Android Auto" to start the
application in the system.
Access to the different audio sources remains
available in the margin of the Android Auto
display, using the touch buttons located in the
upper bar.
Access to the menus for the system is possible
at any time using the dedicated buttons.
There may be a pause before applications become available,
depending on the quality of the network.
Pairing a Bluetooth®
telephone
The services available depend on the
network, the SIM card and the
compatibility of the Bluetooth devices used.
Consult the telephone user guide and the
service provider to check which services are
available.
The Bluetooth function must be activated and the telephone configured as "Visible
to all” (in the telphone settings).
To complete the pairing, whichever procedure is
used (from the telephone or from the system),
ensure that the code is the same in the system
and in the telephone.
If the pairing procedure fails, we
recommend deactivating and then
reactivating the Bluetooth function on the
telephone.
Procedure from the telephone
Select the name of the system in the list of detected devices.
In the system, accept the connection request
from the telephone.
Procedure from the system
Press Telephone to display the main
page.
Press "Bluetooth search".
The list of detected telephones is
displayed.
Select the name of the chosen telephone in the list.
Connection sharing
The system offers to connect the telephone with
3 profiles:
– "Telephone" (hands-free kit, telephone only),– “Streaming" (streaming: wireless playing of
audio files on the telephone),
– "Mobile internet data ".Select one or more profiles.
Press "OK" to confirm.
Depending on the type of telephone, you may by
prompted to accept the transfer of contacts and
messages.
The ability of the system to connect just one profile depends on the telephone.
All three profiles may connect by default.
The profiles compatible with the system are: HFP, OPP, PBAP, A2DP, AVRCP,
MAP and PAN.
Page 192 of 244
190
CITROËN Connect Nav
CITROËN Connect Nav
GPS navigation -
Applications - Multimedia
audio system - Bluetooth
®
telephone
The functions and settings described
vary according to the vehicle version and
configuration.
For safety reasons and because they
require sustained attention by the driver,
the following operations must be carried out
with the vehicle stationary and the ignition
on:
– Pairing the smartphone with the system in Bluetooth mode.– Using the smartphone.– Connection to the CarPlay®, MirrorLinkTM
or Android Auto applications (certain
applications interrupt their display while the
vehicle is moving).
– Changing the system settings and configuration.
The system is protected so that it only operates in the vehicle.
The message Energy Economy Mode is
displayed when the system is about to enter
the corresponding mode.
System and map updates can be
downloaded from the Brand’s website.
The update procedure is also available on the
website.
The system’s Open Source Software (OSS) source codes are available at the
following addresses:
https://www.groupe-psa.com/fr/oss/
https://www.groupe-psa.com/en/oss/
First steps
With the engine running, a press mutes the sound.
With the ignition off, a press turns the system on.
Adjustment of the volume.
Use the buttons either side of or below the touch
screen for access to the menus, then press the
virtual buttons in the touch screen.
Depending on the model, use the "Source" or
"Menu" buttons on the left of the touch screen
for access to the menus, then press the virtual
buttons in the touch screen.
You can display the menus at any time by
pressing the screen briefly with three fingers.
All of the touch areas of the screen are white.
Press the cross to go back a level.
Press "OK" to confirm.
The touch screen is of the "capacitive" type.
To clean the screen, use a soft, non-abrasive
cloth (e.g. spectacles cloth) with no additional
product.
Do not use sharp objects on the screen.
Do not touch the screen with wet hands.
Certain information is displayed permanently in
the upper band of the touch screen:
– Reminder of the air conditioning information (depending on version), and direct access to the
corresponding menu.
– Go directly to the selection of the audio
source, to the list of radio stations (or list of titles
depending on the source).
– Go to the message notifications, emails, map updates and, depending on the services, the
navigation notifications.
– Go to the settings for the touch screen and the digital instrument panel.