2021 CITROEN C1 ignition
[x] Cancel search: ignitionPage 104 of 269

102
C1_en_Chap05_eclairage-visibilite_ed01-2016
Manual guide-me-home
lighting*
Temporarily keeping the dipped beam headlamps on after the vehicle's ignition has b
een switched off makes the exit of the vehicle's
o
ccupants easier when the light is poor.
Switching on
F Place the lighting control stalk in the "
lighting off " or "AUTO" position.
F
W
ith the ignition off, "flash" the headlamps
u
sing the lighting control stalk.
The
lighting comes on for about 30 seconds.
Switching off
The manual guide-me-home lighting switches off immediately if you.
-
f
lash the headlamps again,
-
p
lace the lighting control stalk in another
p
osition,
-
s
witch the ignition on.
*
Depending
on
version.
Lighting and visibility
Page 108 of 269

106
C1_en_Chap06_securite_ed01-2016
Horn
Audible warning to alert other road users to an imminent d anger.
When
manoeuvring the vehicle,
t
ake care not to operate the horn
u
nintentionally.
F
P
ress one of the steering wheel spokes.F
P
ress the central part of the steering
w
heel.
Hazard warning lamps
Visual warning with of all the direction i
ndicators flashing to alert other road users to a
v
ehicle breakdown, towing or accident.
F
P
ress this button, all of the direction
in
dicators
f
lash.
They
can operate with the ignition off.
Safety
Page 117 of 269

115
C1_en_Chap06_securite_ed01-2016
Seat belts
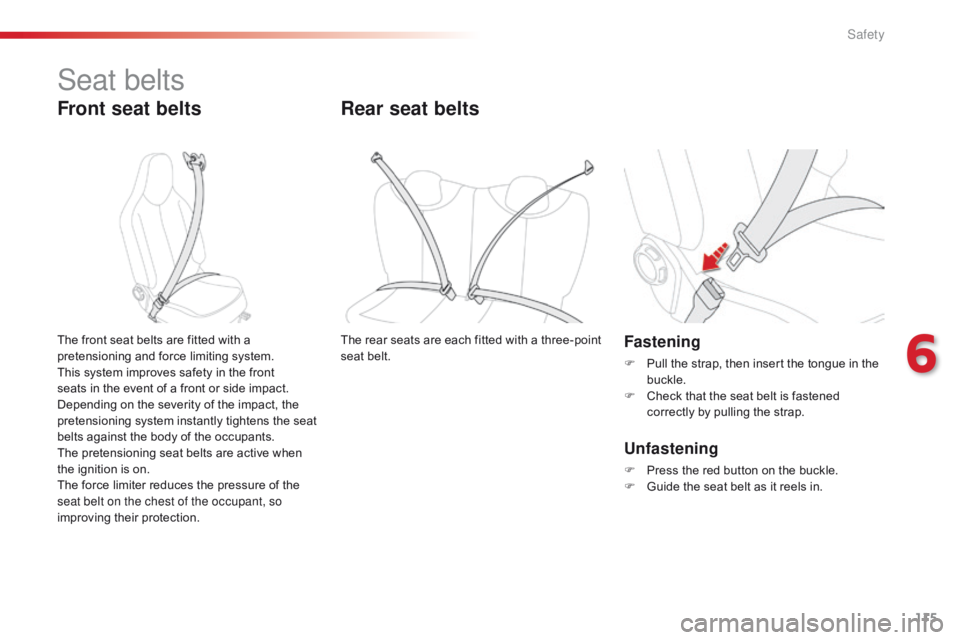
Front seat belts
Fastening
F Pull the strap, then insert the tongue in the buc
kle.
F
C
heck that the seat belt is fastened
c
orrectly by pulling the strap.
The
front
seat
belts
are
fitted
with
a
p
retensioning
and
force
limiting
system.
This
system
improves
safety
in
the
front
s
eats
in
the
event
of
a
front
or
side
impact.
D
epending
on
the
severity
of
the
impact,
the
p
retensioning
system
instantly
tightens
the
seat
b
elts
against
the
body
of
the
occupants.
The
pretensioning
seat
belts
are
active
when
t
he
ignition
is
on.
The
force
limiter
reduces
the
pressure
of
the
s
eat belt on the chest of the occupant, so
improving
their
protection.
Rear seat belts
The rear seats are each fitted with a three-point s eat belt.
Unfastening
F Press the red button on the buckle.
F G uide the seat belt as it reels in.
6
Safety
Page 120 of 269

118
C1_en_Chap06_securite_ed01-2016
Airbags
Designed to contribute towards the safety of the occupants in the event of violent collisions.
T
he airbags supplement the action of the force-
limiting
seat belts.
If
a collision occurs, the electronic detectors
r
ecord and analyse the front and side impacts
s
ustained in the impact detection zones:
-
i
n the case of a serious impact, the airbags
a
re deployed instantly and contribute
t
owards better protection of the occupants
o
f the vehicle; immediately after the impact,
t
he airbags deflate rapidly so that they
d
o not hinder visibility or the exit of the
o
ccupants,
-
i
n the case of a minor or rear impact or in
c
ertain roll-over conditions, the airbags
m
ay not be deployed; the seat belt alone
c
ontributes towards providing your
p
rotection in these situations.
The airbags do not operate when the
ignition is switched off. The
deployment of an airbag is
a
ccompanied by a slight emission
o
f smoke and a noise, due to the
d
etonation of the pyrotechnic charge
i
ncorporated in the system.
This
smoke is not harmful, but sensitive
i
ndividuals may experience slight
ir
ritation.
The
detonation noise associated with
t
he deployment of an airbag may result
i
n a slight loss of hearing for a short
t
ime.
This
equipment will only deploy once.
I
f a second impact occurs (during the
s
ame or a subsequent accident), the
a
irbag will not be deployed again.
Impact detection zones
A. Front impact zone.
B. S ide impact zone.
Front airbags
Deployment
The airbags are deployed, except the passenger's front airbag if it is deactivated, in the e
vent of a serious front impact to all or part of the
f
ront impact zone A,
in the longitudinal centreline
o
f the vehicle on a horizontal plane and directed
f
rom the front to the rear of the vehicle.
The
front airbag inflates between the thorax and
h
ead of the front occupant of the vehicle and the
s
teering wheel, driver's side, and the dashboard,
p
assenger's side to cushion their for ward
m
ovement.
System
which protects the driver and front
p
assenger in the event of a serious front impact
i
n order to limit the risk of injury to the head and
t
horax.
The driver's airbag is fitted in the centre of the
s
teering wheel; the front passenger's airbag is
f
itted in the dashboard above the glove box.
Safety
Page 121 of 269

119
C1_en_Chap06_securite_ed01-2016
Deactivating the passenger's
front airbag
Only the passenger's front airbag can be deactivated.
F
W
ith the ignition off ,
insert the key in the
p
assenger airbag deactivation switch.
F
T
urn it to the "OFF"
p
osition.
F
R
emove the key keeping the switch in the
n
ew position.When
the ignition is on, this warning
l
amp comes in the seat belt and
p
assenger's front airbag display
s
creen. It stays on while the airbag is
d
eactivated. To
assure the safety of your child,
t
he passenger's front airbag must be
d
eactivated when you install a rear ward
f
acing child seat on the front passenger
sea
t.
Other wise, the child would risk being
s
eriously injured or killed if the airbag
w
ere deployed.
Reactivating the passenger's
front airbag
When you remove a rear ward facing child seat, w
ith the ignition off , turn the switch to the
"ON"
position to reactivate the airbag and so
a
ssure the safety of your front passenger in the
e
vent of an impact.
When
the ignition is switched on, this
w
arning lamp comes on in the seat
b
elt and passenger's front airbag
d
isplay screen. It stays on while the
f
ront airbag is activated.
Operating fault
Illumination of this warning lamp in the instrument panel indicates a fault
w
ith the airbags.
Contact
a
CITROËN dealer or a qualified
w
orkshop
without delay to have the system
c
hecked.
The airbags may no longer be
d
eployed
in the event of a serious impact.
In
this
case, do not install a child seat or seat
a
n
adult
on the front passenger seat.
6
Safety
Page 139 of 269

137
C1_en_Chap06_securite_ed01-2016
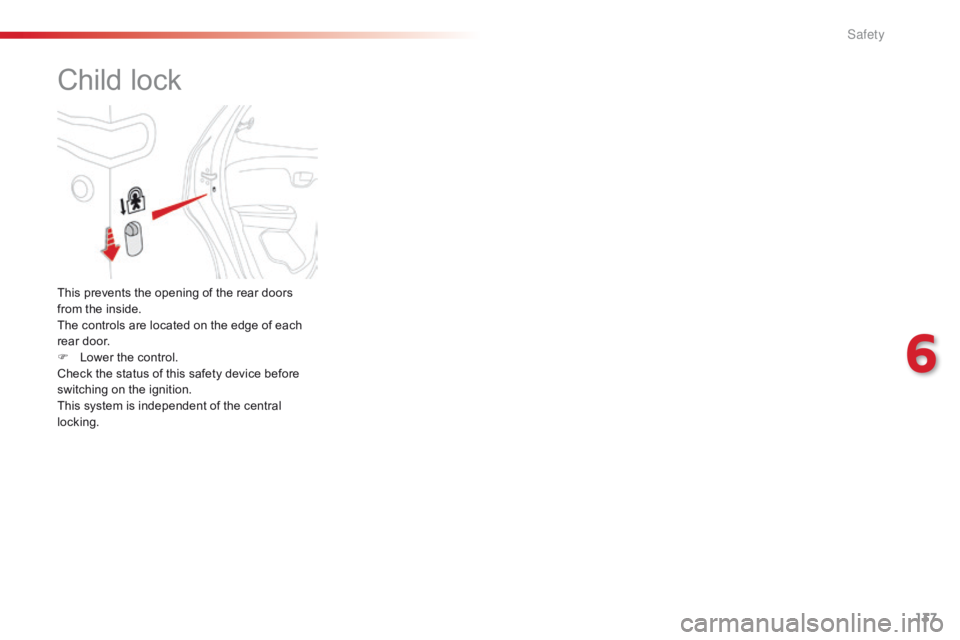
Child lock
This prevents the opening of the rear doors from the inside.
The
controls are located on the edge of each
r
ear door.
F
L
ower the control.
Check
the status of this safety device before
s
witching on the ignition.
This
system is independent of the central
l
ocking.
6
S
Page 140 of 269

138
C1_en_Chap07_info-pratiques_ed01-2016
Fuel tank
Low fuel levelRefuelling
When the low fuel level is reached, t
his warning lamp comes on,
a
ccompanied by an audible signal.
The
message "LO FUEL" is displayed in place
o
f
the
range.
You have approximately 5 litres remaining.
In
certain
driving conditions and depending on
t
he
engine, the distance which can be travelled
w
ith
the
fuel remaining may be less than
3
0 miles
(50 km). To
refuel in complete safety:
F
Y
ou must stop the engine and switch off
the ignition (ignition in "LOCK" position
or "OFF" mode) .
F
P
ull the control on the lower dashboard,
d
river's side, to release the filler flap.
F
O
pen the fuel filler flap.
If
you run out of fuel, the emission
c
ontrol system warning lamp may come
o
n
in the instrument panel. It will go off
a
utomatically after the engine has been
s
tarted a few times. Refuelling
must only be done with the engine
stopped and the ignition switched off ( ignition s
witch in the "LOCK" position or " OFF"
mode).
The capacity of the fuel tank is approximately 35 litres.
Additions of fuel must be of at least 5 litres to
b
e registered by the fuel gauge.
A
label on the inside of the flap reminds you
w
hich type of fuel to use.
There
may be an inrush of air when removing
t
he filler cap. This vacuum is per fectly normal
a
nd results from the sealing of the fuel system.
Practical information
Page 150 of 269

148
C1_en_Chap07_info-pratiques_ed01-2016
Checking levels
Take care when working under the bonnet, as certain areas of the engine
m
ay be extremely hot (risk of burns) and
t
he cooling fan could start at any time
(
even with the ignition off).
Engine oil level
The check of the oil level is carried out with the dipstick, located under
t
he bonnet. For the position of the
d
ipstick, refer to the under-bonnet
v
iew on a previous page.
Checking with dipstick
Check all of these levels regularly, in line with the manufacturer's service schedule. Top them up if necessary, unless other wise indicated.
I f a level drops significantly, have the corresponding system checked by a CITROËN dealer or a qualified workshop.
To
ensure the accuracy of the reading,
y
our vehicle must be on a level
s
ur face, with the engine off for at least
3
0 minutes.
It
is normal to top up the oil level between
t
wo services (or oil changes). CITROËN
r
ecommends that you check the level, and top
u
p if necessary, every 3 000 miles (5 000 km). If
you find that the oil level is above the A mark
o
r below the B mark, do not star t the engine.
-
I
f the level is above the MAX
mark (risk
o
f engine damage), contact a CITROËN
d
ealer or a qualified workshop.
-
I
f the level is below the MIN
mark, you
m
ust top-up the engine oil.
Refer
to the under-bonnet view for the location
o
f the dipstick on your vehicle.
F
T
ake the dipstick by its coloured grip and
p
ull it out completely.
F
W
ith the end of the dipstick with a clean
a
nd non-fluffy cloth.
F
R
efit the dipstick and push it fully down,
t
hen pull it out again for a visual check of
t
he oil level: the level must be between the
t
wo marks A and B.
Practical information