2021 CITROEN AMI wheel
[x] Cancel search: wheelPage 4 of 44

2
Contents
■
Overview
■
Eco-driving
1Dashboard instrumentsInstrument panel with monochrome display screen 6
Warning and indicator lamps 6
Charge level 7
Distance recorder 7
2AccessDoors 9
Windows 9
3Ease of use and comfortDriver's seat 10
Door mirrors 10
Ventilation/Heating/Demisting 10
Interior fittings 11
Available accessories 12
4Lighting and visibilityExterior lighting 13
Direction indicators 13
Wipers/Screenwash 13
Changing a wiper blade 14
5SafetySafety - General recommendations 15
Hazard warning lamps 15
Horn 15
Seat belts 15
Child seats 16
6DrivingDriving recommendations 18
Parking brake 18
Drive selector 19
Starting/Stopping the vehicle 19
7Practical informationCharging the traction battery 21
Electric motor 23
Checking levels 23
Checks 24
Free-wheeling 25
Advice on care and maintenance 25
8In the event of a breakdownChanging a wheel 27
Changing a bulb 27
Changing a fuse 28
12 V battery 29
Towing the vehicle 33
9Technical dataElectric motor 34
Dimensions 34
Identification markings 35
■
Alphabetical index
Page 14 of 44

12
Ease of use and comfort
Lower retractable shelf
► When loading long, flat objects (max.
1.2 m) and limited load (<10 kg), put the lower
retractable shelf in place.
►
Secure the load in the middle of the lower
retractable shelf with appropriate fasteners
(tensioners or straps not supplied).
►
When loading high and heavy objects
(>10 kg), raise the lower retractable shelf against
the fixed vertical partition.
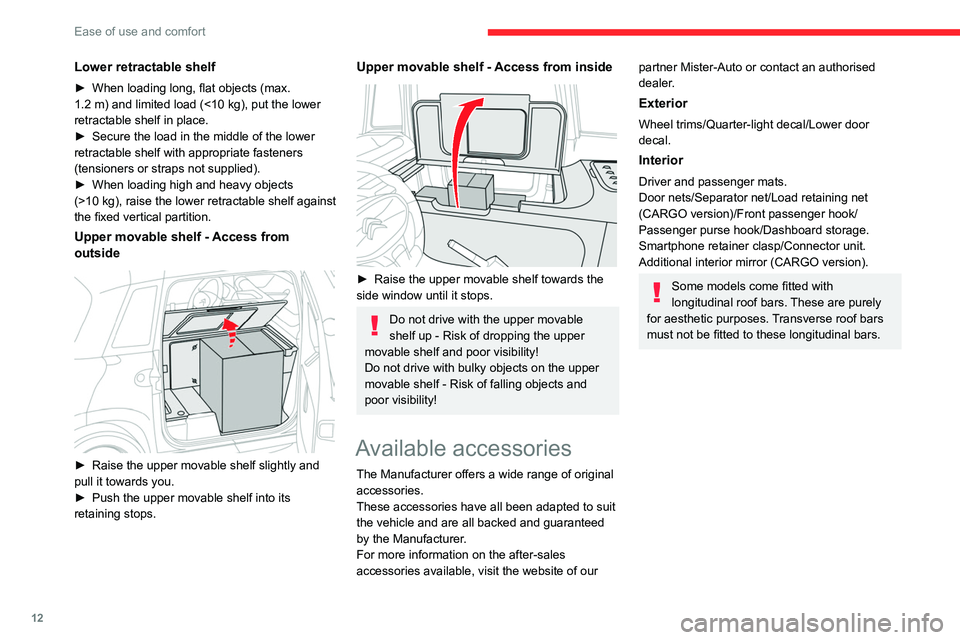
Upper movable shelf - Access from
outside
► Raise the upper movable shelf slightly and
pull it towards you.
►
Push the upper movable shelf into its
retaining stops.
Upper movable shelf - Access from inside
► Raise the upper movable shelf towards the
side window until it stops.
Do not drive with the upper movable
shelf up - Risk of dropping the upper
movable shelf and poor visibility!
Do not drive with bulky objects on the upper
movable shelf
- Risk of falling objects and
poor visibility!
Available accessories
The Manufacturer offers a wide range of original
accessories.
These accessories have all been adapted to suit
the vehicle and are all backed and guaranteed
by the Manufacturer.
For more information on the after-sales
accessories available, visit the website of our
partner Mister-Auto or contact an authorised
dealer.
Exterior
Wheel trims/Quarter-light decal/Lower door
decal.
Interior
Driver and passenger mats.
Door nets/Separator net/Load retaining net
(CARGO version)/Front passenger hook/
Passenger purse hook/Dashboard storage.
Smartphone retainer clasp/Connector unit.
Additional interior mirror (CARGO version).
Some models come fitted with
longitudinal roof bars. These are purely
for aesthetic purposes. Transverse roof bars
must not be fitted to these longitudinal bars.
Page 20 of 44

18
Driving
Driving recommendations
General information
► Observe the driving regulations and remain
vigilant whatever the traffic conditions.
►
Monitor your environment and keep your
hands on the wheel to be able to react to
anything that may happen any time.
►
Drive smoothly, anticipate the need for
braking and maintain a longer safety distance,
especially in bad weather
.
►
Stop the vehicle to carry out operations that
require close attention (such as adjustments).
Never drive with the parking brake
applied . Risk of overheating and
damaging the braking system!
Never leave a vehicle running unattended.
If the driver must leave the vehicle, the
parking brake must be applied and N mode
selected using the drive selector.
On flooded roads
We strongly advise against driving on flooded
roads, as this could seriously damage your
vehicle's motor and electrical systems.
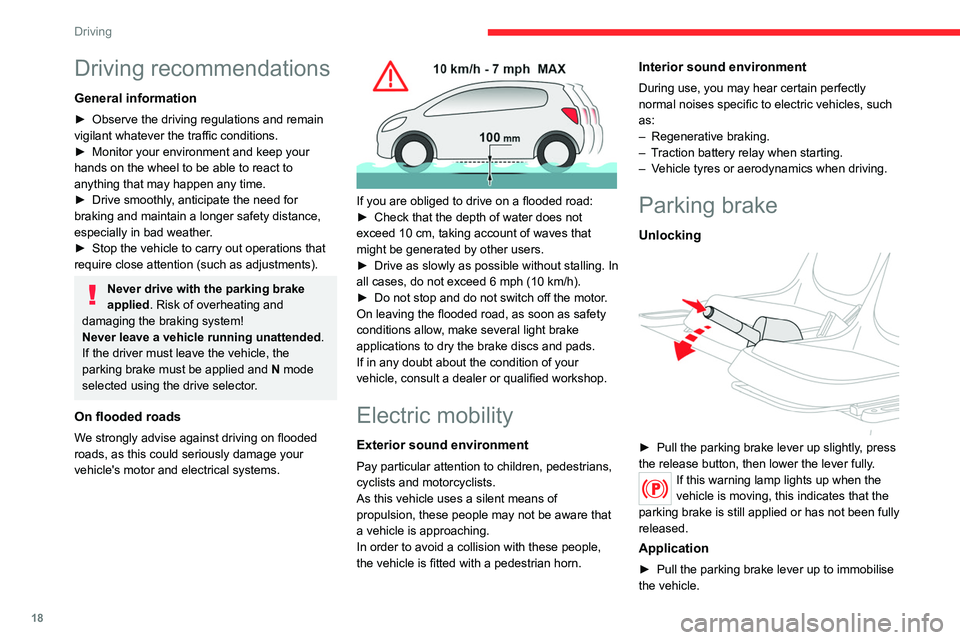
If you are obliged to drive on a flooded road:
► Check that the depth of water does not
exceed 10 cm, taking account of waves that
might be generated by other users.
►
Drive as slowly as possible without stalling. In
all cases, do not exceed 6 mph (10 km/h).
► Do not stop and do not switch off the motor.
On leaving the flooded road, as soon as safety
conditions allow
, make several light brake
applications to dry the brake discs and pads.
If in any doubt about the condition of your
vehicle, consult a dealer or qualified workshop.
Electric mobility
Exterior sound environment
Pay particular attention to children, pedestrians,
cyclists and motorcyclists.
As this vehicle uses a silent means of
propulsion, these people may not be aware that
a vehicle is approaching.
In order to avoid a collision with these people,
the vehicle is fitted with a pedestrian horn.
Interior sound environment
During use, you may hear certain perfectly
normal noises specific to electric vehicles, such
as:
–
Regenerative braking.
– Traction battery relay when starting.
– Vehicle tyres or aerodynamics when driving.
Parking brake
Unlocking
► Pull the parking brake lever up slightly, press
the release button, then lower the lever fully .
If this warning lamp lights up when the
vehicle is moving, this indicates that the
parking brake is still applied or has not been fully
released.
Application
► Pull the parking brake lever up to immobilise
the vehicle.
Page 21 of 44

19
Driving
6When parking on a slope, turn the
wheels against the kerb and/or place a
chock behind one of the wheels, apply the
parking brake and switch off the ignition.
Drive selector
The drive selector has 3 buttons:
D. Forward (Drive)
N. Neutral
R. Reverse (Rear)
When the ignition is switched on, the instrument
panel lights up.
When the motor is switched on, N mode is
displayed on the instrument panel, along with the
READY warning lamp.
►
To move to
D or R mode, depress the brake
pedal and then press the desired button.
By default, this lamp flashes.
Do not depress the accelerator pedal
when switching to D or R mode.
Engine braking and energy recovery
The vehicle is fitted with an energy
recovery system which operates during
deceleration: regenerative braking.
This system of engine braking consists of
recovering part of the energy generated
during deceleration and feeding it back to
the traction battery in order to improve the
vehicle's driving range.
When the traction battery is fully charged
and during the first few miles/kilometres of
a journey, the regenerative braking does not
operate.
Adapt your driving style and use the brake
pedal.
Engine braking and brake pedal
The engine braking can never replace
the brake pedal.
When driving downhill, it is essential not to
exceed the maximum speed of the vehicle
and to voluntarily limit its speed by using the
brake pedal.
In order to protect the drive chain, a
slight decrease in performance may be
observed at low temperatures or during
prolonged use of maximum power.
Starting/Stopping the
vehicle
Ignition switch
1. Stop position Switching off the engine.
2. Ignition on position
Use electrical accessories.
3. Starting position Engine starting.
Starting
When the ignition is switched on, the instrument
panel lights up, all lights come on and the
steering column is unlocked.
Page 25 of 44

23
Practical information
7The charge level increases slowly as charging
progresses.
When the charge is completed, the instrument
panel switches off.
Disconnection
► Disconnect the charging cable from the
power socket.
►
Open the passenger door.
► Store all of the charging cable inside its
housing.
►
Close the passenger door.
Electric motor
1. Screenwash fluid reservoir
2. Fuse box
3. 12
V battery
4. T
raction battery/48
V electrical circuit
5. Electric motor
6. Brake fluid reservoir
Checking levels
Check all of the following levels regularly in
accordance with the Manufacturer's service
schedule. Top them up if required, unless
otherwise indicated.
If a particular level has dropped significantly,
have the corresponding circuit checked by a
dealer or qualified workshop.
Fluids must comply with the
Manufacturer's recommendations.
Used products
Avoid prolonged contact of used fluids
with the skin.
Most of these fluids are harmful to health and
very corrosive.
Do not discard used fluids into sewers
or onto the ground.
Drain used fluids into the dedicated
containers provided by dealers or qualified
workshops.
Brake fluid
Before doing any work
Switch off the ignition, apply the parking
brake, check that the instrument panel is off
and that the charging cable is not connected.
To find out how often the brake fluid should be
replaced, refer to the Manufacturer's servicing
schedule.
Removing front bumper
► Remove the 2 lower fixing screws from the
frame.
►
Remove the 2 upper access flaps from the
wings, pass an arm under the wing and lift it up.
►
Remove the 2 upper side fixing screws from
the flaps.
►
Remove the 2 lower side fixing screws from
the wheel arches.
►
Pull the bumper horizontally for about ten
centimetres until the attachment points come
away.
►
Disconnect the indicator wiring looms.
Before topping up, it is necessary to
protect the motor and its connectors in
Page 26 of 44

24
Practical information
order to avoid any risk of brake fluid splashing
onto them.
Topping up
Use only DOT4 brake fluid from a sealed
container.
►
Clean the cap before removing it to refill.The level of this fluid should be close to the "MAX" mark. If not, check the brake
pads for wear.
Refitting front bumper
► Bring the bumper close to the frame.
► Connect the indicator wiring looms.
► Place it in position and then push the bumper
horizontally until the attachment points clip into
place.
►
Screw the 2 upper side fixing screws into the
flaps.
►
Screw the 2 lower side fixing screws into the
wheel arches.
►
Screw the 2 lower fixing screws into the
frame.
►
Clip the 2 upper access flaps to the wings.
Screenwash fluid
Access/Topping up
The fluid must be topped up with a pre-mixed
product.
In winter (temperatures below 0°C), a fluid
containing an anti-freeze agent which is
appropriate for the temperature conditions
must be used in order to protect the system's
components (pump, tank, ducts, jets).
Filling with pure water is prohibited in all
circumstances (risk of freezing,
limescale, etc.).
► Top up to the required level when
necessary .
Tank capacity: 1 litre.
► Turn both fixing screws a quarter turn.
► Unclip the access cover.
► Remove the cap from the tank to top up.
Checks
Unless otherwise indicated, check these
components in accordance with the
Manufacturer's service schedule.
Otherwise, have them checked by a dealer or
qualified workshop.
Only use products recommended by the
Manufacturer or products of equivalent
quality and specification.
In order to optimise the operation of
components as important as those in the
braking system, the Manufacturer selects and
offers very specific products.
12 V battery
The battery does not require any maintenance.
Check regularly that the terminals are correctly
tightened and that the connections are clean.
For more information on the precautions
to take before any work on the 12 V
battery
, refer to the corresponding section.
Manual parking brake
If you notice excessive brake lever travel
or decreased effectiveness, the parking
brake must be adjusted, even between two
services.
This system must be checked by a dealer or
qualified workshop.
Brake pads/Discs/Drums
Brake wear depends on the style of
driving, particularly in the case of vehicles
used in town, over short distances. It may be
necessary to have the condition of the brakes
checked, even between vehicle services.
Page 27 of 44

25
Practical information
7Unless there is a leak in the circuit, a drop in the
brake fluid level indicates that the brake pads
are worn.
For information on checking brake disc/
drum wear, contact a dealer or a qualified
workshop.
After washing the vehicle, moisture, or in wintry conditions, ice can form on the
brake discs and pads: braking efficiency may
be reduced. Gently dab the brakes to dry and
defrost them.
Wheels and tyres
All tyre pressures must be checked when the tyres are cold.
The pressures indicated on the tyre pressure
label are valid for "cold" tyres. If you have driven
for more than 10 minutes or more than 6 miles
(10 kilometres), add 0.3 bar (30 kPa) to the
values indicated on the label.
Under-inflation increases energy
consumption. Non-compliant tyre
pressures cause tyres to wear prematurely
and have an adverse effect on the vehicle's
road holding - risk of accident!
Driving with worn or damaged tyres reduces the
braking and road holding performance of the
vehicle. We recommended regularly checking
the condition of tyres (tread and sidewalls) and
wheel rims as well as the presence of valves. When the wear indicators no longer appear set
back from the tread, the depth of the grooves is
less than 1.6 mm; it is essential to replace the
tyres.
Using different size wheels and tyres from those
specified can affect the lifetime of tyres, wheel
rotation, ground clearance, the speedometer
reading and have an adverse effect on road
holding.
Shock absorbers
It is not easy for drivers to detect when
shock absorbers are worn. Nevertheless,
shock absorbers have a major impact on road
holding and braking performance.
For your safety and driving comfort, it is
important to have them regularly checked by a
dealer or a qualified workshop.
Changing to free-wheeling
In certain situations, you must allow the vehicle
to free-wheel (when being towed, on a rolling
road, transport by rail or sea, etc.).
►
Switch the ignition off.
► Release the parking brake.
Advice on care and maintenance
General information - Exterior
Do not wash the vehicle in full sunshine
or in extremely cold conditions.
Do not use a high pressure washer or
automatic carwash to clean the vehicle.
Use a water jet (temperature between +20°C
and +40°C).
Before starting to clean your vehicle,
remember to lock the windows and
doors.
Use a sponge and soapy water or a pH
neutral product.
Move the water jet perpendicular to the
surface to be cleaned, avoiding the door
seals.
Rinse the vehicle using demineralised water,
then gently wipe the bodywork with a clean
microfibre cloth.
Promptly clean off any marks containing
corrosive chemical substances liable to
damage the vehicle's paintwork (including
tree resin, bird droppings, insect secretions,
pollen and tar).
If justified by the environment, clean the
vehicle more frequently to remove salty
deposits (in coastal areas), soot (in industrial
Page 29 of 44

27
In the event of a breakdown
8Changing a wheel
The vehicle is not equipped with on-board tools,
such as a jack or wheel brace.
In the event of a flat tyre, call a dealer or
qualified workshop.
To have winter tyres fitted or the wheels
changed, consult a dealer or qualified workshop.
Changing a bulb
Cleaning
The headlamps have polycarbonate
lenses with a protective coating:
–
Do not clean them with a dry or abrasive
cloth, nor with detergent or solvent
products.
–
Use a sponge and soapy water or a pH
neutral product.
–
When using a jet of water to clean off
persistent marks, do not keep the jet directed
towards the headlamps, lamps or their
edges for too long, so as not to damage their
protective coating and seals.
Light-emitting diodes (LEDs)
Do not touch LED headlamps/lamps.
To replace this type of bulb, you must consult
a dealer or qualified workshop.
Direction indicators
Rapid flashing of the indicator lamp for a
direction indicator
(left or right) indicates that
one of the bulbs on the corresponding side
has failed.
Front lamps
1. Direction indicators
2. Sidelamps
3. Dipped beam headlamps
Rear lamps
1.Direction indicators
2. Sidelamps
3. Brake lamps
4. Number plate lamp