2021 CHRYSLER VOYAGER reset
[x] Cancel search: resetPage 161 of 348

MULTIMEDIA159
Care And Maintenance
Do not press the touchscreen with any hard or
sharp objects (pen, USB stick, jewelry, etc.),
which could scratch the surface.
Do not spray any liquid or chemicals directly on
the screen! Use a clean and dry microfiber lens
cleaning cloth in order to clean the touchscreen.
If necessary, use a lint-free cloth dampened
with a cleaning solution, such as isopropyl
alcohol or an isopropyl alcohol and water solu -
tion ratio of 50:50. Be sure to follow the solvent
manufacturer's precautions and directions
Úpage 331.
UCONNECT MODES
STEERING WHEEL AUDIO CONTROLS
The remote sound system controls are located on
the rear surface of the steering wheel at the three
and nine o’clock positions.
Remote Sound System Controls
The right-hand control is a rocker-type switch with
a push button in the center and controls the
volume and mode of the sound system. Pushing
the top of the rocker switch will increase the
volume, and pushing the bottom of the rocker
switch will decrease the volume.
Pushing the center button will make the radio
switch between the various modes available
(AM/FM/SXM or Media, etc.).
The left-hand control is a rocker-type switch with a
push button in the center. The function of the
left-hand control is different depending on which
mode you are in. The following describes the left-hand control
operation in each mode:
Radio Operation
Pushing the top of the switch will Seek Up for the
next available station and pushing the bottom of
the switch will Seek Down for the next available
station.
The button located in the center of the left-hand
control will tune to the next preset station that you
have programmed in the radio presets.
Media Mode
Pushing the top of the switch skips to
the next track on the selected media
(AUX/USB/Bluetooth®). Pushing the switch up
twice will go forward two tracks. Pushing the
bottom switch goes to the beginning of the current
track, or the beginning of the previous track if it is
within eight seconds after the current track begins
to play. Double pressing the bottom button switch
will skip to the previous track if it is after eight
seconds into the current track.5
21_RUV_OM_EN_USC_t.book Page 159
Page 162 of 348

160MULTIMEDIA
RADIO MODE
Radio Controls
Uconnect 4 With 7-inch Display
The radio is equipped with the following modes:
AM
FM
SiriusXM® Satellite Radio (if equipped)
Press the Radio button on the touchscreen to enter
the Radio Mode. The different tuner modes, AM,
FM, and SXM, can then be selected by pressing the
corresponding buttons in Radio Mode.
Volume & On/Off Control
Push the Volume & On/Off control knob to turn on
and off the Uconnect system.
The electronic volume control turns continuously
(360 degrees) in either direction, without stopping.
Turning the Volume & On/Off control knob
clockwise increases the volume, and
counterclockwise decreases it.
When the audio system is turned on, the sound will
be set at the same volume level as last played.
Mute Button
Push the Mute button to mute or unmute the
system.
Tune/Scroll Control
Turn the rotary Tune/Scroll control knob clockwise
to increase or counterclockwise to decrease the
radio station frequency. Push the Enter/Browse
button to choose a selection. Seek
The Seek Up and Down functions are activated by
pressing the double arrow buttons on the
touchscreen to the right and left of the radio
station display or by pushing the left steering wheel
audio control button up or down.
Seek Up
and Seek Down
Press and release the Seek Up or
Seek Down button to tune the radio to the next
available station or channel. During a Seek Up/
Down function, if the radio reaches the starting
station after passing through the entire band two
times, the radio will stop at the station where it
began.
Fast Seek Up and Fast Seek Down
Press and hold, and then release the
Seek Up or Seek Down button to advance the radio through the available stations or
channels at a faster rate. The radio stops at the
next available station or channel when the button
on the touchscreen is released.
NOTE:
Pressing and holding either the Seek Up or
Seek Down button will scan the different
frequency bands at a slower rate.
1 — Radio Bands
2 — Preset Radio Stations
3 — View Next Preset Radio Stations
4 — Status Bar
5 — Browse Button
6 — Seek Down
7 — Tune Button
8 — Seek Up
9 — Audio Settings
10 — Bottom Bar
21_RUV_OM_EN_USC_t.book Page 160
Page 164 of 348

162MULTIMEDIA
No Subscription
Radios equipped with a Satellite receiver require a
subscription to the SiriusXM® Service. When the
radio does not have the necessary subscription,
the radio is able to receive the Preview channel
only.
Acquiring SiriusXM® Subscription
To activate the SiriusXM® Satellite Radio
subscription, US residents visit
siriusxm.com/
getallaccess or call: 1-800-643-2112
Canadian residents visit
https://
www.siriusxm.ca/ or call: 1-888-539-7474.
NOTE:You will need to provide the SiriusXM® ID (RID)
located at the bottom of the Channel 0 screen.
The Satellite Mode is activated by a press of the
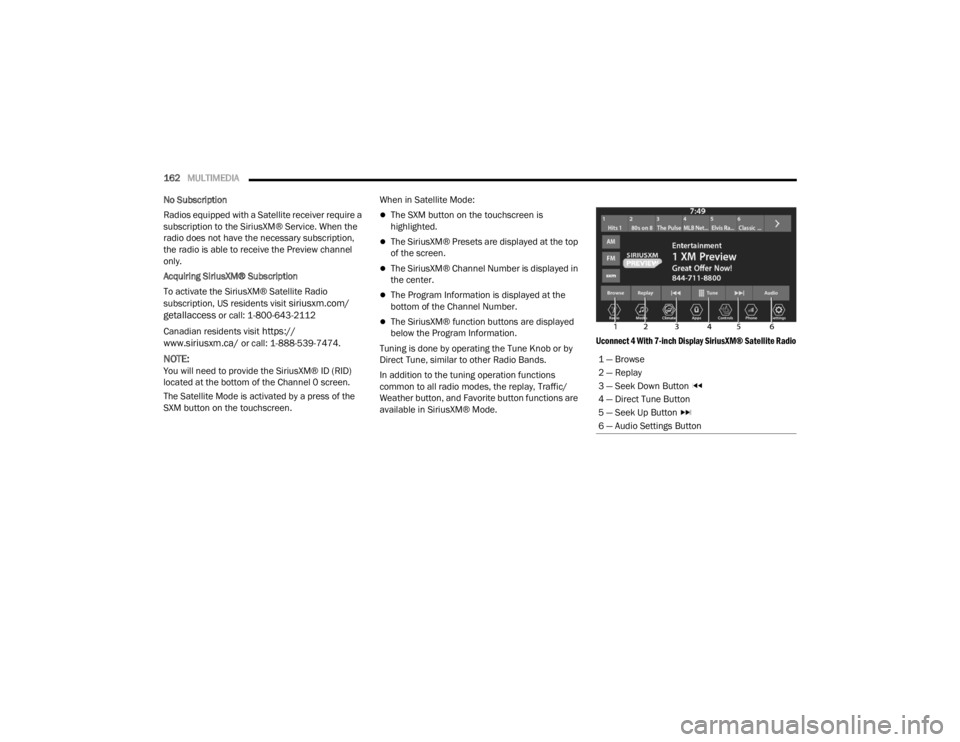
SXM button on the touchscreen. When in Satellite Mode:
The SXM button on the touchscreen is
highlighted.
The SiriusXM® Presets are displayed at the top
of the screen.
The SiriusXM® Channel Number is displayed in
the center.
The Program Information is displayed at the
bottom of the Channel Number.
The SiriusXM® function buttons are displayed
below the Program Information.
Tuning is done by operating the Tune Knob or by
Direct Tune, similar to other Radio Bands.
In addition to the tuning operation functions
common to all radio modes, the replay, Traffic/
Weather button, and Favorite button functions are
available in SiriusXM® Mode.
Uconnect 4 With 7-inch Display SiriusXM® Satellite Radio
1 — Browse
2 — Replay
3 — Seek Down Button
4 — Direct Tune Button
5 — Seek Up Button
6 — Audio Settings Button
21_RUV_OM_EN_USC_t.book Page 162
Page 166 of 348

164MULTIMEDIA
FAVORITES
Press the Favorites button on the touchscreen to
activate the favorites menu, which will time out
within 20 seconds in absence of user interaction.
You can exit the Favorites Menu by a press of the X
button.
The favorites feature enables you to set a favorite
artist or song that is currently playing. The radio
then uses this information to alert you when either
the favorite artist or song is being played at any
time by any of the SiriusXM® Channels.
The maximum number of favorites that can be
stored in the Radio is 50.
Favorite Artist: While the song is playing, to set a
favorite artist, press the Favorites button on the
touchscreen and then the Favorite Artist button on
the touchscreen.
Favorite Song: While the song is playing, to set a
favorite song, press the Favorites button on the
touchscreen and then the Favorite Song button on
the touchscreen.
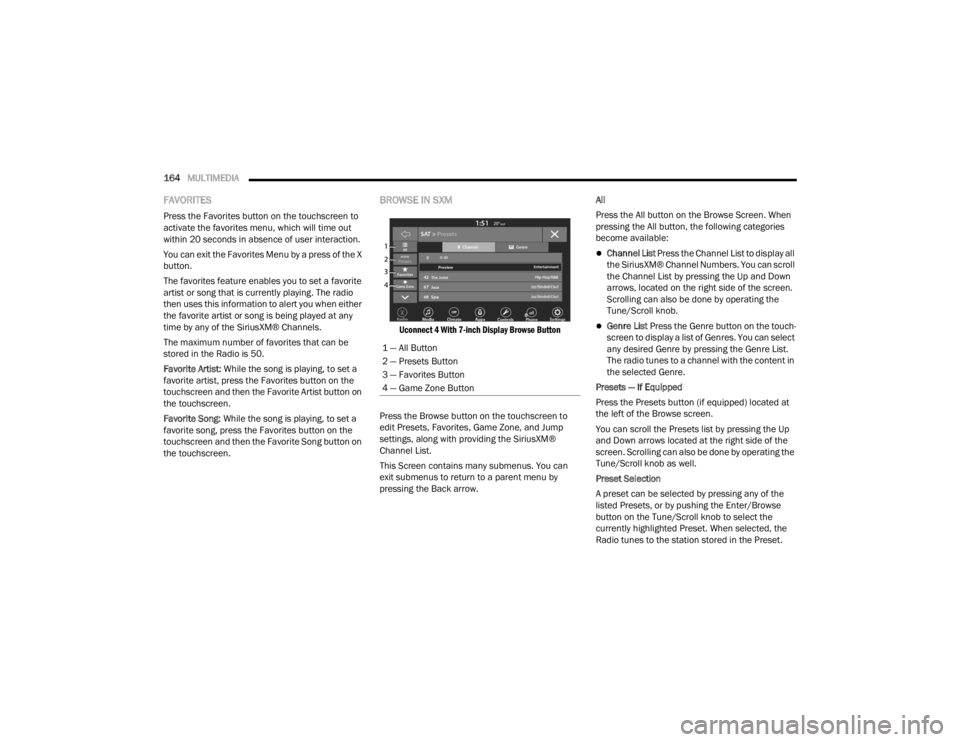
BROWSE IN SXM
Uconnect 4 With 7-inch Display Browse Button
Press the Browse button on the touchscreen to
edit Presets, Favorites, Game Zone, and Jump
settings, along with providing the SiriusXM®
Channel List.
This Screen contains many submenus. You can
exit submenus to return to a parent menu by
pressing the Back arrow. All
Press the All button on the Browse Screen. When
pressing the All button, the following categories
become available:
Channel List
Press the Channel List to display all
the SiriusXM® Channel Numbers. You can scroll
the Channel List by pressing the Up and Down
arrows, located on the right side of the screen.
Scrolling can also be done by operating the
Tune/Scroll knob.
Genre List Press the Genre button on the touch -
screen to display a list of Genres. You can select
any desired Genre by pressing the Genre List.
The radio tunes to a channel with the content in
the selected Genre.
Presets — If Equipped
Press the Presets button (if equipped) located at
the left of the Browse screen.
You can scroll the Presets list by pressing the Up
and Down arrows located at the right side of the
screen. Scrolling can also be done by operating the
Tune/Scroll knob as well.
Preset Selection
A preset can be selected by pressing any of the
listed Presets, or by pushing the Enter/Browse
button on the Tune/Scroll knob to select the
currently highlighted Preset. When selected, the
Radio tunes to the station stored in the Preset.
1 — All Button
2 — Presets Button
3 — Favorites Button
4 — Game Zone Button
21_RUV_OM_EN_USC_t.book Page 164
Page 167 of 348

MULTIMEDIA165
Deleting A Preset
A preset can be deleted in the Presets Browse
screen by pressing the Trash Can icon for the
corresponding preset.
Favorites
Press the Favorites button on the Browse screen.
The Favorites menu provides a means to edit the
Favorites list and to configure the Alert Settings,
along with providing a list of Channels currently
airing any of the items in the Favorites list.
You can scroll the Favorites list by pressing the Up
and Down arrows located at the right side of the
screen. Scrolling can also be done by operating the
Tune/Scroll knob as well.
Remove Favorites
Press the Remove Favorites tab at the top of the
screen. Press the Delete All button on the
touchscreen to delete all of the Favorites or press
the Trash Can icon next to the Favorite to be
deleted.
Alert Settings
Press the Alert Settings tab at the top of the
Favorites screen. The Alert Settings menu allows
you to choose from a visual alert or audible and
visual alert when one of your favorites is airing on
any of the SiriusXM® channels. Game Zone
Press the Game Zone button, located at the left of
the Browse screen. This feature provides you with
the ability to select teams, edit the selection, and
set alerts.
On-Air
Press the On-Air tab at the top of the screen. The
On-Air list provides a list of Channels currently
airing any of the items in the Selections list, and
pressing any of the items in the list tunes the radio
to that channel.
Select Team — If Equipped
Press the Select Team button on the touchscreen
to activate the League Scroll list. Press the chosen
league and a scroll list of all teams within the
league will appear, then you can select a team by
pressing the corresponding box. A check mark
appears for all teams that are chosen.
Remove Selection/Trash Can Icon
Press the Remove Selection tab at the top of the
screen. Press the Delete All button on the
touchscreen to delete all of the selections or press
the Trash Can icon next to the selection to be
deleted.
Alert Settings
Press the Alert Setting tab at the top of the screen.
The Alert Settings menu allows you to choose from
“Alert me to on-air games upon start” or “Alert
upon score update” or both when one or more of
your selections is airing on any of the SiriusXM®
channels.
Tune Start
Tune Start begins playing the current song from
the beginning when you tune to a music channel
using one of the 12 presets. This feature occurs
the first time the preset is selected during that
current song.
5
21_RUV_OM_EN_USC_t.book Page 165
Page 168 of 348

166MULTIMEDIA
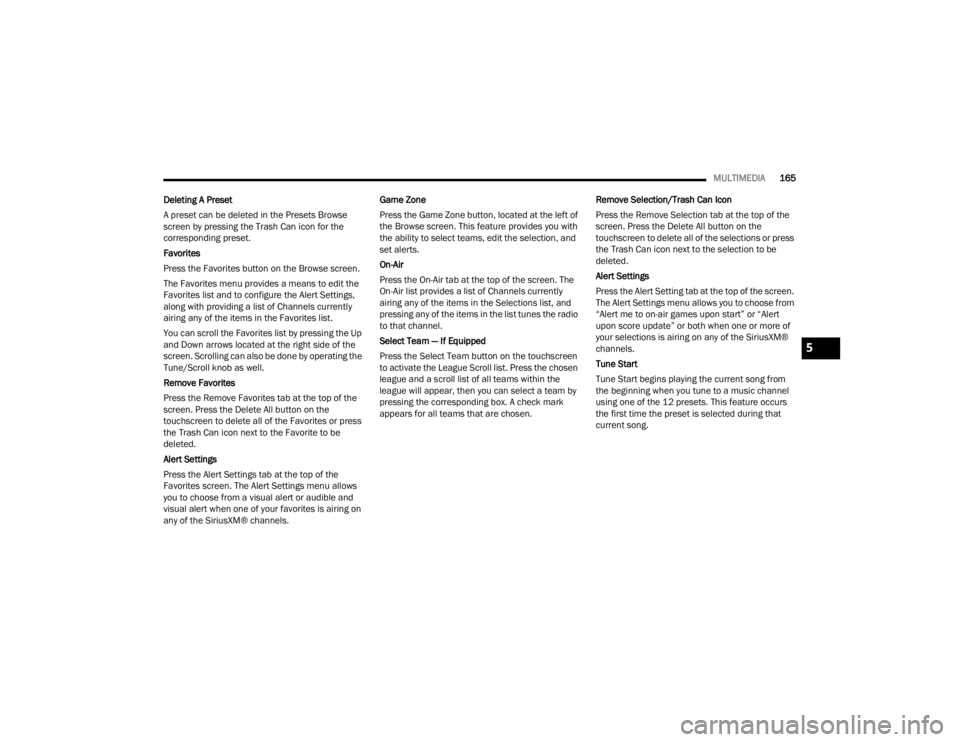
Setting Presets
Uconnect 4 With 7-inch Display Radio Presets
The Presets are available for all Radio Modes, and
are activated by pressing any of the Preset
buttons, located at the top of the screen.
When you are on a station that you wish to save as
a preset, press and hold the numbered button on
the touchscreen for more than two seconds.
The Radio stores up to 12 presets in each of the
Radio Modes.
A total of six presets will appear on the screen. You
can switch between the radio presets list by
pressing the Arrow button located in the upper
right of the radio touchscreen.
PRESET FEATURES — IF EQUIPPED
Browse In AM/FM
When in either AM or FM, the Browse Screen
provides a means to edit the Presets List and is
entered by pushing the Enter/Browse button.
Scrolling Preset List
Once in the Browse Presets screen, you can scroll
the preset list by rotation of the Tune/Scroll knob
or by pressing the Up and Down Arrow keys,
located on the right of the screen.
Preset Selection From List
A preset can be selected by pressing any of the
listed Presets, or by pushing the Enter/Browse
button on the Tune/Scroll knob to select the
currently highlighted Preset.
When selected, the radio tunes to the station
stored in the Presets.
Deleting Presets
A preset can be deleted in the Presets Browse
screen by pressing the Trash Can icon for the
corresponding preset. Return To Main Radio Screen
You can return to the Main Radio Screen by
pressing the X button or the Back Arrow button
when in the Browse Presets screen.
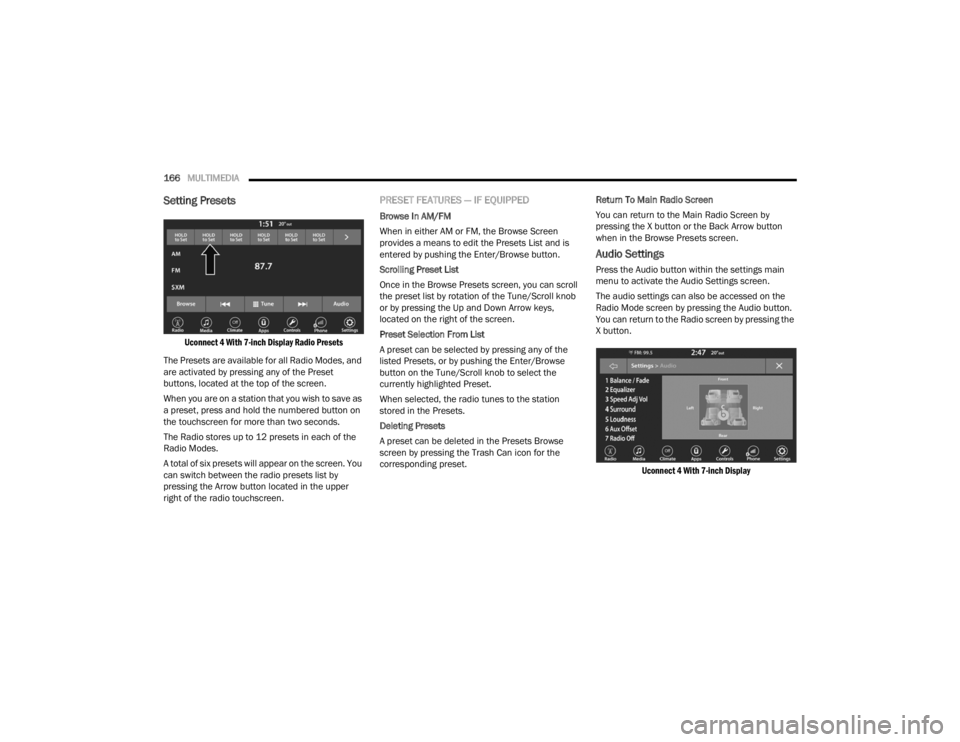
Audio Settings
Press the Audio button within the settings main
menu to activate the Audio Settings screen.
The audio settings can also be accessed on the
Radio Mode screen by pressing the Audio button.
You can return to the Radio screen by pressing the
X button.
Uconnect 4 With 7-inch Display
21_RUV_OM_EN_USC_t.book Page 166
Page 200 of 348

198SAFETY
FCW Limited Warning
If the instrument cluster displays “ACC/FCW
Limited Functionality” or “ACC/FCW Limited
Functionality Clean Front Windshield”
momentarily, there may be a condition that limits
FCW functionality. Although the vehicle is still
drivable under normal conditions, the active
braking may not be fully available. Once the
condition that limited the system performance is
no longer present, the system will return to its full
performance state. If the problem persists, see an
authorized dealer.
Service FCW Warning
If the system turns off, and the instrument cluster
displays:
ACC/FCW Unavailable Service Required
Cruise/FCW Unavailable Service Required
This indicates there is an internal system fault.
Although the vehicle is still drivable under normal
conditions, have the system checked by an
authorized dealer.
Pedestrian Emergency Braking (PEB) —
If Equipped
The Pedestrian Emergency Braking (PEB) is a
subsystem of the FCW system that provides the
driver with audible and visual warnings in the
instrument cluster display, and may apply
automatic braking when it detects a potential
frontal collision with a pedestrian.
If a PEB event begins at a speed below 37 mph
(60 km/h), the system may provide braking to
mitigate the potential collision with a pedestrian. If
the PEB event stops the vehicle completely, the
system will hold the vehicle at a standstill for two
seconds and then release the brakes. When the
system determines a collision with the pedestrian
in front of you is no longer probable, the warning
message will be deactivated.
The minimum speed for PEB activation is 3 mph
(5 km/h). Turning PEB On Or Off
NOTE:The default status of PEB is “On.” This allows the
system to warn you of a possible frontal collision
with the pedestrian.
The PEB button is located in the Uconnect display
in the Controls settings
Úpage 142.
To turn the PEB system off, push the Pedestrian
Emergency Braking button once.
To turn the PEB system back on, push the
Pedestrian Emergency Braking button again.
Changing the PEB status to “Off” deactivates the
system, so no warning or active braking will be
available in case of a possible frontal collision with
the pedestrian.
NOTE:The PEB system will NOT retain the last setting
selected by the driver after ignition shut down. The
system will reset to the default setting when the
vehicle is restarted.
WARNING!
Pedestrian Emergency Braking (PEB) is not
intended to avoid a collision on its own, nor can
PEB detect every type of potential collision with
a pedestrian. The driver has the responsibility to
avoid a collision by controlling the vehicle via
braking and steering. Failure to follow this
warning could lead to serious injury or death.
21_RUV_OM_EN_USC_t.book Page 198
Page 226 of 348

224SAFETY
(Continued)
Cut off battery power to the:
Engine
Electric Motor (if equipped)
Electric power steering
Brake booster
Electric park brake
Automatic transmission gear selector
Horn
Front wiper
Headlamp washer pump
NOTE:After an accident, remember to cycle the ignition to
the STOP (OFF/LOCK) position and remove the key
from the ignition switch to avoid draining the
battery. Carefully check the vehicle for fuel leaks in
the engine compartment and on the ground near
the engine compartment and fuel tank before
resetting the system and starting the engine. If
there are no fuel leaks or damage to the vehicle
electrical devices (e.g. headlights) after an
accident, reset the system by following the
procedure described below. If you have any doubt,
contact an authorized dealer.
Enhanced Accident Response System
Reset Procedure
In order to reset the Enhanced Accident Response
System functions after an event, the ignition switch
must be changed from ignition START or ON/RUN
to ignition OFF. Carefully check the vehicle for fuel
leaks in the engine compartment and on the
ground near the engine compartment and fuel
tank before resetting the system and starting the
engine.
After an accident, if the vehicle will not start after
performing the reset procedure, the vehicle must
be towed to an authorized dealer to be inspected
and to have the Enhanced Accident Response
System reset.
Maintaining Your Air Bag System Event Data Recorder (EDR)
This vehicle is equipped with an event data
recorder (EDR). The main purpose of an EDR is to
record, in certain crash or near crash-like
situations, such as an air bag deployment or hitting
a road obstacle, data that will assist in
understanding how a vehicle’s systems performed.
WARNING!
Modifications to any part of the air bag system
could cause it to fail when you need it. You
could be injured if the air bag system is not
there to protect you. Do not modify the compo-
nents or wiring, including adding any kind of
badges or stickers to the steering wheel hub
trim cover or the upper passenger side of the
instrument panel. Do not modify the front
fascia/bumper, vehicle body structure, or add
aftermarket side steps or running boards.
It is dangerous to try to repair any part of the
air bag system yourself. Be sure to tell anyone
who works on your vehicle that it has an air
bag system.
Do not attempt to modify any part of your air
bag system. The air bag may inflate acciden -
tally or may not function properly if modifica -
tions are made. Take your vehicle to an
authorized dealer for any air bag system
service. If your seat, including your trim cover
and cushion, needs to be serviced in any way
(including removal or loosening/tightening of
seat attachment bolts), take the vehicle to an
authorized dealer. Only manufacturer
approved seat accessories may be used. If it is
necessary to modify the air bag system for
persons with disabilities, contact an autho -
rized dealer.
WARNING!
21_RUV_OM_EN_USC_t.book Page 224