2021 CHRYSLER 300 buttons
[x] Cancel search: buttonsPage 46 of 268
44 GETTING TO KNOW YOUR VEHICLE
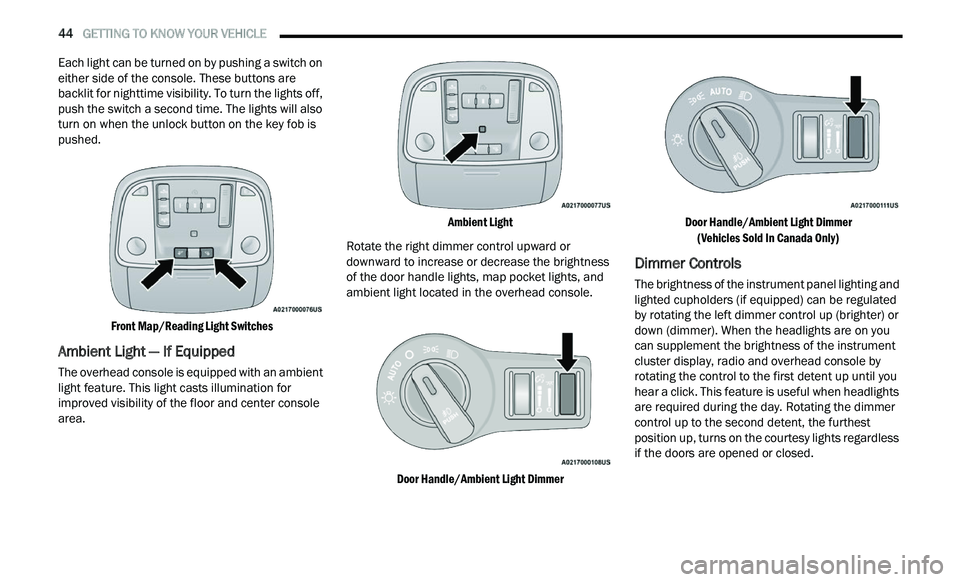
Each light can be turned on by pushing a switch on
either side of the console. These buttons are
backlit for nighttime visibility. To turn the lights off,
push the switch a second time. The lights will also
turn on when the unlock button on the key fob is
pushed.
Front Map/Reading Light Switches
Ambient Light — If Equipped
The overhead console is equipped with an ambient
light feature. This light casts illumination for
improved visibility of the floor and center console
area.
Ambient Light
Rotate the right dimmer control upward or
d ow
nward to increase or decrease the brightness
of the door handle lights, map pocket lights, and
ambient light located in the overhead console.
Door Handle/Ambient Light Dimmer Door Handle/Ambient Light Dimmer
(V
ehicles Sold In Canada Only)
Dimmer Controls
The brightness of the instrument panel lighting and
lighted cupholders (if equipped) can be regulated
by rotating the left dimmer control up (brighter) or
down (dimmer). When the headlights are on you
can supplement the brightness of the instrument
cluster display, radio and overhead console by
rotating the control to the first detent up until you
hear a click. This feature is useful when headlights
are required during the day. Rotating the dimmer
control up to the second detent, the furthest
position up, turns on the courtesy lights regardless
if the doors are opened or closed.
Page 50 of 268
48 GETTING TO KNOW YOUR VEHICLE
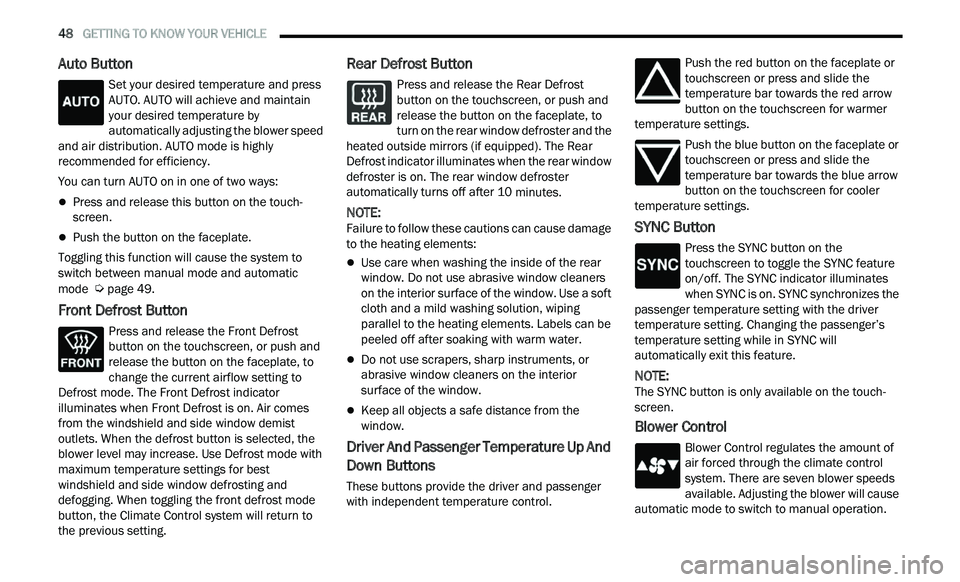
Auto Button
Set your desired temperature and press
AUTO. AUTO will achieve and maintain
you
r desired temperature by
automatically adjusting the blower speed
and air distribution. AUTO mode is highly
recommended for efficiency.
You can turn AUTO on in one of two ways:
Press and release this button on the touch -
screen.
Push the button on the faceplate.
Toggling this function will cause the system to
s w
itch between manual mode and automatic
mode
Ú page 49.
Front Defrost Button
Press and release the Front Defrost
button on the touchscreen, or push and
re
lease the button on the faceplate, to
change the current airflow setting to
Defrost mode. The Front Defrost indicator
illuminates when Front Defrost is on. Air comes
from the windshield and side window demist
outlets. When the defrost button is selected, the
blower level may increase. Use Defrost mode with
maximum temperature settings for best
windshield and side window defrosting and
defogging. When toggling the front defrost mode
button, the Climate Control system will return to
the previous setting.
Rear Defrost Button
Press and release the Rear Defrost
button on the touchscreen, or push and
r e
lease the button on the faceplate, to
turn on the rear window defroster and the
heated outside mirrors (if equipped). The Rear
Defrost indicator illuminates when the rear window
defroster is on. The rear window defroster
automatically turns off after 10 minutes.
NOTE:
Failure to follow these cautions can cause damage
t o
the heating elements:
Use care when washing the inside of the rear
window. Do not use abrasive window cleaners
on the interior surface of the window. Use a soft
cloth and a mild washing solution, wiping
parallel to the heating elements. Labels can be
peeled off after soaking with warm water.
Do not use scrapers, sharp instruments, or
abrasive window cleaners on the interior
surface of the window.
Keep all objects a safe distance from the
window.
Driver And Passenger Temperature Up And
Down Buttons
These buttons provide the driver and passenger
with independent temperature control. Push the red button on the faceplate or
touchscreen or press and slide the
t
e
mperature bar towards the red arrow
button on the touchscreen for warmer
temperature settings.
Push the blue button on the faceplate or
touchscreen or press and slide the
te
mperature bar towards the blue arrow
button on the touchscreen for cooler
temperature settings.
SYNC Button
Press the SYNC button on the
touchscreen to toggle the SYNC feature
o n
/off. The SYNC indicator illuminates
when SYNC is on. SYNC synchronizes the
passenger temperature setting with the driver
temperature setting. Changing the passenger’s
temperature setting while in SYNC will
automatically exit this feature.
NOTE:
The SYNC button is only available on the touch-
screen.
Blower Control
Blower Control regulates the amount of
air forced through the climate control
s y
stem. There are seven blower speeds
available. Adjusting the blower will cause
automatic mode to switch to manual operation.
Page 51 of 268
GETTING TO KNOW YOUR VEHICLE 49
The speeds can be selected using either the
blower control knob on the faceplate or the
buttons on the touchscreen.
Faceplate
The blower speed increases as you turn the blower
c
on
trol knob clockwise from the lowest blower
setting. The blower speed decreases as you turn
the blower control knob counterclockwise.
Touchscreen
Use the small blower icon to reduce the blower
s e
tting and the large blower icon to increase the
blower setting. Blower can also be selected by
pressing the blower bar area between the icons.
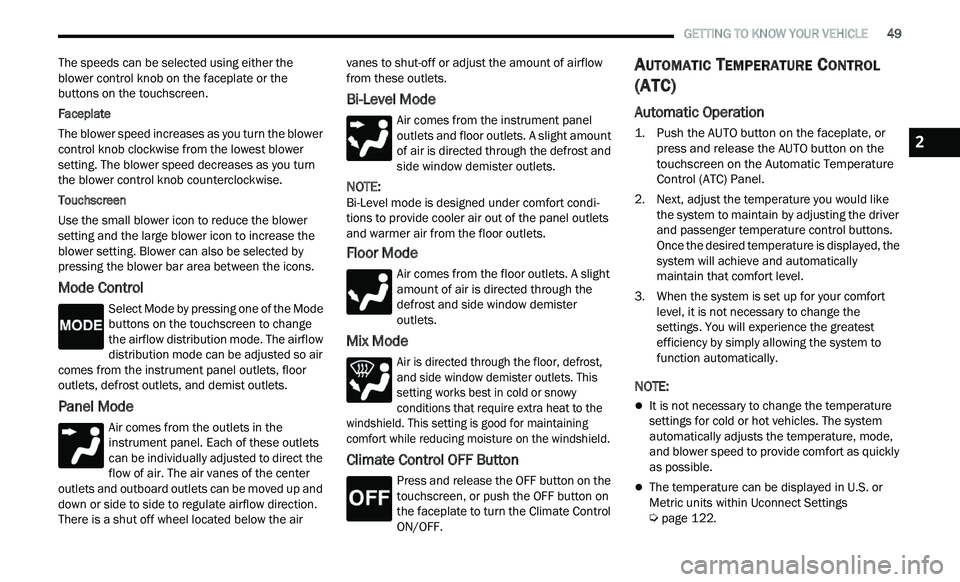
Mode Control
Select Mode by pressing one of the Mode
buttons on the touchscreen to change
t h
e airflow distribution mode. The airflow
distribution mode can be adjusted so air
comes from the instrument panel outlets, floor
outlets, defrost outlets, and demist outlets.
Panel Mode
Air comes from the outlets in the
instrument panel. Each of these outlets
c a
n be individually adjusted to direct the
flow of air. The air vanes of the center
outlets and outboard outlets can be moved up and
down or side to side to regulate airflow direction.
There is a shut off wheel located below the air vanes to shut-off or adjust the amount of airflow
from these outlets.
Bi-Level Mode
Air comes from the instrument panel
outlets and floor outlets. A slight amount
of
air is directed through the defrost and
side window demister outlets.
NOTE:
Bi-Level mode is designed under comfort condi -
tions to provide cooler air out of the panel outlets
a n
d warmer air from the floor outlets.
Floor Mode
Air comes from the floor outlets. A slight
amount of air is directed through the
de
frost and side window demister
outlets.
Mix Mode
Air is directed through the floor, defrost,
and side window demister outlets. This
s e
tting works best in cold or snowy
conditions that require extra heat to the
windshield. This setting is good for maintaining
comfort while reducing moisture on the windshield.
Climate Control OFF Button
Press and release the OFF button on the
touchscreen, or push the OFF button on
t h
e faceplate to turn the Climate Control
ON/OFF.
AUTOMATIC TEMPERATURE CONTROL
(ATC)
Automatic Operation
1. Push the AUTO button on the faceplate, or
press and release the AUTO button on the
touchscreen on the Automatic Temperature
Control (ATC) Panel.
2. Next, adjust the temperature you would like t
he system to maintain by adjusting the driver
and passenger temperature control buttons.
Once the desired temperature is displayed, the
system will achieve and automatically
maintain that comfort level.
3. When the system is set up for your comfort l
evel, it is not necessary to change the
settings. You will experience the greatest
efficiency by simply allowing the system to
function automatically.
NOTE:
It is not necessary to change the temperature
settings for cold or hot vehicles. The system
automatically adjusts the temperature, mode,
and blower speed to provide comfort as quickly
as possible.
The temperature can be displayed in U.S. or
Metric units within Uconnect Settings
Ú page 122.
2
Page 68 of 268
66 GETTING TO KNOW YOUR INSTRUMENT PANEL
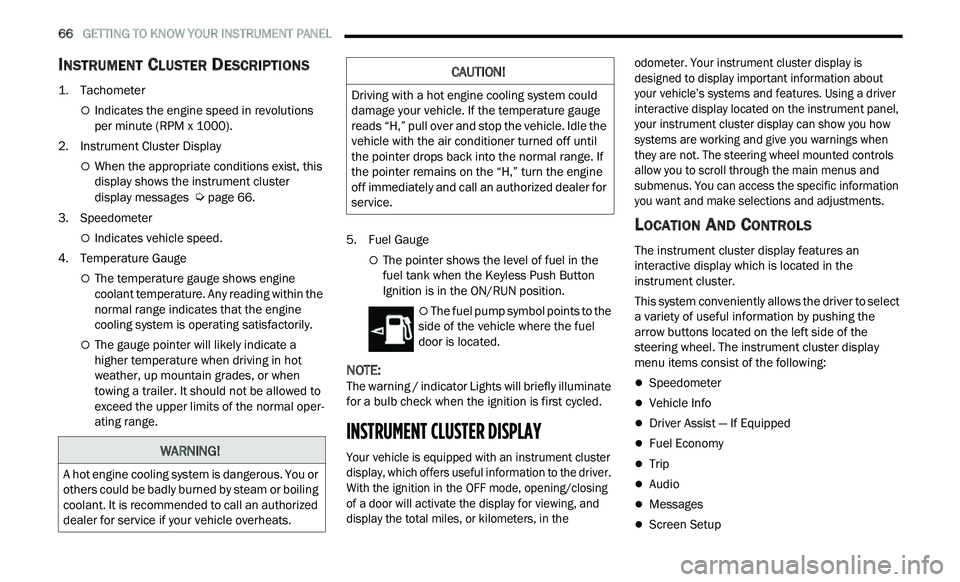
INSTRUMENT CLUSTER DESCRIPTIONS
1. Tachometer
Indicates the engine speed in revolutions
per minute (RPM x 1000).
2. Instrument Cluster Display
When the appropriate conditions exist, this
display shows the instrument cluster
display messages
Ú page 66.
3. S peedometer
Indicates vehicle speed.
4. T emperature Gauge
The temperature gauge shows engine
coolant temperature. Any reading within the
normal range indicates that the engine
cooling system is operating satisfactorily.
The gauge pointer will likely indicate a
higher temperature when driving in hot
weather, up mountain grades, or when
towing a trailer. It should not be allowed to
exceed the upper limits of the normal oper
-
ating range. 5. Fuel Gauge
The pointer shows the level of fuel in the
fuel tank when the Keyless Push Button
Ignition is in the ON/RUN position.
The fuel pump symbol points to the
side of the vehicle where the fuel
d oor
is located.
NOTE:
The warning / indicator Lights will briefly illuminate
f or
a bulb check when the ignition is first cycled.
INSTRUMENT CLUSTER DISPLAY
Your vehicle is equipped with an instrument cluster
display, which offers useful information to the driver.
With the ignition in the OFF mode, opening/closing
of a door will activate the display for viewing, and
display the total miles, or kilometers, in the odometer. Your instrument cluster display is
designed to display important information about
your vehicle’s systems and features. Using a driver
interactive display located on the instrument panel,
your instrument cluster display can show you how
systems are working and give you warnings when
they are not. The steering wheel mounted controls
allow you to scroll through the main menus and
submenus. You can access the specific information
you want and make selections and adjustments.
LOCATION AND CONTROLS
The instrument cluster display features an
interactive display which is located in the
instrument cluster.
This system conveniently allows the driver to select
a
variety of useful information by pushing the
arrow buttons located on the left side of the
steering wheel. The instrument cluster display
menu items consist of the following:
Speedometer
Vehicle Info
Driver Assist — If Equipped
Fuel Economy
Trip
Audio
Messages
Screen Setup
WARNING!
A hot engine cooling system is dangerous. You or
others could be badly burned by steam or boiling
coolant. It is recommended to call an authorized
dealer for service if your vehicle overheats.
CAUTION!
Driving with a hot engine cooling system could
damage your vehicle. If the temperature gauge
reads “H,” pull over and stop the vehicle. Idle the
vehicle with the air conditioner turned off until
the pointer drops back into the normal range. If
the pointer remains on the “H,” turn the engine
off immediately and call an authorized dealer for
service.
Page 69 of 268

GETTING TO KNOW YOUR INSTRUMENT PANEL 67
Instrument Cluster Display Controls
Up And Down Arrow Buttons:
Using the up
or down arrow buttons allows
you to cycle through the Main Menu Items.
Changes the Main Screen area and Menu Title
a r
ea.
Left And Right Arrow Buttons:
Using the left
or right arrow button allows
you to cycle through the submenu items of the
M a
in menu item.
NOTE:
Holding the up / down or left / right
a
rrow button will loop the user through the
c u
rrently selected menu or options presented
on the screen.
Upon returning to a main menu, the last
submenu screen viewed within that main menu
will be displayed.
OK Button:
For Digital Speedometer:
Pushing the OK button changes units (mph or
km/h).
For Screen Setup:
OK button allows user to enter menu and
submenus.
Within each submenu layer, the up and
down arrow buttons will allow the user to
select the item of interest.
Pushing the OK button makes the selection. A
confirmation screen will appear, returning the
user to the first page of the submenu.
Pushing the left arrow button will exit each
submenu layer and return to the main menu.
For the Trip and Fuel Economy menus:
Information is reset by pushing and holding the
OK button.
ENGINE OIL LIFE RESET
Oil Change Required
Your vehicle is equipped with an engine oil change
in
dicator system. The “Oil Change Required”
message will display in the instrument cluster
display for five seconds after a single chime has
sounded, to indicate the next scheduled oil change
interval. The engine oil change indicator system is
duty cycle based, which means the engine oil
change interval may fluctuate, dependent upon
your personal driving style.
Unless reset, this message will continue to display
e a
ch time you place the ignition in the ON/RUN
position. To turn off the message temporarily, push
and release the OK or arrow buttons. To reset the
oil change indicator system (after performing the
scheduled maintenance), refer to the following
procedure.
Vehicles Equipped With Keyless Enter ‘N Go™ —
I g
nition
Use the steering wheel instrument cluster display
con
trols for the following procedure(s):
1. Without pressing the brake pedal, push the E
NGINE START/STOP button and place the
ignition in the ON/RUN position (do not start
the engine).
1 — Left Arrow Button
2 — Up Arrow Button
3 — Right Arrow Button
4 — Down Arrow Button
5 — OK Button
3
Page 94 of 268
92 STARTING AND OPERATING
FUEL SAVER TECHNOLOGY 5.7L ONLY —
IF EQUIPPED
This feature offers improved fuel economy by
shutting off four of the engine's eight cylinders
during light load and cruise conditions. The system
is automatic with no driver inputs or additional
driving skills required.
NOTE:
This system may take some time to return to full
f u
nctionality after a battery disconnect.
POWER STEERING
The Electric Power Steering system will give you
good vehicle response and increased ease of
maneuverability in tight spaces. The system will
vary its assist to provide light efforts while parking
and good feel while driving. If the electric steering
system experiences a fault that prevents it from
providing assist, you will still have the ability to
steer the vehicle manually. Alternate electric power steering efforts can be
s
e
lected through the Uconnect system
Ú page 122.
If the Electric Power Steering Fault
Warning Light is displayed and the
“ S
ERVICE POWER STEERING” or the
“POWER STEERING ASSIST OFF –
SERVICE SYSTEM” message is displayed within the
instrument cluster display, this indicates the
vehicle needs to be taken to the dealer for service
Ú page 71.
NOTE:
Even if the power steering assistance is no longer
operational, it is still possible to steer the vehicle.
Under these conditions there will be a substan
-
tial increase in steering effort, especially at low
s p
eeds and during parking maneuvers.
If the condition persists, see an authorized
dealer for service.
If the Electric Power Steering Fault Warning Light is
di
splayed and the “POWER STEERING SYSTEM
OVER TEMP” message is displayed on the
instrument cluster screen, they indicate that
extreme steering maneuvers may have occurred
which caused an over temperature condition in the
power steering system. Once driving conditions are
safe, pull over and let the vehicle idle for a few
moments until the Electric Power Steering Fault
Warning Light and message turn off.
CRUISE CONTROL SYSTEMS — IF EQUIPPED
Your vehicle may be equipped with the Cruise
Control system, or the Adaptive Cruise Control
(ACC) system:
Cruise Control will keep your vehicle at a
constant preset speed.
Adaptive Cruise Control (ACC) will adjust the
vehicle speed up to the preset speed to main -
tain a distance with the vehicle ahead.
NOTE:
In vehicles equipped with ACC, if ACC is not
enabled, Fixed Speed Cruise Control will not
detect vehicles directly ahead of you. Always be
aware of the feature selected.
Only one Cruise Control feature can operate at a
time. For example, if Fixed Speed Cruise Control
is enabled, Adaptive Cruise Control will be
unavailable, and vice versa.
CRUISE CONTROL
When engaged, the Cruise Control system takes
over accelerator operations at speeds greater than
25 mph (40 km/h), or 20 mph (32 km/h)
de
pending on engine size and axle ratio.
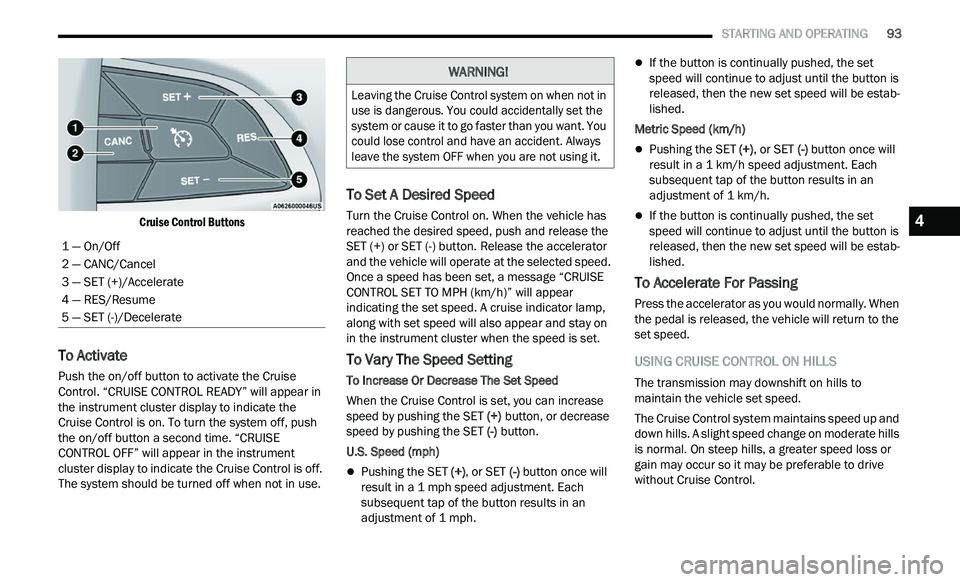
The Cruise Control buttons are located on the right
si
de of the steering wheel.
WARNING!
Continued operation with reduced assist could
pose a safety risk to yourself and others. Service
should be obtained as soon as possible.
Page 95 of 268
STARTING AND OPERATING 93
Cruise Control Buttons
To Activate
Push the on/off button to activate the Cruise
Control. “CRUISE CONTROL READY” will appear in
the instrument cluster display to indicate the
Cruise Control is on. To turn the system off, push
the on/off button a second time. “CRUISE
CONTROL OFF” will appear in the instrument
cluster display to indicate the Cruise Control is off.
The system should be turned off when not in use.
To Set A Desired Speed
Turn the Cruise Control on. When the vehicle has
reached the desired speed, push and release the
SET (+) or SET (-) button. Release the accelerator
and the vehicle will operate at the selected speed.
Once a speed has been set, a message “CRUISE
CONTROL SET TO MPH (km/h)” will appear
indicating the set speed. A cruise indicator lamp,
along with set speed will also appear and stay on
in the instrument cluster when the speed is set.
To Vary The Speed Setting
To Increase Or Decrease The Set Speed
When the Cruise Control is set, you can increase
sp
eed by pushing the SET (+) button, or decrease
speed by pushing the SET (-) button.
U.S. Speed (mph)
Pushing the SET (+) , or SET (-) button once will
result in a 1 mph speed adjustment. Each
s u
bsequent tap of the button results in an
adjustment of 1 mph.
If the button is continually pushed, the set
speed will continue to adjust until the button is
released, then the new set speed will be estab -
lished.
Metric Speed (km/h)
Pushing the SET (+), or SET (-) button once will
result in a 1 km/h speed adjustment. Each
s u
bsequent tap of the button results in an
adjustment of 1 km/h.
If the button is continually pushed, the set
speed will continue to adjust until the button is
released, then the new set speed will be estab -
lished.
To Accelerate For Passing
Press the accelerator as you would normally. When
the pedal is released, the vehicle will return to the
set speed.
USING CRUISE CONTROL ON HILLS
The transmission may downshift on hills to
maintain the vehicle set speed.
The Cruise Control system maintains speed up and
dow
n hills. A slight speed change on moderate hills
is normal. On steep hills, a greater speed loss or
gain may occur so it may be preferable to drive
without Cruise Control.
1 — On/Off
2 — CANC/Cancel
3 — SET (+)/Accelerate
4 — RES/Resume
5 — SET (-)/Decelerate
WARNING!
Leaving the Cruise Control system on when not in
use is dangerous. You could accidentally set the
system or cause it to go faster than you want. You
could lose control and have an accident. Always
leave the system OFF when you are not using it.
4
Page 97 of 268
STARTING AND OPERATING 95
Adaptive Cruise Control (ACC) Operation
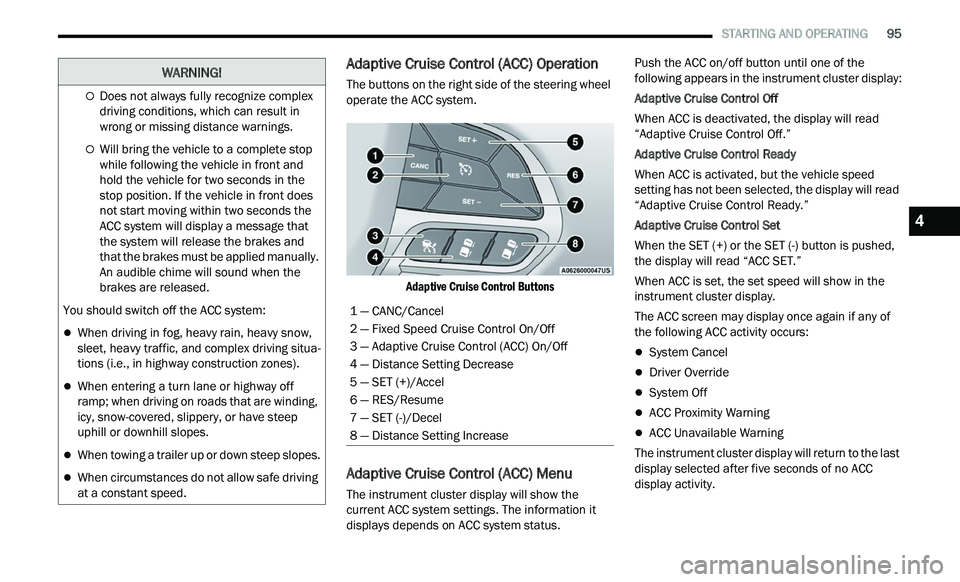
The buttons on the right side of the steering wheel
operate the ACC system.
Adaptive Cruise Control Buttons
Adaptive Cruise Control (ACC) Menu
The instrument cluster display will show the
current ACC system settings. The information it
displays depends on ACC system status. Push the ACC on/off button until one of the
f
ol
lowing appears in the instrument cluster display:
Adaptive Cruise Control Off
When ACC is deactivated, the display will read
“ A
daptive Cruise Control Off.”
Adaptive Cruise Control Ready
When ACC is activated, but the vehicle speed
s e
tting has not been selected, the display will read
“Adaptive Cruise Control Ready.”
Adaptive Cruise Control Set
When the SET (+) or the SET (-) button is pushed,
t h
e display will read “ACC SET.”
When ACC is set, the set speed will show in the
in
strument cluster display.
The ACC screen may display once again if any of
th
e following ACC activity occurs:
System Cancel
Driver Override
System Off
ACC Proximity Warning
ACC Unavailable Warning
The instrument cluster display will return to the last
d i
splay selected after five seconds of no ACC
display activity.
Does not always fully recognize complex
driving conditions, which can result in
wrong or missing distance warnings.
Will bring the vehicle to a complete stop
while following the vehicle in front and
hold the vehicle for two seconds in the
stop position. If the vehicle in front does
not start moving within two seconds the
ACC system will display a message that
the system will release the brakes and
that the brakes must be applied manually.
An audible chime will sound when the
brakes are released.
You should switch off the ACC system:
When driving in fog, heavy rain, heavy snow,
sleet, heavy traffic, and complex driving situa -
tions (i.e., in highway construction zones).
When entering a turn lane or highway off
ramp; when driving on roads that are winding,
icy, snow-covered, slippery, or have steep
uphill or downhill slopes.
When towing a trailer up or down steep slopes.
When circumstances do not allow safe driving
at a constant speed.
WARNING!
1 — CANC/Cancel
2 — Fixed Speed Cruise Control On/Off
3 — Adaptive Cruise Control (ACC) On/Off
4 — Distance Setting Decrease
5 — SET (+)/Accel
6 — RES/Resume
7 — SET (-)/Decel
8 — Distance Setting Increase
4