2021 CHEVROLET TRAVERSE remove third row seat
[x] Cancel search: remove third row seatPage 44 of 369

Chevrolet Traverse Owner Manual (GMNA-Localizing-U.S./Canada/Mexico-
14637844) - 2021 - CRC - 3/26/21
Seats and Restraints 43
Rear Seat Adjustment
The second row seats slide forward for
more room.
To adjust the seat position:1. Remove objects on the floor in front of or on the second row seat, or in the seat
tracks on the floor.
2. Lift the lever below the seat cushion and slide the seat forward or backward.
Entering and Exiting the Third Row
{Warning
Using the third row seating position
while the second row is folded could
cause injury in a sudden stop or crash. Be
sure to return the seat to the passenger
seating position. Push and pull on the
seat to make sure it is locked into place.
{Warning
If the seatback and seat base are not
locked, the seat could move forward in a
sudden stop or crash and injure the
occupant. Always push and pull on the
seatbacks to be sure the seatback and
seat base are locked.
Caution
Folding a rear seat with the seat belts
still fastened may cause damage to the
seat or the seat belts. Always unbuckle
the seat belts and return them to their
normal stowed position before folding a
rear seat.
To access the third row from the driver side
(bench seat only):
1. Remove objects on the floor in front of or on the second row seat, or in the seat
tracks on the floor.
2. Make sure that the seat belt is unfastened and in the stowed position.
3. Pull the handle on top of the seat forward and pull the seat forward.
To access the third row from the
passenger side:
The second row passenger side seat can be
easily moved for third row entry or exit
with a forward-facing child restraint installed
Page 45 of 369

Chevrolet Traverse Owner Manual (GMNA-Localizing-U.S./Canada/Mexico-
14637844) - 2021 - CRC - 3/26/21
44 Seats and Restraints
using the LATCH system. Remove a
rear-facing child restraint before moving the
seat for third row entry or exit.
{Warning
Remove the child from the child restraint
before moving the seat forward for third
row entry or exit. Failure to do so may
result in injury to the child.
1. Remove objects on the floor in front of the second row seat, or in the seat
tracks on the floor.
2. Pull the handle on the top or side of theseat forward and pull the seat forward.
Returning the Seat to the Seating
Position
To return the second row seat to its normal
seating position:
1. Remove objects on the floor behind the second row seat or in the seat tracks on
the floor.
2. Push on the seatback until the seat is locked into place.
3. Push and pull on the seatback and seat cushion to make sure they are locked in
place.
4. Check that the seat belt is not under the seat cushion.
Reclining the Seatbacks
To recline the seatbacks:
1. Leaning rearward in the seat, pull thereclining seatback lever.
2. Move the seatback to the desired position, and then release the lever to
lock the seatback in place.
3. Push and pull on the seatback to make sure it is locked.
Page 46 of 369

Chevrolet Traverse Owner Manual (GMNA-Localizing-U.S./Canada/Mexico-
14637844) - 2021 - CRC - 3/26/21
Seats and Restraints 45
Folding the Seatbacks
To fold the second row seatbacks:1. Remove anything on or under the seat.
2. Pull up on the reclining seatback lever.
To return the seatback to the seating
position, lift the seatback and push it
rearward until it locks into place. Push and
pull on the seatback to make sure it is
locked.
Heated Rear Seats
{Warning
If temperature change or pain to the skin
cannot be felt, the seat heater may cause
burns. See the Warning under Heated
and Ventilated Front Seats 041.
If equipped, the buttons are on the rear of
the center console.
With the engine running, press
MorLto
heat the left or right outboard seat cushion.
An indicator on the climate control display
appears when this feature is on. This feature turns on at the highest setting.
With each press of the button, the heated
seat changes to the next lower setting, and
then the off setting. Three lights indicate
the highest setting, and one light indicates
the lowest. If the heated seats are on high,
the level may automatically be lowered
after approximately 30 minutes.
Third Row Seats
{Warning
Using the third row seating position
while the second row is folded, or pushed
forward in the entry position, could cause
injury in a sudden stop or crash. Be sure
to return the seat to the passenger
seating position. Push and pull on the
seat to make sure it is locked into place.
Folding the Seatback
Caution
Folding a rear seat with the seat belts
still fastened may cause damage to the
seat or the seat belts. Always unbuckle
(Continued)
Page 47 of 369

Chevrolet Traverse Owner Manual (GMNA-Localizing-U.S./Canada/Mexico-
14637844) - 2021 - CRC - 3/26/21
46 Seats and Restraints
Caution (Continued)
the seat belts and return them to their
normal stowed position before folding a
rear seat.
To fold the third row seatback: 1. Remove objects on the floor in front of or on the second row seat, or in the seat
tracks on the floor.
2. If the second row seat is in the full rear position, adjust it forward to allow the
third row seat to fold fully flat.
3. Remove anything on or under the seat.
4. Disconnect the center seat belt mini-latch, using a key in the slot on the
mini-buckle, and let the belt retract into
the headliner.
5. Stow the mini-latch in the holder in theheadliner.
6. Pull the release strap located on theseatback.
7. Push the seatback forward to lay flat.
8. Repeat for the other seatback, if necessary.
Returning the Seat to the Seating
Position
To return the seatback to the seating
position:
1. From the rear of the vehicle, raise the seatback to the upright position using
the pull strap on the back of the third
row seat, or lift the seatback and push it
into place from inside the vehicle.
Page 55 of 369

Chevrolet Traverse Owner Manual (GMNA-Localizing-U.S./Canada/Mexico-
14637844) - 2021 - CRC - 3/26/21
54 Seats and Restraints
4. Buckle, position, and release the seatbelt as described previously in this
section. Make sure that the shoulder belt
crosses the shoulder. The belt should be
close to, but not contacting, the neck.
To remove and store the comfort guide,
squeeze the belt edges together so that the
seat belt can be removed from the guide.
Slide the guide back into its storage pocket
on the side of the seatback.
If the comfort guides are not equipped on
the second row outboard seating positions
seat belt, they are available through your
dealer. Instructions are included with the
guides. Third Row Seating Positions
Comfort guides are available through your
dealer for the third row seating positions.
Instructions are included with the guides.
Seat Belt Use During Pregnancy
Seat belts work for everyone, including
pregnant women. Like all occupants, they
are more likely to be seriously injured if
they do not wear seat belts.
A pregnant woman should wear a
lap-shoulder belt, and the lap portion should
be worn as low as possible, below the
rounding, throughout the pregnancy.
The best way to protect the fetus is to
protect the mother. When a seat belt is
worn properly, it is more likely that the
fetus will not be hurt in a crash. For
pregnant women, as for anyone, the key to
making seat belts effective is wearing them
properly.
Seat Belt Extender
If the vehicle's seat belt will fasten around
you, you should use it.
But if a seat belt is not long enough, your
dealer will order you an extender. When
you go in to order it, take the heaviest coat
you will wear, so the extender will be long
enough for you. To help avoid personal
injury, do not let someone else use it, and
use it only for the seat it is made to fit. The
extender has been designed for adults.
Never use it for securing child restraints. For
more information on the proper use and fit
of seat belt extenders see the instruction
sheet that comes with the extender.
Safety System Check
Periodically check the seat belt reminder,
seat belts, buckles, latch plates, retractors,
shoulder belt height adjusters (if equipped),
and seat belt anchorages to make sure they
Page 77 of 369

Chevrolet Traverse Owner Manual (GMNA-Localizing-U.S./Canada/Mexico-
14637844) - 2021 - CRC - 3/26/21
76 Seats and Restraints
Be sure to use an anchor located directly
behind the seating position where the child
restraint will be placed.
Third Row
The top tether anchors are on the rear of
the seatback for each seating position in the
third row.
For models with a cargo cover, the top
tether anchors are on the back of the rear
seatbacks. Remove the cargo cover before
installing the top tether. The cargo cover
should remain off while the top tether is in
use. Be sure to use an anchor directly
behind the seating position where the child
restraint will be placed. Do not secure a child restraint in a position
without a top tether anchor if a national or
local law requires that the top tether be
attached, or if the instructions that come
with the child restraint say that the top
tether must be attached.
According to accident statistics, children and
infants are safer when properly restrained in
a child restraint system or infant restraint
system secured in a rear seating position.
See
Where to Put the Restraint 070 for
additional information.
Securing a Child Restraint Designed for
the LATCH System
{Warning
A child could be seriously injured or killed
in a crash if the child restraint is not
properly attached to the vehicle using
either the LATCH anchors or the vehicle
seat belt. Follow the instructions that
came with the child restraint and the
instructions in this manual.
{Warning
To reduce the risk of serious or fatal
injuries during a crash, do not attach
more than one child restraint to a single
anchor. Attaching more than one child
restraint to a single anchor could cause
the anchor or attachment to come loose
or even break during a crash. A child or
others could be injured.
{Warning
Children can be seriously injured or
strangled if a shoulder belt is wrapped
around their neck. The shoulder belt can
tighten but cannot be loosened if it is
locked. The shoulder belt locks when it is
pulled all the way out of the retractor.
It unlocks when the shoulder belt is
allowed to go all the way back into the
retractor, but it cannot do this if it is
wrapped around a child’s neck. If the
shoulder belt is locked and tightened
around a child’s neck, the only way to
loosen the belt is to cut it.
(Continued)
Page 78 of 369

Chevrolet Traverse Owner Manual (GMNA-Localizing-U.S./Canada/Mexico-
14637844) - 2021 - CRC - 3/26/21
Seats and Restraints 77
Warning (Continued)
Buckle any unused seat belts behind the
child restraint so children cannot reach
them. Pull the shoulder belt all the way
out of the retractor to set the lock, and
tighten the belt behind the child restraint
after the child restraint has been
installed.
Caution
Do not let the LATCH attachments rub
against the vehicle’s seat belts. This may
damage these parts. If necessary, move
buckled seat belts to avoid rubbing the
LATCH attachments.
Do not fold the rear seatback when the
seat is occupied. Do not fold the empty
rear seat with a seat belt buckled. This
could damage the seat belt or the seat.
Unbuckle and return the seat belt to its
stowed position, before folding the seat.
The vehicle is equipped with a front center
airbag in the inboard side of the driver seat.
Even with a front center airbag, a child
restraint can be installed in any second row
seating position. If a child restraint is installed in a second row center seat, move
the second row seat to the rearward
position, whenever possible, to minimize
contact with the front center airbag.
If you need to secure more than one child
restraint in the rear seat, see
Where to Put
the Restraint 070.
1. Put the child restraint on the seat. If the head restraint interferes with the proper
installation of the child restraint, the
head restraint may be removed. See
"Head Restraint Removal and
Reinstallation" at the end of this section.
2. Attach and tighten the lower attachments to the lower anchors. If the
child restraint does not have lower
attachments or the desired seating
position does not have lower anchors,
secure the child restraint with the top
tether and the seat belt. Refer to your
child restraint manufacturer instructions
and the instructions in this manual.
2.1. Find the lower anchors for the desired seating position.
2.2. To access the lower anchors in the second row, it may help to recline
the seatback. Third row seatbacks must be
upright before placing the child
restraint on the seat.
2.3. Put the child restraint on the seat.
2.4. Attach and tighten the lower attachments on the child restraint
to the lower anchors.
If necessary, adjust the angle of the
second row seatback to achieve a
tight installation. Make sure the
second row bench seatbacks are
aligned at the same angle.
3. If the child restraint manufacturer recommends that the top tether be
attached, attach and tighten the top
tether to the top tether anchor, if the
vehicle has one. Refer to the child
restraint instructions and the following
steps:
3.1. Find the top tether anchor.
3.2. Route, attach, and tighten the top tether according to your child
restraint instructions and the
following instructions:
Page 80 of 369
Chevrolet Traverse Owner Manual (GMNA-Localizing-U.S./Canada/Mexico-
14637844) - 2021 - CRC - 3/26/21
Seats and Restraints 79
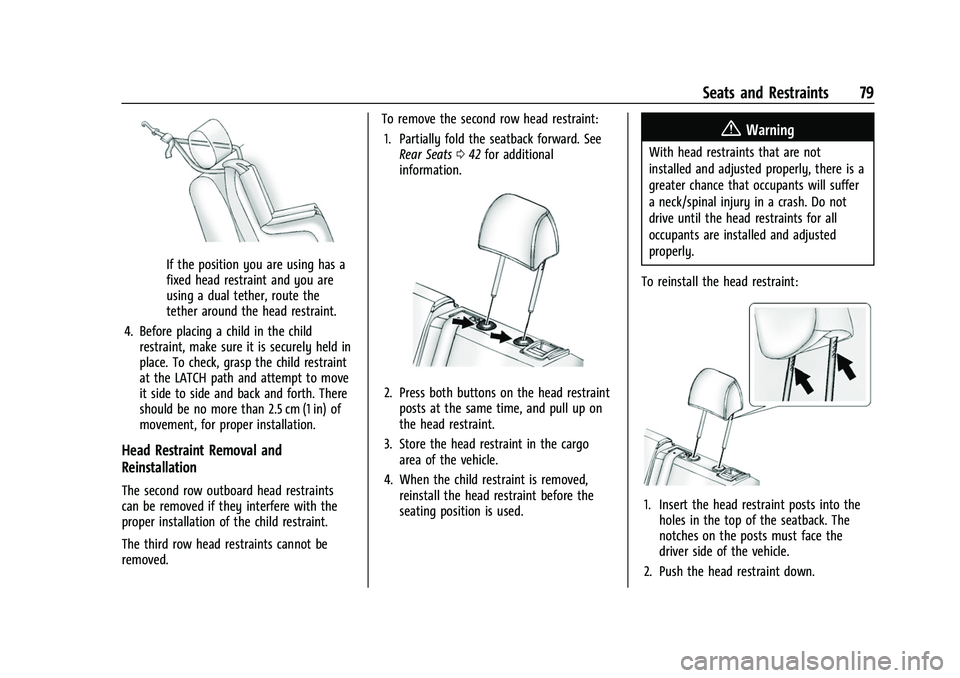
If the position you are using has a
fixed head restraint and you are
using a dual tether, route the
tether around the head restraint.
4. Before placing a child in the child restraint, make sure it is securely held in
place. To check, grasp the child restraint
at the LATCH path and attempt to move
it side to side and back and forth. There
should be no more than 2.5 cm (1 in) of
movement, for proper installation.
Head Restraint Removal and
Reinstallation
The second row outboard head restraints
can be removed if they interfere with the
proper installation of the child restraint.
The third row head restraints cannot be
removed. To remove the second row head restraint:
1. Partially fold the seatback forward. See Rear Seats 042 for additional
information.
2. Press both buttons on the head restraint posts at the same time, and pull up on
the head restraint.
3. Store the head restraint in the cargo area of the vehicle.
4. When the child restraint is removed, reinstall the head restraint before the
seating position is used.
{Warning
With head restraints that are not
installed and adjusted properly, there is a
greater chance that occupants will suffer
a neck/spinal injury in a crash. Do not
drive until the head restraints for all
occupants are installed and adjusted
properly.
To reinstall the head restraint:
1. Insert the head restraint posts into the holes in the top of the seatback. The
notches on the posts must face the
driver side of the vehicle.
2. Push the head restraint down.