2021 CHEVROLET TAHOE light
[x] Cancel search: lightPage 2 of 20

2
INSTRUMENT PANEL
SYMBOLS
Exterior/ Instrument Panel Lamp Controls
4WDF/Drive Mode/Air Suspension ControlsF
Power Mirror/ Power Window/ Memory SeatF Buttons
Audio Next/Previous Favorite Station Controls (behind steering wheel)
Audio Volume Control (behind steering wheel)
Steering Wheel Adjustment Control
Engine Start/Stop Button
Integrated Trailer Brake ControlF
Traction Control-StabiliTrak Off/Park AssistF/Auto Engine Stop-Start Disable/Power Outlet Enable/Lane Keep AssistF/Hill Descent ControlF Buttons
Driver Information Center Controls/Voice Recognition Buttons
Head-Up Display ControlsF
Electronic Parking Brake Switch
Cruise Control/Adaptive Cruise ControlF/Forward Collision Alert/ Heated Steering WheelF Buttons
Low Fuel
Brake System
Cruise Control Set
Security
IntelliBeam
Engine Oil Pressure
Airbag Readiness
PARK Electronic Parking Brake
Service Electronic Parking Brake
Check Engine
Traction Control Off
Lights On Reminder
Antilock Brake System
Charging System
Driver Seat Belt Reminder
2 Pass. Seat Belt Reminder
Low Tire Pressure
Power Outlet On
Turn Signal/ Windshield Wipers/Washer Lever
Page 3 of 20

3
Refer to your Owner’s Manual to learn about the information being relayed by the lights, gauges and indicators on the instrument cluster.
See Introduction in your Owner’s Manual.
F Optional equipment
Climate Control Automatic Operation
Wireless Charging PadF/USB Ports/ Accessory Power OutletF
Passenger’s Heated/Ventilated Seat ButtonsF
Climate Control Sync Settings (Synchronize passenger’s settings to driver’s settings)
Rear Climate Controls On-Off/ Rear Display Buttons
Climate Control Fan Speed/Air Delivery Modes
Driver’s Heated/ Ventilated Seat ButtonsF
Electronic Precision Shift Transmission Controls
Infotainment System Touch Screen
Infotainment System Controls
Storage CompartmentF (press handle button to slide)
Hazard Warning Flashers Button
AUTO 4WD Mode
Hill Descent Control
Lane Keep Assist
Vehicle Ahead
Automatic Emergency Braking
Engine Coolant
Pedestrian Ahead
StabiliTrak Active
StabiliTrak Off
Trailer Sway Control
Door Ajar
High Country model shown
Page 10 of 20

10F Optional equipment
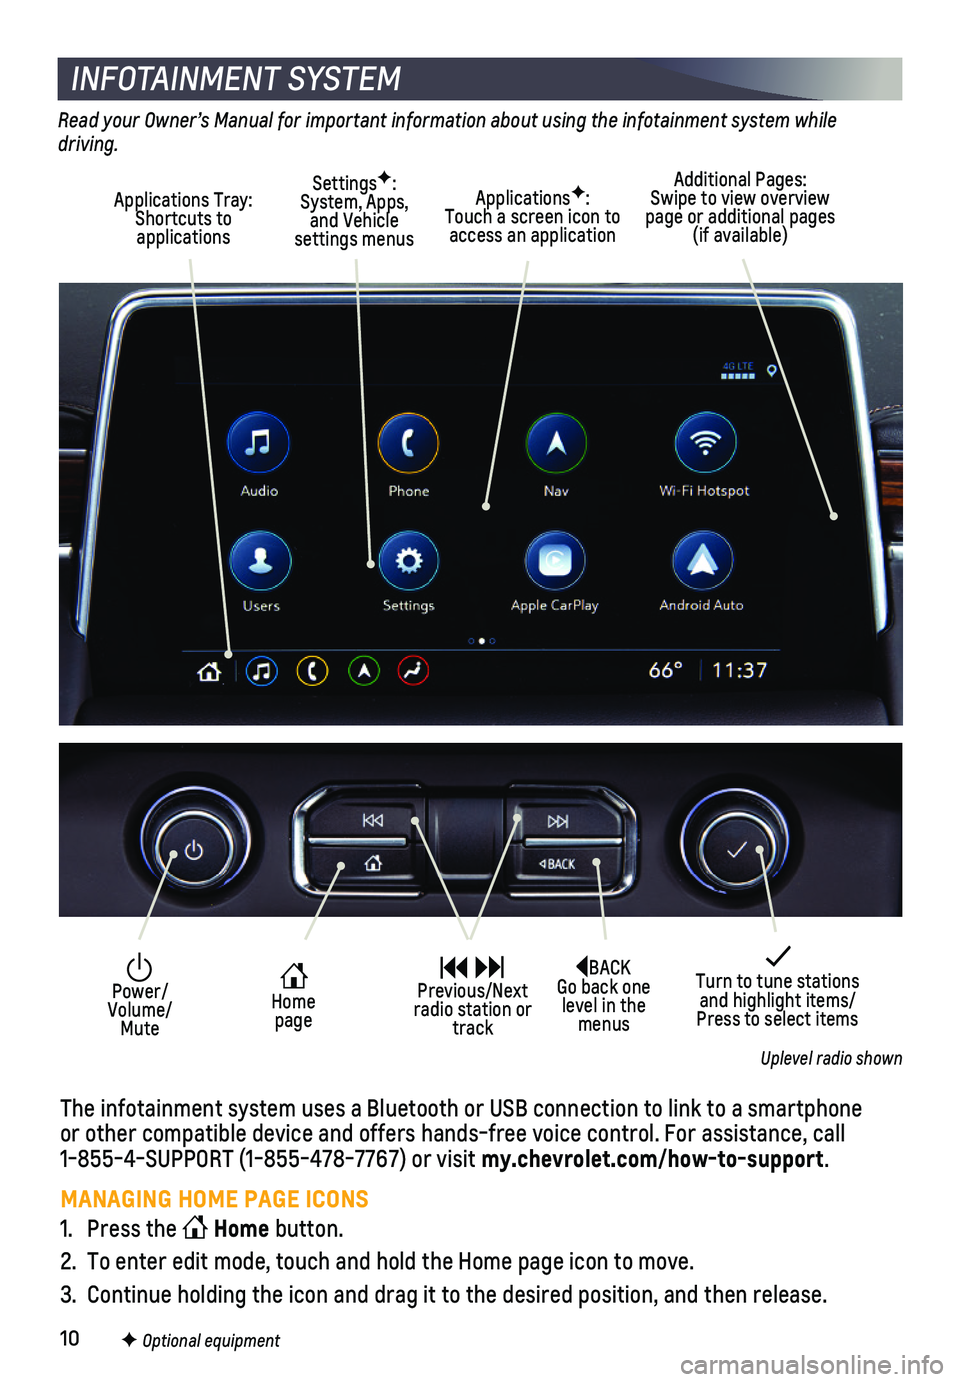
INFOTAINMENT SYSTEM
Read your Owner’s Manual for important information about using the infotainment system while driving.
Additional Pages: Swipe to view overview page or additional pages (if available)
Applications Tray: Shortcuts to applications
SettingsF: System, Apps, and Vehicle settings menus
ApplicationsF: Touch a screen icon to access an application
BACK Go back one level in the menus
Home page
Power/ Volume/Mute
Previous/Next radio station or track
Turn to tune stations and highlight items/Press to select items
Uplevel radio shown
The infotainment system uses a Bluetooth or USB connection to link to a \
smartphone or other compatible device and offers hands-free voice control. For assi\
stance, call 1-855-4-SUPPORT (1-855-478-7767) or visit my.chevrolet.com/how-to-support.
MANAGING HOME PAGE ICONS
1. Press the Home button.
2. To enter edit mode, touch and hold the Home page icon to move.
3. Continue holding the icon and drag it to the desired position, and then \
release.
Page 13 of 20

13F Optional equipment
The Rear Seat Media system includes 2 touch-screens, 2 USB-C ports, 2 HDMI ports, and 2
wireless infrared headphones.
To power on the system and view the Home page, double tap anywhere on either screen.
To power on the system and control the screen sources from the front seats, select the Rear Media icon on the Home page of the infotainment screen.
Video sources include the USB or HDMI ports located on the rear of the c\
enter con-sole. Any USB port in the vehicle also can be used to provide content fo\
r the system.
To enable the 110-volt outlet on the rear of the center console, with th\
e vehicle On, press the Power Outlet button on the left side of the instrument panel.
See Infotainment System in your Owner’s Manual.
INTELLIBEAM LIGHTING SYSTEM
The IntelliBeam system automatically turns the high-beam headlamps on/of\
f based on traffic conditions when the lamp control is in the AUTO or Headlamps position and the system is activated, indicated by a green indicator on the instrument cluster. A blue
indicator appears when the high-beam headlamps are on. The system is tur\
ned off if the high/low-beam changer or the flash-to-pass feature is used.
To enable the IntelliBeam system, activate the high/low-beam changer on \
and then off within 2 seconds using the turn signal lever.
Note: IntelliBeam activates the high-beam headlamps only when driving over 25 mph.
See Lighting in your Owner’s Manual.
REAR SEAT MEDIA SYSTEMF
ADAPTIVE CRUISE CONTROL–ADVANCEDF
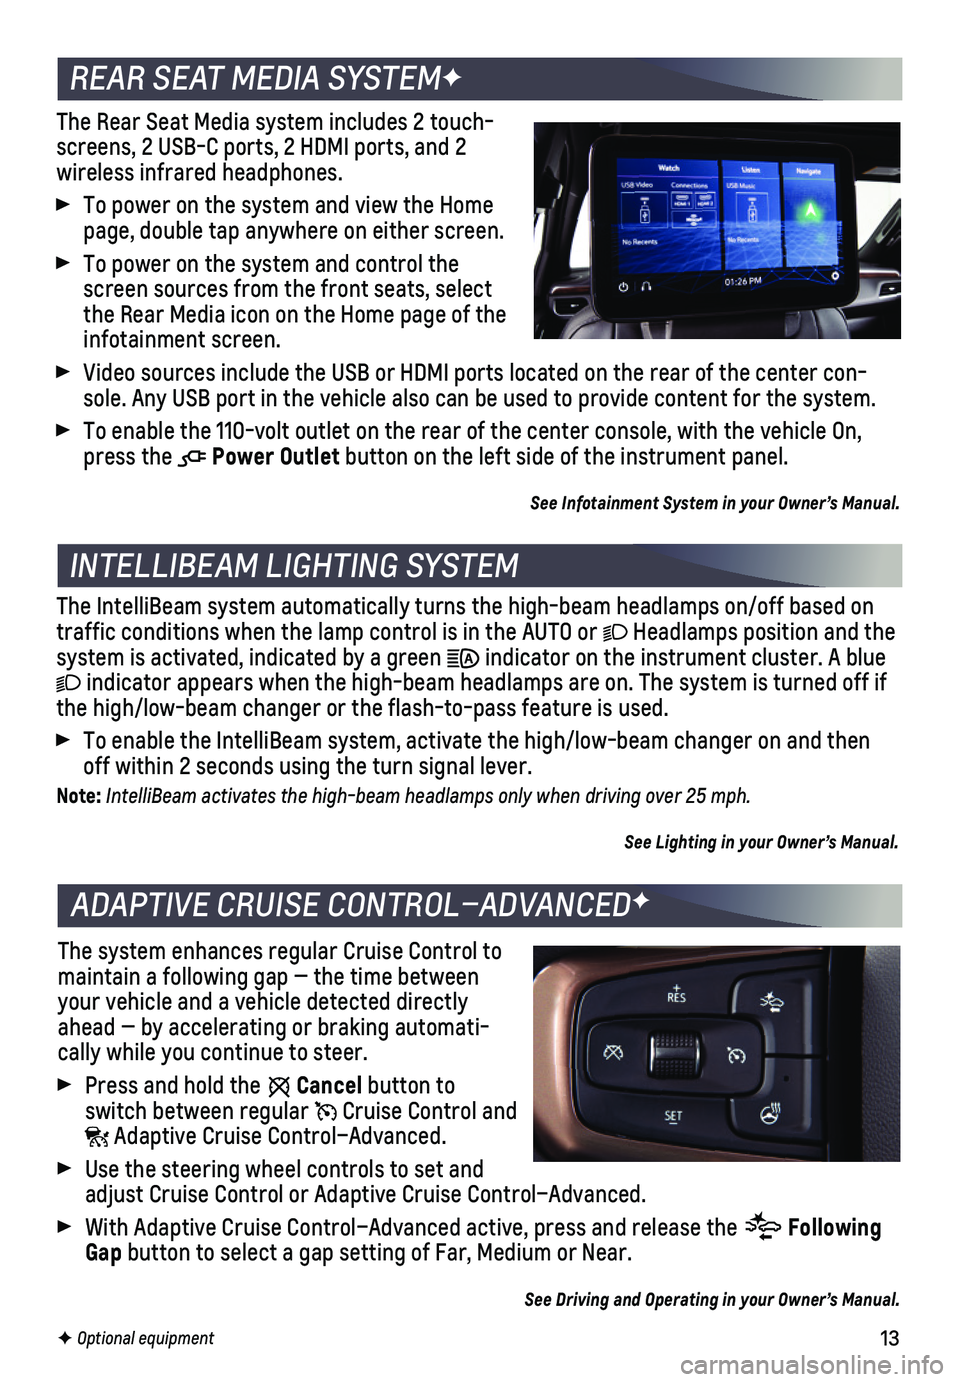
The system enhances regular Cruise Control to maintain a following gap — the time between your vehicle and a vehicle detected directly ahead — by accelerating or braking automati-cally while you continue to steer.
Press and hold the Cancel button to switch between regular Cruise Control and Adaptive Cruise Control–Advanced.
Use the steering wheel controls to set and adjust Cruise Control or Adaptive Cruise Control–Advanced.
With Adaptive Cruise Control–Advanced active, press and release the Following Gap button to select a gap setting of Far, Medium or Near.
See Driving and Operating in your Owner’s Manual.
Page 14 of 20

14F Optional equipment
OVERHEAD CONSOLE FEATURESF
Universal Remote SystemF
Dome Lamps Off Control for Doors
Map Lights
Sunroof Slide SwitchF
Passenger-side 3rd-Row Folding Seat ControlF
Sunroof Sunshade SwitchF
Sunroof Tilt SwitchF
Power Sliding Center Console ControlF
Driver-side 3rd-Row Folding Seat ControlF
Power Liftgate Control KnobF
POWER SLIDING CENTER CONSOLEF
The Power Sliding Center Console moves rearward for additional storage options and easier access to rear console features.
Press and hold the or button on the front overhead console to move the center console rearward or forward.
With the center console fully rearward, pull the lower handle (A) to pull out the lower storage compartment.
With the console moved rearward, push forward on the center console armrest (B) to move it forward.
See Storage in your Owner’s Manual.
A
B
DOME LAMPS
To turn a reading lamp on/off, press the lamp lens.
To turn on/off all reading/dome lamps with the doors closed, press and h\
old any lens. The dome lamps will not turn on if the OFF button is pressed on the overhead console.
Refer to your Owner’s Manual for more information about the Overhead Console features.
Page 15 of 20

15F Optional equipment
DRIVER MODE CONTROLF/FOUR-WHEEL DRIVEF
DRIVER MODE CONTROL
The Driver Mode Control settings automatically adjust various vehicle control systems based on driving preferences, weather and road condi-tions. The modes are displayed on the Driver Information Center.
Rotate the Driver Mode Control knob (A) on the left side of the instrument panel to select a mode.
Normal – Use for normal driving.
Sport – Use for enhanced responsiveness on paved roads.
Snow/Ice (2WD only) – Use for enhanced traction during slippery conditions.
Off-Road (4WD only) – Use for enhanced control on unpaved roads or trails at moderate speeds.
Tow/Haul – Use to reduce shift cycling when towing or hauling heavy loads in \
stop-and-go traffic, rolling hills, or busy parking lots.
Terrain (4WD onlyF) – Press the button for enhanced control in low-speed off-road
conditions. The system automatically provides light vehicle braking to simulate engine vehicle braking. Only available with the single-speed transfer case when in4
4
2
.
FOUR-WHEEL DRIVE
Use the four-wheel drive buttons (B) on the left side of the instrument panel to shift into and out of four-wheel drive. The Driver Information Center displays the current status of the transfer case.
AUTO Automatic 4WD High – Use when traction conditions vary.
4
4
2
2WD High – Use for most streets and highways.
4
4
2
4WD High – Use when extra traction is needed or in most off-road driving.
Shift between
44
2
, 4
4
2
, and AUTO at normal driving speeds.
44
2
4WD Low (2-Speed Transfer CaseF) – Use when driving off-road in deep sand, mud or snow, or on steep hills. Shift into or out of this mode when the vehi\
cle is stopped or moving less than 3 mph with the transmission in Neutral. Shift the trans\
mission into gear when the indicator light stops flashing.
N Neutral (2-Speed Transfer CaseF) – Use to dolly or dinghy tow the vehicle. Refer to your Owner’s Manual for the shift procedure.
See Driving and Operating in your Owner’s Manual.
A
B
4WD model shown
Page 19 of 20

19F Optional equipment
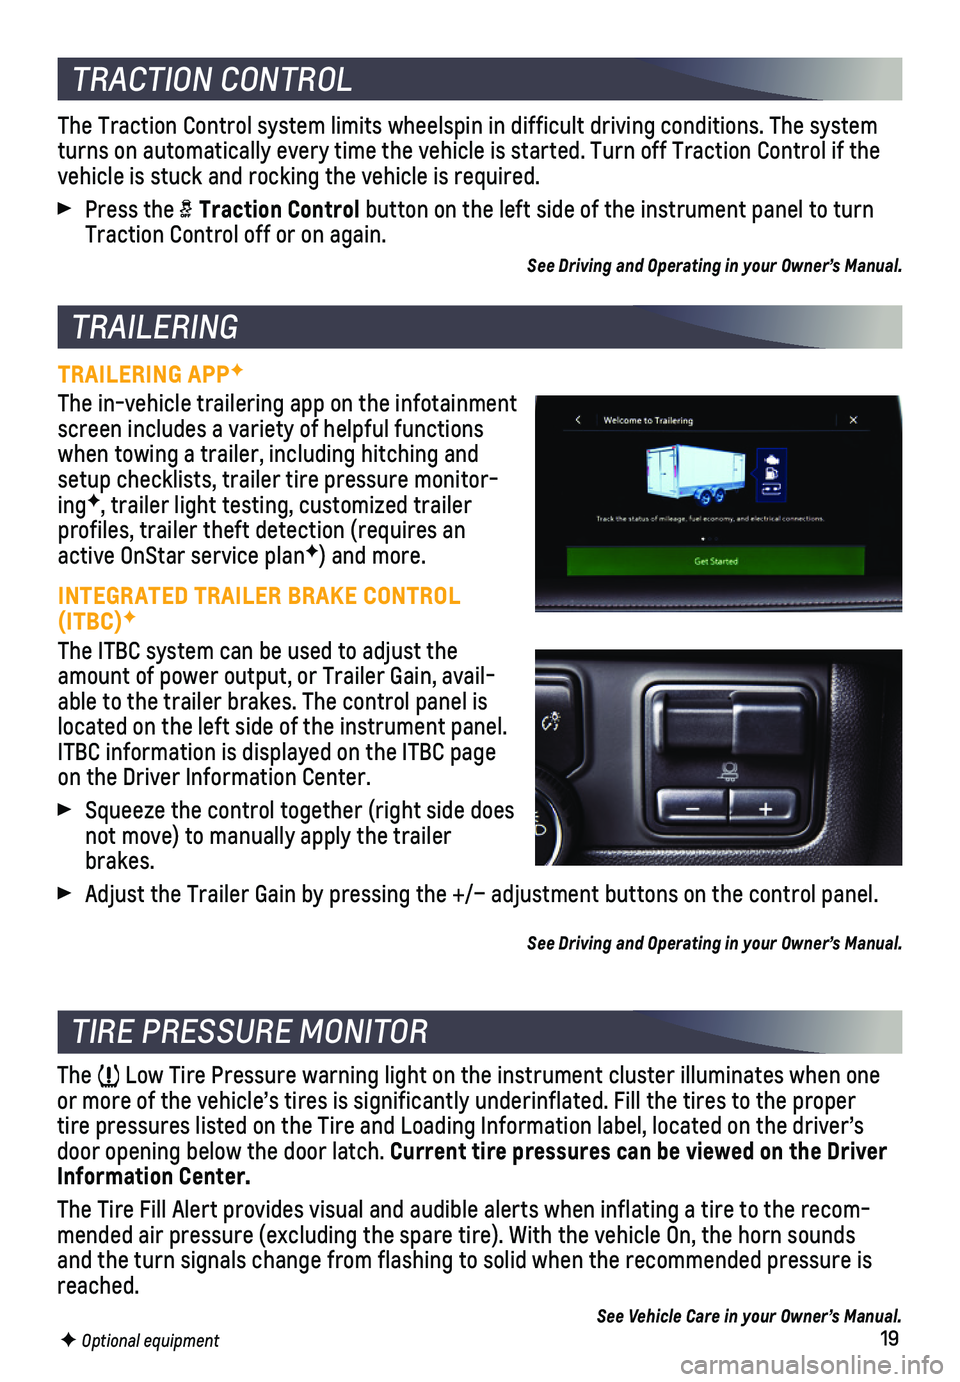
TRAILERING APPF
The in-vehicle trailering app on the infotainment screen includes a variety of helpful functions when towing a trailer, including hitching and setup checklists, trailer tire pressure monitor-ingF, trailer light testing, customized trailer
profiles, trailer theft detection (requires an active OnStar service planF) and more.
INTEGRATED TRAILER BRAKE CONTROL (ITBC)F
The ITBC system can be used to adjust the amount of power output, or Trailer Gain, avail-able to the trailer brakes. The control panel is located on the left side of the instrument panel. ITBC information is displayed on the ITBC page on the Driver Information Center.
Squeeze the control together (right side does not move) to manually apply the trailer brakes.
Adjust the Trailer Gain by pressing the +/– adjustment buttons on the\
control panel.
See Driving and Operating in your Owner’s Manual.
TRACTION CONTROL
The Traction Control system limits wheelspin in difficult driving condit\
ions. The system turns on automatically every time the vehicle is started. Turn off Tract\
ion Control if the vehicle is stuck and rocking the vehicle is required.
Press the Traction Control button on the left side of the instrument panel to turn Traction Control off or on again.
See Driving and Operating in your Owner’s Manual.
TRAILERING
TIRE PRESSURE MONITOR
The Low Tire Pressure warning light on the instrument cluster illuminates wh\
en one or more of the vehicle’s tires is significantly underinflated. Fill t\
he tires to the proper tire pressures listed on the Tire and Loading Information label, located\
on the driver’s door opening below the door latch. Current tire pressures can be viewed on the Driver Information Center.
The Tire Fill Alert provides visual and audible alerts when inflating a \
tire to the recom-mended air pressure (excluding the spare tire). With the vehicle On, t\
he horn sounds and the turn signals change from flashing to solid when the recommended \
pressure is reached.
See Vehicle Care in your Owner’s Manual.
Page 20 of 20

20
1-800-CHEV-USA (1-800-243-8872) TTY Users: 1-888-889-2438
As the owner of a new Chevrolet, you are automatically enrolled in the C\
hevrolet Roadside Assistance program for up to 5 years/60,000 miles, whichever oc\
curs first, at no expense to you. Chevrolet’s Roadside Assistance toll-free numbe\
r is staffed by a team of trained advisors who are available 24 hours a day, 365 days a ye\
ar, to contact a
service provider for light services (fuel delivery, jump-starts, flat t\
ire and lock-outs) or make arrangements to tow your vehicle to the nearest Chevrolet dealer fo\
r any repairs.
ONSTAR ROADSIDE ASSISTANCE
If you have a current OnStar Safety & Security plan, push the blue OnStar button or red Emergency button to get the help you need. An OnStar advisor will use GPS technol\
ogy to pinpoint your vehicle location and contact the nearest service provid\
er.
To learn more about OnStar services, press the blue OnStar button, visit onstar.com, call 1-888-4-ONSTAR (1-888-466-7827), or refer to your Owner’s Manual.
Get to know your vehicle inside and out with the Chevrolet Owner Center.\
Check out personalized information including an online Owner’s Manual and helpf\
ul how-to videos, track your service history and warranty status, manage your OnStar and C\
onnected Services vehicle plans, review your current Vehicle Diagnostics report (\
active service account required) and more. Create an account today at my.chevrolet.com.
Download the myChevrolet app to your compatible smartphone (or device)\
and, if your vehicle is properly equipped, you can start or turn off your engine, loc\
k or unlock your doors, view key diagnostic information, set parking information and more\
.
The app is available on select Apple and Android devices. Service availa\
bility, features and functionality vary by vehicle, device and data plan. Device data con\
nection required. Visit onstar.com for more details. Download the mobile app from your compatible mobile device’s app store.
ROADSIDE ASSISTANCE
CHEVROLET OWNER CENTER
MYCHEVROLET MOBILE APP
84266987 A!84266987=A!
Certain restrictions, precautions and safety procedures apply to your ve\
hicle. Please read your Owner’s Manual for complete instructions. All information contained in this guide is ba\
sed on the latest information available at the time of printing and is subject to change without notice. Copyright 2020 General Motors. All rights reserved.
We recommend always using ACDelco or GM Genuine Parts.