2021 CHEVROLET SILVERADO 2500HD child lock
[x] Cancel search: child lockPage 86 of 433
Chevrolet Silverado 2500 HD/3500 HD Owner Manual (GMNA-Localizing-U.
S./Canada/Mexico-14632154) - 2021 - CRC - 11/20/20
Seats and Restraints 85
Double Cab
1. Remove the head restraint or headrestprior to installing a forward-facing child
restraint in an outboard rear seating
position. See “Head Restraint or Headrest
Removal and Reinstallation” underLower
Anchors and Tethers for Children (LATCH
System) 074.
2. Put the child restraint on the seat.
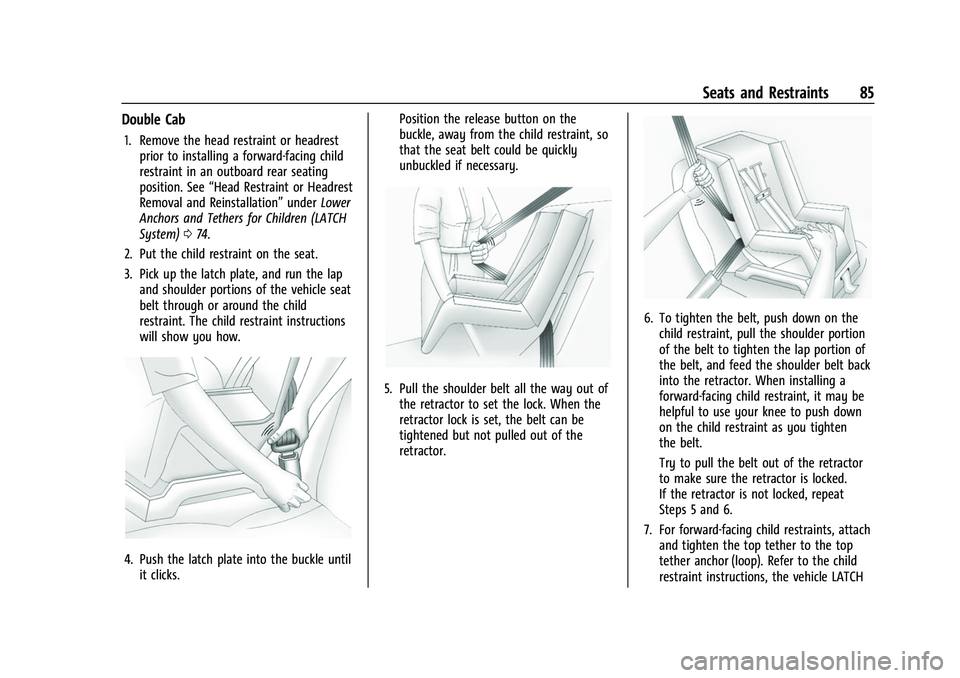
3. Pick up the latch plate, and run the lap and shoulder portions of the vehicle seat
belt through or around the child
restraint. The child restraint instructions
will show you how.
4. Push the latch plate into the buckle untilit clicks. Position the release button on the
buckle, away from the child restraint, so
that the seat belt could be quickly
unbuckled if necessary.
5. Pull the shoulder belt all the way out of
the retractor to set the lock. When the
retractor lock is set, the belt can be
tightened but not pulled out of the
retractor.
6. To tighten the belt, push down on thechild restraint, pull the shoulder portion
of the belt to tighten the lap portion of
the belt, and feed the shoulder belt back
into the retractor. When installing a
forward-facing child restraint, it may be
helpful to use your knee to push down
on the child restraint as you tighten
the belt.
Try to pull the belt out of the retractor
to make sure the retractor is locked.
If the retractor is not locked, repeat
Steps 5 and 6.
7. For forward-facing child restraints, attach and tighten the top tether to the top
tether anchor (loop). Refer to the child
restraint instructions, the vehicle LATCH
Page 87 of 433
Chevrolet Silverado 2500 HD/3500 HD Owner Manual (GMNA-Localizing-U.
S./Canada/Mexico-14632154) - 2021 - CRC - 11/20/20
86 Seats and Restraints
anchor weight limits, and instructions
listed inLower Anchors and Tethers for
Children (LATCH System) 074.
8. Before placing a child in the child restraint, make sure it is securely held in
place. To check, grasp the child restraint
at the seat belt path and attempt to
move it side to side and back and forth.
When the child restraint is properly
installed, there should be no more than
2.5 cm (1 in) of movement.
To remove the child restraint, unbuckle the
vehicle seat belt and let it return to the
stowed position. If the top tether is attached
to a top tether anchor, disconnect it.
Reinstall the head restraint or headrest
before the seating position is used. See
“Head Restraint or Headrest Removal and
Reinstallation” underLower Anchors and
Tethers for Children (LATCH System) 074 for
additional information on installing the
headrest properly.
Crew Cab
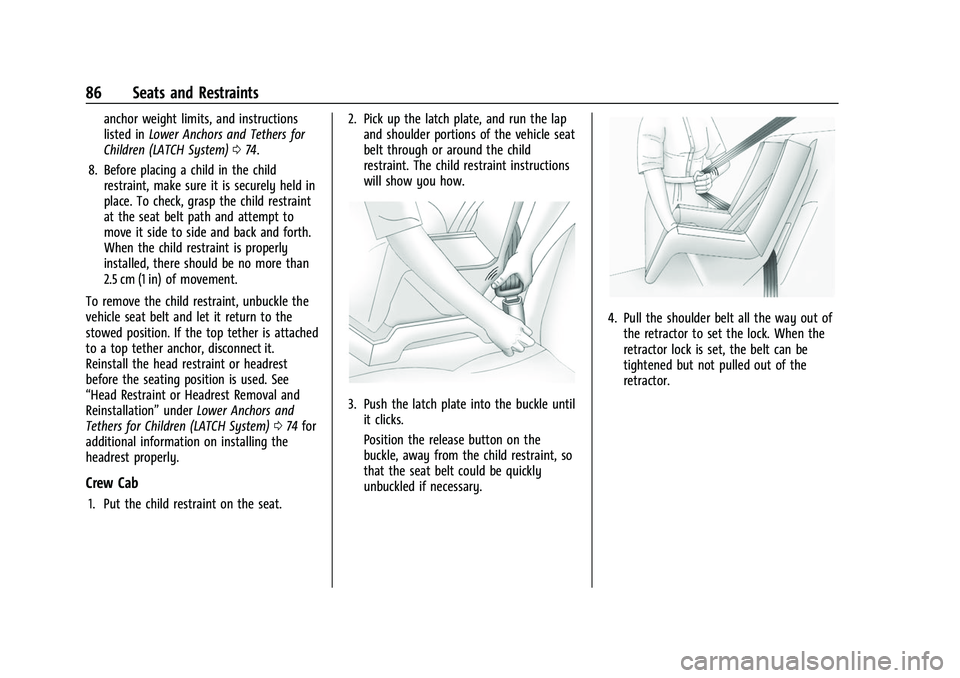
1. Put the child restraint on the seat. 2. Pick up the latch plate, and run the lap
and shoulder portions of the vehicle seat
belt through or around the child
restraint. The child restraint instructions
will show you how.
3. Push the latch plate into the buckle untilit clicks.
Position the release button on the
buckle, away from the child restraint, so
that the seat belt could be quickly
unbuckled if necessary.
4. Pull the shoulder belt all the way out ofthe retractor to set the lock. When the
retractor lock is set, the belt can be
tightened but not pulled out of the
retractor.
Page 88 of 433
Chevrolet Silverado 2500 HD/3500 HD Owner Manual (GMNA-Localizing-U.
S./Canada/Mexico-14632154) - 2021 - CRC - 11/20/20
Seats and Restraints 87
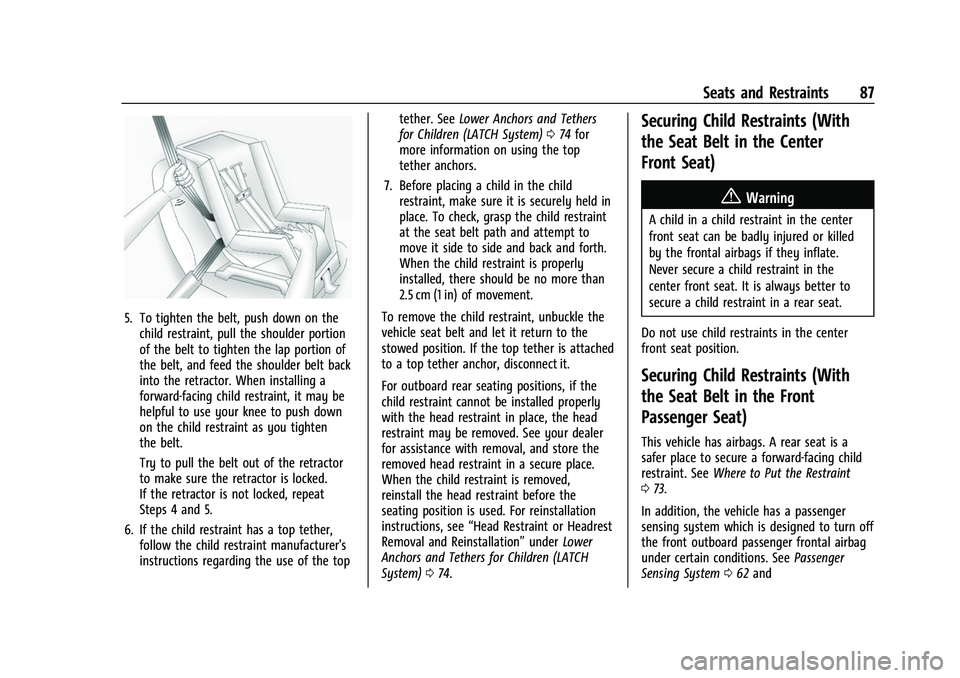
5. To tighten the belt, push down on thechild restraint, pull the shoulder portion
of the belt to tighten the lap portion of
the belt, and feed the shoulder belt back
into the retractor. When installing a
forward-facing child restraint, it may be
helpful to use your knee to push down
on the child restraint as you tighten
the belt.
Try to pull the belt out of the retractor
to make sure the retractor is locked.
If the retractor is not locked, repeat
Steps 4 and 5.
6. If the child restraint has a top tether, follow the child restraint manufacturer's
instructions regarding the use of the top tether. See
Lower Anchors and Tethers
for Children (LATCH System) 074 for
more information on using the top
tether anchors.
7. Before placing a child in the child restraint, make sure it is securely held in
place. To check, grasp the child restraint
at the seat belt path and attempt to
move it side to side and back and forth.
When the child restraint is properly
installed, there should be no more than
2.5 cm (1 in) of movement.
To remove the child restraint, unbuckle the
vehicle seat belt and let it return to the
stowed position. If the top tether is attached
to a top tether anchor, disconnect it.
For outboard rear seating positions, if the
child restraint cannot be installed properly
with the head restraint in place, the head
restraint may be removed. See your dealer
for assistance with removal, and store the
removed head restraint in a secure place.
When the child restraint is removed,
reinstall the head restraint before the
seating position is used. For reinstallation
instructions, see “Head Restraint or Headrest
Removal and Reinstallation” underLower
Anchors and Tethers for Children (LATCH
System) 074.
Securing Child Restraints (With
the Seat Belt in the Center
Front Seat)
{Warning
A child in a child restraint in the center
front seat can be badly injured or killed
by the frontal airbags if they inflate.
Never secure a child restraint in the
center front seat. It is always better to
secure a child restraint in a rear seat.
Do not use child restraints in the center
front seat position.
Securing Child Restraints (With
the Seat Belt in the Front
Passenger Seat)
This vehicle has airbags. A rear seat is a
safer place to secure a forward-facing child
restraint. See Where to Put the Restraint
0 73.
In addition, the vehicle has a passenger
sensing system which is designed to turn off
the front outboard passenger frontal airbag
under certain conditions. See Passenger
Sensing System 062 and
Page 90 of 433
Chevrolet Silverado 2500 HD/3500 HD Owner Manual (GMNA-Localizing-U.
S./Canada/Mexico-14632154) - 2021 - CRC - 11/20/20
Seats and Restraints 89
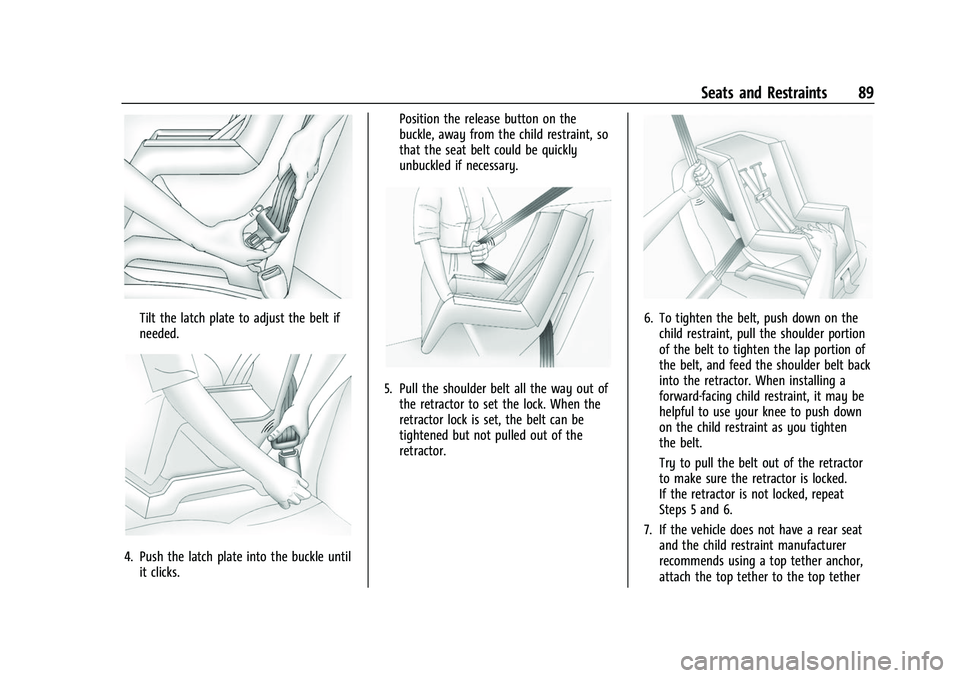
Tilt the latch plate to adjust the belt if
needed.
4. Push the latch plate into the buckle untilit clicks. Position the release button on the
buckle, away from the child restraint, so
that the seat belt could be quickly
unbuckled if necessary.
5. Pull the shoulder belt all the way out of
the retractor to set the lock. When the
retractor lock is set, the belt can be
tightened but not pulled out of the
retractor.
6. To tighten the belt, push down on thechild restraint, pull the shoulder portion
of the belt to tighten the lap portion of
the belt, and feed the shoulder belt back
into the retractor. When installing a
forward-facing child restraint, it may be
helpful to use your knee to push down
on the child restraint as you tighten
the belt.
Try to pull the belt out of the retractor
to make sure the retractor is locked.
If the retractor is not locked, repeat
Steps 5 and 6.
7. If the vehicle does not have a rear seat and the child restraint manufacturer
recommends using a top tether anchor,
attach the top tether to the top tether
Page 93 of 433

Chevrolet Silverado 2500 HD/3500 HD Owner Manual (GMNA-Localizing-U.
S./Canada/Mexico-14632154) - 2021 - CRC - 11/20/20
92 Storage
Underseat Storage
There may be storage under the rear
passenger seat. Lift up on the seat bench to
access. Push the seat bench toward the floor
to close.
Rear Storage
There may be storage in the rear seat.
Pull the tab to access.
Push the storage door to close. The storage
door must be closed before installing child
restraints.
Center Console Storage
Bench Seat
Pull the strap on the side of the center
seatback to access the storage area and
cupholders. Do not use the center seatback
as a seating position when the seatback is
folded down.
To raise the seatback, push the seatback
rearward until it locks in the upright
position. Push and pull on the seatback to
make sure it is locked.
Page 249 of 433

Chevrolet Silverado 2500 HD/3500 HD Owner Manual (GMNA-Localizing-U.
S./Canada/Mexico-14632154) - 2021 - CRC - 11/20/20
248 Driving and Operating
{Warning
Do not rely on the Driver Assistance
Systems. These systems do not replace
the need for paying attention and driving
safely. You may not hear or feel alerts or
warnings provided by these systems.
Failure to use proper care when driving
may result in injury, death, or vehicle
damage. SeeDefensive Driving 0208.
Under many conditions, these systems
will not:
.Detect children, pedestrians, bicyclists,
or animals.
.Detect vehicles or objects outside the
area monitored by the system.
.Work at all driving speeds.
.Warn you or provide you with enough
time to avoid a crash.
.Work under poor visibility or bad
weather conditions.
.Work if the detection sensor is not
cleaned or is covered by ice, snow,
mud, or dirt. (Continued)
Warning (Continued)
.Work if the detection sensor is
covered up, such as with a sticker,
magnet, or metal plate.
.Work if the area surrounding the
detection sensor is damaged or not
properly repaired.
Complete attention is always required
while driving, and you should be ready to
take action and apply the brakes and/or
steer the vehicle to avoid crashes.
Audible or Safety Alert Seat
Some driver assistance features alert the
driver of obstacles by beeping. To change
the volume of the warning chime, see
“Comfort and Convenience” underVehicle
Personalization 0126.
If equipped with the Safety Alert Seat, the
driver seat cushion may provide a vibrating
pulse alert instead of beeping. To change
this, see “Collision/Detection Systems” under
Vehicle Personalization 0126.
Cleaning
Depending on vehicle options, keep these
areas of the vehicle clean to ensure the best
driver assistance feature performance. Driver Information Center (DIC) messages may
display when the systems are unavailable or
blocked.
Page 257 of 433

Chevrolet Silverado 2500 HD/3500 HD Owner Manual (GMNA-Localizing-U.
S./Canada/Mexico-14632154) - 2021 - CRC - 11/20/20
256 Driving and Operating
.A compatible trailer profile is not
configured or a non-compatible trailer
profile is selected.
.The vehicle is in R (Reverse).
.The trailer is not connected.
.The accessory rear trailer camera is not
connected or connected to the incorrect
input.
The preview may not be provided or the
wrong preview may be provided if:
.The accessory cameras are not recognized.
Ensure that the accessory camera(s) are
connected and power cycle the vehicle.
.The accessory trailer cameras are
swapped at the hitch connector. Ensure
that the accessory camera(s) are
connected to the correct input.
.The accessory trailer camera(s) are
connected to the correct camera input.
.The accessory trailer camera(s) are not
installed according to the installation
instructions.
A feature may be unavailable or not
activating as expected if:
.The customization is disabled. Check the
customization settings where applicable.
.The accessory trailer cameras are
swapped at the hitch connector. Ensure
that the accessory camera(s) are
connected to the correct camera input.
A view may switch automatically if:
.The vehicle is shifted to another gear.
Park Assist
With Front and Rear Park Assist, as the
vehicle moves at speeds of less than 8 km/h
(5 mph) the sensors on the bumpers may
detect objects up to 1.2 m (4 ft) in front and
2.5 m (8 ft) behind the vehicle within a zone
25 cm (10 in) high off the ground and below
bumper level. These detection distances may
be shorter during warmer or humid weather.
Blocked sensors will not detect objects and
can also cause false detections. Keep the
sensors clean of mud, dirt, snow, ice, and
slush; and clean sensors after a car wash in
freezing temperatures.
{Warning
The Park Assist system does not detect
children, pedestrians, bicyclists, animals,
or objects located below the bumper or
that are too close or too far from the
vehicle. It is not available at speeds (Continued)
Warning (Continued)
greater than 8 km/h (5 mph). To prevent
injury, death, or vehicle damage, even
with Park Assist, always check the area
around the vehicle and check all mirrors
before moving forward or backing.
The instrument cluster may have a Park
Assist display with bars that show “distance
to object” and object location information
for the Front and Rear Park Assist system.
As the object gets closer, more bars light up
and the bars change color from yellow to
amber to red.
When an object is first detected in the rear,
one beep will be heard from the rear,
or both sides of the Safety Alert Seat will
pulse two times. When an object is very
close —<0.4 m (1.5 ft) in the vehicle rear or
Page 268 of 433
Chevrolet Silverado 2500 HD/3500 HD Owner Manual (GMNA-Localizing-U.
S./Canada/Mexico-14632154) - 2021 - CRC - 11/20/20
Driving and Operating 267
Warning (Continued)
.Read and follow all the instructions on
the fuel pump island.
.Turn off the engine when refueling.
.Keep sparks, flames, and smoking
materials away from fuel.
.Do not leave the fuel pump
unattended.
.Avoid using electronic devices while
refueling.
.Do not re-enter the vehicle while
pumping fuel.
.Keep children away from the fuel
pump and never let children
pump fuel.
.Before touching the fill nozzle, touch a
metallic object to discharge static
electricity from your body.
.Fuel can spray out if the fuel cap is
opened too quickly. This spray can
happen if the tank is nearly full, and is
more likely in hot weather. Open the
fuel cap slowly and wait for any hiss
noise to stop, then unscrew the cap all
the way.Turn the fuel cap counterclockwise to
remove. Fully insert and latch the fill nozzle,
begin fueling. For models with dual fuel
tanks, the fuel gauge shows an average of
both tanks. When refueling, refuel the
primary front tank first, then add fuel to the
auxiliary rear tank.
{Warning
Overfilling the fuel tank by more than
three clicks of a standard fill nozzle may
cause:
.Vehicle performance issues, including
engine stalling and damage to the fuel
system.
.Fuel spills.
.Under certain conditions, fuel fires.
Be careful not to spill fuel. Wait five seconds
after you have finished pumping before
removing the fill nozzle. Clean fuel from
painted surfaces as soon as possible. See
Exterior Care 0373. Reinstall the cap by
turning it clockwise until it clicks.
{Warning
If a fire starts while you are refueling, do
not remove the fill nozzle. Shut off the
flow of fuel by shutting off the pump or
by notifying the station attendant. Leave
the area immediately.
Caution
If a new fuel cap is needed, get the right
type of cap from your dealer. The wrong
type of fuel cap may not fit properly,
may turn on the malfunction indicator
lamp, and could damage the fuel system
and emissions system. See Malfunction
Indicator Lamp (Check Engine Light) 0111.
Filling a Portable Fuel Container
{Warning
Never fill a portable fuel container while
it is in the vehicle. Static electricity
discharge from the container can ignite
the fuel vapor. You or others could be
(Continued)