2021 CHEVROLET SILVERADO 2500HD tailgate
[x] Cancel search: tailgatePage 25 of 433
Chevrolet Silverado 2500 HD/3500 HD Owner Manual (GMNA-Localizing-U.
S./Canada/Mexico-14632154) - 2021 - CRC - 11/20/20
24 Keys, Doors, and Windows
Use the key to unlock the tailgate.
Open the tailgate by lifting up on its handle
while pulling the tailgate down.
To shut the tailgate, firmly push it upward
until it latches.
After closing the tailgate, pull it back to be
sure it is latched securely.
Some tailgates have an electric latch. If the
battery is disconnected or has low voltage,
the tailgate will not open. The tailgate will
resume operation when the battery is
reconnected or recharged.
Power Release Tailgate
{Warning
Make sure there is no one in the way of
the power tailgate as it is opening and
closing, and keep hands away from the
tailgate hinges when in use. You or
others could be injured if caught in the
path of the power tailgate or tailgate
hinges.
Caution
To avoid damage to the tailgate, make
sure the area behind the tailgate is clear
before opening it.
In the case of a dead battery, the tailgate
can be opened manually. Contact your
dealer or Roadside Assistance.
If equipped, to lock or unlock the tailgate,
use the RKE transmitter or the key. See
Remote Keyless Entry (RKE) System
Operation (Key Access) 010 or
Remote Keyless Entry (RKE) System
Operation (Keyless Access) 013.
The vehicle must be in P (Park).
To open the tailgate:
.Pressxtwice quickly on the RKE
transmitter until the tailgate moves.
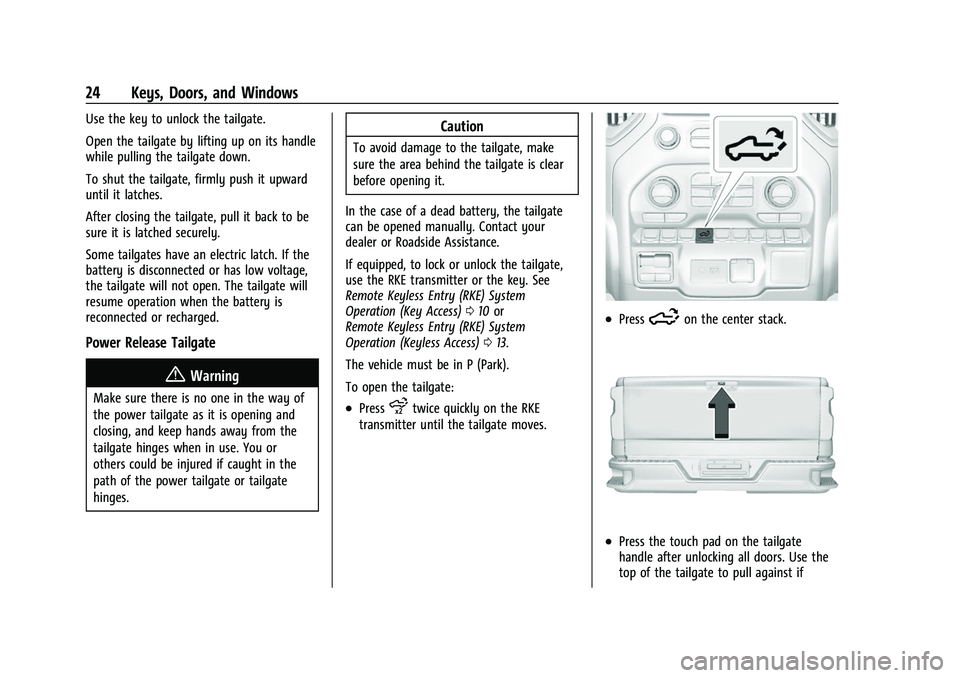
.Press5on the center stack.
.Press the touch pad on the tailgate
handle after unlocking all doors. Use the
top of the tailgate to pull against if
Page 26 of 433
Chevrolet Silverado 2500 HD/3500 HD Owner Manual (GMNA-Localizing-U.
S./Canada/Mexico-14632154) - 2021 - CRC - 11/20/20
Keys, Doors, and Windows 25
assistance is required. If equipped with
Keyless Access, a locked tailgate can be
opened if the RKE transmitter is within
1 m (3 ft).
To close the tailgate, firmly push it upward
until it latches. Pull it back to be sure it is
latched securely.
Power Tailgate
{Warning
Make sure there is no one in the way of
the power tailgate as it is opening and
closing, and keep hands away from the
tailgate hinges when in use. You or
others could be injured if caught in the
path of the power tailgate or tailgate
hinges.
Caution
To avoid damage to the tailgate, make
sure the area behind the tailgate is clear
before opening it.
If equipped with a power open/close
tailgate, the tailgate can be opened or
closed in several ways. To open the tailgate,
do one of the following:
.Pressxtwice quickly on the RKE
transmitter until the tailgate moves. See
Remote Keyless Entry (RKE) System
Operation (Key Access) 010 or
Remote Keyless Entry (RKE) System
Operation (Keyless Access) 013.
If equipped with Keyless Access, a locked
tailgate can be opened if the RKE
transmitter is within 1 m (3 ft).
.Press5on the center stack.
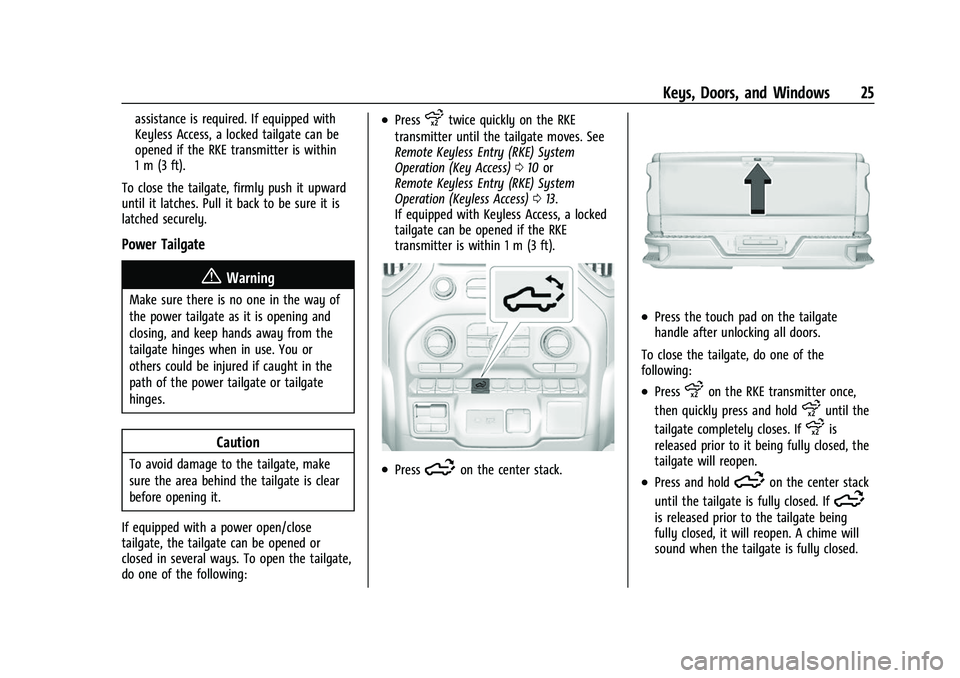
.Press the touch pad on the tailgate
handle after unlocking all doors.
To close the tailgate, do one of the
following:
.Pressxon the RKE transmitter once,
then quickly press and hold
xuntil the
tailgate completely closes. If
xis
released prior to it being fully closed, the
tailgate will reopen.
.Press and hold5on the center stack
until the tailgate is fully closed. If
5
is released prior to the tailgate being
fully closed, it will reopen. A chime will
sound when the tailgate is fully closed.
Page 27 of 433
Chevrolet Silverado 2500 HD/3500 HD Owner Manual (GMNA-Localizing-U.
S./Canada/Mexico-14632154) - 2021 - CRC - 11/20/20
26 Keys, Doors, and Windows
.Press the touch pad on the tailgate
handle.
A chime sounds and the taillamps flash
during the closing operation. If the warning
chime is not functioning, the tailgate will
not power close. Power opening is still
enabled. See your dealer for service.
The power tailgate may be temporarily
disabled after repeated power cycling over a
short period of time. If this occurs, the
tailgate can still be operated manually.
The vehicle must be in P (Park) to operate
the power tailgate. If the vehicle is shifted
out of P (Park) while the power function is
in progress, the tailgate will continue to
completion. If the vehicle is accelerated
while the tailgate is still closing, the tailgate
may stop and reverse direction. Make sure
the tailgate is closed and latched before
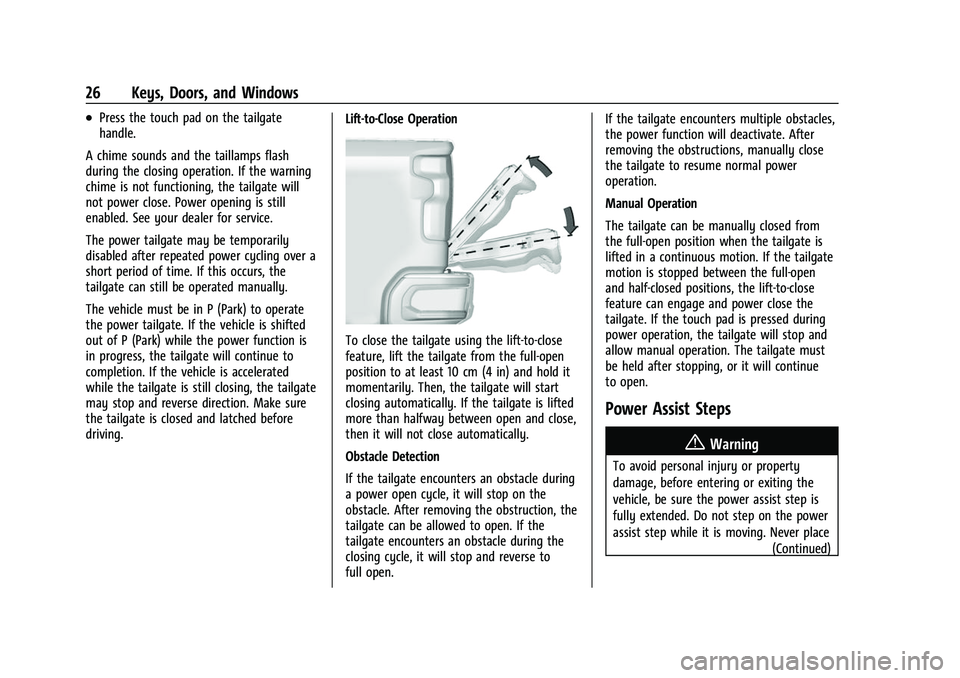
driving. Lift-to-Close Operation
To close the tailgate using the lift-to-close
feature, lift the tailgate from the full-open
position to at least 10 cm (4 in) and hold it
momentarily. Then, the tailgate will start
closing automatically. If the tailgate is lifted
more than halfway between open and close,
then it will not close automatically.
Obstacle Detection
If the tailgate encounters an obstacle during
a power open cycle, it will stop on the
obstacle. After removing the obstruction, the
tailgate can be allowed to open. If the
tailgate encounters an obstacle during the
closing cycle, it will stop and reverse to
full open.If the tailgate encounters multiple obstacles,
the power function will deactivate. After
removing the obstructions, manually close
the tailgate to resume normal power
operation.
Manual Operation
The tailgate can be manually closed from
the full-open position when the tailgate is
lifted in a continuous motion. If the tailgate
motion is stopped between the full-open
and half-closed positions, the lift-to-close
feature can engage and power close the
tailgate. If the touch pad is pressed during
power operation, the tailgate will stop and
allow manual operation. The tailgate must
be held after stopping, or it will continue
to open.
Power Assist Steps
{Warning
To avoid personal injury or property
damage, before entering or exiting the
vehicle, be sure the power assist step is
fully extended. Do not step on the power
assist step while it is moving. Never place
(Continued)
Page 140 of 433

Chevrolet Silverado 2500 HD/3500 HD Owner Manual (GMNA-Localizing-U.
S./Canada/Mexico-14632154) - 2021 - CRC - 11/20/20
Lighting 139
Some localities have laws that require the
headlamps to be on with the fog lamps.
Task Lighting
If equipped, task lighting projects light from
the outside mirrors away from the vehicle.
While the vehicle is parked, press
Kto
select one of the following options:
.Left and Right Task Lights Illuminated
.Left Task Light Illuminated
.Right Task Light Illuminated
.Left and Right Task Lights Off
If the vehicle leaves a parked position, the
lights will immediately turn off. If the vehicle is off, the lights will stay on
for approximately 10 minutes.
If any Task lights are on, if the button has
not been pressed after approximately
5 seconds, pressing it again will turn off all
Task Lights.
Auxiliary Roof-Mounted Lamp
If equipped, this button includes wiring
provisions for a dealer or a qualified service
center to install an auxiliary roof lamp.
For information on roof-mounted emergency
lamp installation, see www.gmupfitter.com
or contact your dealer.
If the vehicle has this button, the vehicle
may have the snow plow prep package. See
Add-On Electrical Equipment
0297.
Exterior Cargo Lamps
The cargo lamps provide more light in the
cargo area or on the sides of the vehicle,
if needed. The lamps inside the pickup box,
in the tailgate handle, for the hitch, and/or
the cargo mirror lamps also turn on,
if equipped.
If the vehicle is in P (Park), R (Reverse),
or N (Neutral) the Cargo Lamp Switch causes
the lights to cycle through the following
states for each button press:
- Initial Press:
- CHMSL/Cargo Bed Lights - On
- Cargo Mirror Lights - On
- Cargo Switch Indicator (if equipped) - On
Page 250 of 433
Chevrolet Silverado 2500 HD/3500 HD Owner Manual (GMNA-Localizing-U.
S./Canada/Mexico-14632154) - 2021 - CRC - 11/20/20
Driving and Operating 249
.Front and rear bumpers and the area
below the bumpers
.Front grille and headlamps
.Front camera lens in the front grille or
near the front emblem
.Front side and rear side panels
.Outside of the windshield in front of the
rearview mirror
.Side camera lens on the bottom of the
outside mirrors
.Rear side corner bumpers
.Rear Vision Camera in the tailgate handle
.Rear Camera Mirror and Cargo View
Camera in the Center High-Mounted
Stoplamp
Radio Frequency
This vehicle may be equipped with driver
assistance systems that operate using radio
frequency. See Radio Frequency Statement
0 409.
Assistance Systems for Parking or
Backing
If equipped, the Rear Vision Camera (RVC),
Surround Vision, Rear Park Assist (RPA),
Front Park Assist (FPA), and Rear Cross
Traffic Alert (RCTA) may help the driver park
or avoid objects. Always check around the
vehicle when parking or backing.
The RVC, RPA, and Surround Vision will not
work properly if the tailgate is down. If the
tailgate is down, do not use these systems.
Rear Vision Camera (RVC)
When the vehicle is shifted into R (Reverse),
the RVC displays an image of the area
behind the vehicle in the infotainment
display. The previous screen displays when
the vehicle is shifted out of R (Reverse) after
a short delay. To return to the previous
screen sooner, press any button on the
infotainment system, shift into P (Park), or,
while in D (Drive), reach a vehicle speed of
approximately 12 km/h (8 mph). The rear
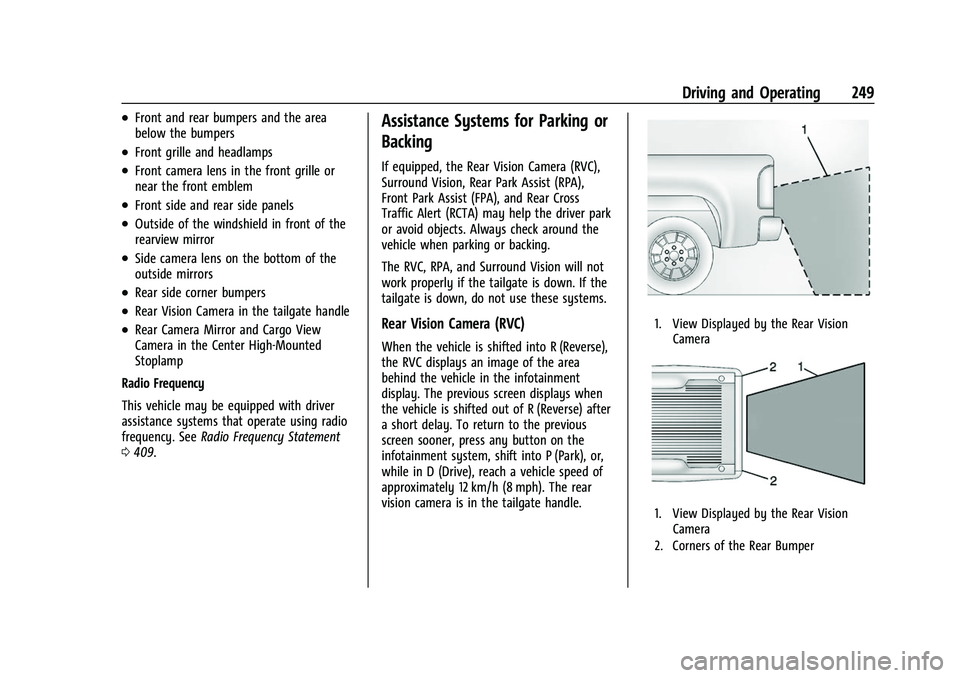
vision camera is in the tailgate handle.
1. View Displayed by the Rear Vision
Camera
1. View Displayed by the Rear VisionCamera
2. Corners of the Rear Bumper
Page 255 of 433
Chevrolet Silverado 2500 HD/3500 HD Owner Manual (GMNA-Localizing-U.
S./Canada/Mexico-14632154) - 2021 - CRC - 11/20/20
254 Driving and Operating
.Provides a rearward split view of
the left and right sides of the
vehicle and trailer with an overlay
view of the area behind the trailer.
The feature is available when a
trailer is connected. the feature
requires user installation of an
accessory trailer camera on the
rear exterior surface of the trailer
per the accessory trailer camera
installation instructions (see your
dealer for accessory trailer
camera(s) and information). To
select, touch Rear Trailer View/Rear
Side View with Available
Articulation Functionality/
Picture-in-Picture Side view on the
infotainment display when a
camera view is active. Each press
of the button will toggle through
the Rear Trailer View, Trailer Tow
mirror View and Combo View. To
access this view when in a forward
gear above 12 km/h (8 mph), touch
CAMERA on the infotainment
display and touch the Rear Trailer
View/Rear Side View with Available
Articulation Functionality/
Picture-in-Picture Side View icon.
Touch X to exit.HD Surround Vision with Trailer Camera
Provisions
If equipped, this feature provides additional
views to aid in trailering/towing. The
system shows multiple views in the
infotainment display using five cameras
mounted around the vehicle and up to two
additional accessory cameras that can be
mounted on or in a trailer. The front camera
is in the grille under the front emblem, the
side cameras are on the bottom of the
outside mirrors, the rear camera is in the
tailgate handle and the bed camera is
mounted on the rear of the cab.
Additionally, up to two accessory cameras
can be mounted to the rear and/or interior
of the trailer. See your dealer for accessory
trailer cameras. To access, touch CAMERA on
the infotainment display or shift to
R (Reverse). To return to the previous screen
when not in reverse, touch the Home or
Back buttons on the infotainment display.
Certain trailer views require a compatible
trailer profile be configured and selected.
A compatible trailer is a box type trailer
(cargo, camper, etc.) with a conventional
hitch.
Available camera views:
.Front/Rear Standard View
.Front/Rear Top-Down View
.Rear Bowl View
.Front/Rear Side View
.Hitch View
.Bed View
.Rear trailer View
.Rear Side view with a available
articulation functionality
.Picture-in-Picture Side View
.Interior Trailer View
.Transparent trailer View
.Surround View
.Guidance Lines
.Hitch Guidance
Surround Vision (360 Degrees)
If equipped, the Surround Vision system can
display various views surrounding the
vehicle in the infotainment display using
four cameras mounted around the vehicle.
The front camera is in the grille under the
front emblem, the side cameras are on the
bottom of the outside mirrors, and the rear
camera is in the tailgate handle.
The Surround Vision system can be accessed
by selecting CAMERA in the infotainment
display or when the vehicle is shifted into
R (Reverse). To return to the previous screen
Page 256 of 433
Chevrolet Silverado 2500 HD/3500 HD Owner Manual (GMNA-Localizing-U.
S./Canada/Mexico-14632154) - 2021 - CRC - 11/20/20
Driving and Operating 255
sooner, when not in R (Reverse), press the
Home or Back button on the infotainment
system, shift into P (Park), or, while in D
(Drive), reach a vehicle speed of
approximately 12 km/h (8 mph).
Available camera views:
.Front/Rear Standard View
.Front/Rear Top-Down View
.Rear Bowl View
.Front/Rear Side View
.Hitch View
.Surround View
.Guidance Lines
.Hitch Guidance
Surround Vision
If equipped, this feature provides, additional
views to aid in trailering/towing. The Front
Vision Camera and Surround Vision cameras
are not supported. The system can show
various views in the infotainment display
using cameras mounted in and around the
vehicle and trailer. The rear camera is in the
tailgate handle and the cargo bed camera is
mounted on the rear of the cab. Up to two
accessory cameras can be mounted to the
rear and/or interior of the trailer. See your
dealer for these accessory cameras. The system can be accessed by selecting
CAMERA in the infotainment display or
when the vehicle is shifted into R (Reverse).
To return to the previous screen sooner,
when not in R (Reverse), press the Home or
Back button on the infotainment system or
shift into P (Park).
Available camera views:
.Rear Standard View
.Hitch View
.Bed View
.Rear Trailer View
.Interior Trailer View
.Guidance Lines
.Hitch Guidance
Troubleshooting
The Transparent Trailer calibration may take
longer than expected or not calibrate if:
.The vehicle is driven too fast during
calibration. Speed should be maintained
below 50 km/h (31 mph).
.The vehicle is not driven straight during
calibration. Steering should be maintained
as straight as possible, excessive steering
during calibration may extend
calibration time.
.The calibration is attempted in low light.
Calibration should be attempted when
there is enough light.
.The calibration is attempted during
adverse weather conditions. Calibration
during conditions such as snow or heavy
rain should be avoided.
.The road surface is not ideal for
calibration. Calibration should be
attempted on an alternate road surface.
.The accessory trailer cameras are
swapped at the hitch connector. Ensure
that the camera mounted to the rear of
the trailer is connected to the rear trailer
camera input.
.The accessory trailer camera is mounted,
angled or rotated outside of the defined
mounting location (see camera
installation instructions).
Distortion may be observed in the calibrated
Transparent Trailer View if:
.The accessory trailer camera is mounted,
angled or rotated outside of the defined
mounting location (see camera
installation instructions).
The Transparent Trailer icon may appear
grayed out if:
Page 327 of 433
Chevrolet Silverado 2500 HD/3500 HD Owner Manual (GMNA-Localizing-U.
S./Canada/Mexico-14632154) - 2021 - CRC - 11/20/20
326 Vehicle Care
Midlevel and Uplevel
See your dealer for headlamp replacement.
Uplevel
See your dealer for turn signal replacement.
Turn Signal Lamp Replacement
1. Open the hood.
2. Turn the bulb socket counterclockwise toremove it from the headlamp assembly
and pull it straight out.
3. Remove the bulb by pulling it straight out of the bulb socket.
4. Replace the bulb and reverse Steps 1–3 to reinstall.
Taillamps, Turn Signal, Stoplamps,
and Back-Up Lamps
Base Level Taillamp Assembly
1. Stoplamp/Taillamp/Turn Signal Lamp
2. Back-Up Lamp
3. Side Marker Lamp
Uplevel Taillamp Assembly
1500 shown 2500/3500 similar
1. Back-Up Lamp
It is recommended to replace the grommets
when replacing a bulb. See your dealer.
To replace one of these bulbs:
1. Open the tailgate.