Page 324 of 433

Chevrolet Silverado 2500 HD/3500 HD Owner Manual (GMNA-Localizing-U.
S./Canada/Mexico-14632154) - 2021 - CRC - 11/20/20
Vehicle Care 323
Caution (Continued)
covered by the vehicle warranty. Do not
allow the wiper arm to touch the
windshield.
Front Wiper Blade Replacement
To replace the wiper blade:1. Pull the wiper assembly away from the windshield.
2. Lift up on the latch in the middle of the
wiper blade where the wiper arm
attaches. 3. With the latch open, pull the wiper blade
down toward the windshield far enough
to release it from the J-hooked end of
the wiper arm.
4. Remove the wiper blade.
5. Reverse Steps 1–3 for wiper blade replacement.
Glass Replacement
If the windshield or front side glass must be
replaced, see your dealer to determine the
correct replacement glass.
Windshield Replacement
HUD System
If equipped, the windshield is part of the
HUD system. If the windshield must be
replaced, get one that is designed for HUD
or the HUD image may look out of focus.
Driver Assistance Systems
If the windshield needs to be replaced and
the vehicle is equipped with a front camera
sensor for the Driver Assistance Systems, a
GM replacement windshield is
recommended. The replacement windshield
must be installed according to GM
specifications for proper alignment. If it is not, these systems may not work properly,
they may display messages, or they may
not work at all. See your dealer for proper
windshield replacement.
Gas Strut(s)
This vehicle is equipped with gas strut(s) to
provide assistance in lifting and holding
open the hood/trunk/liftgate system in full
open position.
{Warning
If the gas struts that hold open the hood,
trunk, and/or liftgate fail, you or others
could be seriously injured. Take the
vehicle to your dealer for service
immediately. Visually inspect the gas
struts for signs of wear, cracks, or other
damage periodically. Check to make sure
the hood/trunk/liftgate is held open with
enough force. If struts are failing to hold
the hood/trunk/liftgate, do not operate.
Have the vehicle serviced.
Page 326 of 433

Chevrolet Silverado 2500 HD/3500 HD Owner Manual (GMNA-Localizing-U.
S./Canada/Mexico-14632154) - 2021 - CRC - 11/20/20
Vehicle Care 325
Halogen Bulbs
{Warning
Halogen bulbs have pressurized gas inside
and can burst if you drop or scratch the
bulb. You or others could be injured. Be
sure to read and follow the instructions
on the bulb package.
LED Lighting
This vehicle has several LED lamps. For
replacement of any LED lighting assembly,
contact your dealer.
Headlamps, Front Turn Signal,
Sidemarker, and Parking Lamps
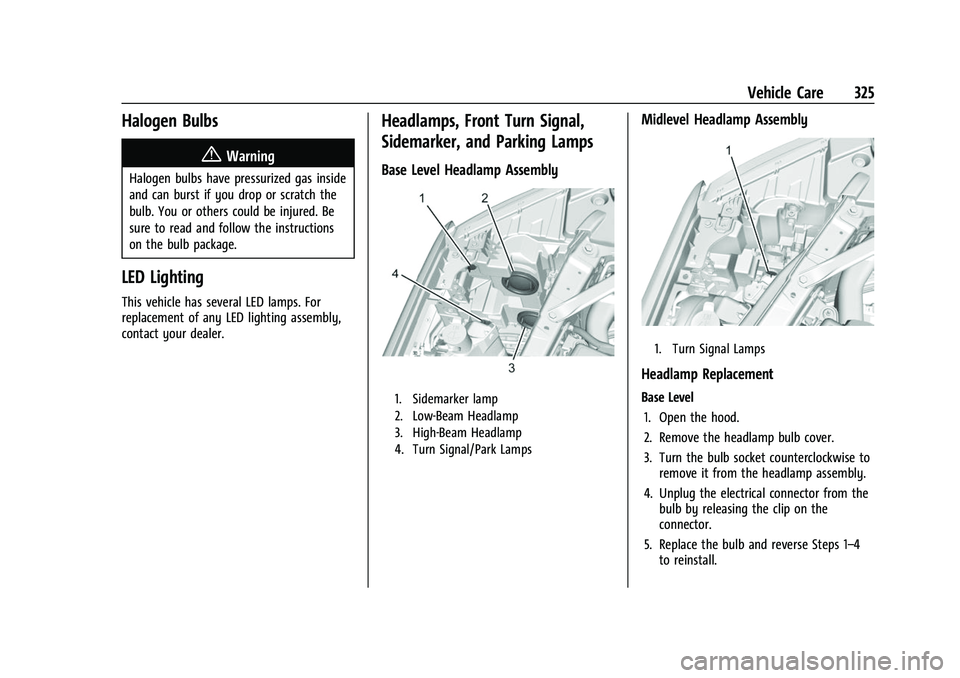
Base Level Headlamp Assembly
1. Sidemarker lamp
2. Low-Beam Headlamp
3. High-Beam Headlamp
4. Turn Signal/Park Lamps
Midlevel Headlamp Assembly
1. Turn Signal Lamps
Headlamp Replacement
Base Level1. Open the hood.
2. Remove the headlamp bulb cover.
3. Turn the bulb socket counterclockwise to remove it from the headlamp assembly.
4. Unplug the electrical connector from the bulb by releasing the clip on the
connector.
5. Replace the bulb and reverse Steps 1–4 to reinstall.
Page 327 of 433
Chevrolet Silverado 2500 HD/3500 HD Owner Manual (GMNA-Localizing-U.
S./Canada/Mexico-14632154) - 2021 - CRC - 11/20/20
326 Vehicle Care
Midlevel and Uplevel
See your dealer for headlamp replacement.
Uplevel
See your dealer for turn signal replacement.
Turn Signal Lamp Replacement
1. Open the hood.
2. Turn the bulb socket counterclockwise toremove it from the headlamp assembly
and pull it straight out.
3. Remove the bulb by pulling it straight out of the bulb socket.
4. Replace the bulb and reverse Steps 1–3 to reinstall.
Taillamps, Turn Signal, Stoplamps,
and Back-Up Lamps
Base Level Taillamp Assembly
1. Stoplamp/Taillamp/Turn Signal Lamp
2. Back-Up Lamp
3. Side Marker Lamp
Uplevel Taillamp Assembly
1500 shown 2500/3500 similar
1. Back-Up Lamp
It is recommended to replace the grommets
when replacing a bulb. See your dealer.
To replace one of these bulbs:
1. Open the tailgate.
Page 369 of 433

Chevrolet Silverado 2500 HD/3500 HD Owner Manual (GMNA-Localizing-U.
S./Canada/Mexico-14632154) - 2021 - CRC - 11/20/20
368 Vehicle Care
1. Check the other vehicle. It must have a12-volt battery with a negative ground
system.
Caution
If the other vehicle does not have a
12-volt system with a negative ground,
both vehicles can be damaged. Only use
a vehicle that has a 12-volt system with a
negative ground for jump starting.
2. If you have a vehicle with a diesel engine with two batteries, you should
know before you begin that, especially in
cold weather, you may not be able to
get enough power from a single battery
in another vehicle to start your diesel
engine. If your vehicle has more than
one battery, using the battery that is
closer to the starter will reduce electrical
resistance. This is located on the
passenger side, in the rear of the engine
compartment.
3. Get the vehicles close enough so the jumper cables can reach, but be sure the
vehicles are not touching each other.
If they are, it could cause an unwanted
ground connection. You would not be able to start your vehicle, and the bad
grounding could damage the electrical
systems.
To avoid the possibility of the vehicles
rolling, set the parking brake firmly on
both vehicles involved in the jump start
procedure. Put the automatic
transmission in P (Park) before setting
the parking brake. If you have a
four-wheel-drive vehicle, be sure the
transfer case is in a drive gear, not in
N (Neutral).
Caution
If any accessories are left on or plugged
in during the jump starting procedure,
they could be damaged. The repairs
would not be covered by the vehicle
warranty. Whenever possible, turn off or
unplug all accessories on either vehicle
when jump starting.
4. Turn the ignition off on both vehicles. Unplug unnecessary accessories plugged
into the accessory power outlets. Turn
off the radio and all the lamps that are
not needed. This will avoid sparks and
help save both batteries. And it could
save the radio! 5. Open the hood on the other vehicle and
locate the positive (+) and negative (−)
terminal locations on that vehicle.
The positive (+) terminal is under a red
plastic cover at the positive battery post.
To uncover the positive (+) terminal,
open the red plastic cover.
For more information on the location of
the remote positive (+) and remote
negative (−) terminals, see Engine
Compartment Overview 0304.
{Warning
An electric fan can start up even when
the engine is not running and can injure
you. Keep hands, clothing, and tools
away from any underhood electric fan.
{Warning
Using a match near a battery can cause
battery gas to explode. People have been
hurt doing this, and some have been
blinded. Use a flashlight if you need
more light.
(Continued)