2021 CHEVROLET SILVERADO 1500 power
[x] Cancel search: powerPage 347 of 463
Chevrolet Silverado 1500 Owner Manual (GMNA-Localizing-U.S./Canada/
Mexico/Paraguay-14632303) - 2021 - CRC - 11/9/20
344 Vehicle Care
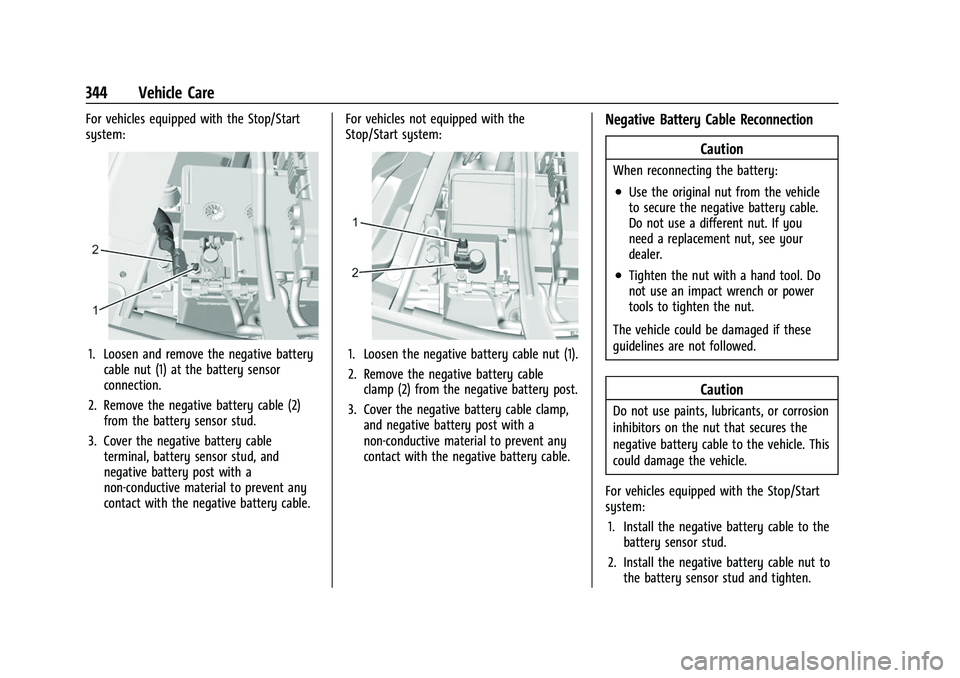
For vehicles equipped with the Stop/Start
system:
1. Loosen and remove the negative batterycable nut (1) at the battery sensor
connection.
2. Remove the negative battery cable (2) from the battery sensor stud.
3. Cover the negative battery cable terminal, battery sensor stud, and
negative battery post with a
non-conductive material to prevent any
contact with the negative battery cable. For vehicles not equipped with the
Stop/Start system:1. Loosen the negative battery cable nut (1).
2. Remove the negative battery cable
clamp (2) from the negative battery post.
3. Cover the negative battery cable clamp, and negative battery post with a
non-conductive material to prevent any
contact with the negative battery cable.
Negative Battery Cable Reconnection
Caution
When reconnecting the battery:
.Use the original nut from the vehicle
to secure the negative battery cable.
Do not use a different nut. If you
need a replacement nut, see your
dealer.
.Tighten the nut with a hand tool. Do
not use an impact wrench or power
tools to tighten the nut.
The vehicle could be damaged if these
guidelines are not followed.
Caution
Do not use paints, lubricants, or corrosion
inhibitors on the nut that secures the
negative battery cable to the vehicle. This
could damage the vehicle.
For vehicles equipped with the Stop/Start
system: 1. Install the negative battery cable to the battery sensor stud.
2. Install the negative battery cable nut to the battery sensor stud and tighten.
Page 348 of 463
Chevrolet Silverado 1500 Owner Manual (GMNA-Localizing-U.S./Canada/
Mexico/Paraguay-14632303) - 2021 - CRC - 11/9/20
Vehicle Care 345
3. Turn the ignition on.
For vehicles not equipped with the Stop/
Start system: 1. Install the negative battery cable clamp to the negative battery post.
2. Tighten the negative battery cable nut.
3. Turn the ignition on.
Four-Wheel Drive
Transfer Case
When to Check Lubricant
Refer to Maintenance Schedule 0409 to
determine when to check the lubricant.
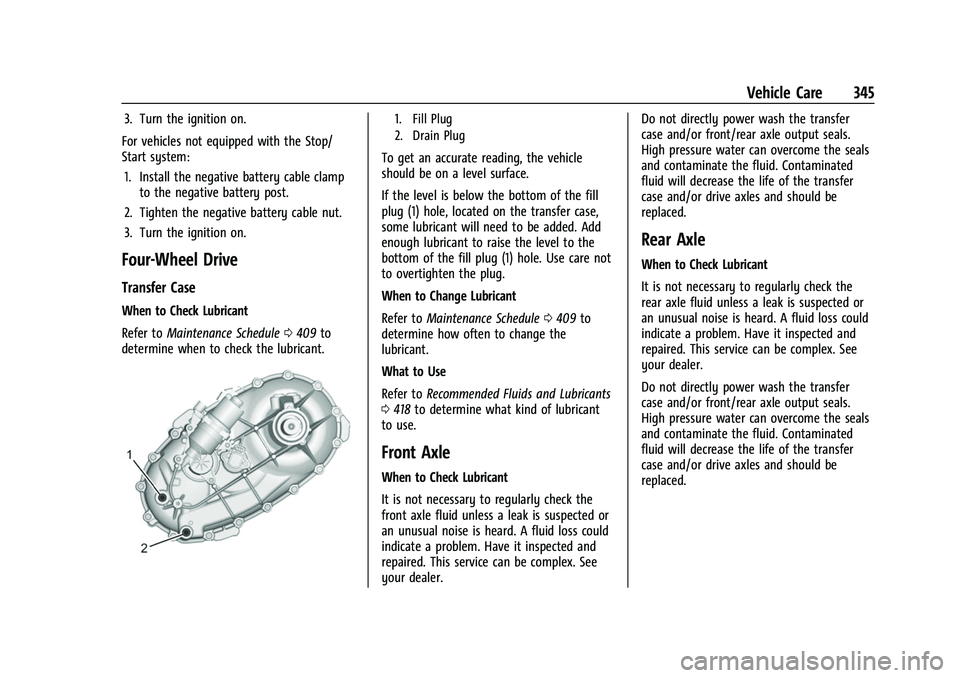
1. Fill Plug
2. Drain Plug
To get an accurate reading, the vehicle
should be on a level surface.
If the level is below the bottom of the fill
plug (1) hole, located on the transfer case,
some lubricant will need to be added. Add
enough lubricant to raise the level to the
bottom of the fill plug (1) hole. Use care not
to overtighten the plug.
When to Change Lubricant
Refer to Maintenance Schedule 0409 to
determine how often to change the
lubricant.
What to Use
Refer to Recommended Fluids and Lubricants
0 418 to determine what kind of lubricant
to use.
Front Axle
When to Check Lubricant
It is not necessary to regularly check the
front axle fluid unless a leak is suspected or
an unusual noise is heard. A fluid loss could
indicate a problem. Have it inspected and
repaired. This service can be complex. See
your dealer. Do not directly power wash the transfer
case and/or front/rear axle output seals.
High pressure water can overcome the seals
and contaminate the fluid. Contaminated
fluid will decrease the life of the transfer
case and/or drive axles and should be
replaced.
Rear Axle
When to Check Lubricant
It is not necessary to regularly check the
rear axle fluid unless a leak is suspected or
an unusual noise is heard. A fluid loss could
indicate a problem. Have it inspected and
repaired. This service can be complex. See
your dealer.
Do not directly power wash the transfer
case and/or front/rear axle output seals.
High pressure water can overcome the seals
and contaminate the fluid. Contaminated
fluid will decrease the life of the transfer
case and/or drive axles and should be
replaced.
Page 355 of 463
Chevrolet Silverado 1500 Owner Manual (GMNA-Localizing-U.S./Canada/
Mexico/Paraguay-14632303) - 2021 - CRC - 11/9/20
352 Vehicle Care
Center High-Mounted Stoplamp
(CHMSL) and Cargo Lamp
This procedure is for the regular cab only.
For crew cab and double cab see your
dealer.
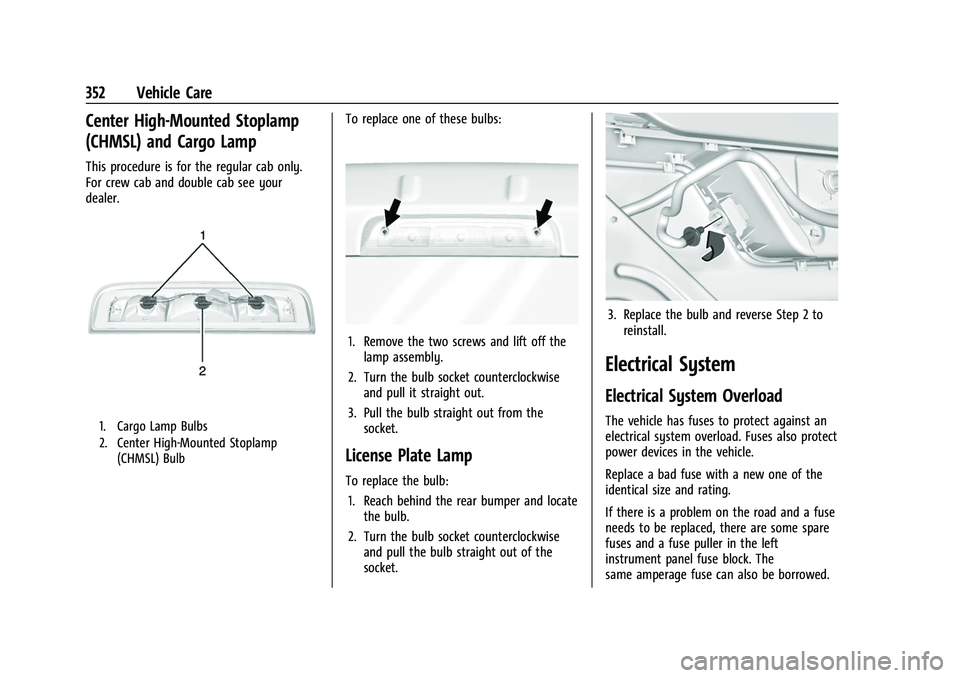
1. Cargo Lamp Bulbs
2. Center High-Mounted Stoplamp(CHMSL) Bulb
To replace one of these bulbs:
1. Remove the two screws and lift off thelamp assembly.
2. Turn the bulb socket counterclockwise and pull it straight out.
3. Pull the bulb straight out from the socket.
License Plate Lamp
To replace the bulb:
1. Reach behind the rear bumper and locate the bulb.
2. Turn the bulb socket counterclockwise and pull the bulb straight out of the
socket.
3. Replace the bulb and reverse Step 2 toreinstall.
Electrical System
Electrical System Overload
The vehicle has fuses to protect against an
electrical system overload. Fuses also protect
power devices in the vehicle.
Replace a bad fuse with a new one of the
identical size and rating.
If there is a problem on the road and a fuse
needs to be replaced, there are some spare
fuses and a fuse puller in the left
instrument panel fuse block. The
same amperage fuse can also be borrowed.
Page 359 of 463
Chevrolet Silverado 1500 Owner Manual (GMNA-Localizing-U.S./Canada/
Mexico/Paraguay-14632303) - 2021 - CRC - 11/9/20
356 Vehicle Care
FusesUsage
65 Auxiliary underhood electrical center
66 Cooling fan motor left 67 Active fuel management 2
68 –
69 Starter Pinion (LD) / Starter Motor (HD Gas)
71 Cooling fan
72 Cooling fan right/Lower
73 Trailer stop/turn lamp left
74 Trailer Interface Module 1
75 DEFC
76 Electric RNG BDS
78 Engine control module
79 Auxiliary battery
80 Cabin cooling pump 81 Trailer stop/turn lamp right Fuses
Usage
82 Trailer Interface Module 2
83 FTZM
84 Trailer brake 85 ENG
86 Engine control module 87 Injector B even
88 O2 B sensor
89 O2 A sensor
90 Injector A odd 91 Engine control module throttle control
92 Cool fan clutch/ Aeroshutter Relays
Usage
5 Headlamp
18 DC/AC inverter
23 Rear window defogger
35 Parking lamp
36 Run/Crank
43 –
59 A/C clutch
64 Starter Motor (LD & HD DSL)
70 Starter Pinion (LD) / Starter Motor (HD Gas)
77 Powertrain
Page 360 of 463
Chevrolet Silverado 1500 Owner Manual (GMNA-Localizing-U.S./Canada/
Mexico/Paraguay-14632303) - 2021 - CRC - 11/9/20
Vehicle Care 357
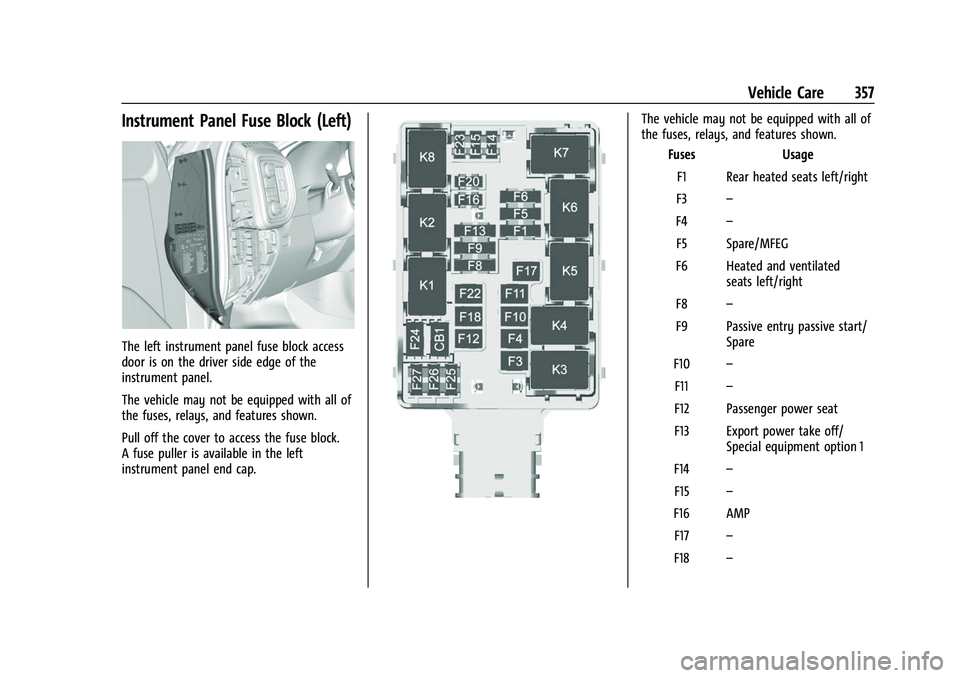
Instrument Panel Fuse Block (Left)
The left instrument panel fuse block access
door is on the driver side edge of the
instrument panel.
The vehicle may not be equipped with all of
the fuses, relays, and features shown.
Pull off the cover to access the fuse block.
A fuse puller is available in the left
instrument panel end cap.
The vehicle may not be equipped with all of
the fuses, relays, and features shown.Fuses Usage
F1 Rear heated seats left/right
F3 –
F4 –
F5 Spare/MFEG
F6 Heated and ventilated seats left/right
F8 –
F9 Passive entry passive start/ Spare
F10 –
F11 –
F12 Passenger power seat
F13 Export power take off/ Special equipment option 1
F14 –
F15 –
F16 AMP F17 –
F18 –
Page 363 of 463
Chevrolet Silverado 1500 Owner Manual (GMNA-Localizing-U.S./Canada/
Mexico/Paraguay-14632303) - 2021 - CRC - 11/9/20
360 Vehicle Care
FusesUsage
F22 Heated steering wheel
F23 MISC R/C
F24 Instrument panel cluster ignition/Overhead
F25 Heating, ventilation, and air conditioning ignition/
Heating, ventilation, and
air conditioning auxiliary
F26 USB ports/Special equipment option retained
accessory power
F27 Accessory power outlet/ retained accessory power
F28 Accessory power outlet/ Battery
F30 Sensing and diagnostic module/Parking brake
F31 Body control module 4
F32 Special equipment option/ Data link connection
F33 Body control module 8
F34 Cargo lamp
F40 CGM Fuses
Usage
F41 Infotainment 1
F42 TCP
F43 –
F44 Active vibration management
F45 Body control module 2
F46 Heating, ventilation, and air conditioning/Battery 1
F47 Instrument panel cluster/ Battery
F48 Transmission control module
F49 Body control module 1 F50 –
F51 Battery 1
F52 Battery 2
F53 –
F54 Sunroof F55 Driver power seat
F56 DC DC TRANS 1 F57 DC DC TRANS 2 Fuses
Usage
F58 Infotainment 2
Circuit
Breakers Usage
1 Accessory power outlet 2
2 Accessory power outlet 1/ Cigarette Lighter
3 Accessory power outlet 3
4 Accessory power outlet 4
Relays Usage
K1 Run/Crank
K2 Retained accessory power/ Accessory 1
K4 Retained accessory power/ Accessory 2
K5 –
Page 368 of 463
Chevrolet Silverado 1500 Owner Manual (GMNA-Localizing-U.S./Canada/
Mexico/Paraguay-14632303) - 2021 - CRC - 11/9/20
Vehicle Care 365
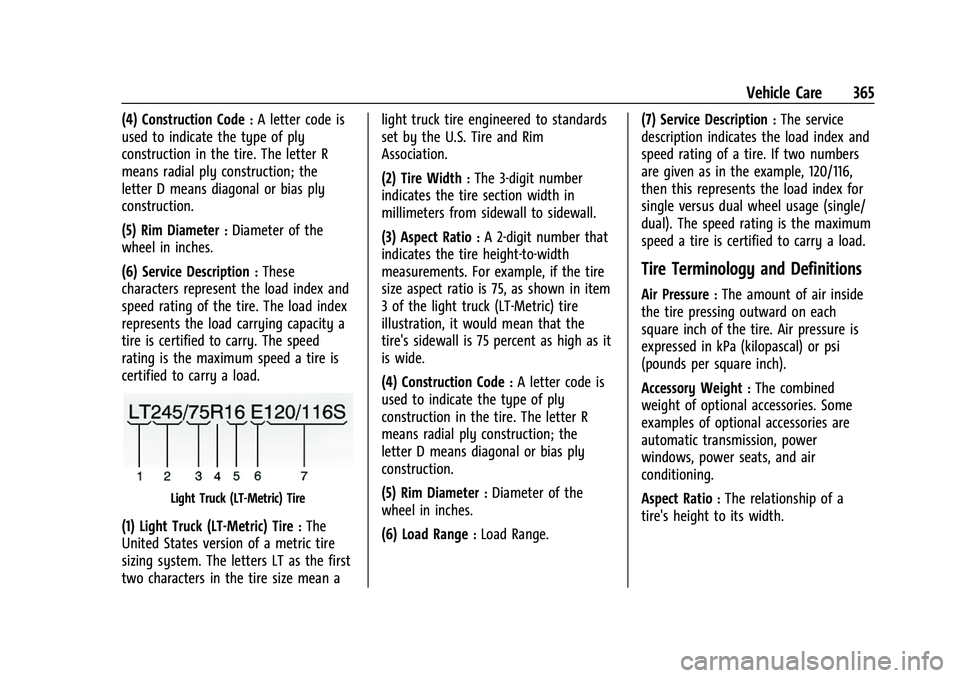
(4) Construction Code:A letter code is
used to indicate the type of ply
construction in the tire. The letter R
means radial ply construction; the
letter D means diagonal or bias ply
construction.
(5) Rim Diameter
:Diameter of the
wheel in inches.
(6) Service Description
:These
characters represent the load index and
speed rating of the tire. The load index
represents the load carrying capacity a
tire is certified to carry. The speed
rating is the maximum speed a tire is
certified to carry a load.
Light Truck (LT-Metric) Tire
(1) Light Truck (LT-Metric) Tire:The
United States version of a metric tire
sizing system. The letters LT as the first
two characters in the tire size mean a light truck tire engineered to standards
set by the U.S. Tire and Rim
Association.
(2) Tire Width
:The 3-digit number
indicates the tire section width in
millimeters from sidewall to sidewall.
(3) Aspect Ratio
:A 2-digit number that
indicates the tire height-to-width
measurements. For example, if the tire
size aspect ratio is 75, as shown in item
3 of the light truck (LT-Metric) tire
illustration, it would mean that the
tire's sidewall is 75 percent as high as it
is wide.
(4) Construction Code
:A letter code is
used to indicate the type of ply
construction in the tire. The letter R
means radial ply construction; the
letter D means diagonal or bias ply
construction.
(5) Rim Diameter
:Diameter of the
wheel in inches.
(6) Load Range
:Load Range. (7) Service Description
:The service
description indicates the load index and
speed rating of a tire. If two numbers
are given as in the example, 120/116,
then this represents the load index for
single versus dual wheel usage (single/
dual). The speed rating is the maximum
speed a tire is certified to carry a load.
Tire Terminology and Definitions
Air Pressure:The amount of air inside
the tire pressing outward on each
square inch of the tire. Air pressure is
expressed in kPa (kilopascal) or psi
(pounds per square inch).
Accessory Weight
:The combined
weight of optional accessories. Some
examples of optional accessories are
automatic transmission, power
windows, power seats, and air
conditioning.
Aspect Ratio
:The relationship of a
tire's height to its width.
Page 387 of 463
Chevrolet Silverado 1500 Owner Manual (GMNA-Localizing-U.S./Canada/
Mexico/Paraguay-14632303) - 2021 - CRC - 11/9/20
384 Vehicle Care
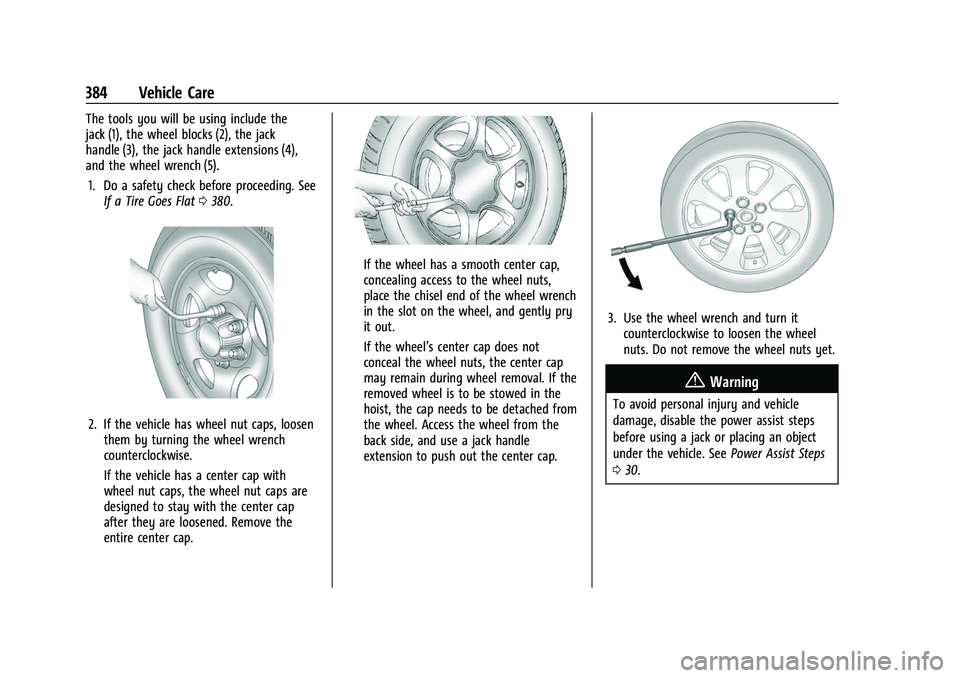
The tools you will be using include the
jack (1), the wheel blocks (2), the jack
handle (3), the jack handle extensions (4),
and the wheel wrench (5).1. Do a safety check before proceeding. See If a Tire Goes Flat 0380.
2. If the vehicle has wheel nut caps, loosen
them by turning the wheel wrench
counterclockwise.
If the vehicle has a center cap with
wheel nut caps, the wheel nut caps are
designed to stay with the center cap
after they are loosened. Remove the
entire center cap.
If the wheel has a smooth center cap,
concealing access to the wheel nuts,
place the chisel end of the wheel wrench
in the slot on the wheel, and gently pry
it out.
If the wheel’s center cap does not
conceal the wheel nuts, the center cap
may remain during wheel removal. If the
removed wheel is to be stowed in the
hoist, the cap needs to be detached from
the wheel. Access the wheel from the
back side, and use a jack handle
extension to push out the center cap.
3. Use the wheel wrench and turn itcounterclockwise to loosen the wheel
nuts. Do not remove the wheel nuts yet.
{Warning
To avoid personal injury and vehicle
damage, disable the power assist steps
before using a jack or placing an object
under the vehicle. See Power Assist Steps
0 30.