2021 CHEVROLET SILVERADO 1500 change wheel
[x] Cancel search: change wheelPage 307 of 463
Chevrolet Silverado 1500 Owner Manual (GMNA-Localizing-U.S./Canada/
Mexico/Paraguay-14632303) - 2021 - CRC - 11/9/20
304 Driving and Operating
To adjust Trailer Gain for each towing
condition:1. Drive the vehicle with the trailer attached on a level road surface
representative of the towing condition
and free of traffic at about 32–40 km/h
(20–25 mph) and fully apply the Manual
Trailer Brake Apply Lever.
Adjusting Trailer Gain at speeds lower
than 32–40 km/h (20–25 mph) may
result in an incorrect gain setting.
2. Adjust the Trailer Gain, using the Trailer Gain (+) or (−) adjustment buttons, to
just below the point of trailer wheel
lock-up, indicated by trailer wheel squeal
or tire smoke when a trailer wheel locks.
Trailer wheel lock-up may not occur if
towing a heavily loaded trailer. Adjust
the Trailer Gain to the highest allowable
setting for the towing condition.
3. Readjust Trailer Gain anytime vehicle loading, trailer loading, or road surface
conditions change or if trailer wheel
lock-up is noticed at any time while
towing.Other ITBC-Related DIC Messages
TRAILER CONNECTED: This message will
briefly display when a trailer with electric
brakes is first connected to the vehicle. This
message will automatically turn off in about
10 seconds. This message can be
acknowledged before it automatically
turns off.
CHECK TRAILER WIRING: This message will
display if:
.The ITBC system first determines
connection to a trailer with electric brakes
and then the trailer harness becomes
disconnected from the vehicle.
If the disconnect occurs while the vehicle
is stationary, this message will
automatically turn off in about
30 seconds. This message will also turn
off if it is acknowledged or if the trailer
harness is reconnected.
If the disconnect occurs while the vehicle
is moving, this message will continue
until the ignition is turned off. This
message will also turn off if it is
acknowledged or if the trailer harness is
reconnected.
.There is an electrical fault in the wiring to
the trailer brakes. This message will
continue as long as there is an electrical
fault in the trailer wiring. This message
will also turn off if it is acknowledged.
To determine whether the electrical fault is
on the vehicle side or trailer side of the
trailer wiring harness connection: 1. Disconnect the trailer wiring harness from the vehicle.
2. Turn the ignition off.
3. Wait 10 seconds, then turn the ignition back to RUN.
4. If the CHECK TRAILER WIRING message reappears, the electrical fault is on the
vehicle side.
If the CHECK TRAILER WIRING message only
reappears when connecting the trailer wiring
harness to the vehicle, the electrical fault is
on the trailer side.
SERVICE TRAILER BRAKE SYSTEM: This
message will display when there is a
problem with the ITBC system. If this
message continues over multiple ignition
cycles, have the vehicle serviced.
Page 334 of 463
Chevrolet Silverado 1500 Owner Manual (GMNA-Localizing-U.S./Canada/
Mexico/Paraguay-14632303) - 2021 - CRC - 11/9/20
Vehicle Care 331
Engine Oil Additives/Engine Oil Flushes
Do not add anything to the oil. The
recommended oils meeting the dexos1
specification are all that is needed for good
performance and engine protection.
Engine oil system flushes are not
recommended and could cause engine
damage not covered by the vehicle
warranty.
What to Do with Used Oil
Used engine oil contains certain elements
that can be unhealthy for your skin and
could even cause cancer. Do not let used oil
stay on your skin for very long. Clean your
skin and nails with soap and water, or a
good hand cleaner. Wash or properly
dispose of clothing or rags containing used
engine oil. See the manufacturer's warnings
about the use and disposal of oil products.
Used oil can be a threat to the environment.
If you change your own oil, be sure to drain
all the oil from the filter before disposal.
Never dispose of oil by putting it in the
trash or pouring it on the ground, into
sewers, or into streams or bodies of water.
Recycle it by taking it to a place that
collects used oil.
Engine Oil Life System
When to Change Engine Oil
This vehicle has a computer system that
indicates when to change the engine oil and
filter. This is based on a combination of
factors which include engine revolutions,
engine temperature, and miles driven. Based
on driving conditions, the mileage at which
an oil change is indicated can vary
considerably. For the oil life system to work
properly, the system must be reset every
time the oil is changed.
On some vehicles, when the system has
calculated that oil life has been diminished,
a CHANGE ENGINE OIL SOON message comes
on to indicate that an oil change is
necessary. Change the oil as soon as
possible within the next 1 000 km (600 mi).
It is possible that, if driving under the best
conditions, the oil life system might indicate
that an oil change is not necessary for up to
a year. The engine oil and filter must be
changed at least once a year and, at this
time, the system must be reset. For vehicles
without the CHANGE ENGINE OIL SOON
message, an oil change is needed when the
REMAINING OIL LIFE percentage is near 0%.
Your dealer has trained service people whowill perform this work and reset the system.
It is also important to check the oil regularly
over the course of an oil drain interval and
keep it at the proper level.
If the system is ever reset accidentally, the
oil must be changed at 5 000 km (3,000 mi)
since the last oil change. Remember to reset
the oil life system whenever the oil is
changed.
How to Reset the Engine Oil Life System
Reset the system whenever the engine oil is
changed so that the system can calculate
the next engine oil change. Always reset the
engine oil life to 100% after every oil
change. It will not reset itself. To reset the
engine oil life system:
1. Display the oil life percentage on the DIC. See Driver Information Center (DIC)
(Base Level) 0124 or
Driver Information Center (DIC) (Midlevel
and Uplevel) 0125.
2. Press the thumbwheel on the steering wheel, or the trip odometer reset stem if
the vehicle does not have DIC controls,
for several seconds. When the
confirmation message displays, select
YES. The oil life will change to 100%.
Page 335 of 463
Chevrolet Silverado 1500 Owner Manual (GMNA-Localizing-U.S./Canada/
Mexico/Paraguay-14632303) - 2021 - CRC - 11/9/20
332 Vehicle Care
The oil life system can also be reset as
follows:1. Display the oil life percentage on the DIC. See Driver Information Center (DIC)
(Base Level) 0124 or
Driver Information Center (DIC) (Midlevel
and Uplevel) 0125.
2. Fully press the accelerator pedal slowly three times within five seconds.
3. If the display changes to 100%, the system is reset.
If the vehicle has a CHANGE ENGINE OIL
SOON message and it comes back on when
the vehicle is started and/or the oil
life percentage is near 0%, the engine oil
life system has not been reset. Repeat the
procedure.
Automatic Transmission Fluid
When to Check and Change Automatic
Transmission Fluid
It is usually not necessary to check the
transmission fluid level. The only reason for
fluid loss is a transmission leak or
overheated transmission. This vehicle is not
equipped with a transmission fluid level
dipstick. There is a special procedure for
checking and changing the transmission fluid in these vehicles. Because this procedure is
difficult, this should be done at the dealer.
Contact the dealer for additional information
or the procedure can be found in the service
manual. See
Publication Ordering
Information 0436.
Caution
Use of the incorrect automatic
transmission fluid may damage the
vehicle, and the damage may not be
covered by the vehicle warranty. Always
use the correct automatic transmission
fluid. See Recommended Fluids and
Lubricants 0418.
Change the fluid and filter at the scheduled
maintenance intervals listed in Maintenance
Schedule 0409. Be sure to use the
transmission fluid listed in Recommended
Fluids and Lubricants 0418.
Engine Air Filter Life System
If equipped, this feature provides the engine
air filter’s remaining life and best timing for
a change. The timing to change an engine
air filter depends on driving and
environmental conditions.
When to Change the Engine Air Filter
When the Driver Information Center (DIC)
displays a message to replace the engine air
filter at the next oil change, follow this
timing.
When the DIC displays a message to replace
the engine air filter soon, replace the engine
air filter at the earliest convenience.
The system must be reset after the engine
air filter is changed.
If the DIC displays a message to check the
engine air filter system, see your dealer.
How to Reset the Engine Air Filter Life
System
To reset:
1. Place the vehicle in P (Park).
2. Display the Air Filter Life on the DIC. See Driver Information Center (DIC) (Base
Level) 0124 or
Driver Information Center (DIC) (Midlevel
and Uplevel) 0125.
3. Press
Ton the steering wheel, or press
the trip odometer reset stem if the
vehicle does not have DIC controls, to
move to the Reset/Disable display area.
Page 344 of 463
Chevrolet Silverado 1500 Owner Manual (GMNA-Localizing-U.S./Canada/
Mexico/Paraguay-14632303) - 2021 - CRC - 11/9/20
Vehicle Care 341
Brake Pedal Travel
See your dealer if the brake pedal does not
return to normal height, or if there is a
rapid increase in pedal travel. This could be
a sign that brake service may be required.
Replacing Brake System Parts
Always replace brake system parts with
new, approved replacement parts. If this is
not done, the brakes may not work
properly. The braking performance can
change in many ways if the wrong brake
parts are installed or if parts are improperly
installed.
Brake Pad Life System
When to Change Brake Pads
This vehicle has a system that estimates the
remaining life of the front and rear brake
pads. Brake pad life is displayed in the
Driver Information Center (DIC), along with
a percentage for each axle. The system must
be reset every time the brake pads are
changed.
When the system has determined that the
brake pads need to be replaced, a message
will display, which may include mileage
remaining.Brake pads should always be replaced as
complete axle sets.
How to Reset the Brake Pad Life System
The system will automatically detect when
significantly worn brake pads are replaced.
When the ignition is turned on after new
pads and wear sensors are installed, a
message will display. Follow the prompts to
reset the system.
The brake pad life system can also be
manually reset:
1. Display Brake Pad Life on the DIC. See Driver Information Center (DIC) (Base
Level) 0124 or
Driver Information Center (DIC) (Midlevel
and Uplevel) 0125.
2. Press the thumbwheel or the trip odometer reset stem if the vehicle does
not have DIC buttons. Select front or rear
pads as appropriate.
3. Select YES on the confirmation message, or press the trip odometer reset stem on
a base level DIC. Repeat for pads on the
other axle if they were also replaced.
How to Disable the Brake Pad Life
System
The brake pad life system can be turned off.
This may be necessary if aftermarket brake
pads without wear sensors are installed.
When the system is turned off, the front
and rear brake pad life percentages will not
display. However, the built-in wear
indicators that make a high-pitched warning
sound when the brake pads are worn can
still determine when the pads should be
replaced. See Brakes0340.
To turn off the brake pad life system: 1. Display Brake Pad Life on the DIC. See Driver Information Center (DIC) (Base
Level) 0124 or
Driver Information Center (DIC) (Midlevel
and Uplevel) 0125.
2. Select DISABLE.
To turn the brake pad life system back on,
follow the above steps but select ENABLE in
Step 2.
Page 348 of 463
Chevrolet Silverado 1500 Owner Manual (GMNA-Localizing-U.S./Canada/
Mexico/Paraguay-14632303) - 2021 - CRC - 11/9/20
Vehicle Care 345
3. Turn the ignition on.
For vehicles not equipped with the Stop/
Start system: 1. Install the negative battery cable clamp to the negative battery post.
2. Tighten the negative battery cable nut.
3. Turn the ignition on.
Four-Wheel Drive
Transfer Case
When to Check Lubricant
Refer to Maintenance Schedule 0409 to
determine when to check the lubricant.
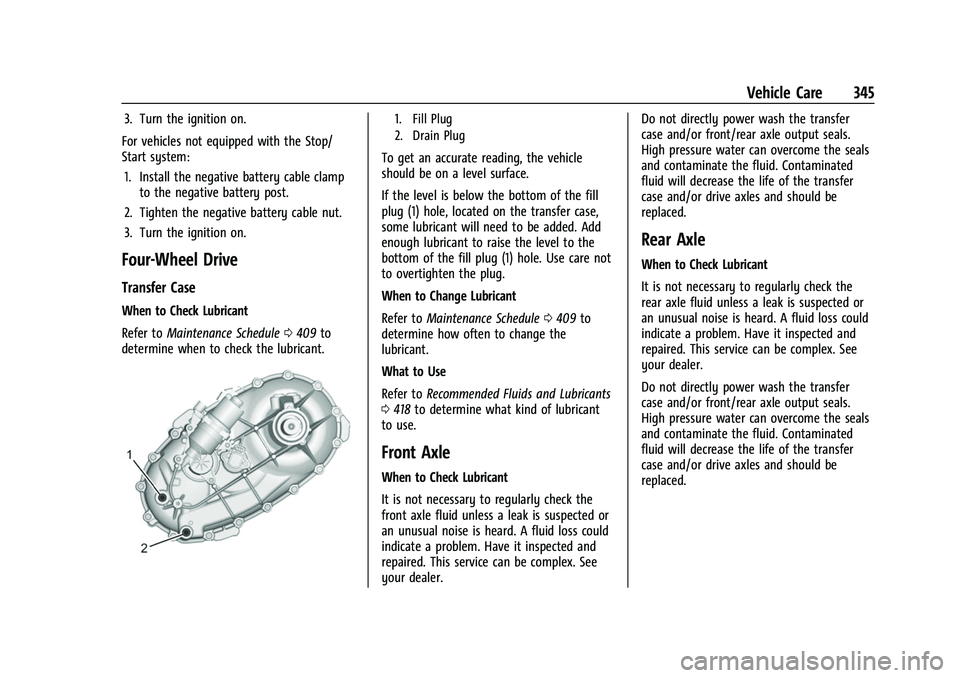
1. Fill Plug
2. Drain Plug
To get an accurate reading, the vehicle
should be on a level surface.
If the level is below the bottom of the fill
plug (1) hole, located on the transfer case,
some lubricant will need to be added. Add
enough lubricant to raise the level to the
bottom of the fill plug (1) hole. Use care not
to overtighten the plug.
When to Change Lubricant
Refer to Maintenance Schedule 0409 to
determine how often to change the
lubricant.
What to Use
Refer to Recommended Fluids and Lubricants
0 418 to determine what kind of lubricant
to use.
Front Axle
When to Check Lubricant
It is not necessary to regularly check the
front axle fluid unless a leak is suspected or
an unusual noise is heard. A fluid loss could
indicate a problem. Have it inspected and
repaired. This service can be complex. See
your dealer. Do not directly power wash the transfer
case and/or front/rear axle output seals.
High pressure water can overcome the seals
and contaminate the fluid. Contaminated
fluid will decrease the life of the transfer
case and/or drive axles and should be
replaced.
Rear Axle
When to Check Lubricant
It is not necessary to regularly check the
rear axle fluid unless a leak is suspected or
an unusual noise is heard. A fluid loss could
indicate a problem. Have it inspected and
repaired. This service can be complex. See
your dealer.
Do not directly power wash the transfer
case and/or front/rear axle output seals.
High pressure water can overcome the seals
and contaminate the fluid. Contaminated
fluid will decrease the life of the transfer
case and/or drive axles and should be
replaced.
Page 365 of 463
Chevrolet Silverado 1500 Owner Manual (GMNA-Localizing-U.S./Canada/
Mexico/Paraguay-14632303) - 2021 - CRC - 11/9/20
362 Vehicle Care
Winter Tires
This vehicle was not originally equipped
with winter tires. Winter tires are designed
for increased traction on snow and
ice-covered roads. Consider installing winter
tires on the vehicle if frequent driving on ice
or snow covered roads is expected. See your
dealer for details regarding winter tire
availability and proper tire selection. Also,
seeBuying New Tires 0376.
With winter tires, there may be decreased
dry road traction, increased road noise, and
shorter tread life. After changing to winter
tires, be alert for changes in vehicle
handling and braking.
If using winter tires:
.Use tires of the same brand and tread
type on all four wheel positions.
.Use only radial ply tires of the same size,
load range, and speed rating as the
original equipment tires.
Winter tires with the same speed rating as
the original equipment tires may not be
available for H, V, W, Y, and ZR speed rated
tires. If winter tires with a lower speed
rating are chosen, never exceed the tire's
maximum speed capability.
All-Terrain Tires
This vehicle may have all-terrain or
mud-terrain tires. These tires provide good
performance on most road surfaces, weather
conditions, and for off-road driving. See
Off-Road Driving 0215.
The tread pattern on these tires may wear
more unevenly than other tires. Consider
rotating the tires more frequently than at
12 000 km (7,500 mi) intervals if irregular
wear is noted when the tires are inspected.
See Tire Inspection 0374.
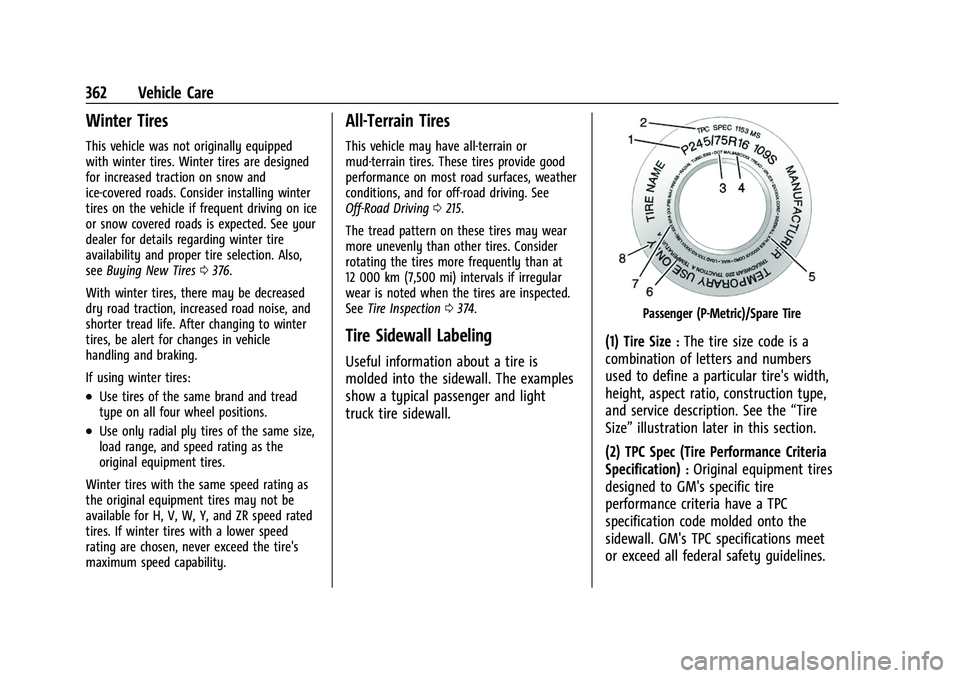
Tire Sidewall Labeling
Useful information about a tire is
molded into the sidewall. The examples
show a typical passenger and light
truck tire sidewall.
Passenger (P-Metric)/Spare Tire
(1) Tire Size:The tire size code is a
combination of letters and numbers
used to define a particular tire's width,
height, aspect ratio, construction type,
and service description. See the “Tire
Size” illustration later in this section.
(2) TPC Spec (Tire Performance Criteria
Specification)
:Original equipment tires
designed to GM's specific tire
performance criteria have a TPC
specification code molded onto the
sidewall. GM's TPC specifications meet
or exceed all federal safety guidelines.
Page 378 of 463
Chevrolet Silverado 1500 Owner Manual (GMNA-Localizing-U.S./Canada/
Mexico/Paraguay-14632303) - 2021 - CRC - 11/9/20
Vehicle Care 375
the tires have been rotated. SeeTire
Pressure 0367 and
Vehicle Load Limits 0222.
Reset the Tire Pressure Monitor System.
See Tire Pressure Monitor Operation
0 369.
Check that all wheel nuts are properly
tightened. See “Wheel Nut Torque”
under Capacities and Specifications
0 424.
{Warning
Rust or dirt on a wheel, or on the
parts to which it is fastened, can
cause wheel nuts to become loose
over time. The wheel could come off
and cause a crash. When changing a
wheel, remove any rust or dirt from
places where the wheel attaches to
the vehicle. In an emergency, a cloth
or paper towel can be used; however,
use a scraper or wire brush later to
remove all rust or dirt. Lightly coat the inner diameter of the
wheel hub opening with wheel bearing
grease after a wheel change or tire
rotation to prevent corrosion or rust
build-up.
{Warning
Do not apply grease to the wheel
mounting surface, wheel conical
seats, or the wheel nuts or bolts.
Grease applied to these areas could
cause a wheel to become loose or
come off, resulting in a crash.
When It Is Time for New Tires
Factors, such as maintenance, temperatures,
driving speeds, vehicle loading, and road
conditions affect the wear rate of the tires.
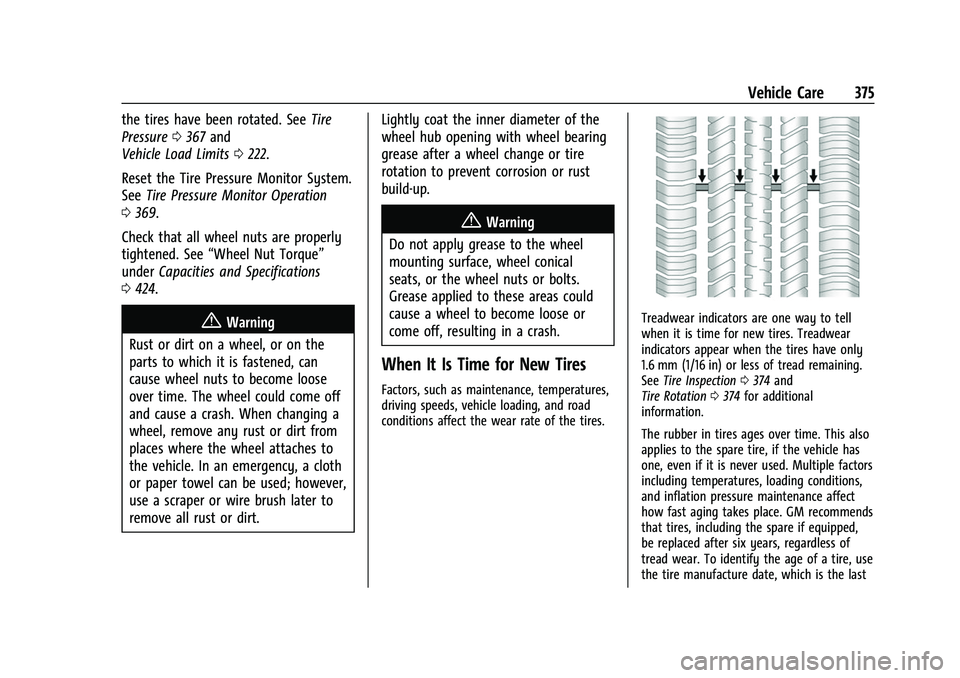
Treadwear indicators are one way to tell
when it is time for new tires. Treadwear
indicators appear when the tires have only
1.6 mm (1/16 in) or less of tread remaining.
See Tire Inspection 0374 and
Tire Rotation 0374 for additional
information.
The rubber in tires ages over time. This also
applies to the spare tire, if the vehicle has
one, even if it is never used. Multiple factors
including temperatures, loading conditions,
and inflation pressure maintenance affect
how fast aging takes place. GM recommends
that tires, including the spare if equipped,
be replaced after six years, regardless of
tread wear. To identify the age of a tire, use
the tire manufacture date, which is the last
Page 384 of 463
Chevrolet Silverado 1500 Owner Manual (GMNA-Localizing-U.S./Canada/
Mexico/Paraguay-14632303) - 2021 - CRC - 11/9/20
Vehicle Care 381
{Warning
Changing a tire can be dangerous. The
vehicle can slip off the jack and roll over
or fall causing injury or death. Find a
level place to change the tire. To help
prevent the vehicle from moving:1. Set the parking brake firmly.
2. Shift the vehicle to P (Park).
3. For vehicles with four-wheel drive with an N (Neutral) transfer case
position, be sure the transfer case is
in a drive gear —not in N (Neutral).
4. Turn off the engine and do not restart while the vehicle is raised.
5. Do not allow passengers to remain in the vehicle.
6. Place wheel blocks, if equipped, on both sides of the tire at the opposite
corner of the tire being changed.
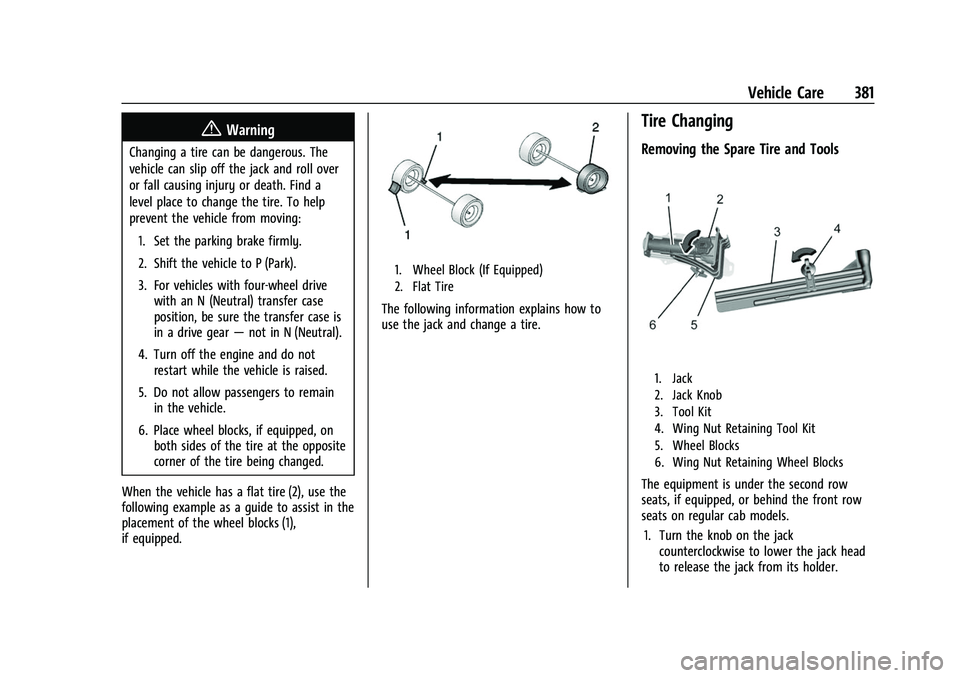
When the vehicle has a flat tire (2), use the
following example as a guide to assist in the
placement of the wheel blocks (1),
if equipped.
1. Wheel Block (If Equipped)
2. Flat Tire
The following information explains how to
use the jack and change a tire.
Tire Changing
Removing the Spare Tire and Tools
1. Jack
2. Jack Knob
3. Tool Kit
4. Wing Nut Retaining Tool Kit
5. Wheel Blocks
6. Wing Nut Retaining Wheel Blocks
The equipment is under the second row
seats, if equipped, or behind the front row
seats on regular cab models. 1. Turn the knob on the jack counterclockwise to lower the jack head
to release the jack from its holder.