2021 CHEVROLET SILVERADO 1500 Lights
[x] Cancel search: LightsPage 233 of 463
Chevrolet Silverado 1500 Owner Manual (GMNA-Localizing-U.S./Canada/
Mexico/Paraguay-14632303) - 2021 - CRC - 11/9/20
230 Driving and Operating
In an emergency, if the vehicle cannot be
pulled over and must be turned off while
driving:1. Push the key all the way in toward the steering column, then turn the key to
ACC/ACCESSORY.
2. Brake using firm and steady pressure. Do not pump the brakes repeatedly. This
may deplete power assist, requiring
increased brake pedal force.
3. Shift the vehicle to N (Neutral). This can be done while the vehicle is moving.
Continue braking and steer the vehicle to
a safe location.
4. Come to a complete stop.
5. Shift to P (Park).
6. Push the key all the way in toward the steering column (1), then turn the
ignition to LOCK/OFF (2).
7. Set the parking brake. See Electric
Parking Brake 0246.
8. Remove the key.
9. Release the brake pedal.Caution
Use the correct key, make sure it is all
the way in —or pushed all the way in
toward the steering column when turning
off the vehicle —and turn it only with
your hand.
1 (ACC/ACCESSORY) : This position allows
features such as the infotainment system to
operate while the vehicle is off. It also
unlocks the steering column, if equipped
with a locking steering column. Use this
position if the vehicle must be pushed or
towed. See Retained Accessory Power (RAP)
0 235.
From ON/RUN, push the key all the way in
toward the steering column, then turn the
key to ACC/ACCESSORY.
If the key is left in ACC/ACCESSORY with the
engine off, the battery could drain and the
vehicle may not start.
A warning chime will sound when the driver
door is opened and the key is in the
ignition.
2 (ON/RUN) : This position can be used to
operate the electrical accessories and to
display some instrument cluster warning
and indicator lights. This position can also be used for service and diagnostics, and to
verify the proper operation of the
malfunction indicator lamp as may be
required for emission inspection purposes.
The switch stays in this position when the
engine is running. The transmission is also
unlocked in this position.
If the key is left in ON/RUN with the engine
off, the battery could drain and the vehicle
may not start.
3 (START) :
This is the position that starts
the engine. When the engine starts, release
the key. The ignition returns to ON/RUN for
driving.
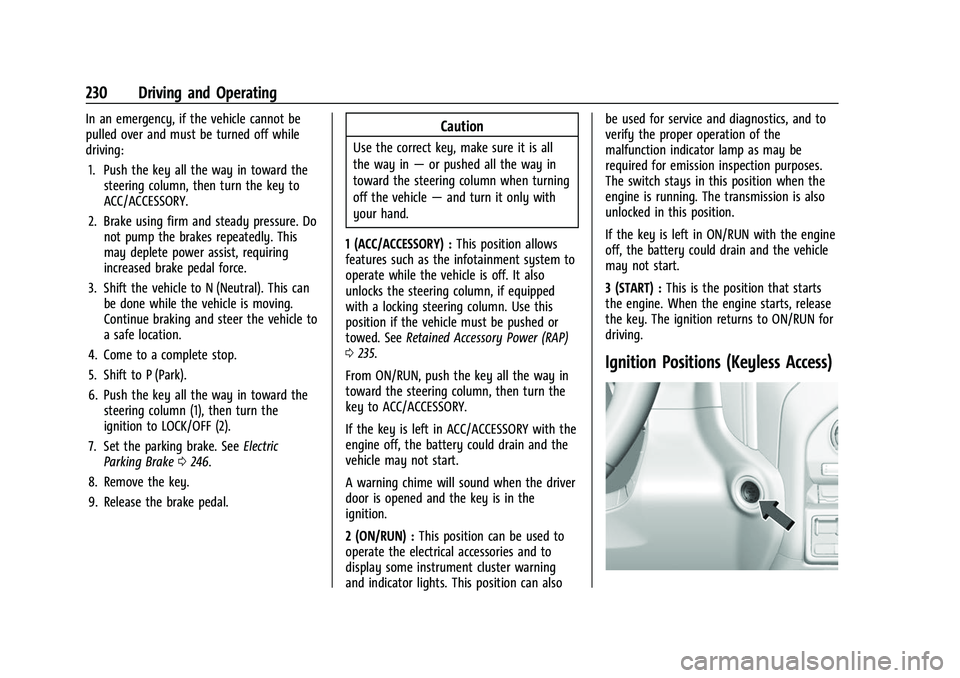
Ignition Positions (Keyless Access)
Page 234 of 463
Chevrolet Silverado 1500 Owner Manual (GMNA-Localizing-U.S./Canada/
Mexico/Paraguay-14632303) - 2021 - CRC - 11/9/20
Driving and Operating 231
Vehicles equipped with Keyless Access have
pushbutton starting.
The Remote Keyless Entry (RKE) transmitter
must be in the vehicle for the system to
operate. If the pushbutton start is not
working, the vehicle may be near a strong
radio antenna signal causing interference to
the Keyless Access system. SeeRemote
Keyless Entry (RKE) System Operation (Key
Access) 010 or
Remote Keyless Entry (RKE) System
Operation (Keyless Access) 013.
To shift out of P (Park), the ignition must be
on or in Service Mode, and the brake pedal
must be applied.
{Warning
Turning off the vehicle while moving may
cause loss of power assist in the brake
and steering systems and disable the
airbags. While driving, only shut the
vehicle off in an emergency.
Stopping the Engine/LOCK/OFF (No Indicator
Lights) : When the vehicle is stopped, press
ENGINE START/STOP once to turn the
engine off. If the vehicle is in P (Park), the ignition will
turn off, and Retained Accessory Power (RAP)
will remain active. See
Retained Accessory
Power (RAP) 0235.
If the vehicle is not in P (Park), the ignition
will return to ACC/ACCESSORY and display
the message SHIFT TO PARK in the Driver
Information Center (DIC). When the vehicle is
shifted into P (Park), the ignition system will
turn off.
The vehicle may have an electric steering
column lock. The lock is activated when the
ignition is turned off and driver door is
opened. A sound may be heard as the lock
actuates or releases. The steering column
lock may not release with the wheels turned
off center. If this happens, the vehicle may
not start. Move the steering wheel from left
to right while attempting to start the
vehicle. If this does not work, the vehicle
needs service.
Unless an emergency exists, do not turn the
engine off when the vehicle is moving. This
will cause a loss of power assist in the brake
and steering systems and disable the
airbags. If the vehicle must be shut off in an
emergency:
1. If the vehicle cannot be pulled over, and must be shut off while driving, press and
hold ENGINE START/STOP button for
longer than two seconds, or press twice
in five seconds.
2. Brake using a firm and steady pressure. Do not pump the brakes repeatedly. This
may deplete power assist, requiring
increased brake pedal force.
3. Shift the vehicle to N (Neutral). This can be done while the vehicle is moving.
After shifting to N (Neutral), firmly apply
the brakes and steer the vehicle to a
safe location.
4. Come to a complete stop, shift to P (Park), and make sure engine is off.
The shift lever must be in P (Park) to
turn the ignition off.
5. Set the parking brake. See Electric
Parking Brake 0246.
Page 277 of 463
Chevrolet Silverado 1500 Owner Manual (GMNA-Localizing-U.S./Canada/
Mexico/Paraguay-14632303) - 2021 - CRC - 11/9/20
274 Driving and Operating
right or three Safety Alert Seat pulses occur
on the left or right side, depending on the
direction of the detected vehicle.
Use caution while backing up when towing
a trailer, as the RCTA detection zones that
extend out from the back of the vehicle do
not move further back when a trailer is
towed.
RCTA is disabled when the trailer connection
status is displayed.
RCTA can be turned off. See“Collision/
Detection Systems” underVehicle
Personalization 0131.
Turning the Features On or Off
PressXon the center stack to turn on or
off the Front and Rear Park Assist. The
indicator light next to the button comes on
when the features are on and turns off
when the features have been disabled. Front and Rear Park Assist can be turned
Off, On, or On with Towbar. See
“Park
Assist” underVehicle Personalization 0131.
If Park Assist is turned off through vehicle
personalization, the Park Assist button will
be disabled. To turn Park Assist on again,
select On in vehicle personalization. The On
with Towbar setting allows Park Assist to
work properly with a trailer hitch. Some
larger trailer hitches may not be compatible.
Turn off Park Assist when towing a trailer.
To turn the RPA symbols on or off, see
“Rear Camera Park Assist Symbols” under
Vehicle Personalization 0131.
Assistance Systems for Driving
If equipped, when driving the vehicle in a
forward gear, Forward Collision Alert (FCA),
Lane Departure Warning (LDW), Lane Keep
Assist (LKA), Side Blind Zone Alert (SBZA),
Lane Change Alert (LCA), Automatic
Emergency Braking (AEB), and/or the Front
Pedestrian Braking (FPB) System can help to
avoid a crash or reduce crash damage.
Forward Collision Alert (FCA)
System
If equipped, the FCA system may help to
avoid or reduce the harm caused by
front-end crashes. When approaching a
vehicle ahead too quickly, FCA provides a
red flashing alert on the windshield and
rapidly beeps or pulses the driver seat. FCA
also lights an amber visual alert if following
another vehicle much too closely.
FCA detects vehicles within a distance of
approximately 60 m (197 ft) and operates at
speeds above 8 km/h (5 mph).
{Warning
FCA is a warning system and does not
apply the brakes. When approaching a
slower-moving or stopped vehicle ahead
too rapidly, or when following a vehicle
too closely, FCA may not provide a
warning with enough time to help avoid
a crash. It also may not provide any
warning at all. FCA does not warn of
pedestrians, animals, signs, guardrails,
bridges, construction barrels, or other
(Continued)
Page 283 of 463
Chevrolet Silverado 1500 Owner Manual (GMNA-Localizing-U.S./Canada/
Mexico/Paraguay-14632303) - 2021 - CRC - 11/9/20
280 Driving and Operating
LCA warning display will light up in the
corresponding outside side mirror and will
flash if the turn signal is on.
{Warning
LCA does not alert the driver to vehicles
outside of the system detection zones,
pedestrians, bicyclists, or animals. It may
not provide alerts when changing lanes
under all driving conditions. Failure to use
proper care when changing lanes may
result in injury, death, or vehicle damage.
Before making a lane change, always
check mirrors, glance over your shoulder,
and use the turn signals.
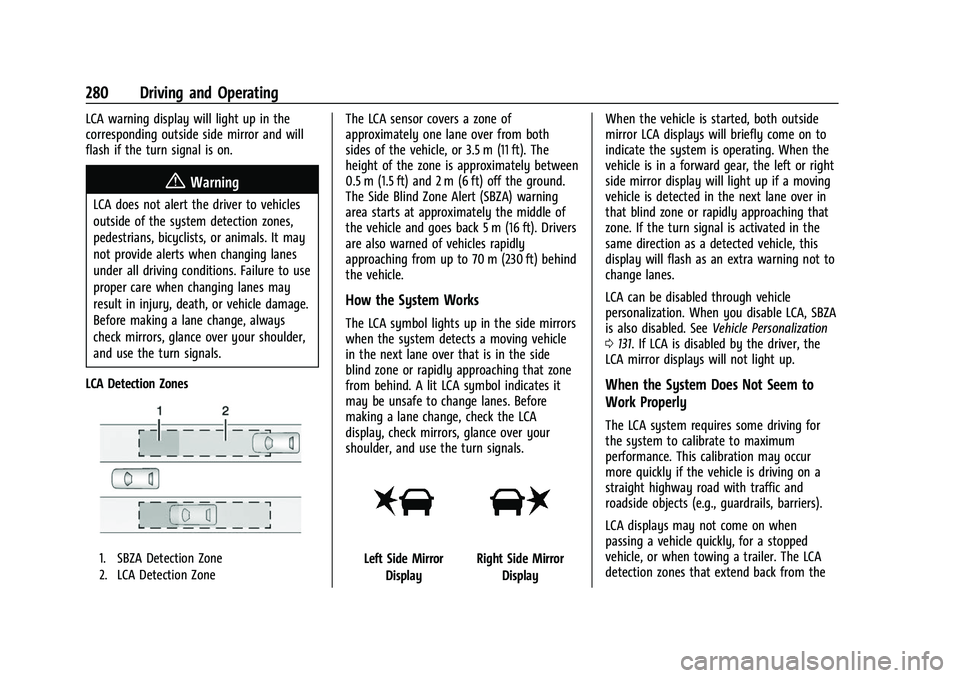
LCA Detection Zones
1. SBZA Detection Zone
2. LCA Detection Zone
The LCA sensor covers a zone of
approximately one lane over from both
sides of the vehicle, or 3.5 m (11 ft). The
height of the zone is approximately between
0.5 m (1.5 ft) and 2 m (6 ft) off the ground.
The Side Blind Zone Alert (SBZA) warning
area starts at approximately the middle of
the vehicle and goes back 5 m (16 ft). Drivers
are also warned of vehicles rapidly
approaching from up to 70 m (230 ft) behind
the vehicle.
How the System Works
The LCA symbol lights up in the side mirrors
when the system detects a moving vehicle
in the next lane over that is in the side
blind zone or rapidly approaching that zone
from behind. A lit LCA symbol indicates it
may be unsafe to change lanes. Before
making a lane change, check the LCA
display, check mirrors, glance over your
shoulder, and use the turn signals.
Left Side Mirror DisplayRight Side Mirror Display When the vehicle is started, both outside
mirror LCA displays will briefly come on to
indicate the system is operating. When the
vehicle is in a forward gear, the left or right
side mirror display will light up if a moving
vehicle is detected in the next lane over in
that blind zone or rapidly approaching that
zone. If the turn signal is activated in the
same direction as a detected vehicle, this
display will flash as an extra warning not to
change lanes.
LCA can be disabled through vehicle
personalization. When you disable LCA, SBZA
is also disabled. See
Vehicle Personalization
0 131. If LCA is disabled by the driver, the
LCA mirror displays will not light up.
When the System Does Not Seem to
Work Properly
The LCA system requires some driving for
the system to calibrate to maximum
performance. This calibration may occur
more quickly if the vehicle is driving on a
straight highway road with traffic and
roadside objects (e.g., guardrails, barriers).
LCA displays may not come on when
passing a vehicle quickly, for a stopped
vehicle, or when towing a trailer. The LCA
detection zones that extend back from the
Page 309 of 463
Chevrolet Silverado 1500 Owner Manual (GMNA-Localizing-U.S./Canada/
Mexico/Paraguay-14632303) - 2021 - CRC - 11/9/20
306 Driving and Operating
trailer connections or trailer brakes could
appear on the DIC. The effects of these
aftermarket devices may have on vehicle
handling or trailer brake performance is not
known.
{Warning
Use of aftermarket electronic trailer sway
control devices could result in reduced
trailer brake performance, loss of trailer
brakes, or other malfunctions, and result
in a crash. You or others could be
seriously injured or killed. Before using
one of these devices:
.Ask the device or trailer manufacturer
if the device has been thoroughly
tested for compatibility with the
make, model, and year of your vehicle
and any optional equipment installed
on your vehicle.
.Before driving, check the trailer brakes
are working properly, if equipped.
Drive the vehicle with the trailer
attached on a level road surface that
is free of traffic at about 32-40 km/h
(20-25 mph) and fully apply the(Continued)
Warning (Continued)
manual trailer brake apply lever. Also,
check the trailer brake lamps and
other lamps are functioning correctly.
.If the trailer brakes are not operating
properly at any time, or if a DIC
message indicates problems with the
trailer connections or trailer brakes,
carefully pull the vehicle over to the
side of the road when traffic
conditions allow.
Trailer Tires
Special Trailer (ST) tires differ from vehicle
tires. Trailer tires are designed with stiff
sidewalls to help prevent sway and to
support heavy loads. These features can
make it difficult to determine if the trailer
tire pressures are low only based on a visual
inspection.
Always check all trailer tire pressures before
each trip when the tires are cool. Low trailer
tire pressure is a leading cause of trailer tire
blow-outs. If the vehicle is equipped with a trailer tire
pressure monitoring system, see the trailer
tire pressure monitoring system description
and the trailering app.
Trailer tires deteriorate over time. The trailer
tire sidewall will show the week and year
the tire was manufactured. Many trailer tire
manufacturers recommend replacing tires
more than six years old.
Overloading is another leading cause of
trailer tire blow-outs. Never load your trailer
with more weight than the tires are
designed to support. The load rating is
located on the trailer tire sidewall.
Always know the maximum speed rating for
the trailer tires before driving. This may be
significantly lower than the vehicle tire
speed rating. The speed rating may be on
the trailer tire sidewall. If the speed rating is
not shown, the default trailer tire speed
rating is 105 km/h (65 mph).
Trailering App
Trailer Lights App
If equipped, the Trailer Lights App is on the
Home Page of the infotainment display.
Page 310 of 463
Chevrolet Silverado 1500 Owner Manual (GMNA-Localizing-U.S./Canada/
Mexico/Paraguay-14632303) - 2021 - CRC - 11/9/20
Driving and Operating 307
Touch Start to cycle the trailer lamps on and
off to determine if they are working. The
test follows this sequence:1. The running lights turn on first and remain on throughout the sequence.
2. The brake lights turn on for about two seconds.
3. The left turn signal light flashes three times.
4. The right turn signal light flashes three times.
5. The reverse lights turn on for about two seconds.
6. Steps 2–5 repeat for approximately one minute and 45 seconds, or until the
test deactivates.
Touch Stop to stop the test. The test will
automatically end after one minute and
45 seconds.
The sequence also deactivates when any of
the following occur:
.The ignition is turned off.
.The transmission is shifted out of P (Park).
.The brake pedal is pressed.
.The turn signal is activated.
.The hazard warning lights are activated.
Trailering App
If equipped, the Trailering App is on the
Home Page of the infotainment display.
If equipped this feature allows profiles for
connected trailers to be created to view
status, to store and track trailer usage
information, and to set up towing assistance
features.
The Trailering App Preview will appear when
the Trailering App is opened for the first
time from the Home Page. Touch GET
STARTED in the Trailering App to go into
the app.
When a trailer is electrically connected and
a trailer profile has not been created, there
will be an option to create a profile, use a
guest profile, or select Accessory/No trailer.
After the pop-up is displayed three times,
Don’t Remind Me will display and touching
that will turn off the trailer detection
pop-up. To turn the Trailer Detection Alert
on, select ON in the Settings tab.
When a trailer is electrically connected and
after a Trailer Profile has been created, the
trailer detection pop-up will appear with a
list of all of the custom Trailer Profiles made
on the vehicle. To load an existing Trailer
Profile, select one of the Trailer Profiles listed, or load the Guest Trailer Profile by
selecting GUEST TRAILER. Touching
Accessory/No trailer will select Accessory/No
trailer as the active Trailer Profile and will
dismiss the pop- up. Shifting the vehicle
from P (Park) will select Guest Trailer as the
active Trailer Profile and will dismiss the
pop-up.
Create a Trailer Profile
1. Touch Create Profile on the trailer detection pop-up or touch + Add Trailer
Profile in the Trailering App.
2. Create a name for the trailer.
3. Select the trailer type.
4. Select Save Profile.
A pop-up will indicate the setup is complete.
Touch DONE to complete the process or
touch TRAILER FEATURE SETUP to set up the
Tow/Haul Mode reminder, Trailer Tire
Pressure Monitoring System, if equipped,
maintenance reminders, or towing
assistance, if equipped.
Import a Trailer Profile
A trailer profile saved to an OnStar account
can be imported to the vehicle. 1. Touch + Add Trailer Profile in the Trailering App
Page 311 of 463
Chevrolet Silverado 1500 Owner Manual (GMNA-Localizing-U.S./Canada/
Mexico/Paraguay-14632303) - 2021 - CRC - 11/9/20
308 Driving and Operating
2. Touch Import Profile on the pop-up.
3. Select a trailer profile from the list.
4. Touch IMPORT.
A pop-up will indicate the import was
successful. Touch OK to return to the trailer
list and select the trailer profile. The Tow/
Haul Mode reminder, Brake Gain Setting and
Trailer Tire Pressure sensor learning,
if equipped, do not import.
Trailer Feature Setup
Tow/Haul Mode Reminder
To turn the Tow/Haul Mode Reminder
setting on, touch Yes. To turn it off,
touch No.
Trailer Tire Pressure Setup
If the Trailer Tire Pressure Monitoring
System (TTPMS) is detected, touch the Tire
Pressure Monitoring icon to set up tire
pressure monitoring. Touch Yes to set up
the sensors or touch No to return to the
previous screen.
The trailer tire pressure sensors can transmit
up to 7 m (23 feet) from the hitch receiver of
the vehicle. A trailer must be electrically connected to
the vehicle before starting the
sensor-to-vehicle learn process.
After selecting Start from the Learn Sensors
screen, use the Tool Method or the Manual
Method (described below) to learn each tire
sensor, during which the current tire number
will be highlighted.
Each sensor has a minimum of two minutes
to learn, shown by a timer. After a sensor is
learned, a checkmark appears next to the
tire, the vehicle horn will sound, the
vehicle’s brake lamps will flash, and all
working trailer lamps will flash. It then
moves to the next sensor.
To cancel the process touch Stop.
The recommended tire pressure must be
entered for the trailer tires. This allows the
vehicle to alert when the tire pressure is
high or low.
TTPMS must learn the location of the
installed tire sensors to show correct air
pressure and temperature for each tire. To
set up, use one of the following options or
see a tire or trailer dealer for service. The
learning process must be repeated when thetrailer tires are rotated or replaced. See
“Editing a Trailer Profile”
later in this section
for tire pressure sensor relearn information.
Tool Method: A TTPMS activation tool can
be purchased separately to learn the sensor
locations.
Manual Method: Without the tool, the air
pressure can be increased or decreased in
each tire for 10 seconds. Do not exceed the
maximum inflation pressure found on the
tire sidewalls. Make sure to re-adjust tire
pressure to the recommended level when
the process is complete.
Sensor Learning Steps
To complete the sensor-to-vehicle learn
process:
1. Touch Start on the Learn Sensors screen. The horn chirps twice and the Learning
Active screen appears on the
infotainment display.
2. Start with the driver side front trailer tire.
3. Activate the tool near the valve stem or adjust the air pressure of this tire until
the horn chirps and all working vehicle
and trailer lights flash.
Page 314 of 463
Chevrolet Silverado 1500 Owner Manual (GMNA-Localizing-U.S./Canada/
Mexico/Paraguay-14632303) - 2021 - CRC - 11/9/20
Driving and Operating 311
trailer is connected. When a trailer is
connected and the ignition is off, the
Trailering App System will periodically pulse
the lighting circuits of the trailer to verify it
is still connected. The trailer lights may
periodically flash as a result of this trailer
connection detection. These flashes may be
more visible in dark ambient light
environments. The flashing or flickering
lights are a normal condition and the
Trailering App System has built-in
protections to prevent the battery from
draining. When Theft Alert is also enabled
the frequency and pattern of this flashing
will change.
Connection Problem
If any of the trailer connections are lost, a
message about the connection issue will
appear on the Driver Information Center
(DIC). The infotainment display will also
show the connection issue in the Connection
Status view.
If a trailer connection is not detected, the
Trailering App will not display the
Connection Status screen.Connection Trailer Lighting Faults Detected
The Trailering App System monitors for
electrical faults on the trailer lights.
A message about the lighting issue will
appear on the DIC. The infotainment display
will also show the lighting issue in the
Connection Status view. Repair your trailer
lights if needed. A trailer lighting issue is
not covered by your GM warranty.
Diagnose View
Touch Diagnose to see more information
about the connection problem.
This view will display the names of the
trailer connector pins, a graphic of the trailer
connector, and a graphic of the back of the
trailer.
Any connector pin that failed will be amber
color, and the location of the corresponding
connection will be highlighted on the
graphic of the back of the trailer.
The Running Lights connection may not
detect partial outages. Activate the light test
to check all trailer lamps. See
“Light Test”
following. Light Test
Touch Start Light Test to cycle the trailer
lights on and off to determine if they are
working. The test follows this sequence:
1. The running lights turn on first and remain on throughout the sequence.
2. The brake lights turn on for about two seconds.
3. The left turn signal light flashes three times.
4. The right turn signal light flashes three times.
5. The reverse lights turn on for about two seconds.
6. Steps 2–5 repeat for approximately one minute and 45 seconds, or until the
test deactivates.
Touch Stop to stop the test. The test will
automatically end after one minute and
45 seconds.
The sequence also deactivates when any of
the following occur:
.The ignition is turned off.
.The transmission is shifted out of P (Park).
.The brake pedal is pressed.
.The turn signal is activated.