2021 CHEVROLET SILVERADO 1500 steering wheel
[x] Cancel search: steering wheelPage 66 of 463
Chevrolet Silverado 1500 Owner Manual (GMNA-Localizing-U.S./Canada/
Mexico/Paraguay-14632303) - 2021 - CRC - 11/9/20
Seats and Restraints 63
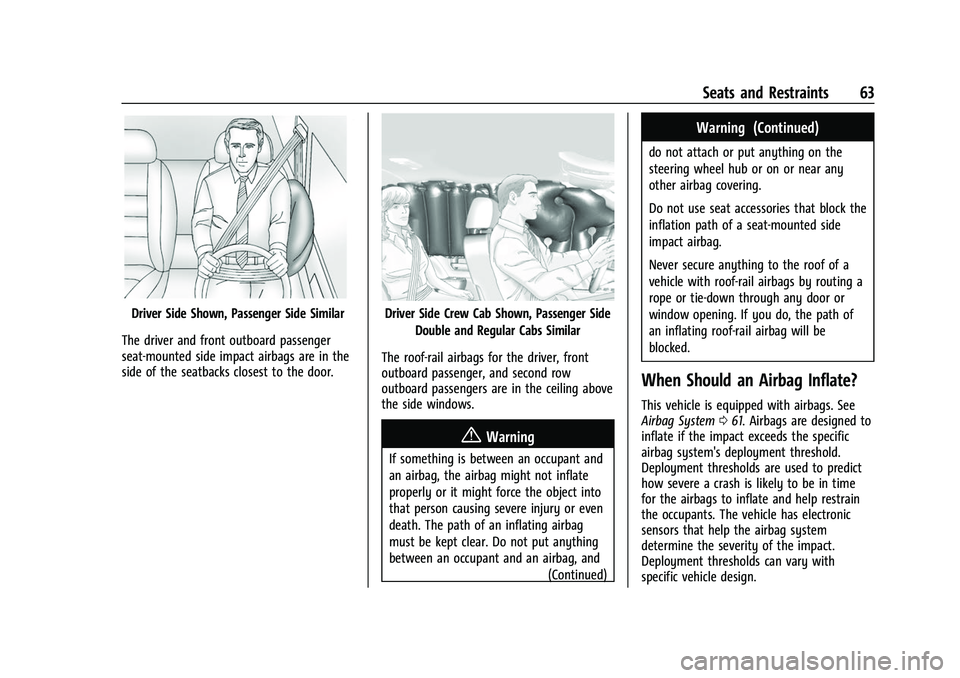
Driver Side Shown, Passenger Side Similar
The driver and front outboard passenger
seat-mounted side impact airbags are in the
side of the seatbacks closest to the door.Driver Side Crew Cab Shown, Passenger Side Double and Regular Cabs Similar
The roof-rail airbags for the driver, front
outboard passenger, and second row
outboard passengers are in the ceiling above
the side windows.
{Warning
If something is between an occupant and
an airbag, the airbag might not inflate
properly or it might force the object into
that person causing severe injury or even
death. The path of an inflating airbag
must be kept clear. Do not put anything
between an occupant and an airbag, and (Continued)
Warning (Continued)
do not attach or put anything on the
steering wheel hub or on or near any
other airbag covering.
Do not use seat accessories that block the
inflation path of a seat-mounted side
impact airbag.
Never secure anything to the roof of a
vehicle with roof-rail airbags by routing a
rope or tie‐down through any door or
window opening. If you do, the path of
an inflating roof-rail airbag will be
blocked.
When Should an Airbag Inflate?
This vehicle is equipped with airbags. See
Airbag System061. Airbags are designed to
inflate if the impact exceeds the specific
airbag system's deployment threshold.
Deployment thresholds are used to predict
how severe a crash is likely to be in time
for the airbags to inflate and help restrain
the occupants. The vehicle has electronic
sensors that help the airbag system
determine the severity of the impact.
Deployment thresholds can vary with
specific vehicle design.
Page 67 of 463
Chevrolet Silverado 1500 Owner Manual (GMNA-Localizing-U.S./Canada/
Mexico/Paraguay-14632303) - 2021 - CRC - 11/9/20
64 Seats and Restraints
Frontal airbags are designed to inflate in
moderate to severe frontal or near frontal
crashes to help reduce the potential for
severe injuries, mainly to the driver's or
front outboard passenger's head and chest.
Whether the frontal airbags will or should
inflate is not based primarily on how fast
the vehicle is traveling. It depends on what
is hit, the direction of the impact, and how
quickly the vehicle slows down.
Frontal airbags may inflate at different crash
speeds depending on whether the vehicle
hits an object straight on or at an angle,
and whether the object is fixed or moving,
rigid or deformable, narrow or wide.
Frontal airbags are not intended to inflate
during vehicle rollovers, rear impacts,
or many side impacts.
In addition, the vehicle has advanced
technology frontal airbags. Advanced
technology frontal airbags adjust the
restraint according to crash severity.
Seat-mounted side impact airbags are
designed to inflate in moderate to severe
side crashes depending on the location of
the impact. Seat-mounted side impact
airbags are not designed to inflate in frontal
impacts, near frontal impacts, rollovers,or rear impacts. A seat-mounted side impact
airbag is designed to inflate on the side of
the vehicle that is struck.
Roof-rail airbags are designed to inflate in
moderate to severe side crashes depending
on the location of the impact. In addition,
these roof-rail airbags are designed to inflate
during a rollover or in a severe frontal
impact. Roof-rail airbags are not designed to
inflate in rear impacts. Both roof-rail airbags
will inflate when either side of the vehicle is
struck or if the sensing system predicts that
the vehicle is about to roll over on its side,
or in a severe frontal impact.
In any particular crash, no one can say
whether an airbag should have inflated
simply because of the vehicle damage or
repair costs.
What Makes an Airbag Inflate?
In a deployment event, the sensing system
sends an electrical signal triggering a release
of gas from the inflator. Gas from the
inflator fills the airbag causing the bag to
break out of the cover. The inflator, the
airbag, and related hardware are all part of
the airbag module.
For airbag locations, see
Where Are the
Airbags? 062.
How Does an Airbag Restrain?
In moderate to severe frontal or near frontal
collisions, even belted occupants can contact
the steering wheel or the instrument panel.
In moderate to severe side collisions, even
belted occupants can contact the inside of
the vehicle.
Airbags supplement the protection provided
by seat belts by distributing the force of the
impact more evenly over the
occupant's body.
Rollover capable roof-rail airbags are
designed to help contain the head and chest
of occupants in the outboard seating
positions in the first and second rows. The
rollover capable roof-rail airbags are
designed to help reduce the risk of full or
partial ejection in rollover events, although
no system can prevent all such ejections.
But airbags would not help in many types
of collisions, primarily because the
occupant's motion is not toward those
airbags. See When Should an Airbag Inflate?
0 63.
Airbags should never be regarded as
anything more than a supplement to seat
belts.
Page 73 of 463
Chevrolet Silverado 1500 Owner Manual (GMNA-Localizing-U.S./Canada/
Mexico/Paraguay-14632303) - 2021 - CRC - 11/9/20
70 Seats and Restraints
.Front seats, including stitching, seams,
or zippers
.Seat belts
.Steering wheel, instrument panel,
overhead console, ceiling trim, or pillar
garnish trim
.Inner door seals, including speakers
Your dealer and the service manual have
information about the location of the airbag
modules and sensors, sensing and diagnostic
module, and airbag wiring along with the
proper replacement procedures.
In addition, the vehicle has a passenger
sensing system for the front outboard
passenger position, which includes sensors
that are part of the passenger seat. The
passenger sensing system may not operate
properly if the original seat trim is replaced
with non-GM covers, upholstery, or trim; or
with GM covers, upholstery, or trim
designed for a different vehicle. Any object,
such as an aftermarket seat heater or a
comfort-enhancing pad or device, installed
under or on top of the seat fabric, could
also interfere with the operation of the
passenger sensing system. This could either
prevent proper deployment of the passenger
airbag(s) or prevent the passenger sensing system from properly turning off the
passenger airbag(s). See
Passenger Sensing
System 066.
If the vehicle has rollover roof-rail airbags,
see Different Size Tires and Wheels 0377 for
additional important information.
If a snow plow is added to the vehicle, the
airbags should still work properly. The
airbag systems were designed to work
properly under a wide range of conditions,
including snow plowing with vehicles that
have the optional snow plow prep package
(RPO VYU). Do not change or defeat the
snow plow's “tripping mechanism.” If you
do, it can damage the snow plow and the
vehicle, and may cause an airbag
deployment.
If the vehicle must be modified because you
have a disability and have questions about
whether the modifications will affect the
vehicle's airbag system, or if you have
questions about whether the airbag system
will be affected if the vehicle is modified for
any other reason, call Customer Assistance.
See Customer Assistance Offices 0430.
Airbag System Check
The airbag system does not need regularly
scheduled maintenance or replacement.
Make sure the airbag readiness light is
working. See Airbag Readiness Light 0114.
Caution
If an airbag covering is damaged, opened,
or broken, the airbag may not work
properly. Do not open or break the airbag
coverings. If there are any opened or
broken airbag coverings, have the airbag
covering and/or airbag module replaced.
For the location of the airbags, see Where
Are the Airbags? 062. See your dealer
for service.
Page 102 of 463

Chevrolet Silverado 1500 Owner Manual (GMNA-Localizing-U.S./Canada/
Mexico/Paraguay-14632303) - 2021 - CRC - 11/9/20
Instruments and Controls 99
Instruments and Controls
Controls
Steering Wheel Adjustment . . . . . . . . . . . 100
Steering Wheel Controls . . . . . . . . . . . . . . 100
Heated Steering Wheel . . . . . . . . . . . . . . . . 100
Horn . . . . . . . . . . . . . . . . . . . . . . . . . . . . . . . . . . . 101
Windshield Wiper/Washer . . . . . . . . . . . . . 101
Compass . . . . . . . . . . . . . . . . . . . . . . . . . . . . . . . 102
Clock . . . . . . . . . . . . . . . . . . . . . . . . . . . . . . . . . . 102
Power Outlets . . . . . . . . . . . . . . . . . . . . . . . . . 102
Wireless Charging . . . . . . . . . . . . . . . . . . . . . 103
Warning Lights, Gauges, and Indicators
Warning Lights, Gauges, andIndicators . . . . . . . . . . . . . . . . . . . . . . . . . . . . 106
Instrument Cluster . . . . . . . . . . . . . . . . . . . . 106
Speedometer . . . . . . . . . . . . . . . . . . . . . . . . . . 110
Odometer . . . . . . . . . . . . . . . . . . . . . . . . . . . . . . 110
Trip Odometer . . . . . . . . . . . . . . . . . . . . . . . . . 110
Tachometer . . . . . . . . . . . . . . . . . . . . . . . . . . . . 110
Fuel Gauge . . . . . . . . . . . . . . . . . . . . . . . . . . . . 110
Engine Oil Pressure Gauge . . . . . . . . . . . . . 111
Engine Coolant Temperature Gauge . . . . 112
Voltmeter Gauge . . . . . . . . . . . . . . . . . . . . . . . 113
Seat Belt Reminders . . . . . . . . . . . . . . . . . . . . 113
Airbag Readiness Light . . . . . . . . . . . . . . . . . 114
Passenger Airbag Status Indicator . . . . . . 115
Charging System Light . . . . . . . . . . . . . . . . . 115 Malfunction Indicator Lamp (Check
Engine Light) . . . . . . . . . . . . . . . . . . . . . . . . . 116
Brake System Warning Light . . . . . . . . . . . 117
Electric Parking Brake Light . . . . . . . . . . . . 118
Service Electric Parking Brake Light . . . . 118
Antilock Brake System (ABS) Warning Light . . . . . . . . . . . . . . . . . . . . . . . . . . . . . . . . . 118
Four-Wheel-Drive Light . . . . . . . . . . . . . . . . . 118
Tow/Haul Mode Light . . . . . . . . . . . . . . . . . 119
Hill Descent Control Light . . . . . . . . . . . . . . 119
Lane Keep Assist (LKA) Light . . . . . . . . . . . 119
Vehicle Ahead Indicator . . . . . . . . . . . . . . . . 119
Pedestrian Ahead Indicator . . . . . . . . . . . . 119
Traction Off Light . . . . . . . . . . . . . . . . . . . . . . 120
Traction Control System (TCS)/Electronic Stability Control Light . . . . . . . . . . . . . . . 120
Electronic Stability Control (ESC) Off Light . . . . . . . . . . . . . . . . . . . . . . . . . . . . . . . . . 120
Engine Coolant Temperature Warning Light . . . . . . . . . . . . . . . . . . . . . . . . . . . . . . . . . 121
Driver Mode Control Light . . . . . . . . . . . . . 121
Tire Pressure Light . . . . . . . . . . . . . . . . . . . . . 122
Engine Oil Pressure Light (Uplevel Cluster) . . . . . . . . . . . . . . . . . . . . . . . . . . . . . . 122
Low Fuel Warning Light . . . . . . . . . . . . . . . . 122
Security Light . . . . . . . . . . . . . . . . . . . . . . . . . . 122
High-Beam On Light . . . . . . . . . . . . . . . . . . . 123
Front Fog Lamp Light . . . . . . . . . . . . . . . . . . 123
Lamps On Reminder . . . . . . . . . . . . . . . . . . . 123
Cruise Control Light . . . . . . . . . . . . . . . . . . . . 123 Door Ajar Light . . . . . . . . . . . . . . . . . . . . . . . . 124
Information Displays
Driver Information Center (DIC) (Base
Level) . . . . . . . . . . . . . . . . . . . . . . . . . . . . . . . . 124
Driver Information Center (DIC) (Midlevel and Uplevel) . . . . . . . . . . . . . . . 125
Head-Up Display (HUD) . . . . . . . . . . . . . . . . 128
Vehicle Messages
Vehicle Messages . . . . . . . . . . . . . . . . . . . . . . 130
Engine Power Messages . . . . . . . . . . . . . . . . 131
Vehicle Speed Messages . . . . . . . . . . . . . . . 131
Vehicle Personalization
Vehicle Personalization . . . . . . . . . . . . . . . . . 131
Universal Remote System
Universal Remote System . . . . . . . . . . . . . 136
Universal Remote System Programming . . . . . . . . . . . . . . . . . . . . . . . . 136
Universal Remote System Operation . . . 138
Page 103 of 463
Chevrolet Silverado 1500 Owner Manual (GMNA-Localizing-U.S./Canada/
Mexico/Paraguay-14632303) - 2021 - CRC - 11/9/20
100 Instruments and Controls
Controls
Steering Wheel Adjustment
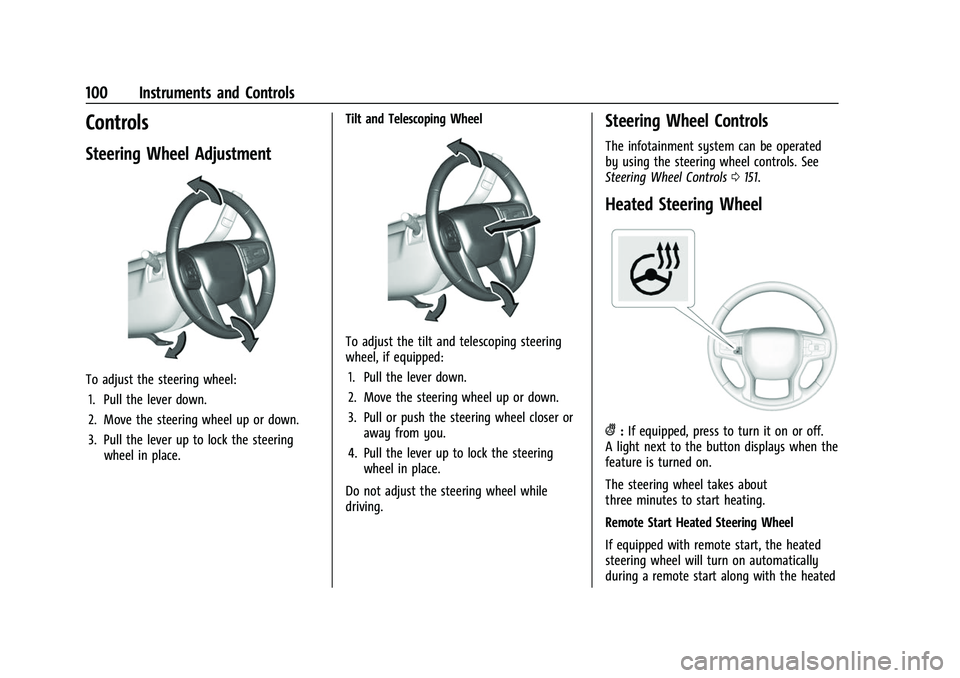
To adjust the steering wheel:1. Pull the lever down.
2. Move the steering wheel up or down.
3. Pull the lever up to lock the steering wheel in place. Tilt and Telescoping Wheel
To adjust the tilt and telescoping steering
wheel, if equipped:
1. Pull the lever down.
2. Move the steering wheel up or down.
3. Pull or push the steering wheel closer or away from you.
4. Pull the lever up to lock the steering wheel in place.
Do not adjust the steering wheel while
driving.
Steering Wheel Controls
The infotainment system can be operated
by using the steering wheel controls. See
Steering Wheel Controls 0151.
Heated Steering Wheel
(:If equipped, press to turn it on or off.
A light next to the button displays when the
feature is turned on.
The steering wheel takes about
three minutes to start heating.
Remote Start Heated Steering Wheel
If equipped with remote start, the heated
steering wheel will turn on automatically
during a remote start along with the heated
Page 104 of 463
Chevrolet Silverado 1500 Owner Manual (GMNA-Localizing-U.S./Canada/
Mexico/Paraguay-14632303) - 2021 - CRC - 11/9/20
Instruments and Controls 101
seats when it is cold outside. The heated
steering wheel indicator light may not
come on.
SeeHeated and Ventilated Front Seats 052.
Horn
To sound the horn, pressaon the
steering wheel.
Windshield Wiper/Washer
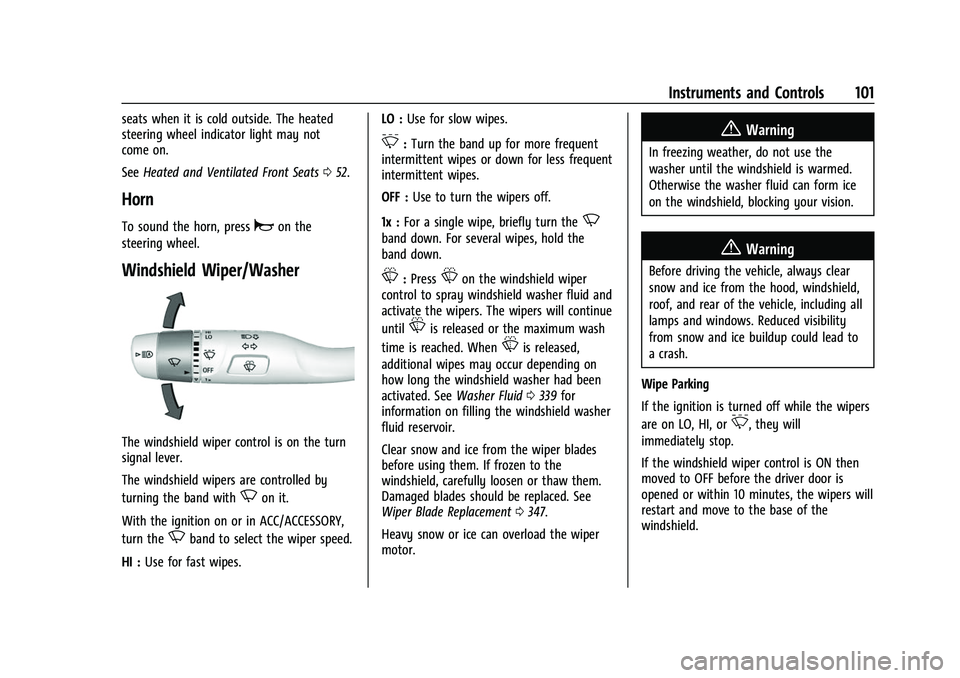
The windshield wiper control is on the turn
signal lever.
The windshield wipers are controlled by
turning the band with
Non it.
With the ignition on or in ACC/ACCESSORY,
turn the
Nband to select the wiper speed.
HI : Use for fast wipes. LO :
Use for slow wipes.
3:Turn the band up for more frequent
intermittent wipes or down for less frequent
intermittent wipes.
OFF : Use to turn the wipers off.
1x : For a single wipe, briefly turn the
N
band down. For several wipes, hold the
band down.
L:PressLon the windshield wiper
control to spray windshield washer fluid and
activate the wipers. The wipers will continue
until
Lis released or the maximum wash
time is reached. When
Lis released,
additional wipes may occur depending on
how long the windshield washer had been
activated. See Washer Fluid0339 for
information on filling the windshield washer
fluid reservoir.
Clear snow and ice from the wiper blades
before using them. If frozen to the
windshield, carefully loosen or thaw them.
Damaged blades should be replaced. See
Wiper Blade Replacement 0347.
Heavy snow or ice can overload the wiper
motor.
{Warning
In freezing weather, do not use the
washer until the windshield is warmed.
Otherwise the washer fluid can form ice
on the windshield, blocking your vision.
{Warning
Before driving the vehicle, always clear
snow and ice from the hood, windshield,
roof, and rear of the vehicle, including all
lamps and windows. Reduced visibility
from snow and ice buildup could lead to
a crash.
Wipe Parking
If the ignition is turned off while the wipers
are on LO, HI, or
3, they will
immediately stop.
If the windshield wiper control is ON then
moved to OFF before the driver door is
opened or within 10 minutes, the wipers will
restart and move to the base of the
windshield.
Page 111 of 463

Chevrolet Silverado 1500 Owner Manual (GMNA-Localizing-U.S./Canada/
Mexico/Paraguay-14632303) - 2021 - CRC - 11/9/20
108 Instruments and Controls
Uplevel Cluster English Standard Shown, Metric Similar
1.Tachometer 0110
2. Engine Oil Pressure Gauge 0111
3. Engine Coolant Temperature Gauge
0112
4. Fuel Gauge 0110
5. Voltmeter Gauge 0113 6.
Speedometer 0110
7. Driver Information Center (DIC) (Base
Level) 0124 or
Driver Information Center (DIC)
(Midlevel and Uplevel) 0125
Cluster Menu (Midlevel and Uplevel)
There is an interactive display area in the
center of the instrument cluster.
Use the right steering wheel control to open
and scroll through the different items and
displays.
Press
SorTto access the cluster
applications. Use the thumbwheel to scroll
through the list of available features. Press
the thumbwheel to select. Not all
applications will be available on all vehicles.
Page 120 of 463
Chevrolet Silverado 1500 Owner Manual (GMNA-Localizing-U.S./Canada/
Mexico/Paraguay-14632303) - 2021 - CRC - 11/9/20
Instruments and Controls 117
.Poor fuel quality can cause inefficient
engine operation and poor driveability,
which may go away once the engine is
warmed up. If this occurs, change the fuel
brand. It may require at least one full
tank of the proper fuel to turn the light
off. SeeRecommended Fuel (Except 6.2L
V8 Engine) 0283 or
Recommended Fuel (6.2L V8 Engine)
0 283.
If the light remains on, see your dealer.
Emissions Inspection and Maintenance
Programs
If the vehicle requires an Emissions
Inspection/Maintenance test, the test
equipment will likely connect to the
vehicle's Data Link Connector (DLC).
The DLC is under the instrument panel to
the left of the steering wheel. Connecting
devices that are not used to perform an
Emissions Inspection/Maintenance test or to service the vehicle may affect vehicle
operation. See
Add-On Electrical Equipment
0 317. See your dealer if assistance is
needed.
The vehicle may not pass inspection if:
.The light is on when the engine is
running.
.The light does not come on when the
ignition is on while the engine is off.
.Critical emission control systems have not
been completely diagnosed. If this
happens, the vehicle would not be ready
for inspection and might require
several days of routine driving before the
system is ready for inspection. This can
happen if the 12-volt battery has recently
been replaced or run down, or if the
vehicle has been recently serviced.
See your dealer if the vehicle will not pass
or cannot be made ready for the test.
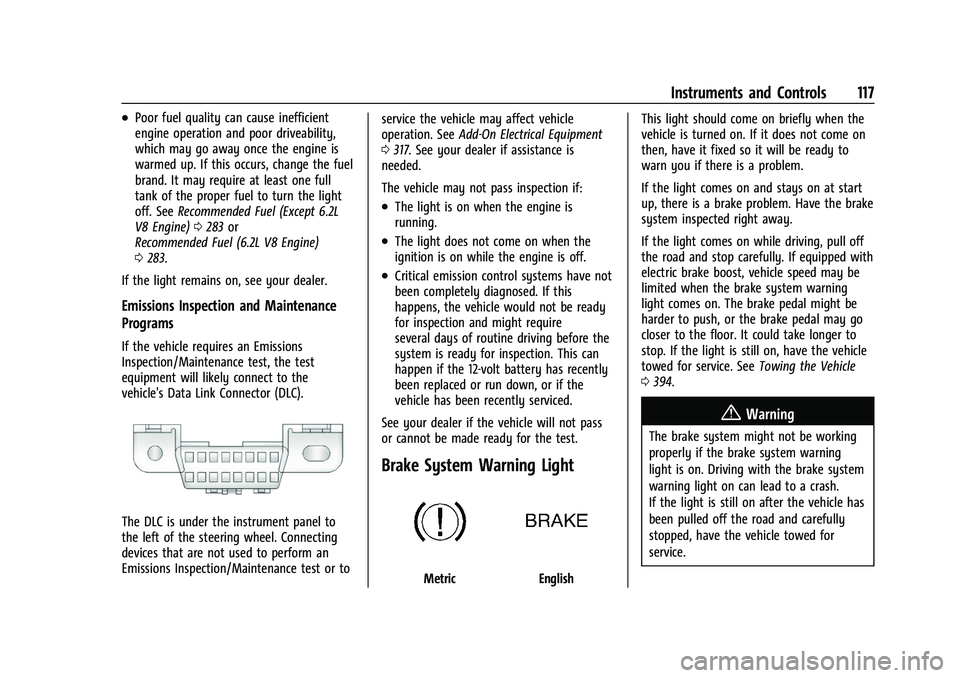
Brake System Warning Light
MetricEnglish This light should come on briefly when the
vehicle is turned on. If it does not come on
then, have it fixed so it will be ready to
warn you if there is a problem.
If the light comes on and stays on at start
up, there is a brake problem. Have the brake
system inspected right away.
If the light comes on while driving, pull off
the road and stop carefully. If equipped with
electric brake boost, vehicle speed may be
limited when the brake system warning
light comes on. The brake pedal might be
harder to push, or the brake pedal may go
closer to the floor. It could take longer to
stop. If the light is still on, have the vehicle
towed for service. See
Towing the Vehicle
0 394.
{Warning
The brake system might not be working
properly if the brake system warning
light is on. Driving with the brake system
warning light on can lead to a crash.
If the light is still on after the vehicle has
been pulled off the road and carefully
stopped, have the vehicle towed for
service.