2021 CHEVROLET SILVERADO 1500 length
[x] Cancel search: lengthPage 74 of 463
Chevrolet Silverado 1500 Owner Manual (GMNA-Localizing-U.S./Canada/
Mexico/Paraguay-14632303) - 2021 - CRC - 11/9/20
Seats and Restraints 71
Replacing Airbag System Parts
after a Crash
{Warning
A crash can damage the airbag systems
in the vehicle. A damaged airbag system
may not properly protect you and your
passenger(s) in a crash, resulting in
serious injury or even death. To help
make sure the airbag systems are
working properly after a crash, have
them inspected and any necessary
replacements made as soon as possible.
If an airbag inflates, you will need to
replace airbag system parts. See your dealer
for service.
If the airbag readiness light stays on after
the vehicle is started or comes on when you
are driving, the airbag system may not work
properly. Have the vehicle serviced right
away. See Airbag Readiness Light 0114.
Child Restraints
Older Children
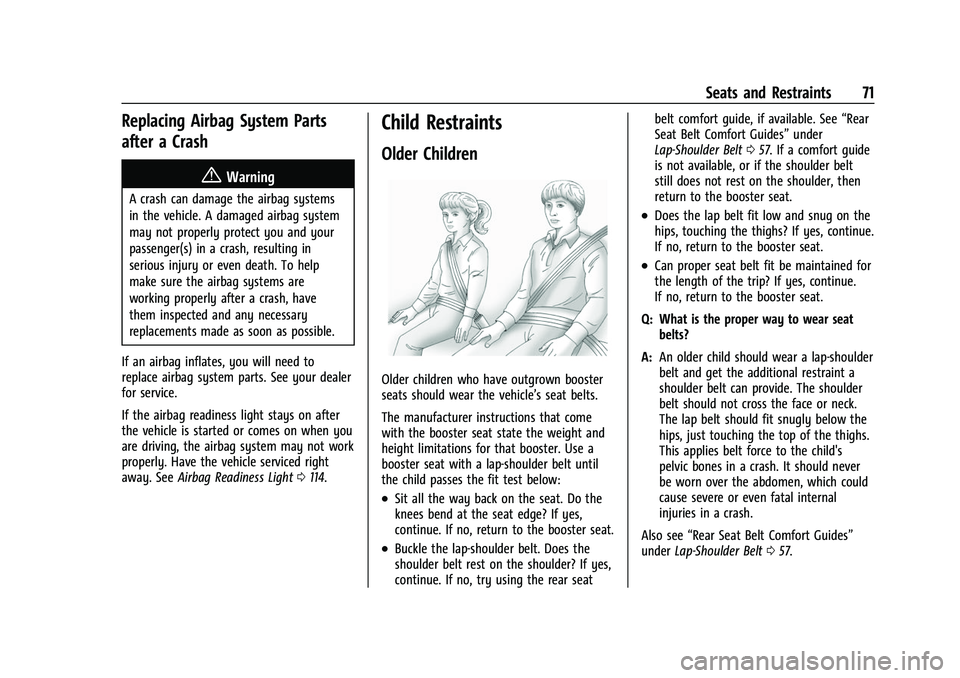
Older children who have outgrown booster
seats should wear the vehicle’s seat belts.
The manufacturer instructions that come
with the booster seat state the weight and
height limitations for that booster. Use a
booster seat with a lap-shoulder belt until
the child passes the fit test below:
.Sit all the way back on the seat. Do the
knees bend at the seat edge? If yes,
continue. If no, return to the booster seat.
.Buckle the lap-shoulder belt. Does the
shoulder belt rest on the shoulder? If yes,
continue. If no, try using the rear seat belt comfort guide, if available. See
“Rear
Seat Belt Comfort Guides” under
Lap-Shoulder Belt 057. If a comfort guide
is not available, or if the shoulder belt
still does not rest on the shoulder, then
return to the booster seat.
.Does the lap belt fit low and snug on the
hips, touching the thighs? If yes, continue.
If no, return to the booster seat.
.Can proper seat belt fit be maintained for
the length of the trip? If yes, continue.
If no, return to the booster seat.
Q: What is the proper way to wear seat belts?
A: An older child should wear a lap-shoulder
belt and get the additional restraint a
shoulder belt can provide. The shoulder
belt should not cross the face or neck.
The lap belt should fit snugly below the
hips, just touching the top of the thighs.
This applies belt force to the child's
pelvic bones in a crash. It should never
be worn over the abdomen, which could
cause severe or even fatal internal
injuries in a crash.
Also see “Rear Seat Belt Comfort Guides”
under Lap-Shoulder Belt 057.
Page 191 of 463

Chevrolet Silverado 1500 Owner Manual (GMNA-Localizing-U.S./Canada/
Mexico/Paraguay-14632303) - 2021 - CRC - 11/9/20
188 Infotainment System
recognition system. Touch Off to prevent
the sharing and possible recording of your
voice commands with this system. This
may limit the system’s ability to
understand your voice commands and
may disable some features.
.Types: This setting lists all
Android-defined as dangerous permissions
currently used by the infotainment
system, the number of applications that
have requested this permission, and the
number of applications that are allowed
to use this permission.
.Used By Applications: This setting lists all
applications that are requested or are
using Android-defined as dangerous
permissions. Only requested and active
permissions are shown.
Display
Touch and the following may display:
.Mode: This adjusts the appearance of the
navigation map view and any
downloaded apps optimized for day or
night time conditions. Set to Auto for the
display to automatically adjust based on
bright/dark conditions.
Touch Auto, Day, or Night to adjust the
display.
.Calibrate Touchscreen: Touch to calibrate
the infotainment display and follow the
prompts.
.Turn Display Off: Touch to turn the
display off. Touch anywhere on the
infotainment display or press any
infotainment control on the center stack
again to turn the display on.
Sounds
Touch and the following may display:
.Maximum Startup Volume: This feature
adjusts the maximum volume of the
infotainment system when you start your
vehicle. To set the maximum startup
volume, touch the controls on the
infotainment display to increase or
decrease.
.Audio Cues: This feature determines if
sounds play when the infotainment
system starts up and shuts down. This
feature can be turned off or on.
.Set Audio Cue Volume: This setting
controls the volume of Audio Cues played
on startup and shut down. Touch the
controls on the infotainment display to
increase or decrease.
.Audible Touch Feedback: This setting
determines if a sound plays when
touching the infotainment display or
radio controls. This feature can be turned
off or on.
Voice
Touch and the following may display:
.Confirm More/Less: This setting specifies
how often the voice recognition system
confirms commands. Touch Confirm More
to have the system check with you more
often before acting on your commands.
.Prompt Length: This setting specifies the
amount of detail the voice recognition
system provides when giving you
feedback. Touch Auto to have the system
automatically adjust to your speech
habits. Touch Informative, Short, or Auto.
.Audio Feedback Speed: Touch Slow,
Medium, or Fast to adjust how quickly
the voice recognition system speaks.
.Friendly Prompts: This setting adjusts the
formality of voice prompts. Touch Off for
shorter prompts. Touch On to hear
prompts with more personality. Touch
Auto to have the prompt match your
command style.
Page 238 of 463
Chevrolet Silverado 1500 Owner Manual (GMNA-Localizing-U.S./Canada/
Mexico/Paraguay-14632303) - 2021 - CRC - 11/9/20
Driving and Operating 235
{Warning
Improper use of the heater cord or an
extension cord can damage the cord and
may result in overheating and fire.
.Plug the cord into a three-prong
electrical utility receptacle that is
protected by a ground fault detection
function. An ungrounded outlet could
cause an electric shock.
.Use a weatherproof, heavy-duty,
15 amp-rated extension cord if needed.
Failure to use the recommended
extension cord in good operating
condition, or using a damaged heater
or extension cord, could make it
overheat and cause a fire, property
damage, electric shock, and injury.
.Do not operate the vehicle with the
heater cord permanently attached to
the vehicle. Possible heater cord and
thermostat damage could occur.
.While in use, do not let the heater
cord touch vehicle parts or sharp
edges. Never close the hood on the
heater cord.(Continued)
Warning (Continued)
.Before starting the vehicle, unplug the
cord, reattach the cover to the plug,
and securely fasten the cord. Keep the
cord away from any moving parts.
5. Before starting the engine, be sure to unplug and store the cord.
The length of time the heater should remain
plugged in depends on several factors. Ask a
dealer in the area where you will be parking
the vehicle for the best advice on this.
Retained Accessory Power (RAP)
When the ignition is turned from on to off,
the following features (if equipped) will
continue to function for up to 10 minutes,
or until the driver door is opened. These
features will also work when the ignition is
in RUN or ACC/ACCESSORY:
.Infotainment System
.Power Windows (during RAP this
functionality will be lost when any door
is opened)
.Sunroof (during RAP this functionality will
be lost when any door is opened)
.Auxiliary Power Outlet
.Audio System
.OnStar System
Shifting Into Park
{Warning
It can be dangerous to get out of the
vehicle if the shift lever is not fully in
P (Park) with the parking brake firmly set.
The vehicle can roll. If you have left the
engine running, the vehicle can move
suddenly. You or others could be injured.
To be sure the vehicle will not move,
even when you are on fairly level ground,
use the steps that follow. With
four-wheel drive, if the transfer case is in
N (Neutral), the vehicle will be free to
roll, even if the shift lever is in P (Park).
Be sure the transfer case is in a drive
gear. If towing a trailer, see Driving
Characteristics and Towing Tips 0288.
1. Hold the brake pedal down, then set the parking brake. See Electric Parking Brake
0 246.
2. Move the shift lever into P (Park) by pulling the shift lever toward you and
moving it up as far as it will go.
Page 253 of 463
Chevrolet Silverado 1500 Owner Manual (GMNA-Localizing-U.S./Canada/
Mexico/Paraguay-14632303) - 2021 - CRC - 11/9/20
250 Driving and Operating
A blinking HDC light indicates the system is
actively applying the brakes to maintain
vehicle speed. HDC can maintain vehicle
speeds between 1 and 22 km/h (1 and
14 mph) on grades greater than or equal
to 10%.
If HDC is to be used for more than
three minutes or on grades steeper than
25%, the transfer case should be put into
Four-Wheel Drive Low (4
n) to reduce the
possibility of brake overheating.
Noise from the Electronic Brake Control
Module (EBCM) is normal when HDC is
active.
When HDC is activated, the initial HDC
speed is set to the current driving speed.
It can be increased or decreased by pressing
+RES or SET- on the steering wheel, or by
applying the accelerator or brake pedal. This
adjusted speed becomes the new set speed.
HDC will remain enabled between 30 and
60 km/h (19 and 37 mph); however, vehicle
speed cannot be set or maintained in this
range. HDC will automatically disable if the
vehicle speed is above 80 km/h (50 mph) or
above 60 km/h (37 mph) for at least
30 seconds.
5must be pressed again to re-enable HDC.
HDC may disable after an extended period
of use. If this happens, HDC will require
time to cool down. The length of time HDC
remains active depends on road conditions,
grade, set speed, vehicle loading, and
outside temperature.
When enabled, if the vehicle speed is above
30 km/h (19 mph) and below 60 km/h
(37 mph), a DIC message will display.
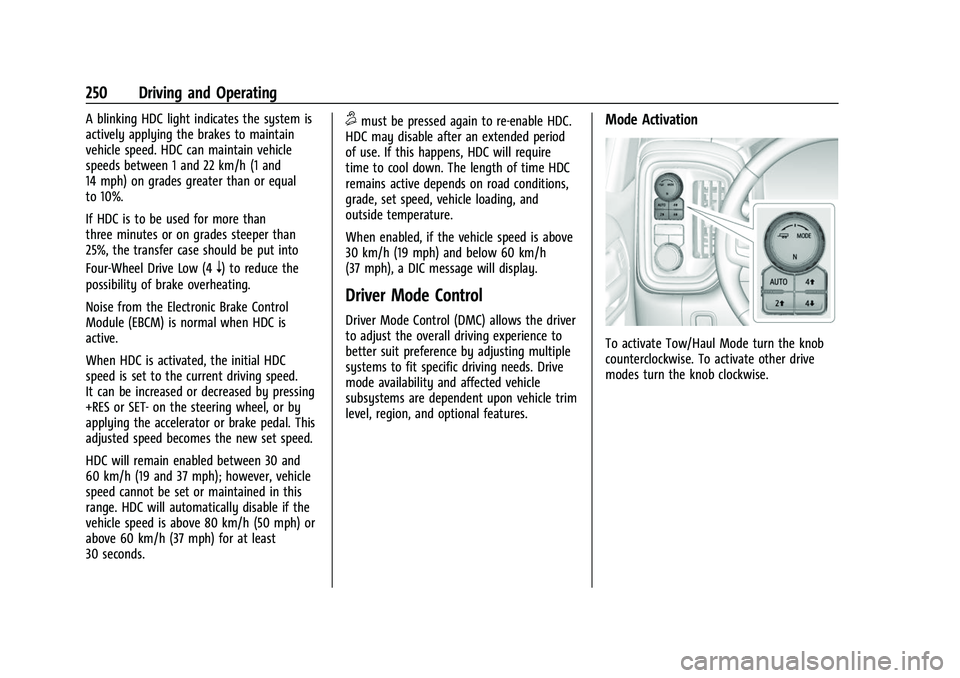
Driver Mode Control
Driver Mode Control (DMC) allows the driver
to adjust the overall driving experience to
better suit preference by adjusting multiple
systems to fit specific driving needs. Drive
mode availability and affected vehicle
subsystems are dependent upon vehicle trim
level, region, and optional features.
Mode Activation
To activate Tow/Haul Mode turn the knob
counterclockwise. To activate other drive
modes turn the knob clockwise.
Page 312 of 463
Chevrolet Silverado 1500 Owner Manual (GMNA-Localizing-U.S./Canada/
Mexico/Paraguay-14632303) - 2021 - CRC - 11/9/20
Driving and Operating 309
The process stops without saving the
sensor locations if this step takes more
than two minutes.
4. Move to the next tire and repeat Step 3 for each sensor. The horn chirps twice
when all sensors are completed.
5. Return to the vehicle to complete the setup.
Maintenance Reminders
To set up maintenance reminders, touch the
Trailer Maintenance icon. Select Yes to set
up the maintenance reminders for the
Trailer Profile. Follow the on-screen prompts.
The maximum number of reminders is 50.
Select No to return to the previous screen.
Towing Assistance
To set up towing assistance features,
if equipped, touch the Towing
Assistance icon.
Touch Yes to begin set up or touch No to
return to the previous screen.
1. Select the number of axles on the trailer.
2. Enter trailer dimensions as prompted.
3. Follow the on-screen instructions to complete setup for available features.
Transparent Trailer Setup (if equipped)
To complete setup for transparent trailer:
.Trailer Length: 300 cm (118.1 in) –970 cm
(381.8 in). Measure from center of coupler
to furthest rear point on the trailer.
.Trailer Width: 120 cm (47.2 in) –260 cm
(102.3 in). Measure from left edge to
right edge.
.Trailer Height: 1 cm (0.39 in) –450 cm
(177.1 in). Measure from ground to tallest
point.
.Hitching Point Length: 180 cm (70.8 in) –
970 cm (381.8 in). Measure from center of
coupler to middle of tires.
.Trailer Tongue Length: 50 cm (19.6 in) –
220 cm (86.6 in). Measure from center of
coupler to trailer front wall.
.Vehicle Hitch Height: 10 cm (3.9 in) –
100 cm (39.3 in). Measure from ground to
top of coupler.
.Vehicle Hitch Length: 10 cm (3.9 in) –
100 cm (39.3 in). Measure from hitch
receiver to center of ball.
1. If trailer dimensions are out of range, this feature will be unavailable.
2. Ensure rear trailer camera is connected. 3. Follow instructions to drive forward to
complete calibration.
Rear Trailer Guidance Setup (if equipped)
A rear trailer camera must be mounted on
the trailer and electrically connected to the
vehicle before transparent trailer feature can
be used. See Assistance Systems for Parking
or Backing 0266.
Trailer dimensions must be in range to
enable this feature.
.Trailer Length: 300 cm (118.1 in) –970 cm
(381.8 in). Measure from center of coupler
to furthest rear point on the trailer.
1. If trailer dimensions are out of range, this feature will be unavailable.
2. Ensure rear trailer camera is connected.
3. Follow instructions to drive forward to complete calibration.
Jack-Knife Alert Setup (if equipped)
Follow instructions to drive forward to
complete calibration.
Trailer Length Indicator Setup (if
equipped)
Follow instructions to drive forward to
complete calibration.
Page 313 of 463
Chevrolet Silverado 1500 Owner Manual (GMNA-Localizing-U.S./Canada/
Mexico/Paraguay-14632303) - 2021 - CRC - 11/9/20
310 Driving and Operating
Trailer Side Blind Zone Alert Setup (if
equipped)
Trailer dimensions must be in range to
enable this feature.
.Trailer Length: 300 cm (118.1 in)–
1200 cm (472.4 in). Measure from center
of coupler to furthest rear point on the
trailer.
If trailer dimensions are out of range, this
feature will be unavailable.
Status View
The Status view shows:
.Vehicle
.Connections
.Tires
.Maintenance
.Cameras
Upon entry, the most recent items will be
shown. Select MORE to view all options.
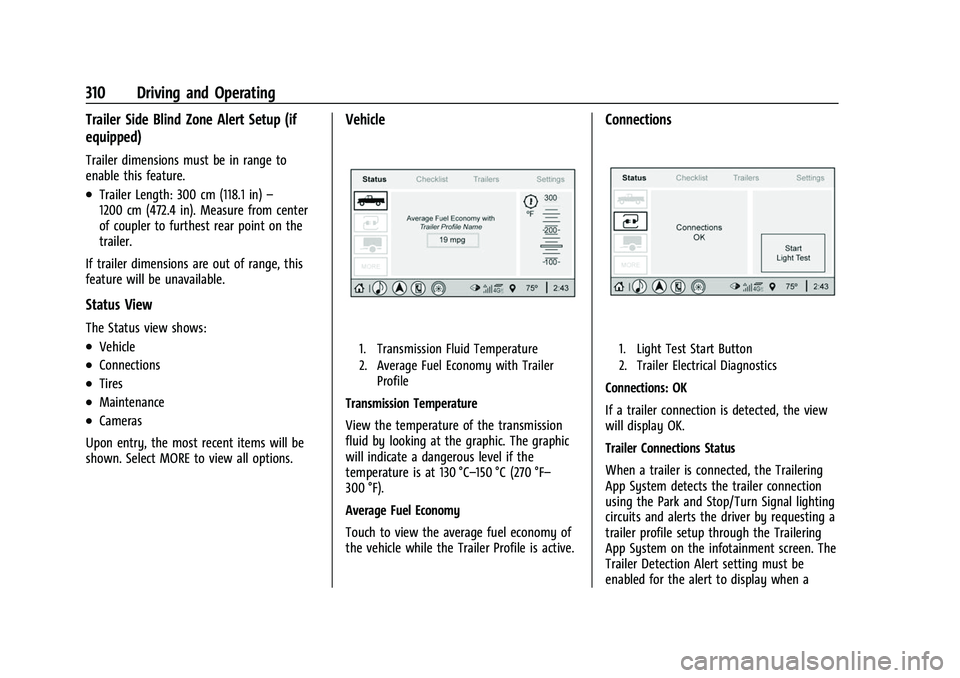
Vehicle
1. Transmission Fluid Temperature
2. Average Fuel Economy with Trailer Profile
Transmission Temperature
View the temperature of the transmission
fluid by looking at the graphic. The graphic
will indicate a dangerous level if the
temperature is at 130 °C–150 °C (270 °F–
300 °F).
Average Fuel Economy
Touch to view the average fuel economy of
the vehicle while the Trailer Profile is active.
Connections
1. Light Test Start Button
2. Trailer Electrical Diagnostics
Connections: OK
If a trailer connection is detected, the view
will display OK.
Trailer Connections Status
When a trailer is connected, the Trailering
App System detects the trailer connection
using the Park and Stop/Turn Signal lighting
circuits and alerts the driver by requesting a
trailer profile setup through the Trailering
App System on the infotainment screen. The
Trailer Detection Alert setting must be
enabled for the alert to display when a
Page 319 of 463
Chevrolet Silverado 1500 Owner Manual (GMNA-Localizing-U.S./Canada/
Mexico/Paraguay-14632303) - 2021 - CRC - 11/9/20
316 Driving and Operating
Settings View
Within the Trailering App, touch the Settings
tab to modify the following settings:
.Trailer Detection Alert
.Maintenance Alerts
.Theft Alert
.Tow/Haul Mode Reminder
.Trailer Length Indicator
Trailer Detection Alert
The Trailer Detection Alert setting will be on
by default. Turn it off to disable the Trailer
Detection pop-up from displaying when a
trailer is connected. The Guest Trailer Profile
will become the active Trailer Profile, unless
another Trailer Profile is selected manually
through the Trailering App. If this setting is
disabled while a Custom Trailer Profile is
active, that Trailer Profile will remain the
active profile until the trailer is
disconnected.
Maintenance Alerts
Touch Maintenance Alerts to view the
Maintenance Alerts settings page. These
alerts are based on the Trailer Profile, so the
settings for each Trailer Profile must beturned on or off. Touch a profile to view
more information or adjust the setting for
that profile.
The setting will be on by default for each
profile. All Maintenance Alerts for that active
Trailer Profile will be received.
Turn a setting off to not receive any of the
Maintenance Alerts when that Trailer Profile
is active.
Theft Alert
A theft alert can be set if a trailer is
connected and the alert is enabled. When
the trailer is disconnected and the vehicle is
off, an alarm will sound.
Touch Theft Alert in Settings to view the
Theft Alert settings page. These alerts are
based on the Trailer Profile, so the settings
for each Trailer Profile must be turned on or
off. Touch a profile to view more
information or adjust the setting for that
profile.
This setting will be off by default for each
Trailer Profile, including the Guest Trailer
Profile.
A smartphone will receive a notification that
the trailer related to the selected Trailer
Profile is disconnected from the vehicle,
if the setting is on for the active Trailer
Profile, the vehicle has an OnStar or
connected service plan and the smartphone
number has been added to the account for
this notification.
If the setting is turned off for a given Trailer
Profile, the smartphone will not receive this
security notification even if the Trailer
Profile is active.
Tow/Haul Mode Reminder
This is a reminder to turn on the Tow/Haul
Mode when towing a trailer. See
Tow/Haul
Mode 0241.
Touch Tow/Haul Mode Reminder in Settings
to view the Tow/Haul Mode Reminder
settings page. These alerts are based on the
Trailer Profile, so the settings for each
Trailer Profile must be turned on or off.
Touch a profile to view more information or
to adjust the setting for that profile.
This setting will default to OFF for each
Trailer Profile, including the Guest Trailer
Profile.
Page 320 of 463
Chevrolet Silverado 1500 Owner Manual (GMNA-Localizing-U.S./Canada/
Mexico/Paraguay-14632303) - 2021 - CRC - 11/9/20
Driving and Operating 317
If Tow/Haul Mode is off and this setting is
on for a Trailer Profile, each time the
ignition is turned on a reminder will appear
to turn on Tow/Haul Mode when the Trailer
Profile is active.
If Tow/Haul Mode is on and this setting is
on for a Trailer Profile, the reminder will not
appear when the Trailer Profile is active.
Trailer Length Indicator
Touch Trailer Length Indicator to view the
Trailer Length Indicator settings page. If this
setting is ON a guideline is displayed in the
side mirror camera view to indicate the rear
of the attached trailer. If this setting is OFF
the guideline will not be displayed.
This setting will default to OFF if the trailer
length indicator feature is not set up. See
"Towing Assistance" for details on the setup.
Conversions and Add-Ons
Add-On Electrical Equipment
{Warning
The Data Link Connector (DLC) is used for
vehicle service and Emission Inspection/
Maintenance testing. SeeMalfunction
Indicator Lamp (Check Engine Light) 0116.
A device connected to the DLC —such as
an aftermarket fleet or driver-behavior
tracking device —may interfere with
vehicle systems. This could affect vehicle
operation and cause a crash. Such devices
may also access information stored in the
vehicle’s systems.
Caution
Some electrical equipment can damage
the vehicle or cause components to not
work and would not be covered by the
vehicle warranty. Always check with your
dealer before adding electrical equipment.
Add-on equipment can drain the vehicle's
12-volt battery, even if the vehicle is not
operating. The vehicle has an airbag system. Before
attempting to add anything electrical to the
vehicle, see
Servicing the Airbag-Equipped
Vehicle 069 and
Adding Equipment to the Airbag-Equipped
Vehicle 069.
For information on wiring auxiliary switches,
see www.gmupfitter.com or contact your
dealer.
Adding a Snow Plow or Similar
Equipment
Caution
Do not exceed 72 km/h (45 mph) with a
snow plow mounted to the vehicle. The
vehicle could overheat and be damaged.
Before installing a snow plow on the vehicle,
follow these guidelines:
Caution
If the vehicle does not have the snow
plow prep package, RPO VYU, adding a
plow can damage the vehicle, and the
repairs would not be covered by the
vehicle warranty. Unless the vehicle was
built to carry a snow plow, do not add
(Continued)